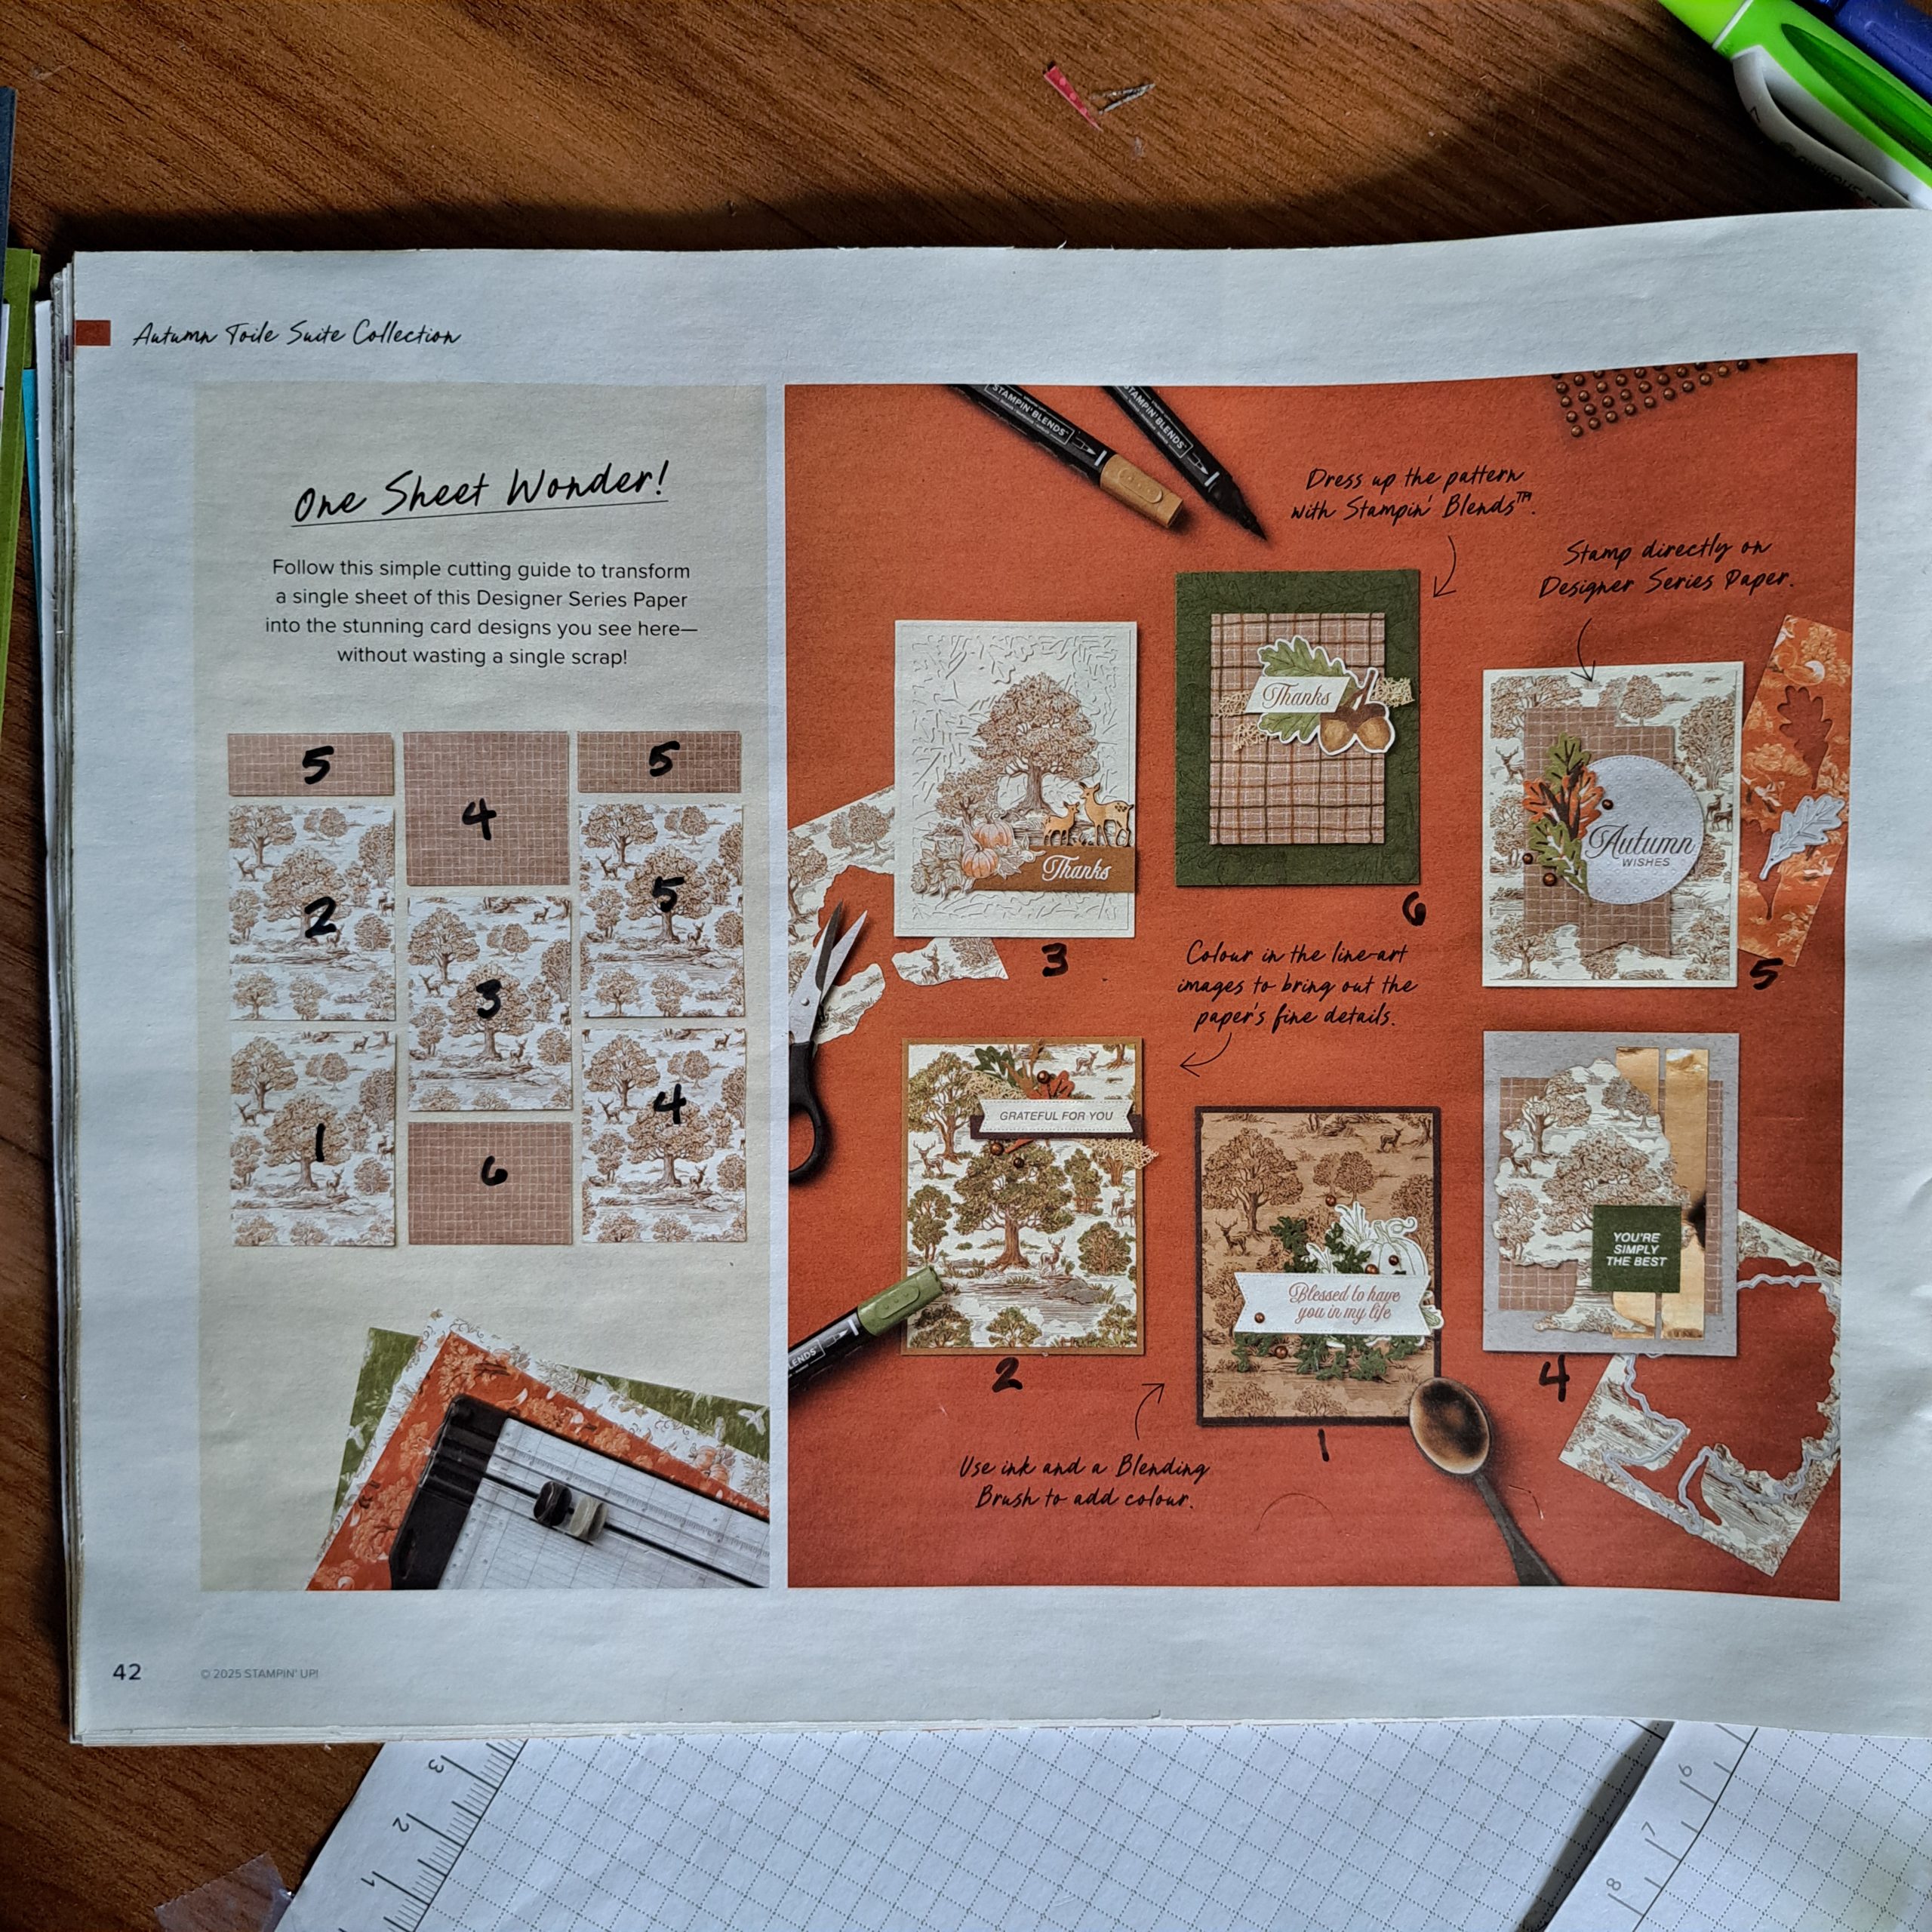
This class is all about the backgrounds and creative ways to use your Designer Series Papers. Originally presented to Stampin’ UP! demonstrators by some of our favorite Stampin’ Up staff; we were encouraged to share it with you! So grab your September to December Mini Cataloge, turn to page 42 and join me for a host of great ideas.
Supplies
Traditional Labels Stamp Set
Traditional Labels Dies
Christmas Greenery Stamp Set
Christmas Greenery Dies
Stylish Shapes Dies
Traditions of Christmas Designer Series Paper
Gold Foil Sheets
Real Red Card Stock
Old Olive Card Stock
Secret Sea Card Stock
Basic White Card Stock
Secret Sea Stampin Pad
Real Red Stampin Pad
Real Red 1/2″ Shiny Ribbon
Traditional Shiny Sequins
Lt. Smoky Slate Stampin Blend Marker
Multipurpose Liquid Glue
Mini Glue Dots
Paper Trimmer
Paper Snips
Blending Brushes
Cut and Emboss Machine
Directions
Making Multiple Card Bases
For book fold (side opening) cards:
Place your card stock into the paper trimmer with the shorter side aligned along the top. Score a line the length of the paper at the half way point, for metric score at 10.5cm for imperial score at 4-1/4″. Turn your cardstock so that the long side is along the top. Cut at 14.85cm or 5-1/2″. You now have two card bases. Repeat with the other two pieces of card stock.
For bottom opening cards:
To create the bottom opening card, place your card stock with the long side at the top first. Score a line the length of the paper at the half way point, for metric score at 14.85cm, for imperial score at 5-1/2″”. Turn your cardstock so that the narrow side is along the top. Cut at 10.5cm for metric, and 4-1/4″ for imperial. You now have two card bases. Repeat with the other two pieces of card stock.
Cutting your One Sheet Wonder:
You can download the cutting guide or just read from here:
The cutting guide was created for use with 8-1/2″ x 11″ card stock. Please keep in mind that this card stock is wider and shorter than our standard A4 card stock used in the Uk and Europe.
I prefer to have a little more card stock showing from side to side when using a large piece of Designer Series Paper. So I have modified the cutting guide by cutting the columns at 10cm in stead of 10.15cm. Making this change does generate a small amount of waste at the end; a strip 3mm x 30.5. I just tucked this strip back into the paper pack to use for another project. This alteration applies to the use of metric card stock only, I do not recommend it if you are using 8-1/2″ x 11″ card stock.
Techniques Featured
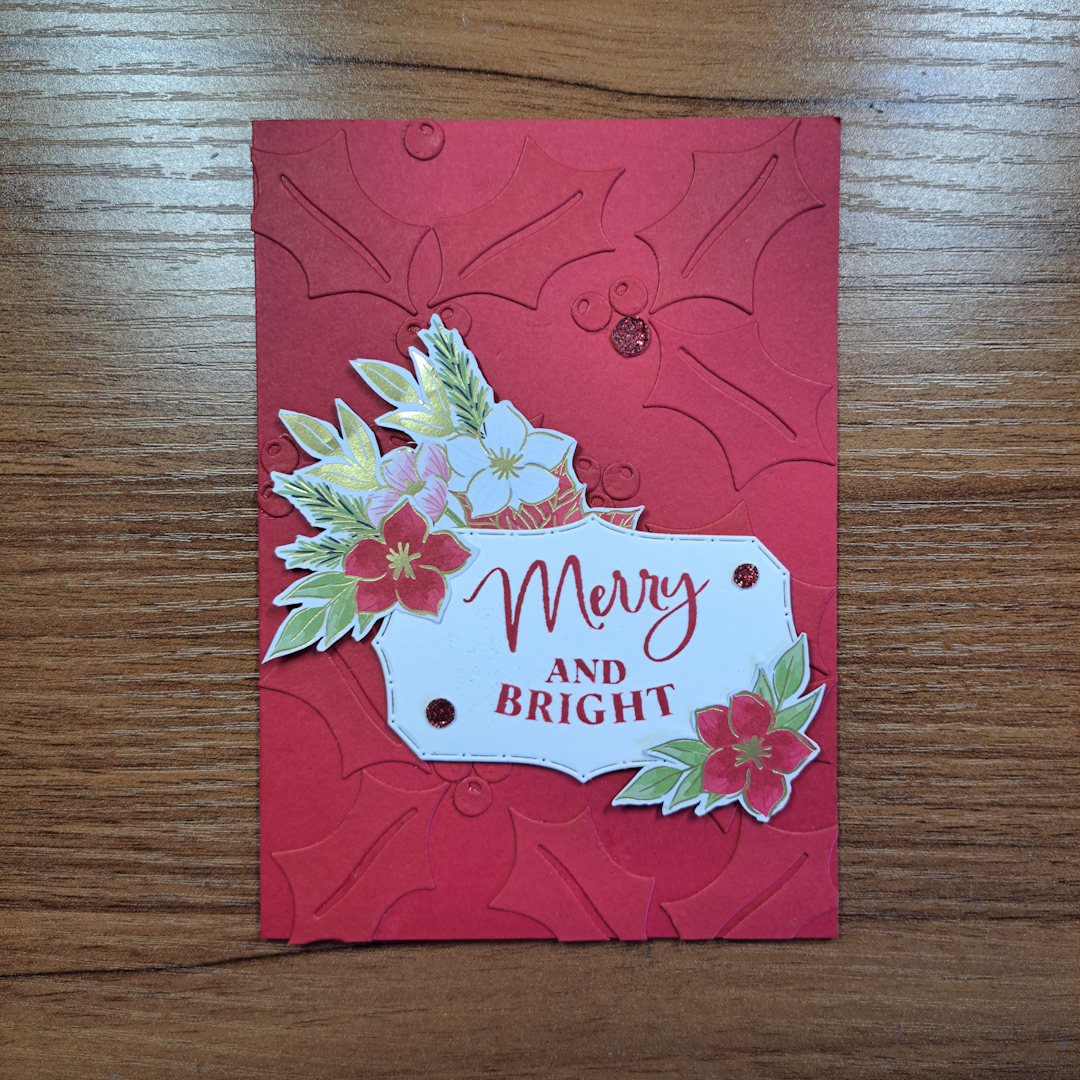
Card No. 1 – Ink blending on Designer Series Paper for use as background papers.
My example of Card No. 1 was to darken the edges of the Designer Series paper using Secret Sea Stampin Pad and a blender brush. The card example in the catalogue uses the blending brush to cover the entire paper changing the color completely.
Other ideas to try with ink blending:
- Reverse my technique by creating a dark spot in the center of the paper and blending/fading the color outward leaving the edges untouched.
- Another way to use this technique is to spotlight parts of the pattern such as one or two of floral elements or shapes.
- Or choose several light colors and place random color spots to create a bokeh effect.
Card No. 2 – Color on your Designer Series Paper
My example of Card No. 2 is to use the Lt. Smoky Slate marker to create shadows on the floral elements. The card example in the catalogue uses Stampin Blend markers to color the trees and deer. This changed the subtle sepia background into a full color picture.
Other ideas to try with coloring:
- Use a back or dark marker to outline the objects on the DSP. This effect can create a stained glass effect when used with softer patterns and softer colored papers. Or go further and draw in the glass dividing lines.
- A black marker can also create a cartoon effect if you outline objects on the DSP with a less precise line. For example of you are outlineing an object don’t close the outline. Or outlining a square with the sides slightly uneven.
- Only color in one object or one repeating object. This can be effective if one of your DSP colors seem to clash with the rest of the card. This works well if you want a more masculine look and those random pink squares really need to be a navy color.
Card No. 3 – Textured backgrounds and fussy cutting Designer Series Paper.
My example of Card No. 3 was to use die cuts cut from the same card stock as my card base. I glued my die cuts to the base in a semi-random pattern to create the tone on tone texture. I fussy cut elements from my DSP to use in highlighting the greeting. The catalogue example uses a large die that was included in the example suite to create the tone on tone effect. Fussy cutting was used more extensively in creating a picture around the greeting (instead of just highlighting).
Other ideas to try:
- Using a large embossing folder either on your card base or on another piece of the same color card stock as a background.
- Cut strips, punch circles, or even cut random shapes with your scissors to add onto same color card stock to add texture.
Card No. 4 – Large Die cuts and Shiny Elements
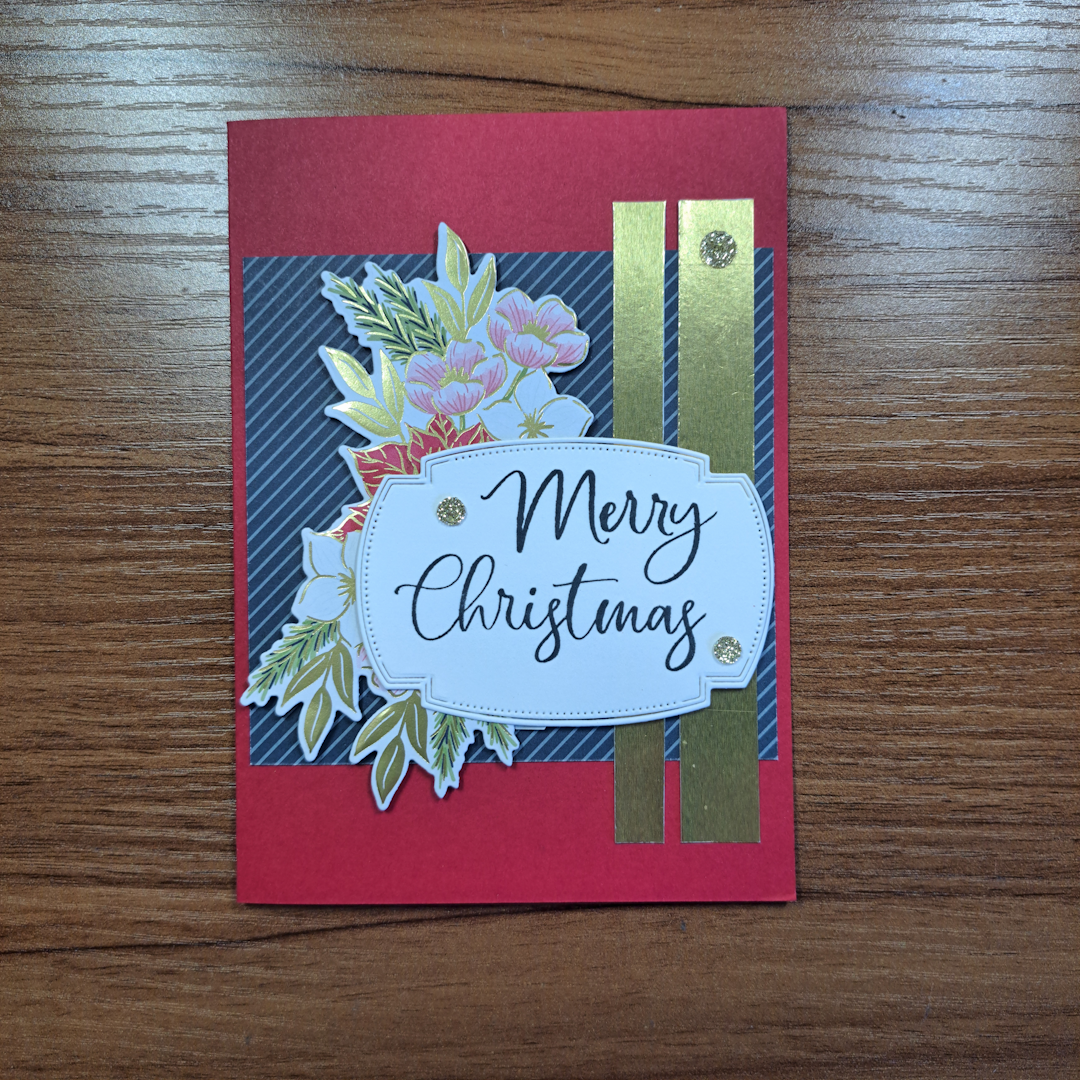
My example uses the largest die included in my suite. It was not nearly as large as the die shown in the catalogue card example. I also did not have a die that had such a definitive shape as the tree. My dies were designed to be used with the stamps or the DSP so that is what I did. This card is a study in “use what you have”. My suite of products did not have a separate set of decorative papers so I used one I had from my stash.
Other ideas for the “shiny” element:
- Most suites come with matching ribbon and/or can be pared with ribbon you already have. A couple of strips of ribbon will yield the same decorative results.
- Some suites come with matching vellum or you could use a couple of strips of plain vellum to achieve a decorative element. The vellum would have a softer appearance than a bold shiny element.
- Don’t forget the power of coordinating plain card stock, I could have used a couple of strips of real red on my card. If you feel this might be too plain you could always wrap the strips in twine or linen thread. Or maybe add a lot of shiny embellishments to the strips.
Card No. 5 – Use both sides of your Designer Series Paper.
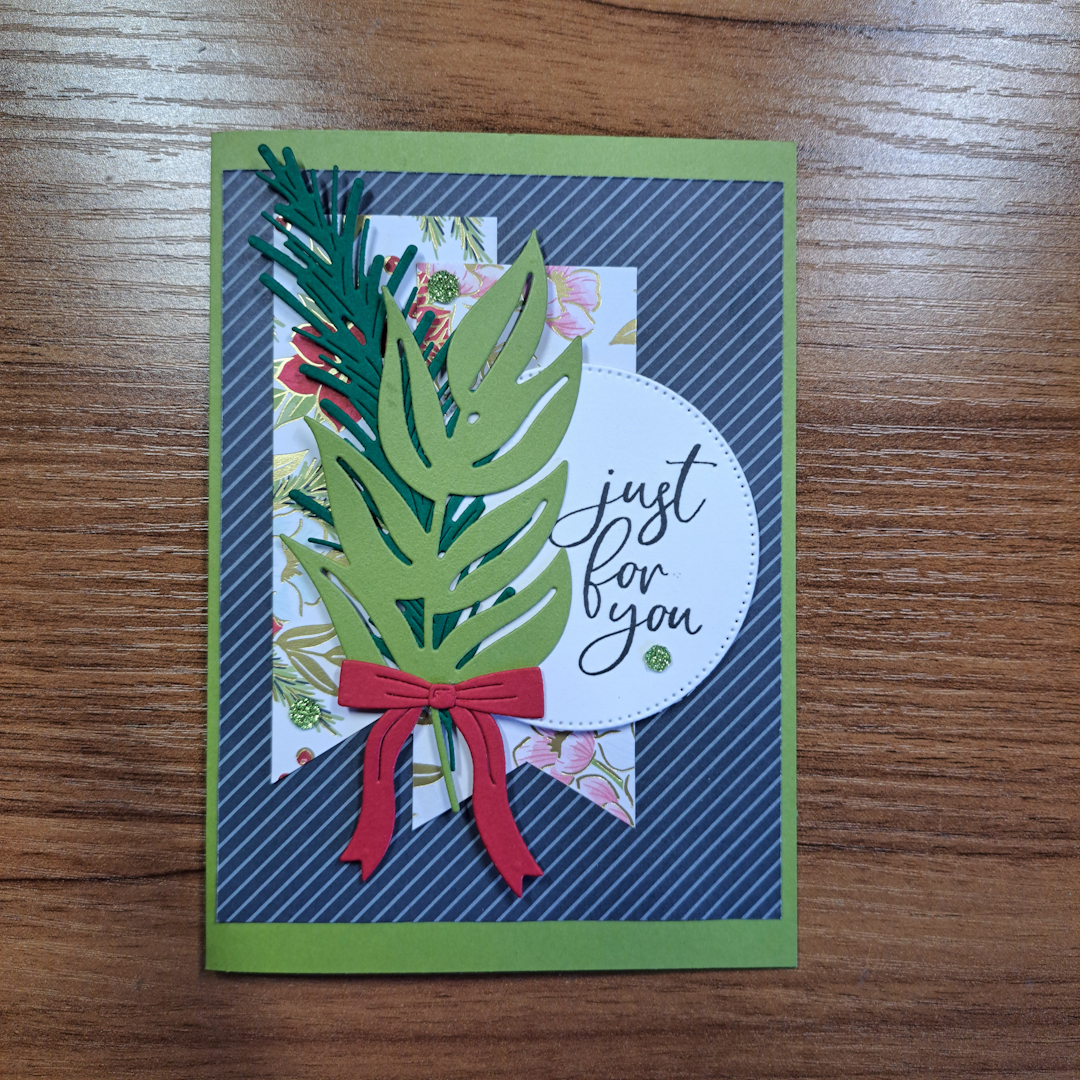
In my example I used the darker reverse side of my DSP as a background and the lighter gold lined sided for my ‘flags’. The catalogue example used the front toile side as a background and the reverse side for the ‘flags’.
Other ideas for the ‘flags’:
- You can always use a plain pair of rectangles.
- Instead of cutting a notch at the bottom of the rectangle tear away a small strip leaving a ragged edge.
- On the back side of the rectangles you want to use draw a line about 1.5cm or 3/8″ from the bottom and cut slits from the bottom to the line. This will create a fringe at the bottom of rectangle.
- Round the bottom corners to create a shape that looks more like a drape, or round all of the corners to make more of an oval shape.
Card No. 6 – Changing the pattern and adding another color to the Designer Series Paper
In my example I used a ruler and drew a red line over every other red line in the pattern of my DSP. This allowed me to add in another color. In the catalogue example they used two different colors to connect the dot pattern of the DSP and create a plaid effect which was much brighter than the plain piece of DSP.
Other ideas to alter patterns:
- If you have a checked pattern or evenly spaced plaid you can draw dots at the line intersections. This can be a subtle change or a bold on if you use large dots and different colors. If you don’t like the idea of drawing them at the intersections go for the center of the squares. You can do this in a pattern or randomly.
- Have a large busy plaid? Color in large squares of the pattern with a dark color. You can color in the squares in a pattern like a diagonal or start at the center and color squares outward in a more circular or oval brick-like pattern.
- You don’t always have to use straight lines. Wavy lines can also effectively change a pattern and add color. This can be a fun way to change a plain striped pattern.
I hope you have enjoyed this class as much as I did. Some of the ideas above are mine and some are repeated from the class. I bet after reading this, your own ideas will be clamoring for release! Go forth my friends and Create! And don’t forget to post pictures of your creations either here in the comments or on social media and tag me @LoriOthen
Product List![Traditions Of Christmas Suite Collection (English) [ 165877 ]](https://assets1.tamsnetwork.com/images/EC042017NF/165877s.jpg "Traditions Of Christmas Suite Collection (English) [ 165877 ]")
![Christmas Greenery Dies [ 165872 ]](https://assets1.tamsnetwork.com/images/EC042017NF/165872s.jpg "Christmas Greenery Dies [ 165872 ]")
![Christmas Greenery Photopolymer Stamp Set [ 165870 ]](https://assets1.tamsnetwork.com/images/EC042017NF/165870s.jpg "Christmas Greenery Photopolymer Stamp Set [ 165870 ]")
![Traditional Labels Photopolymer Stamp Set (English) [ 165854 ]](https://assets1.tamsnetwork.com/images/EC042017NF/165854s.jpg "Traditional Labels Photopolymer Stamp Set (English) [ 165854 ]")
![Traditional Labels Dies [ 165864 ]](https://assets1.tamsnetwork.com/images/EC042017NF/165864s.jpg "Traditional Labels Dies [ 165864 ]")
![Stylish Shapes Dies [ 159183 ]](https://assets1.tamsnetwork.com/images/EC042017NF/159183s.jpg "Stylish Shapes Dies [ 159183 ]")
![Traditions Of Christmas 12" X 12" (30.5 X 30.5 Cm) Specialty Designer Series Paper [ 165853 ]](https://assets1.tamsnetwork.com/images/EC042017NF/165853s.jpg "Traditions Of Christmas 12\" X 12\" (30.5 X 30.5 Cm) Specialty Designer Series Paper [ 165853 ]")
![Gold Foil Sheets [ 132622 ]](https://assets1.tamsnetwork.com/images/EC042017NF/132622s.jpg "Gold Foil Sheets [ 132622 ]")
![Secret Sea A4 Cardstock [ 165296 ]](https://assets1.tamsnetwork.com/images/EC042017NF/165296s.jpg "Secret Sea A4 Cardstock [ 165296 ]")
![Real Red A4 Card Stock [ 106578 ]](https://assets1.tamsnetwork.com/images/EC042017NF/106578s.jpg "Real Red A4 Card Stock [ 106578 ]")
![Old Olive A4 Card Stock [ 106576 ]](https://assets1.tamsnetwork.com/images/EC042017NF/106576s.jpg "Old Olive A4 Card Stock [ 106576 ]")
![Basic White A4 Cardstock [ 166781 ]](https://assets1.tamsnetwork.com/images/EC042017NF/166781s.jpg "Basic White A4 Cardstock [ 166781 ]")
![Secret Sea Classic Stampin' Pad [ 165285 ]](https://assets1.tamsnetwork.com/images/EC042017NF/165285s.jpg "Secret Sea Classic Stampin' Pad [ 165285 ]")
![Real Red Classic Stampin' Pad [ 147084 ]](https://assets1.tamsnetwork.com/images/EC042017NF/147084s.jpg "Real Red Classic Stampin' Pad [ 147084 ]")
![Smoky Slate Stampin' Blends Combo Pack [ 154904 ]](https://assets1.tamsnetwork.com/images/EC042017NF/154904s.jpg "Smoky Slate Stampin' Blends Combo Pack [ 154904 ]")
![Real Red 1/2" (1.3 Cm) Shiny Ribbon [ 165876 ]](https://assets1.tamsnetwork.com/images/EC042017NF/165876s.jpg "Real Red 1/2\" (1.3 Cm) Shiny Ribbon [ 165876 ]")
![Traditional Sparkling Sequins [ 165875 ]](https://assets1.tamsnetwork.com/images/EC042017NF/165875s.jpg "Traditional Sparkling Sequins [ 165875 ]")
![Multipurpose Liquid Glue [ 154974 ]](https://assets1.tamsnetwork.com/images/EC042017NF/154974s.jpg "Multipurpose Liquid Glue [ 154974 ]")
![Mini Glue Dots [ 103683 ]](https://assets1.tamsnetwork.com/images/EC042017NF/103683s.jpg "Mini Glue Dots [ 103683 ]")
![Paper Trimmer [ 152392 ]](https://assets1.tamsnetwork.com/images/EC042017NF/152392s.jpg "Paper Trimmer [ 152392 ]")
![Paper Snips [ 103579 ]](https://assets1.tamsnetwork.com/images/EC042017NF/103579s.jpg "Paper Snips [ 103579 ]")
![Blending Brushes [ 153611 ]](https://assets1.tamsnetwork.com/images/EC042017NF/153611s.jpg "Blending Brushes [ 153611 ]")
![Stampin' Cut & Emboss Machine [ 149653 ]](https://assets1.tamsnetwork.com/images/EC042017NF/149653s.jpg "Stampin' Cut & Emboss Machine [ 149653 ]")