In the summer, for the past three years, I have promised myself I would make this card for the new year. And up until now I have forgotten; thank heavens I went through my notes looking for something new and interesting to do for you.
This pop up card is an old design that I first saw about six years ago, I will put the link to that video at the bottom. The twist and pop mechanism seems complicated at first, but once you make one, the simplicity of the design becomes obvious.
I highly suggest grabbing some plain copy paper and trying out the design. This is what I did; because even after watching the video, I could not wrap my brain around it. While the design is rather easy, writing the ‘how to’ was very hard. I suggest watching the video and using the written instructions and pictures as back-up clarification.
Supplies
Gears & Textures Stamp Set
Gears & Textures Dies
Perennial Postage Dies
Alphabet A La Mode Dies
Reason to Celebrate Stamp Set
Country Woods Designer Series Paper
Silver Foil Sheets
Night of Navy Card Stock
Basic White Card Stock
Night of Navy Stampin’ Pad
Low Profile Sparkle Dots
Adhesive Sheets
Dimensionals
Multipurpose Liquid Glue
Tear & Tape
Blending Brush
Paper Trimmer
Cut & Emboss Machine
Directions
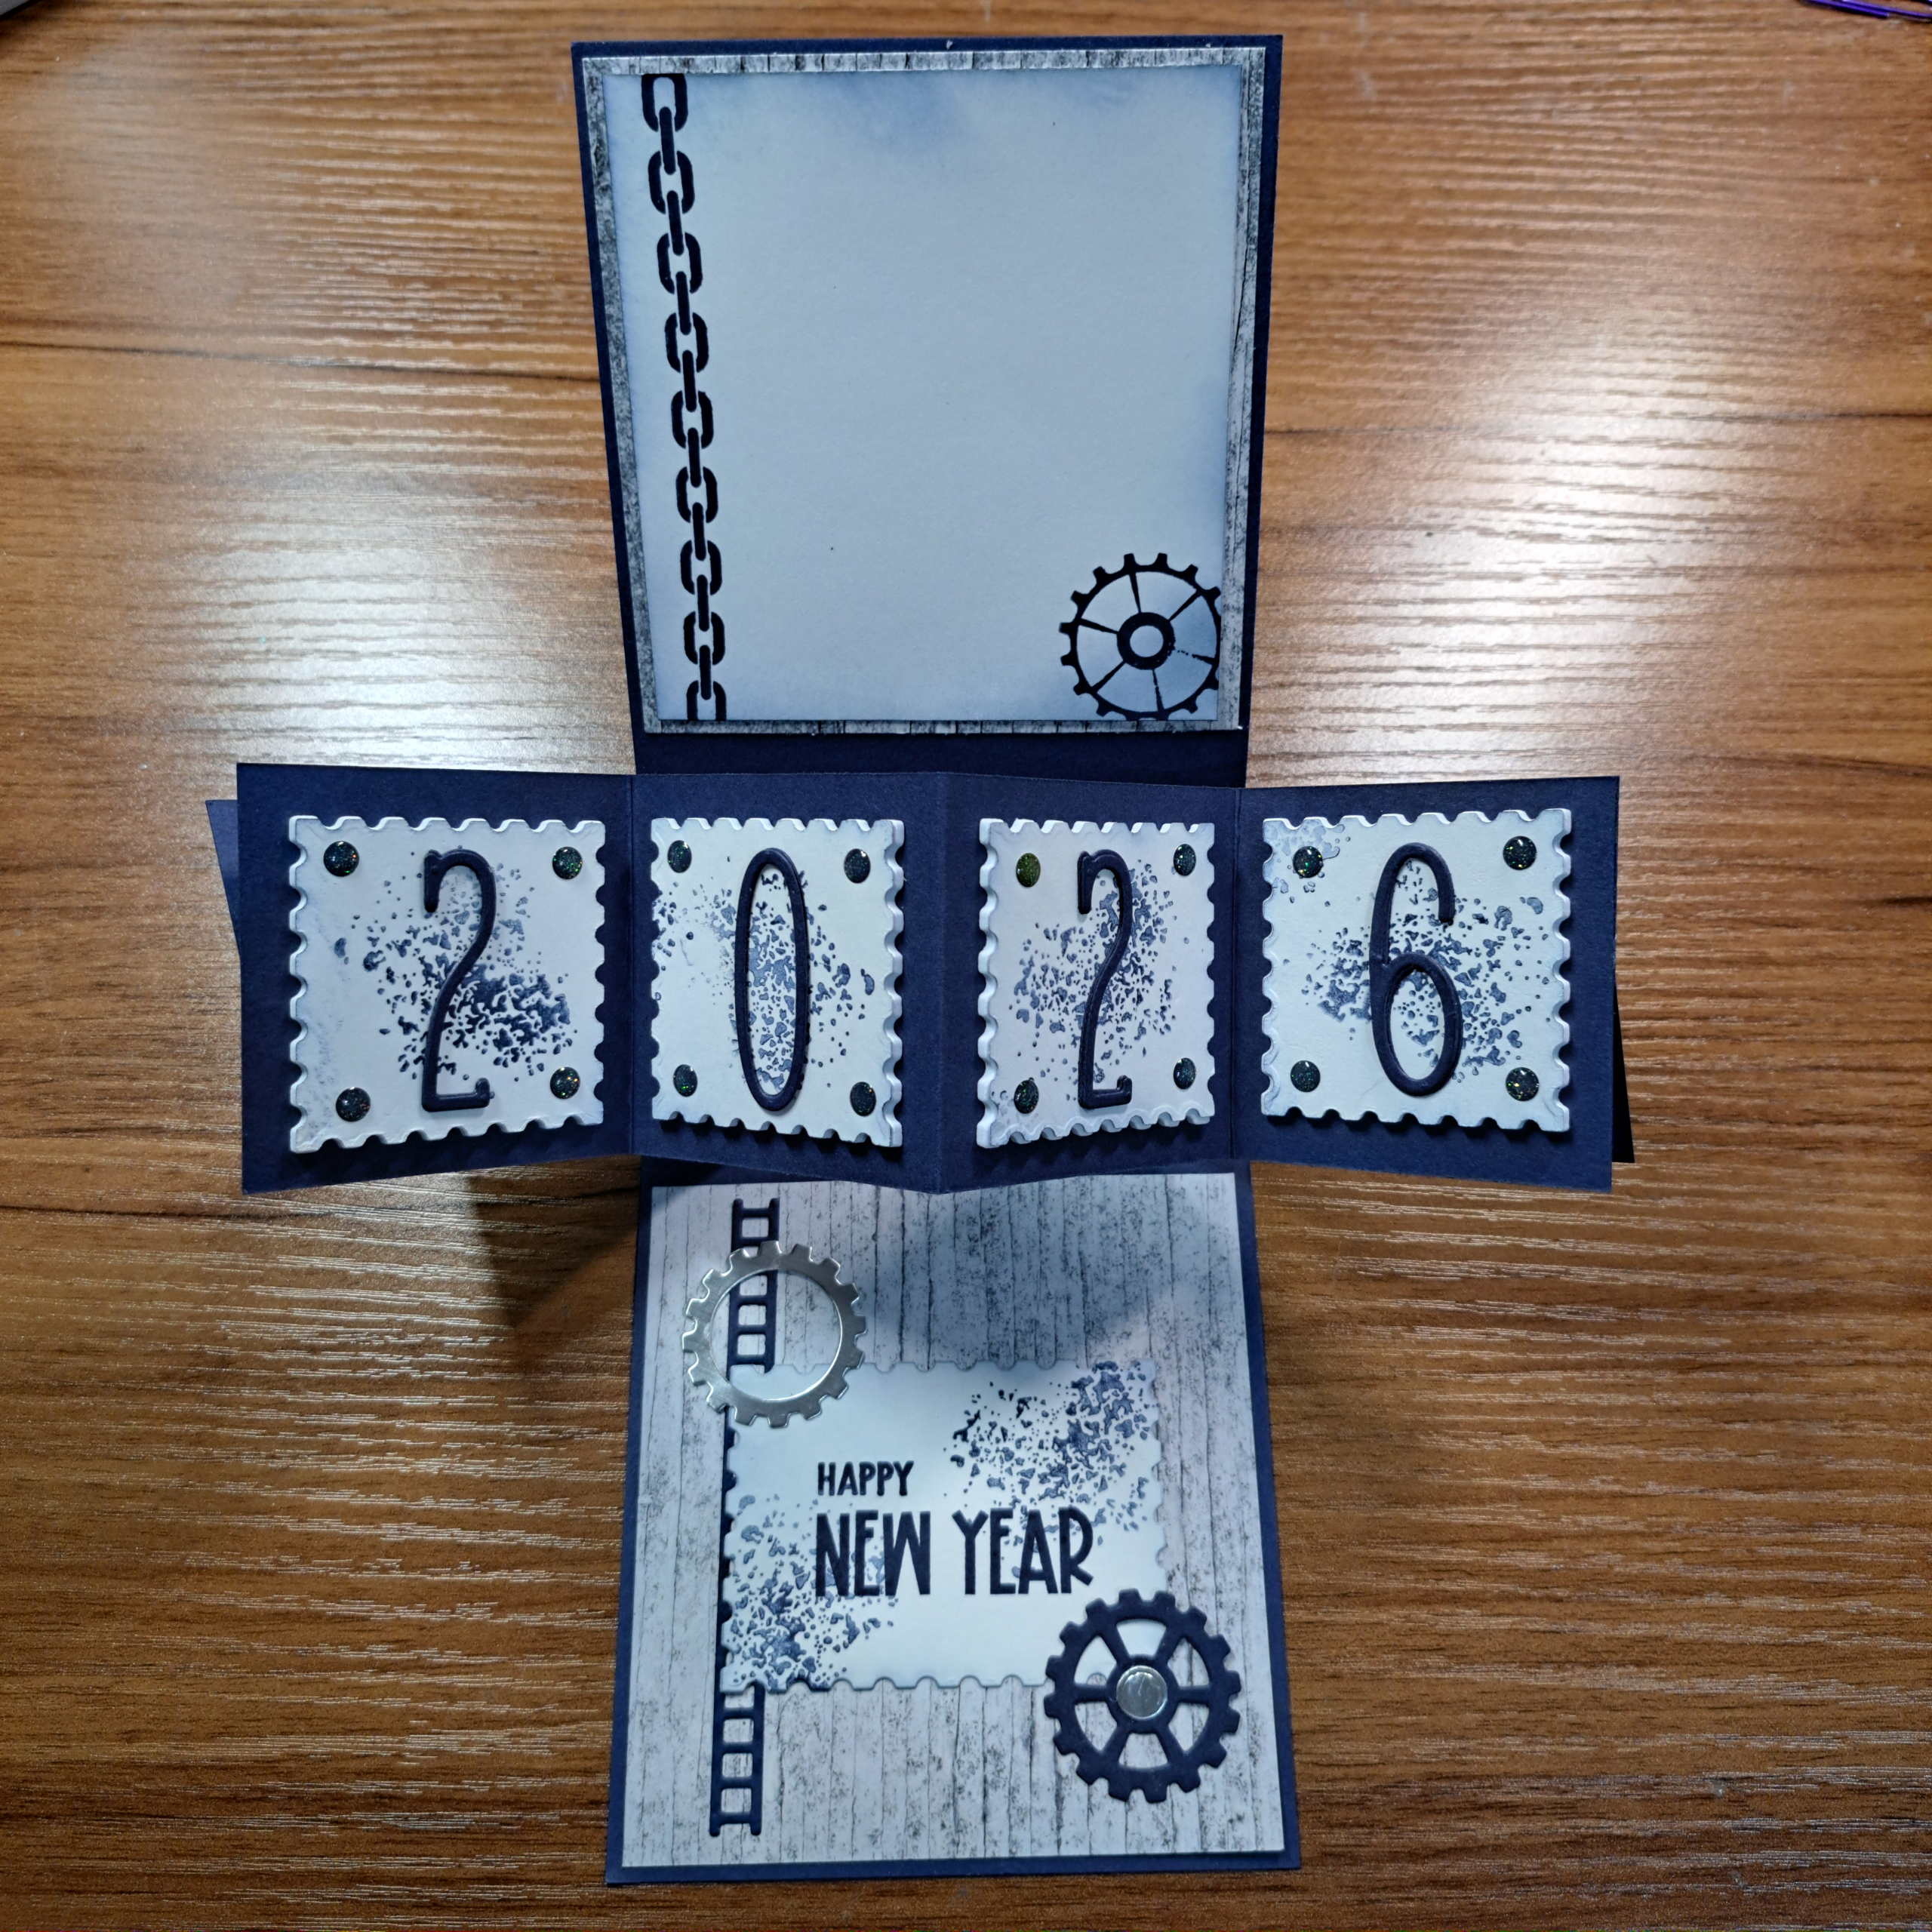
Card Base

Use a half sheet of Night of Navy card stock cut lengthwise, 10.5cm x 29.7cm (4-1/4″ x 11″). Score half way at 14.85cm (5-1/2″), fold and burnish. At this point I recommend decorating the exterior of your card base. You can see the decoration instructions below the mechanism instructions.
Mechanism
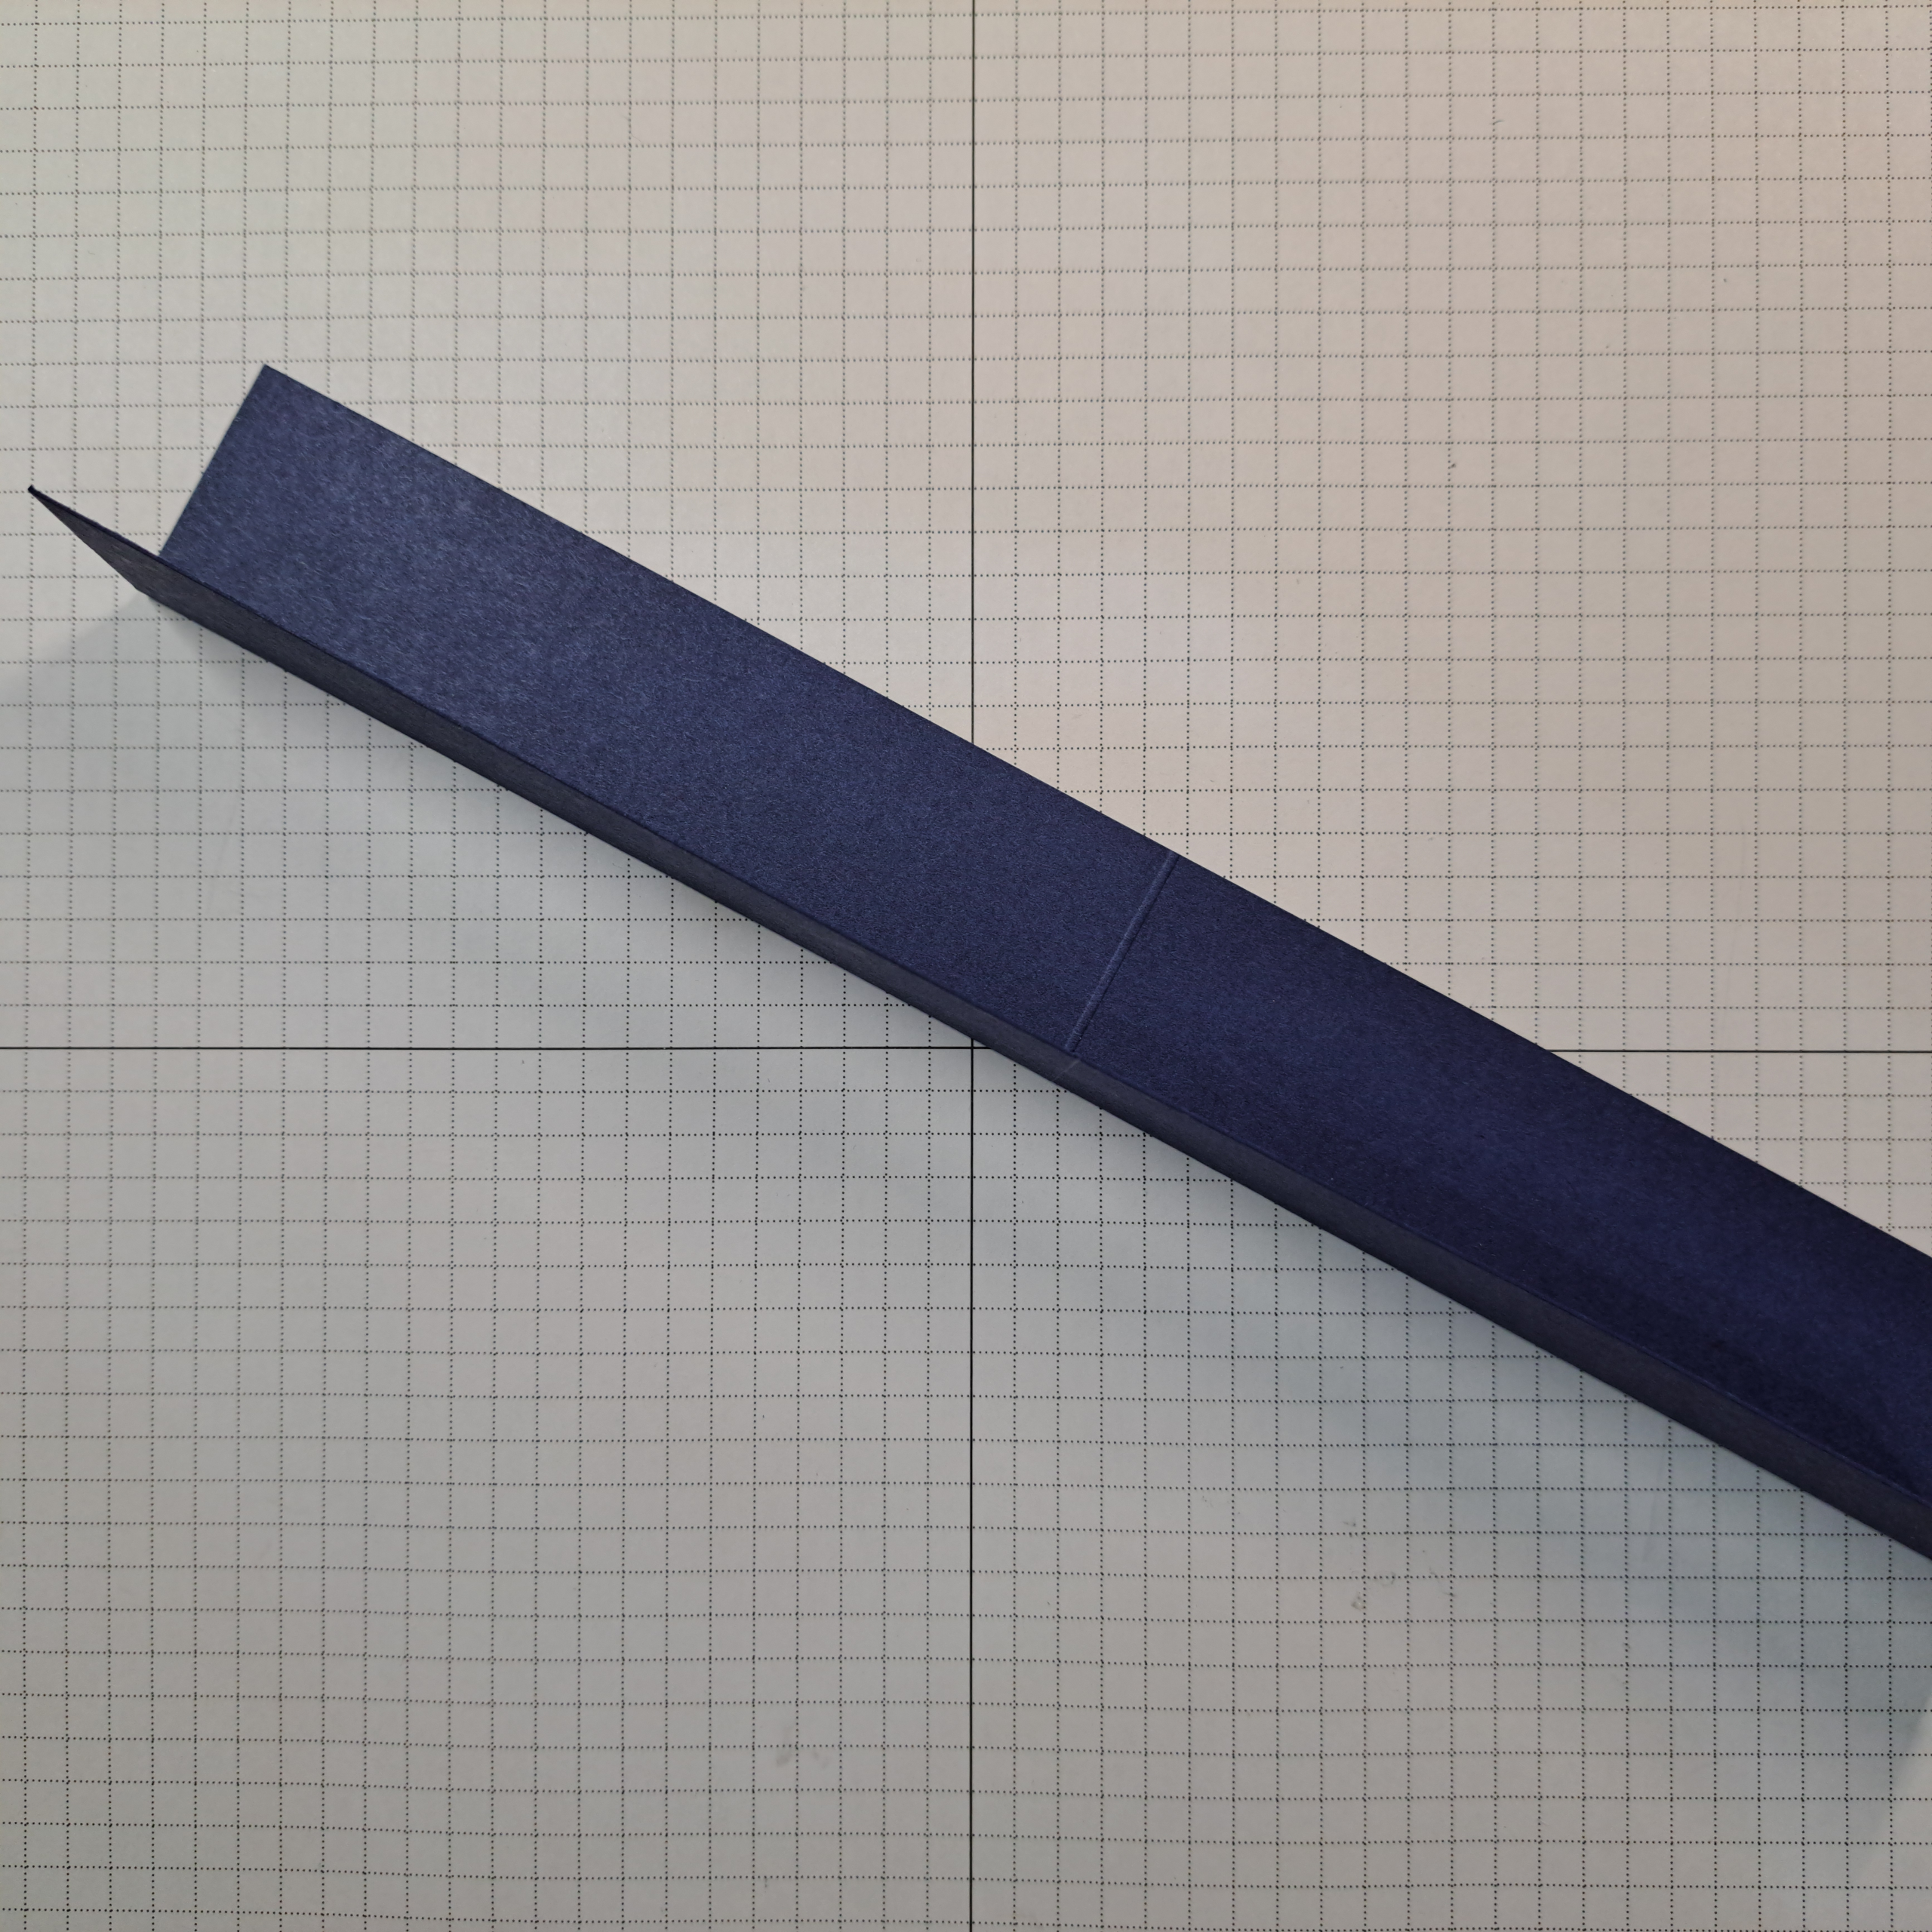
Cut two strips of card stock, each 3cm x 24cm (2-3/8 ” x 9-1/2″).
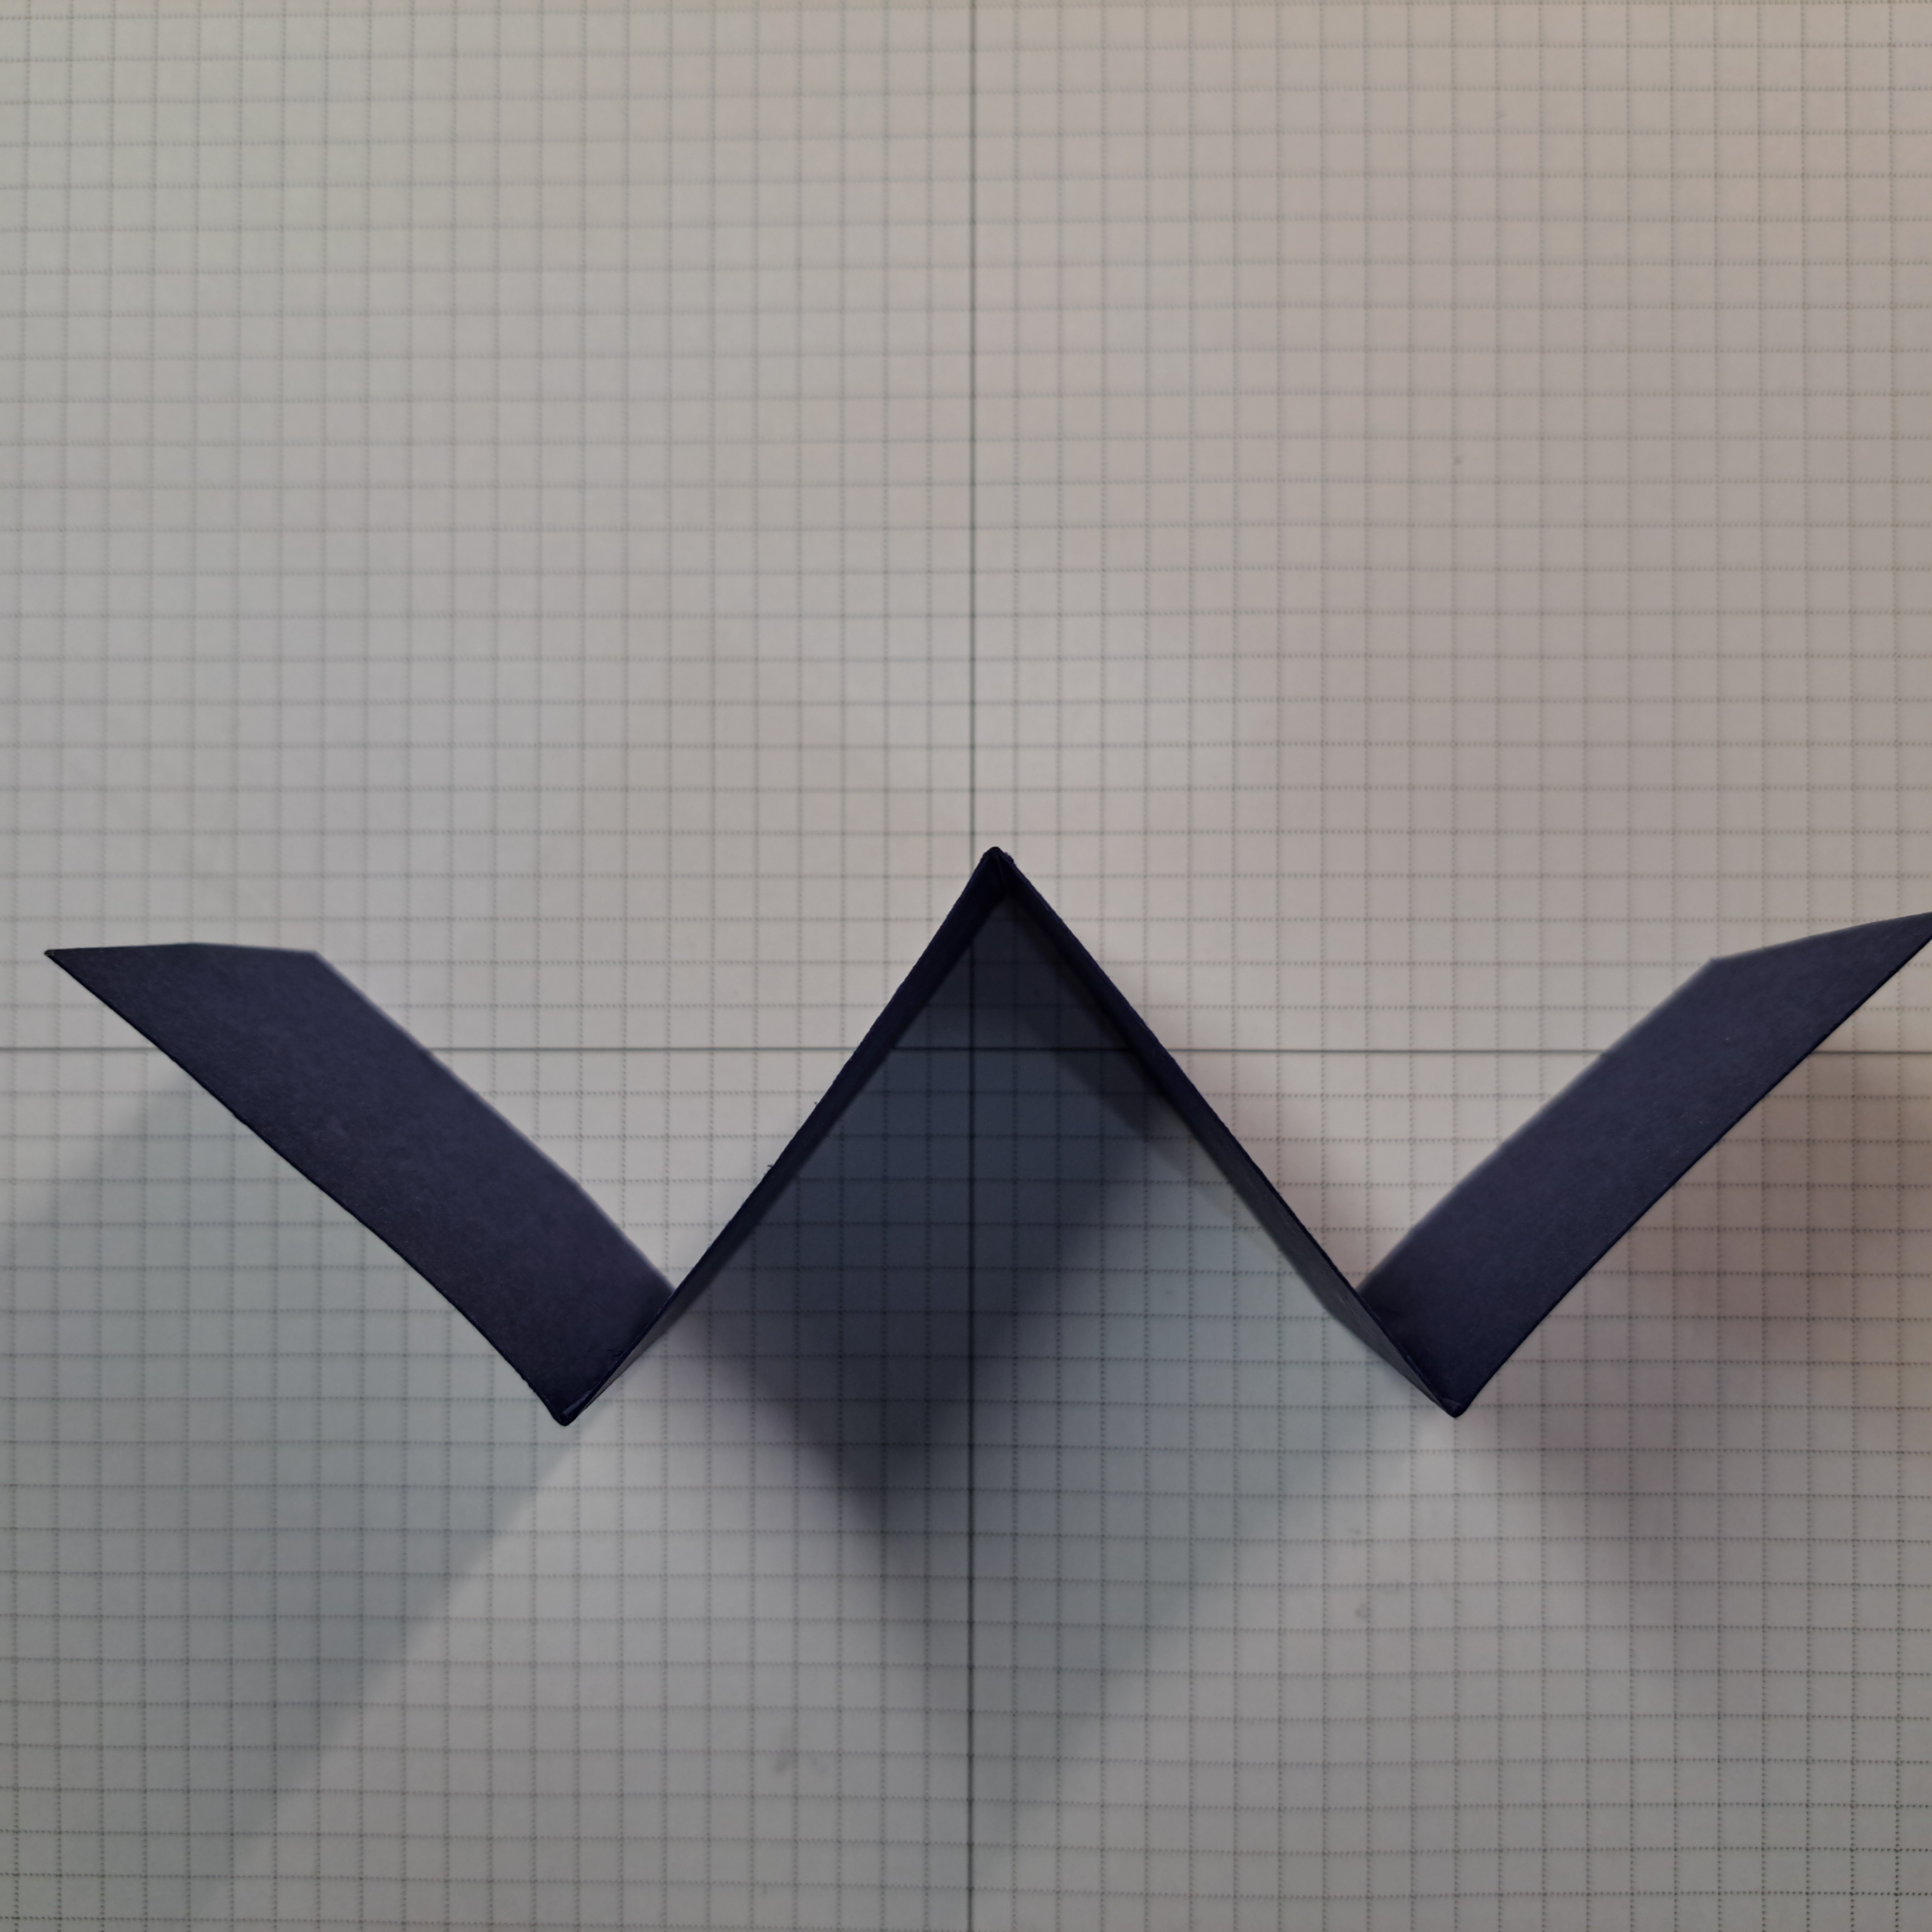
Score strip number one at 6cm, 12cm and 18cm (2-3/8 “, 4-3/4 ” and 7-18″). Fold the strip in half first, along the 12cm (4-3/4″) score line, being sure the ends line up perfectly. (I find that sometimes I need to adjust along the score lines.). Then fold each half back toward the fold (adjusting to be sure everything is even) so that the resulting strip looks like the letter ‘W’. This piece can be decorated at this point (if you wish) before attaching it to the mechanism. I found it easier to do so. Instructions on how I decorated are below.

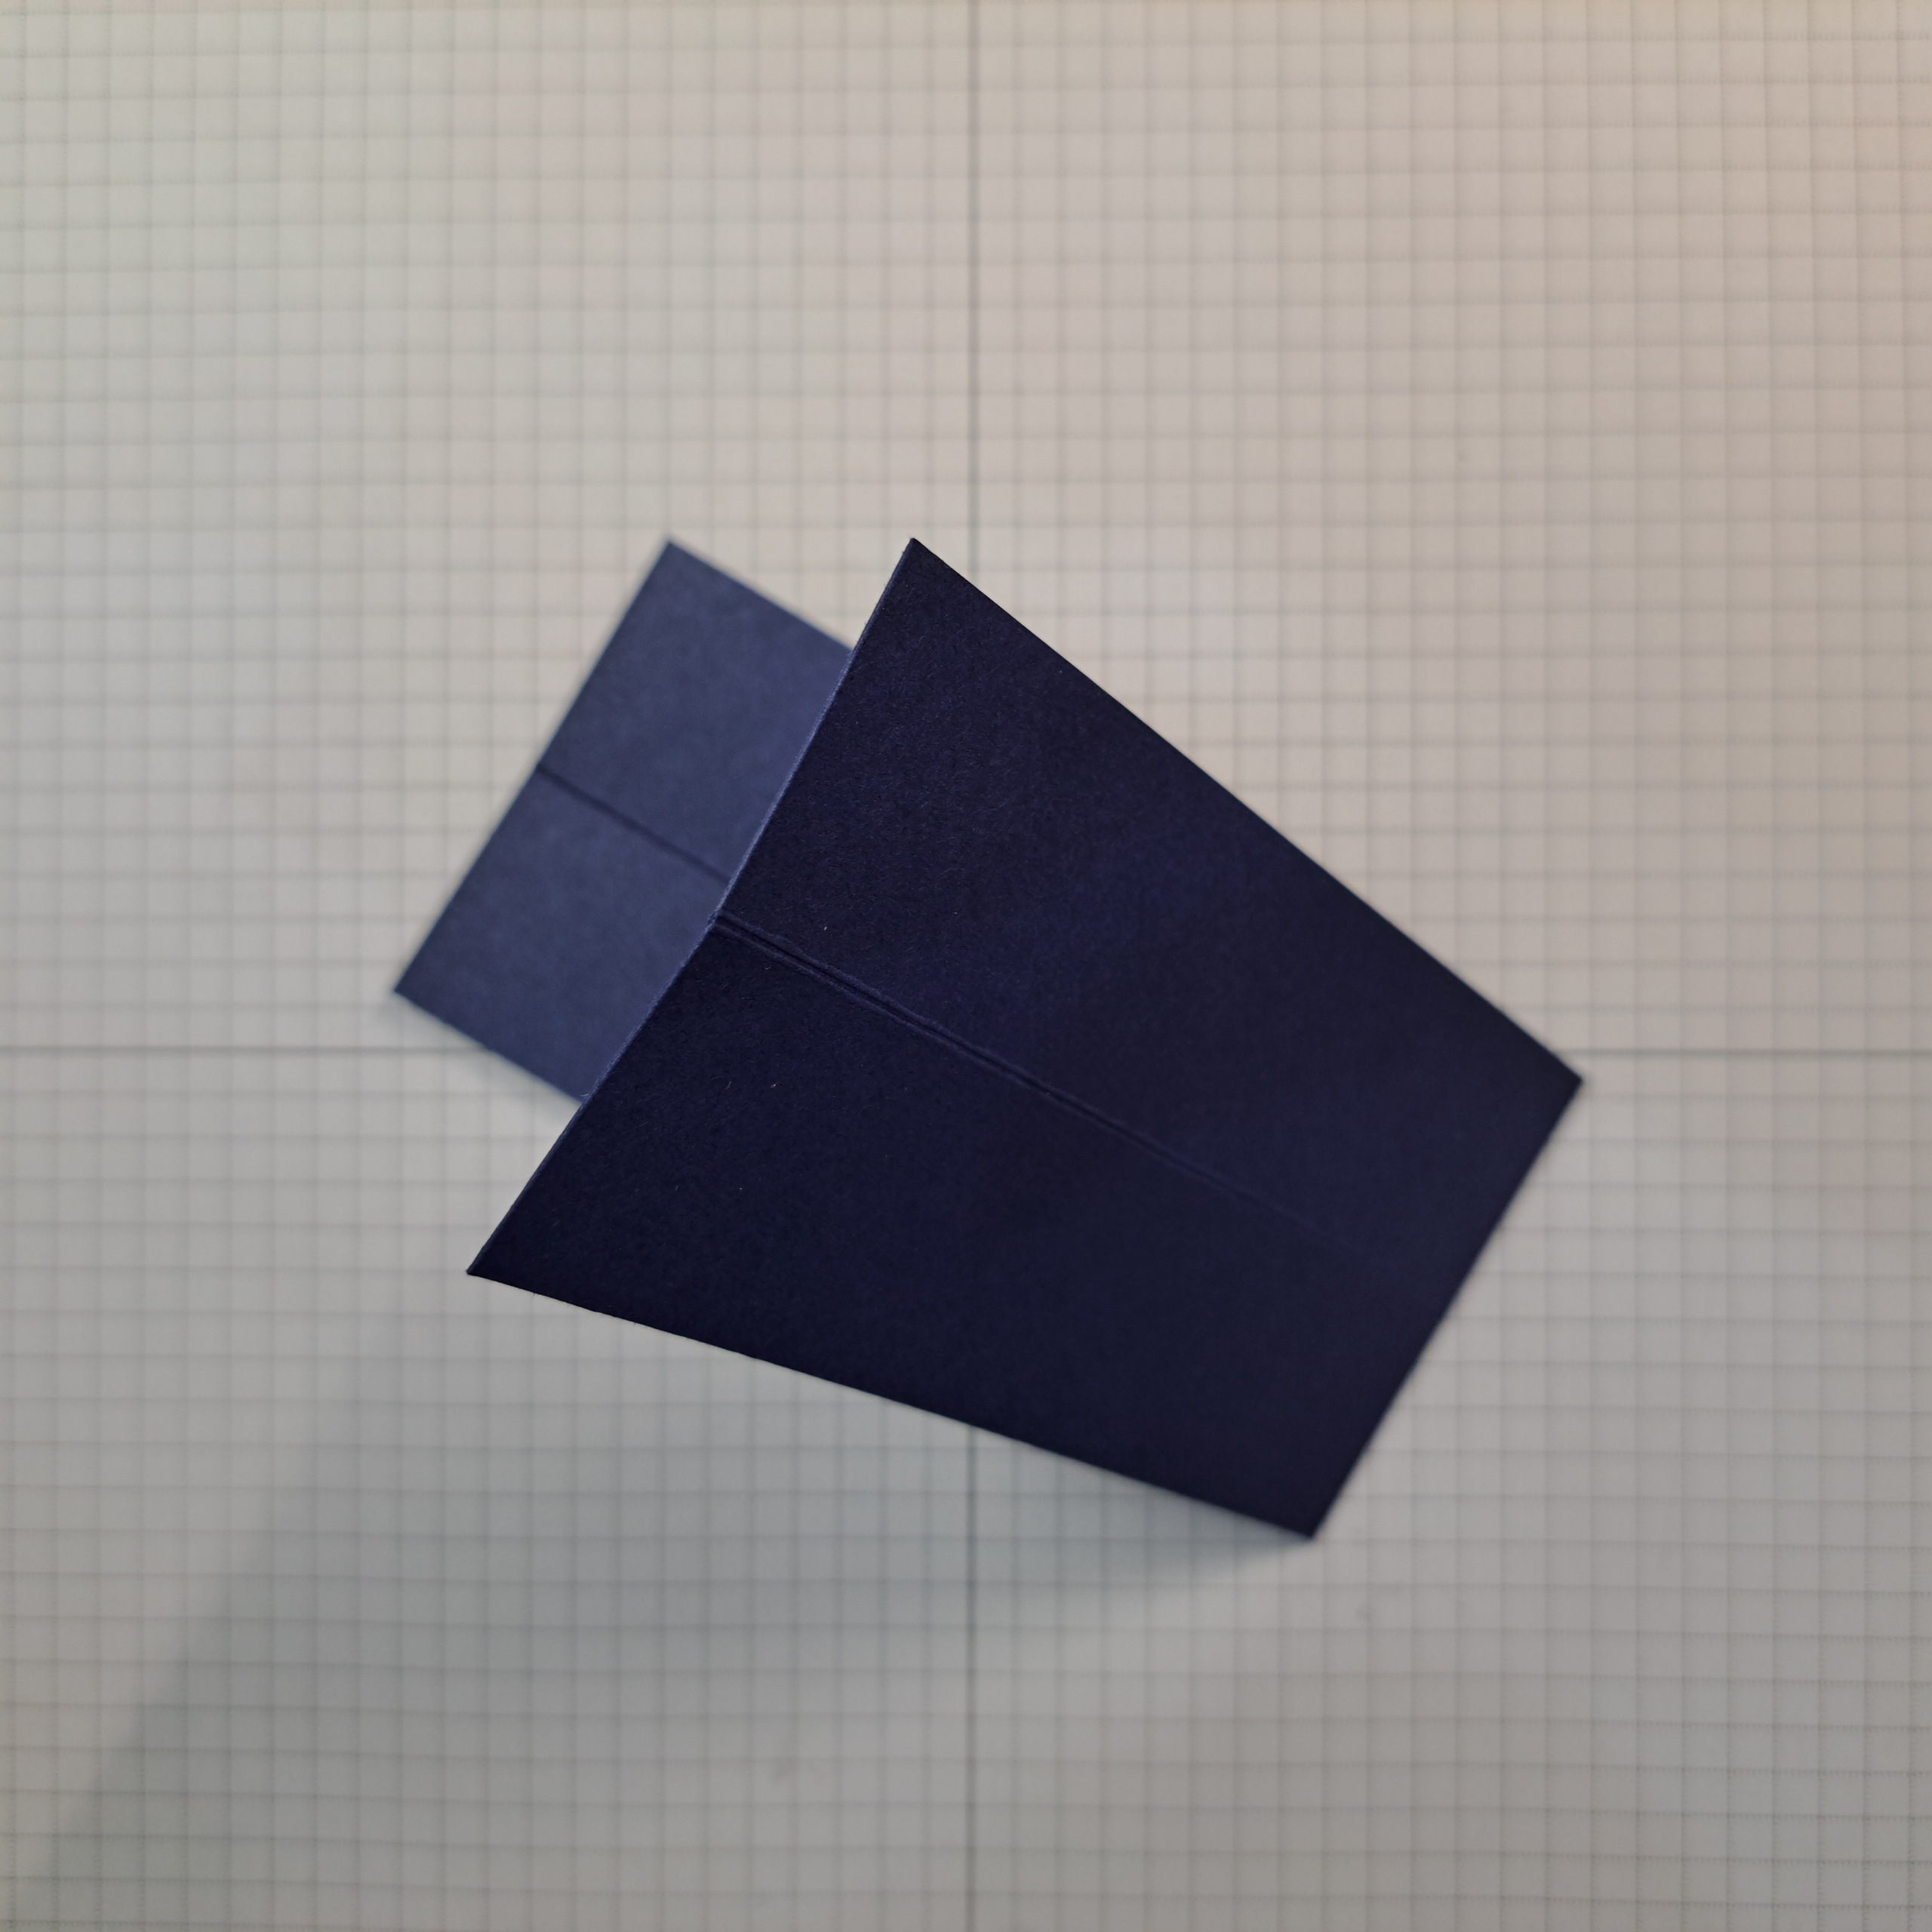
Strip number two requires two separate sets of folds. For the first set, score the strip in half length wise at 3cm (1-3/16″) and again width wise at 12cm (4-3/4″). Carefully fold the strip along the score lines being sure to match up the edges. As noted above you may need to manipulate the card stock a little and use your bone folder to crease the fold. Fold the strip back in the opposite direction(s) and burnish again.
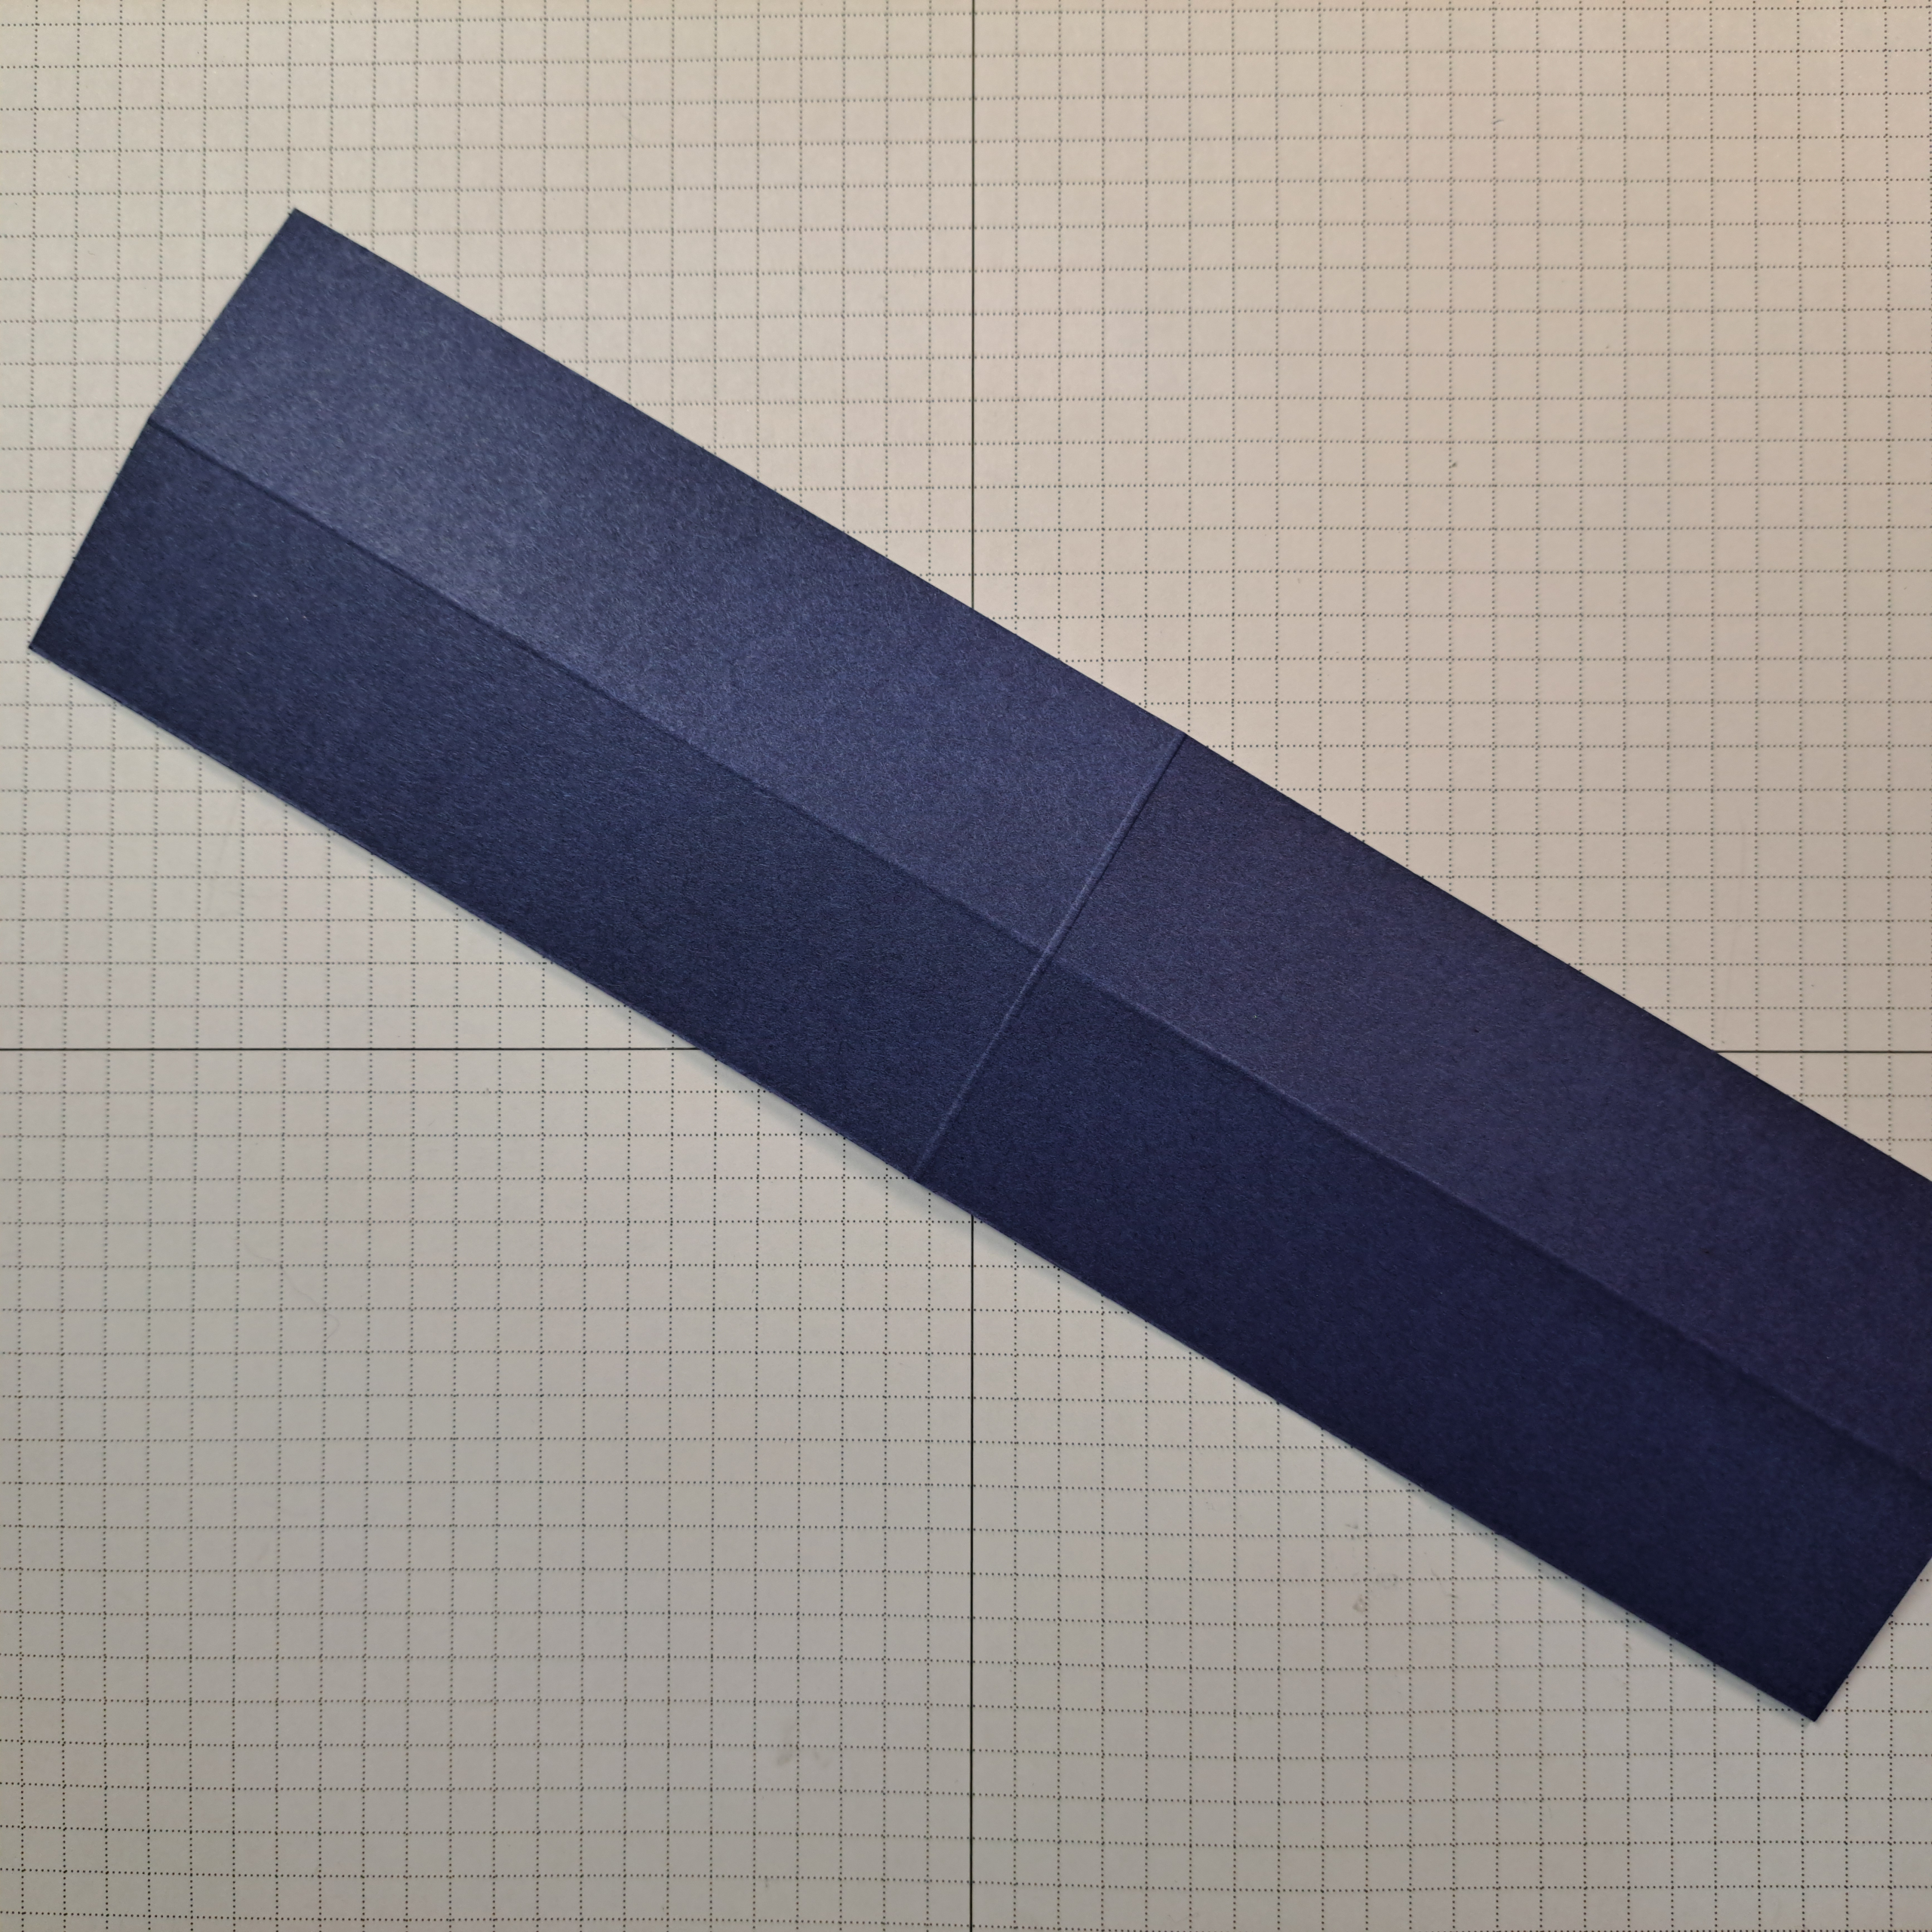
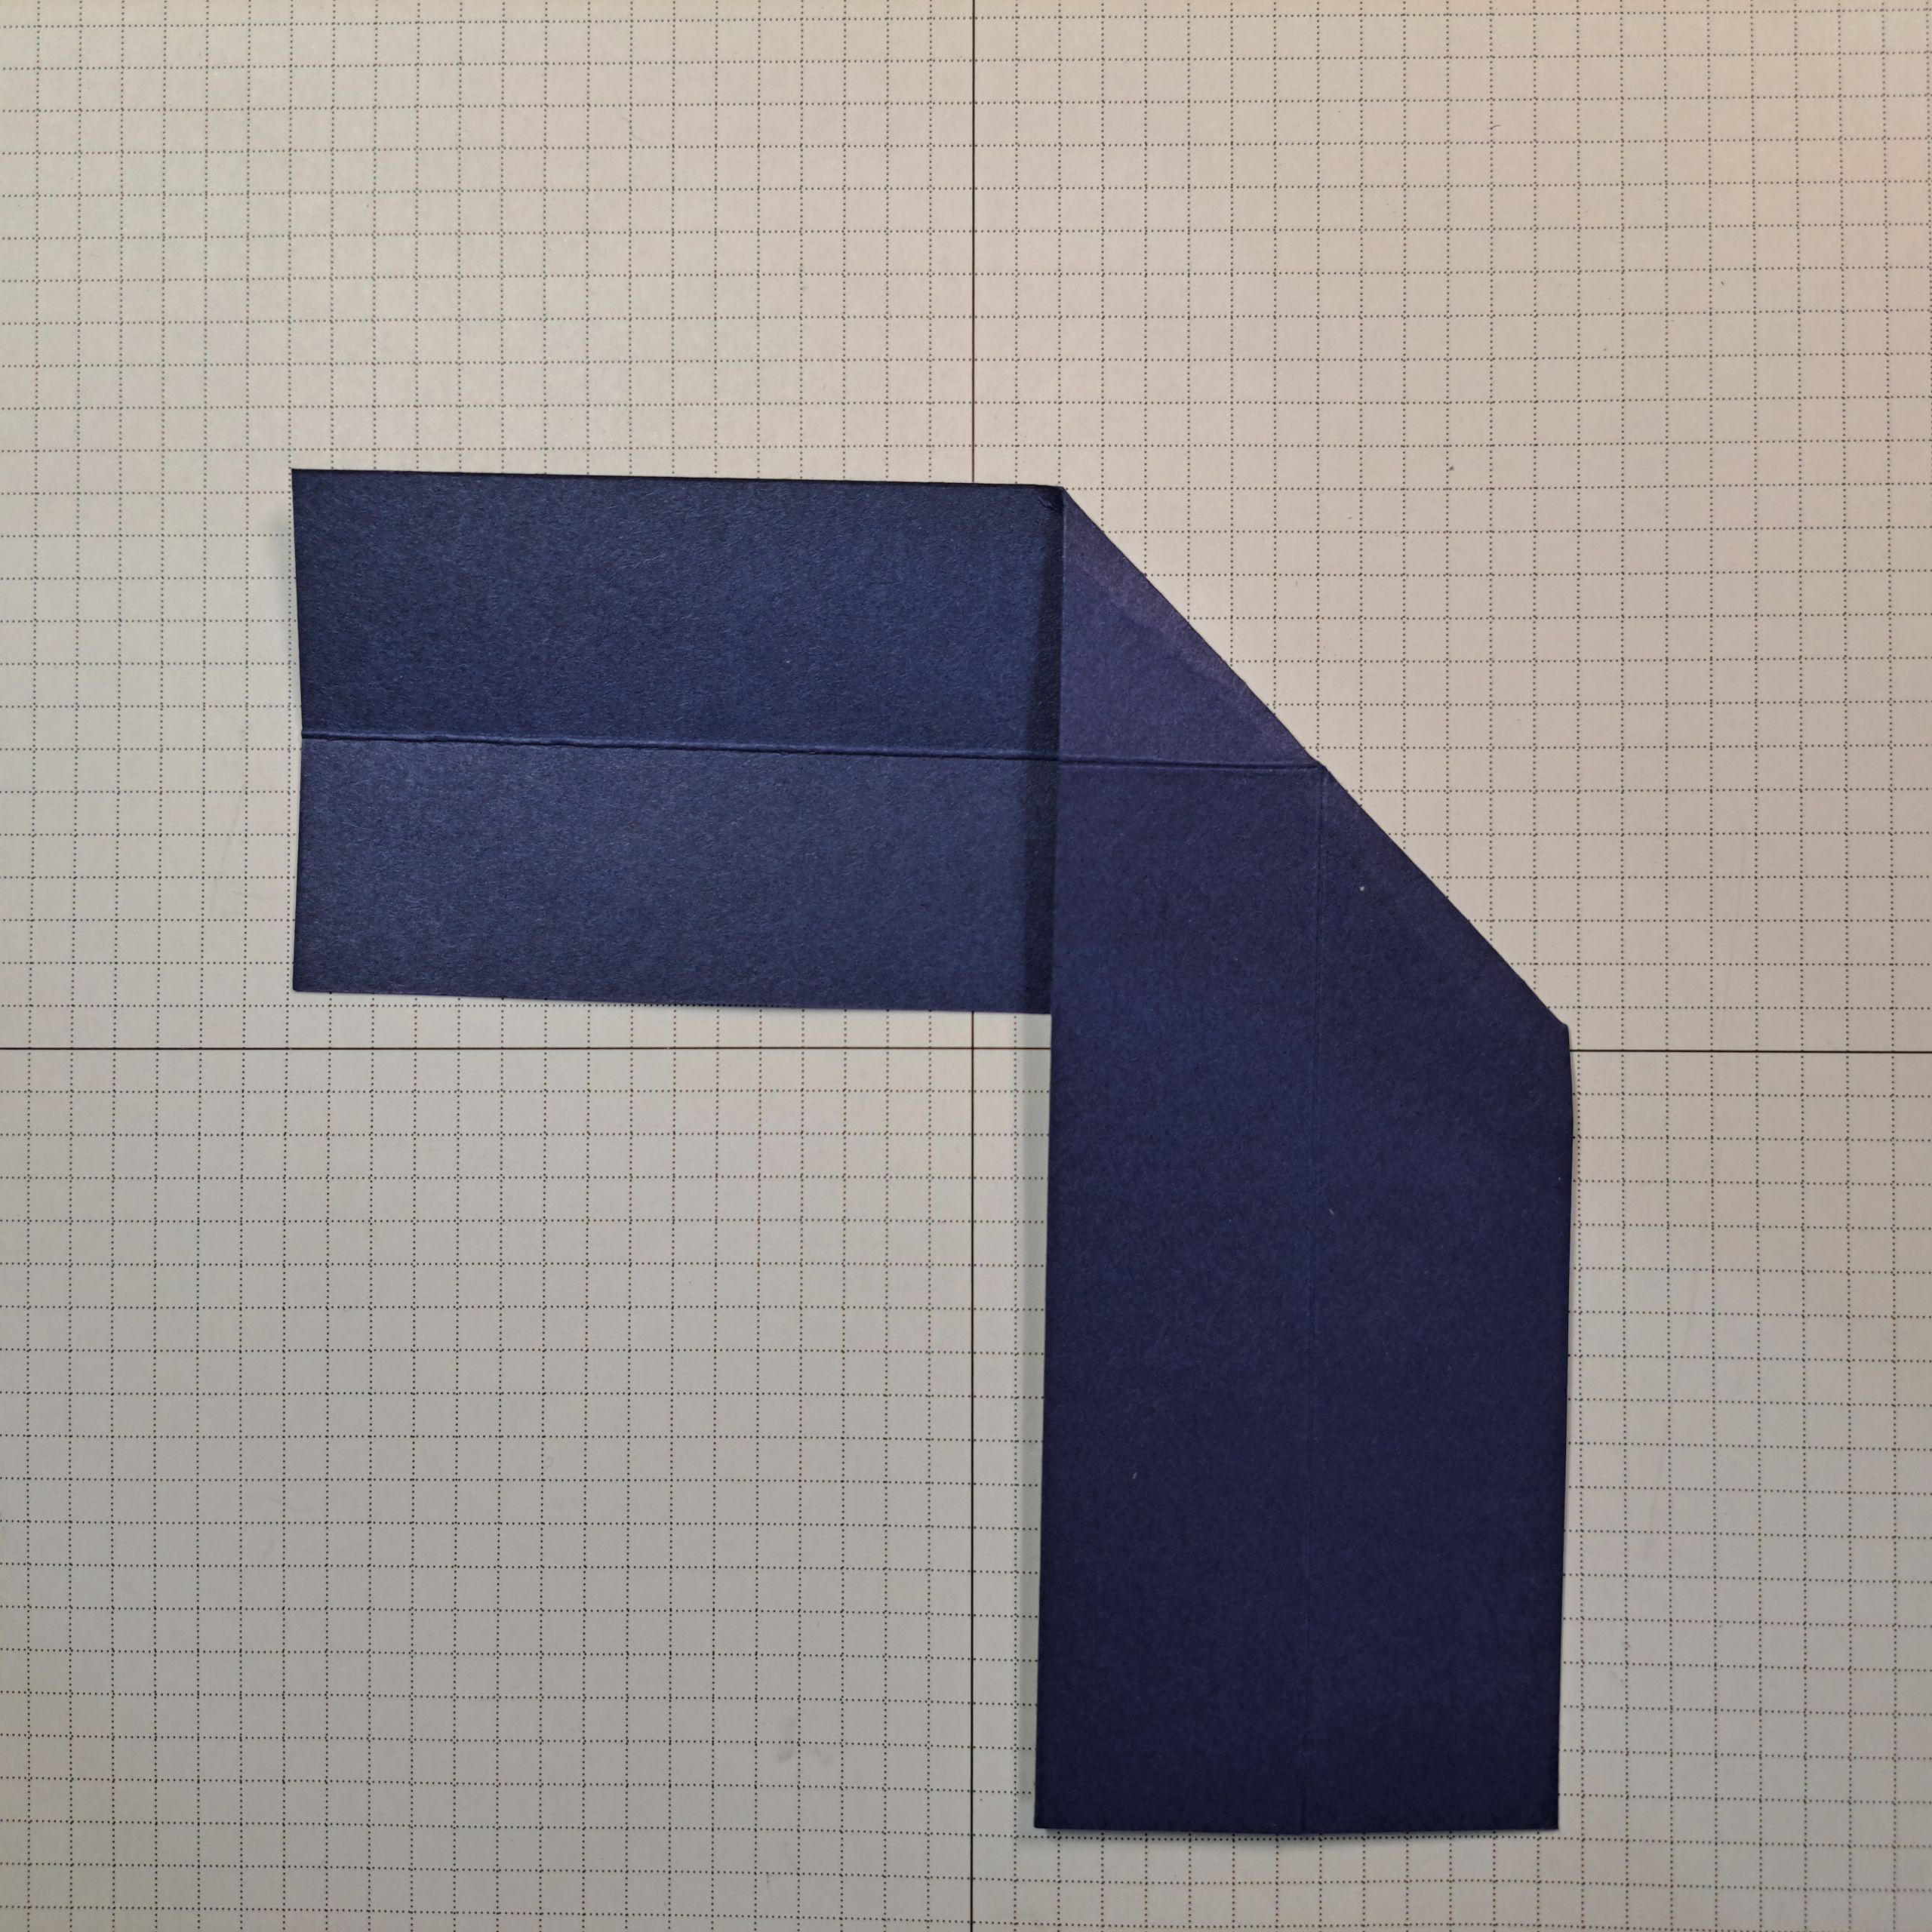
This second set of folds on strip number two will create the twist motion. To begin, bring the right side of the strip over and down, align the vertical score line with the horizontal score line creating a diagonal fold. The center point of the strip (where the score lines cross) should be the center point of this diagonal fold. Before burnishing check the other side to be sure the score lines are aligned. I find that I often have to tweak this second side before burnishing.
Un-fold and return the strip to the starting point. Repeat the fold on the left side, bringing the left end over and down with the center point at the center of the new fold line. You should now have ‘X’ shaped score lines at the center of the strip. See Photos below.
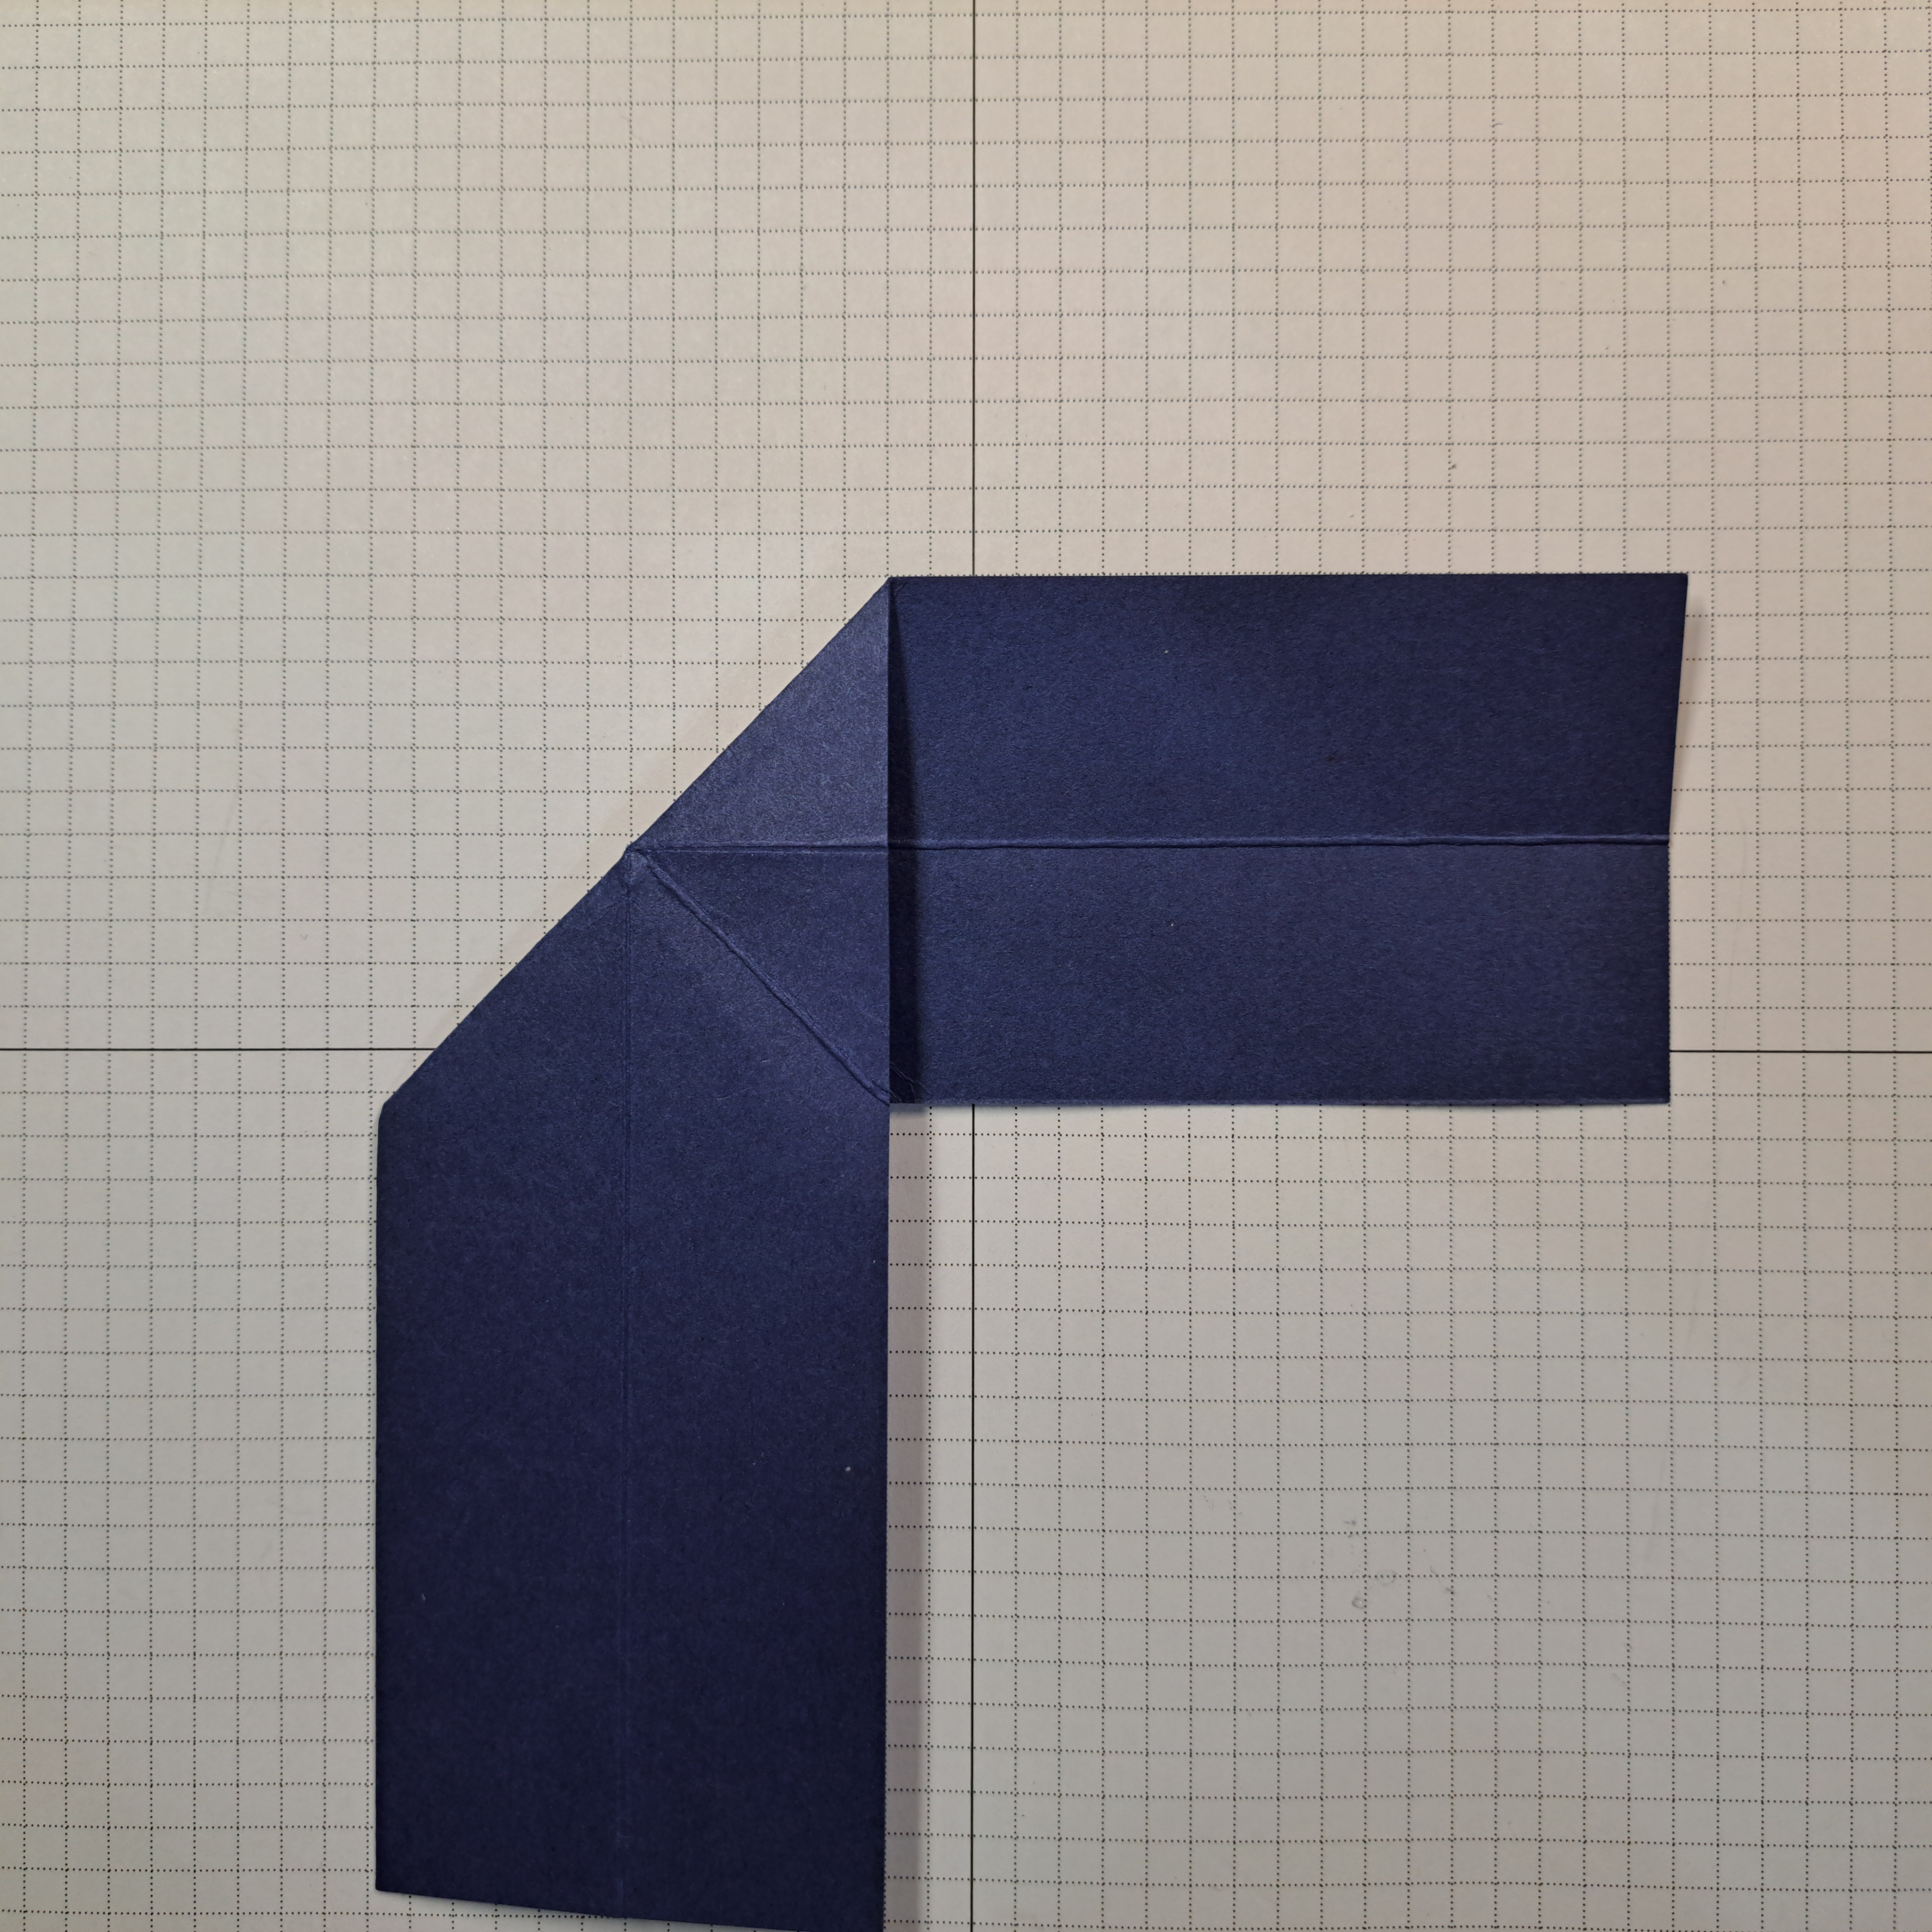
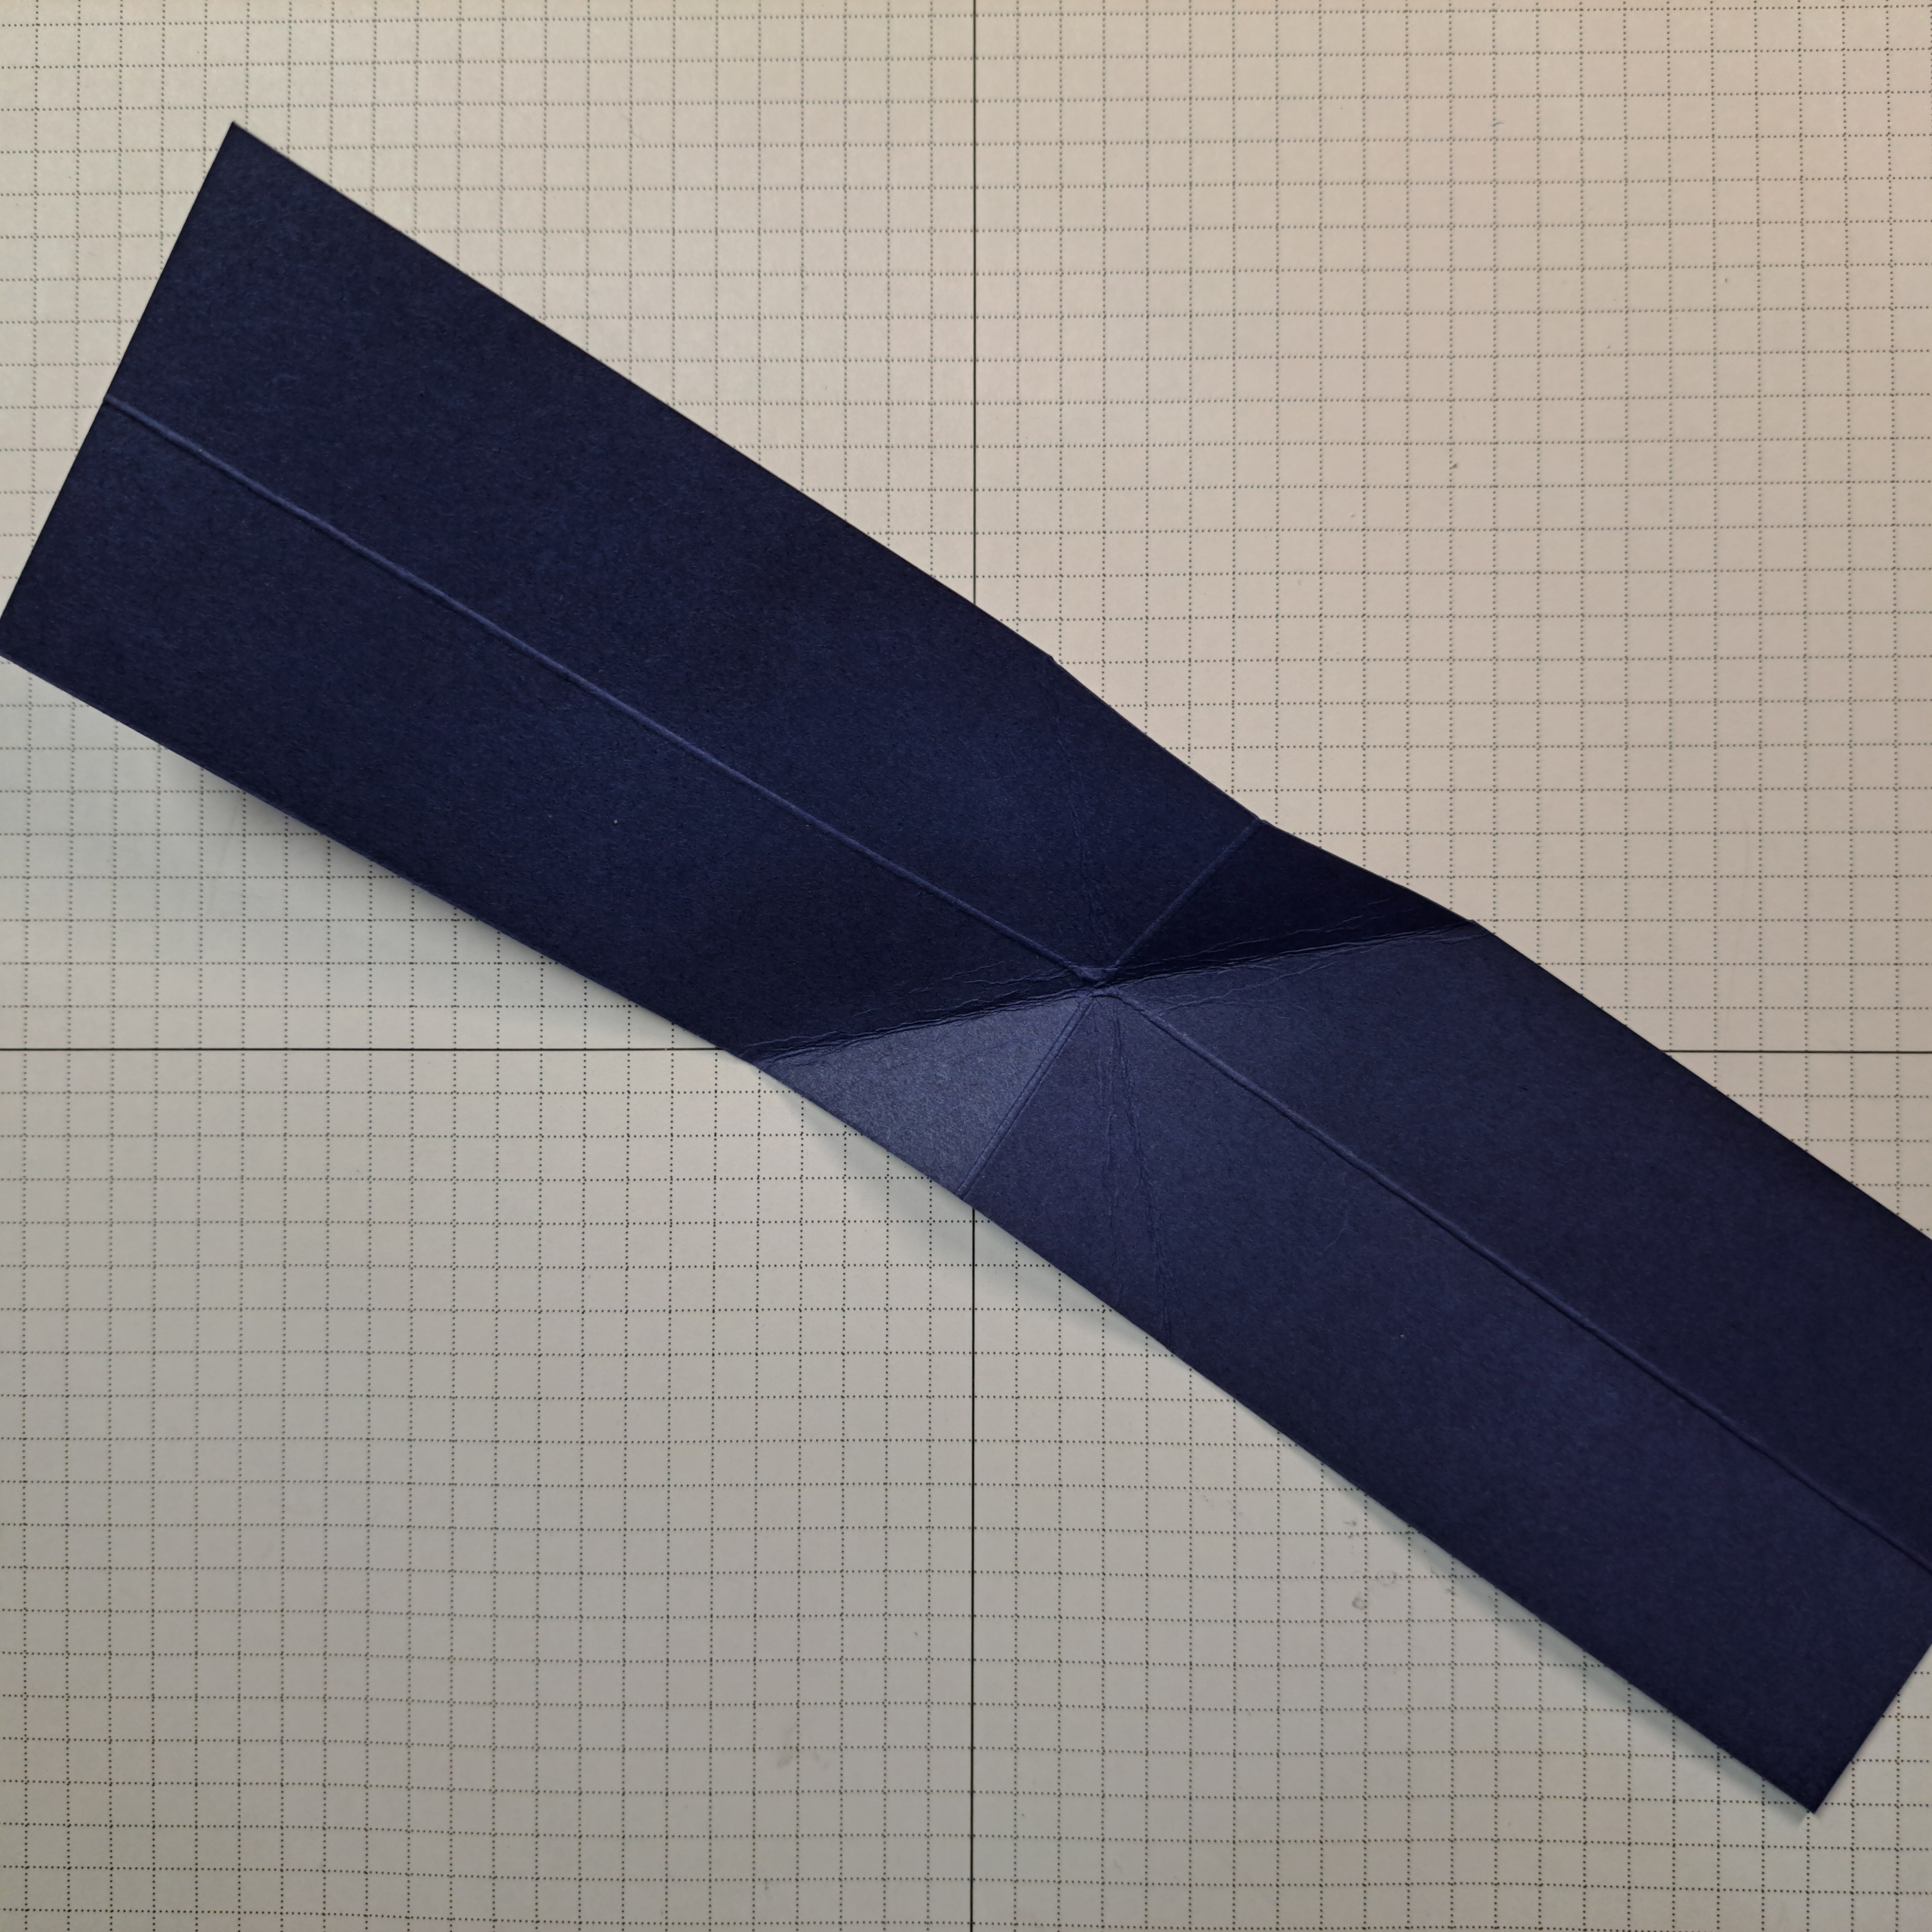
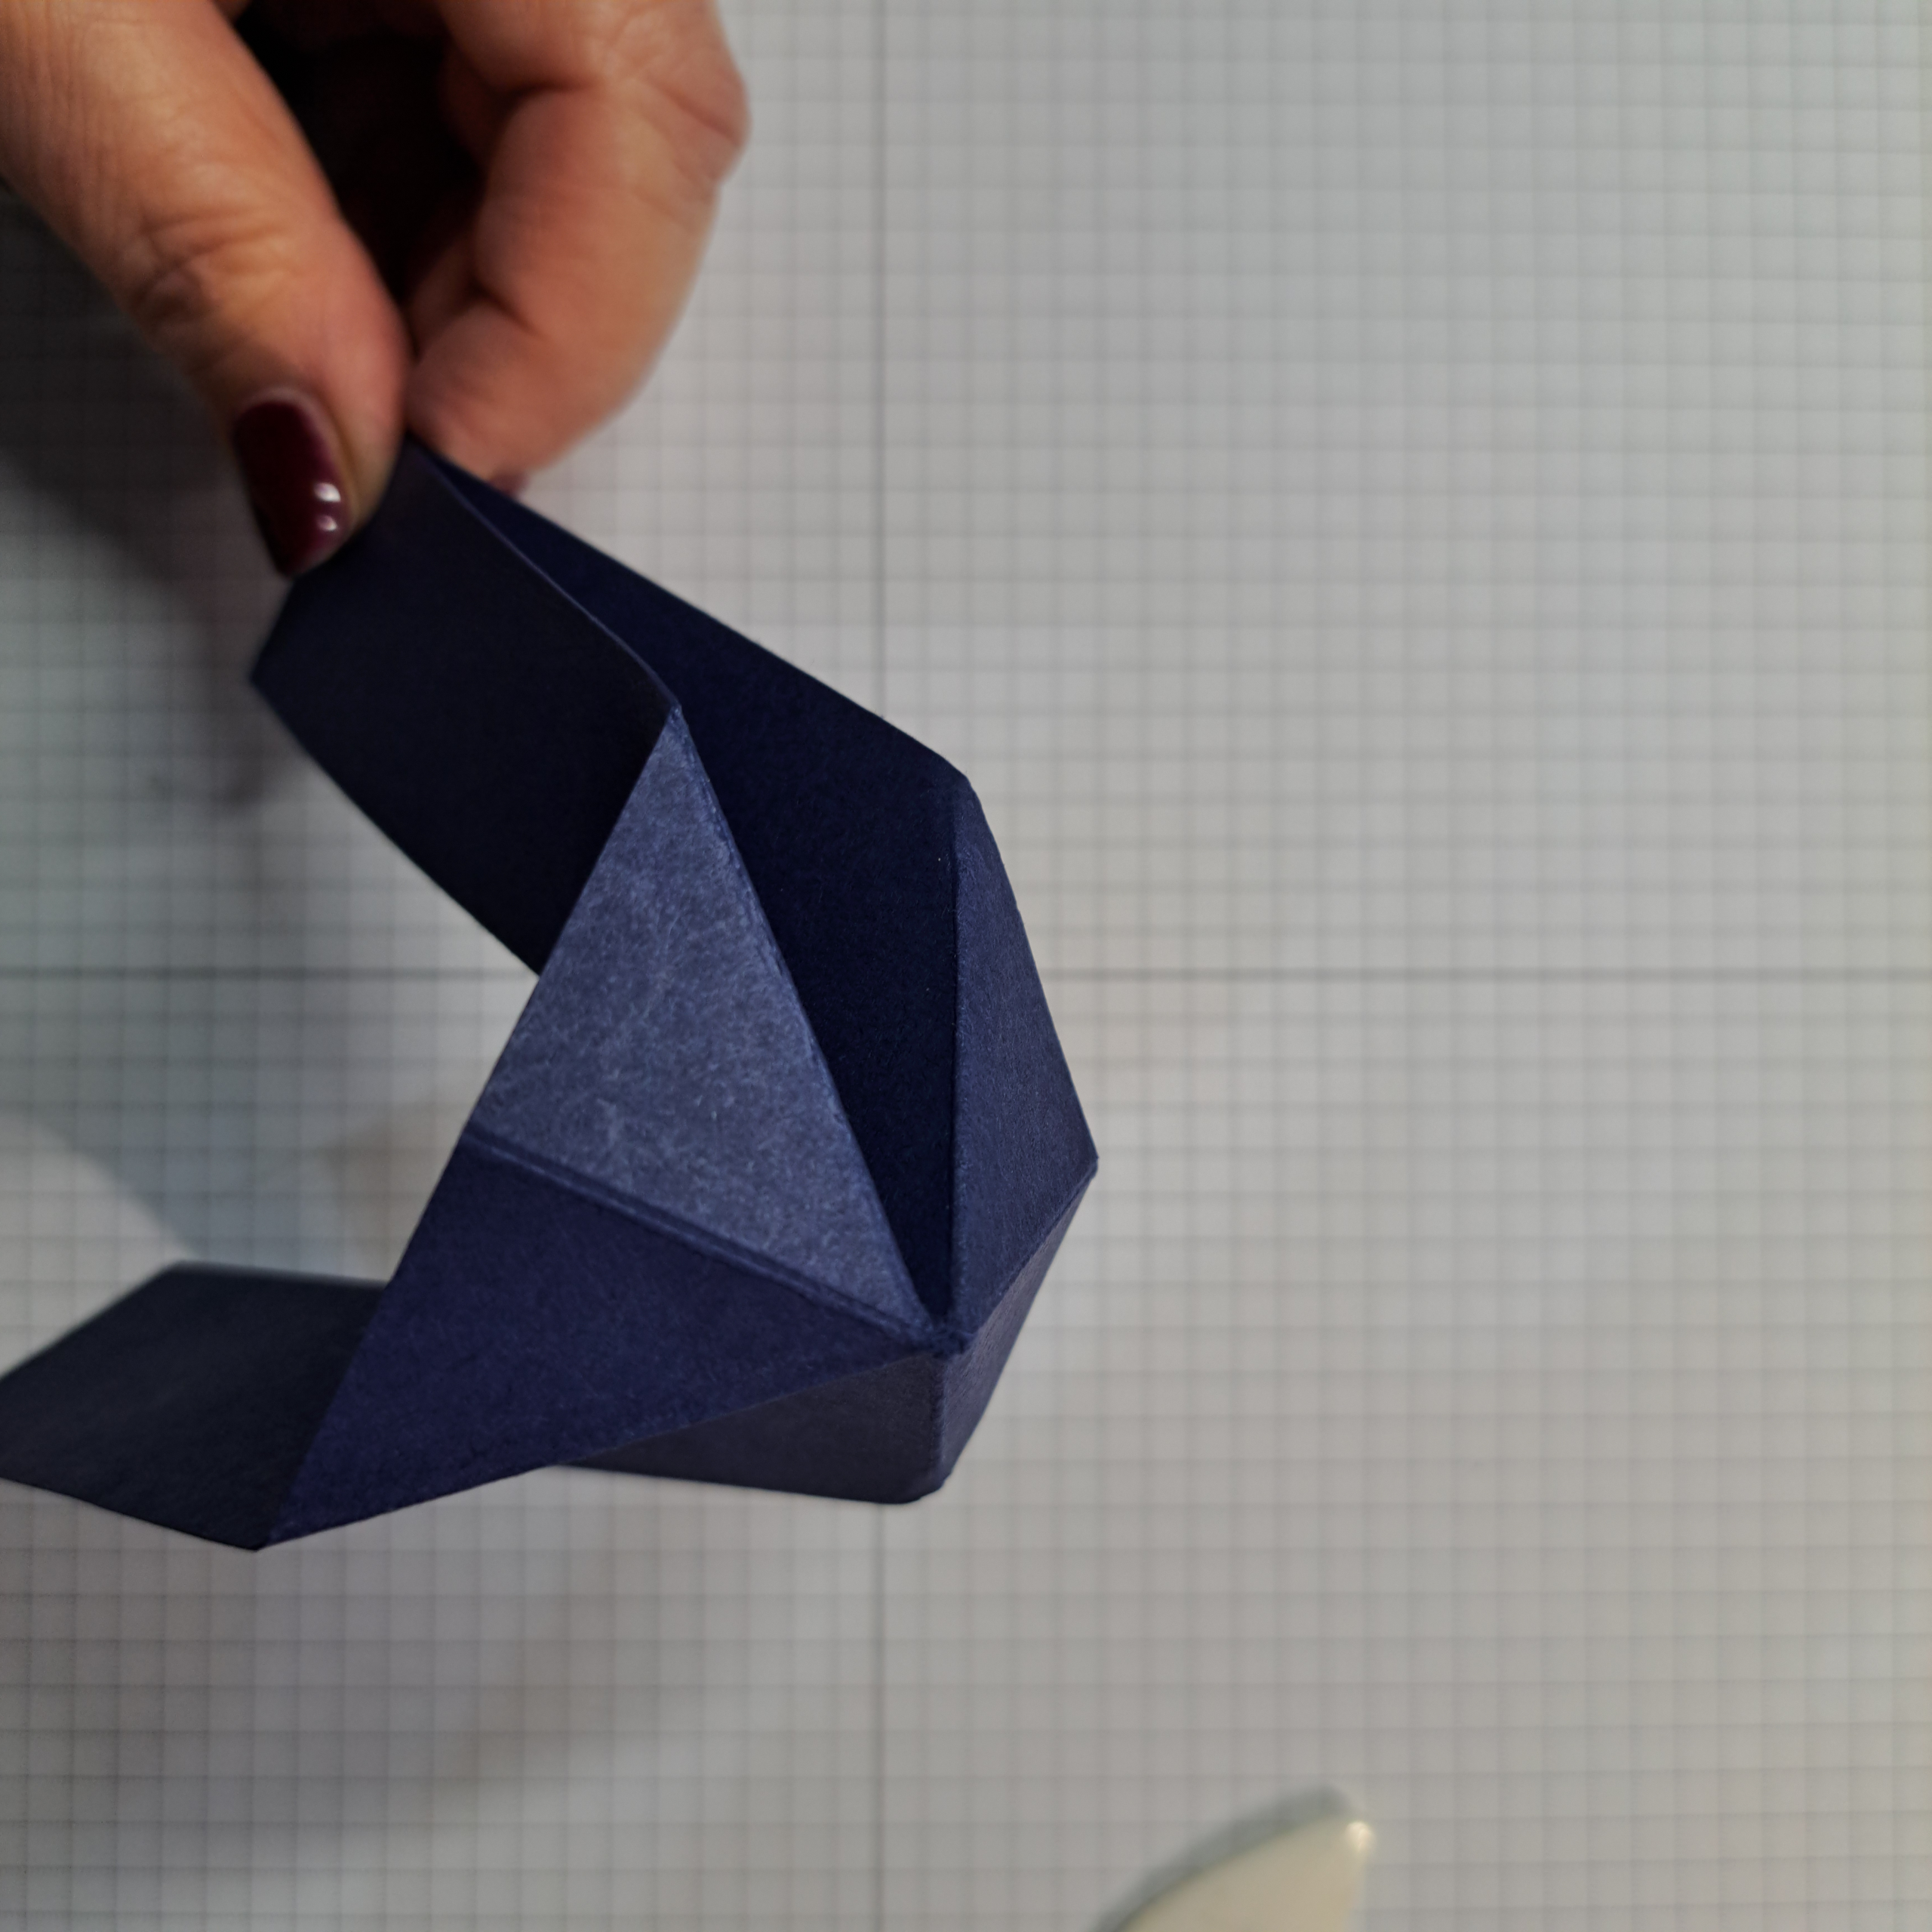
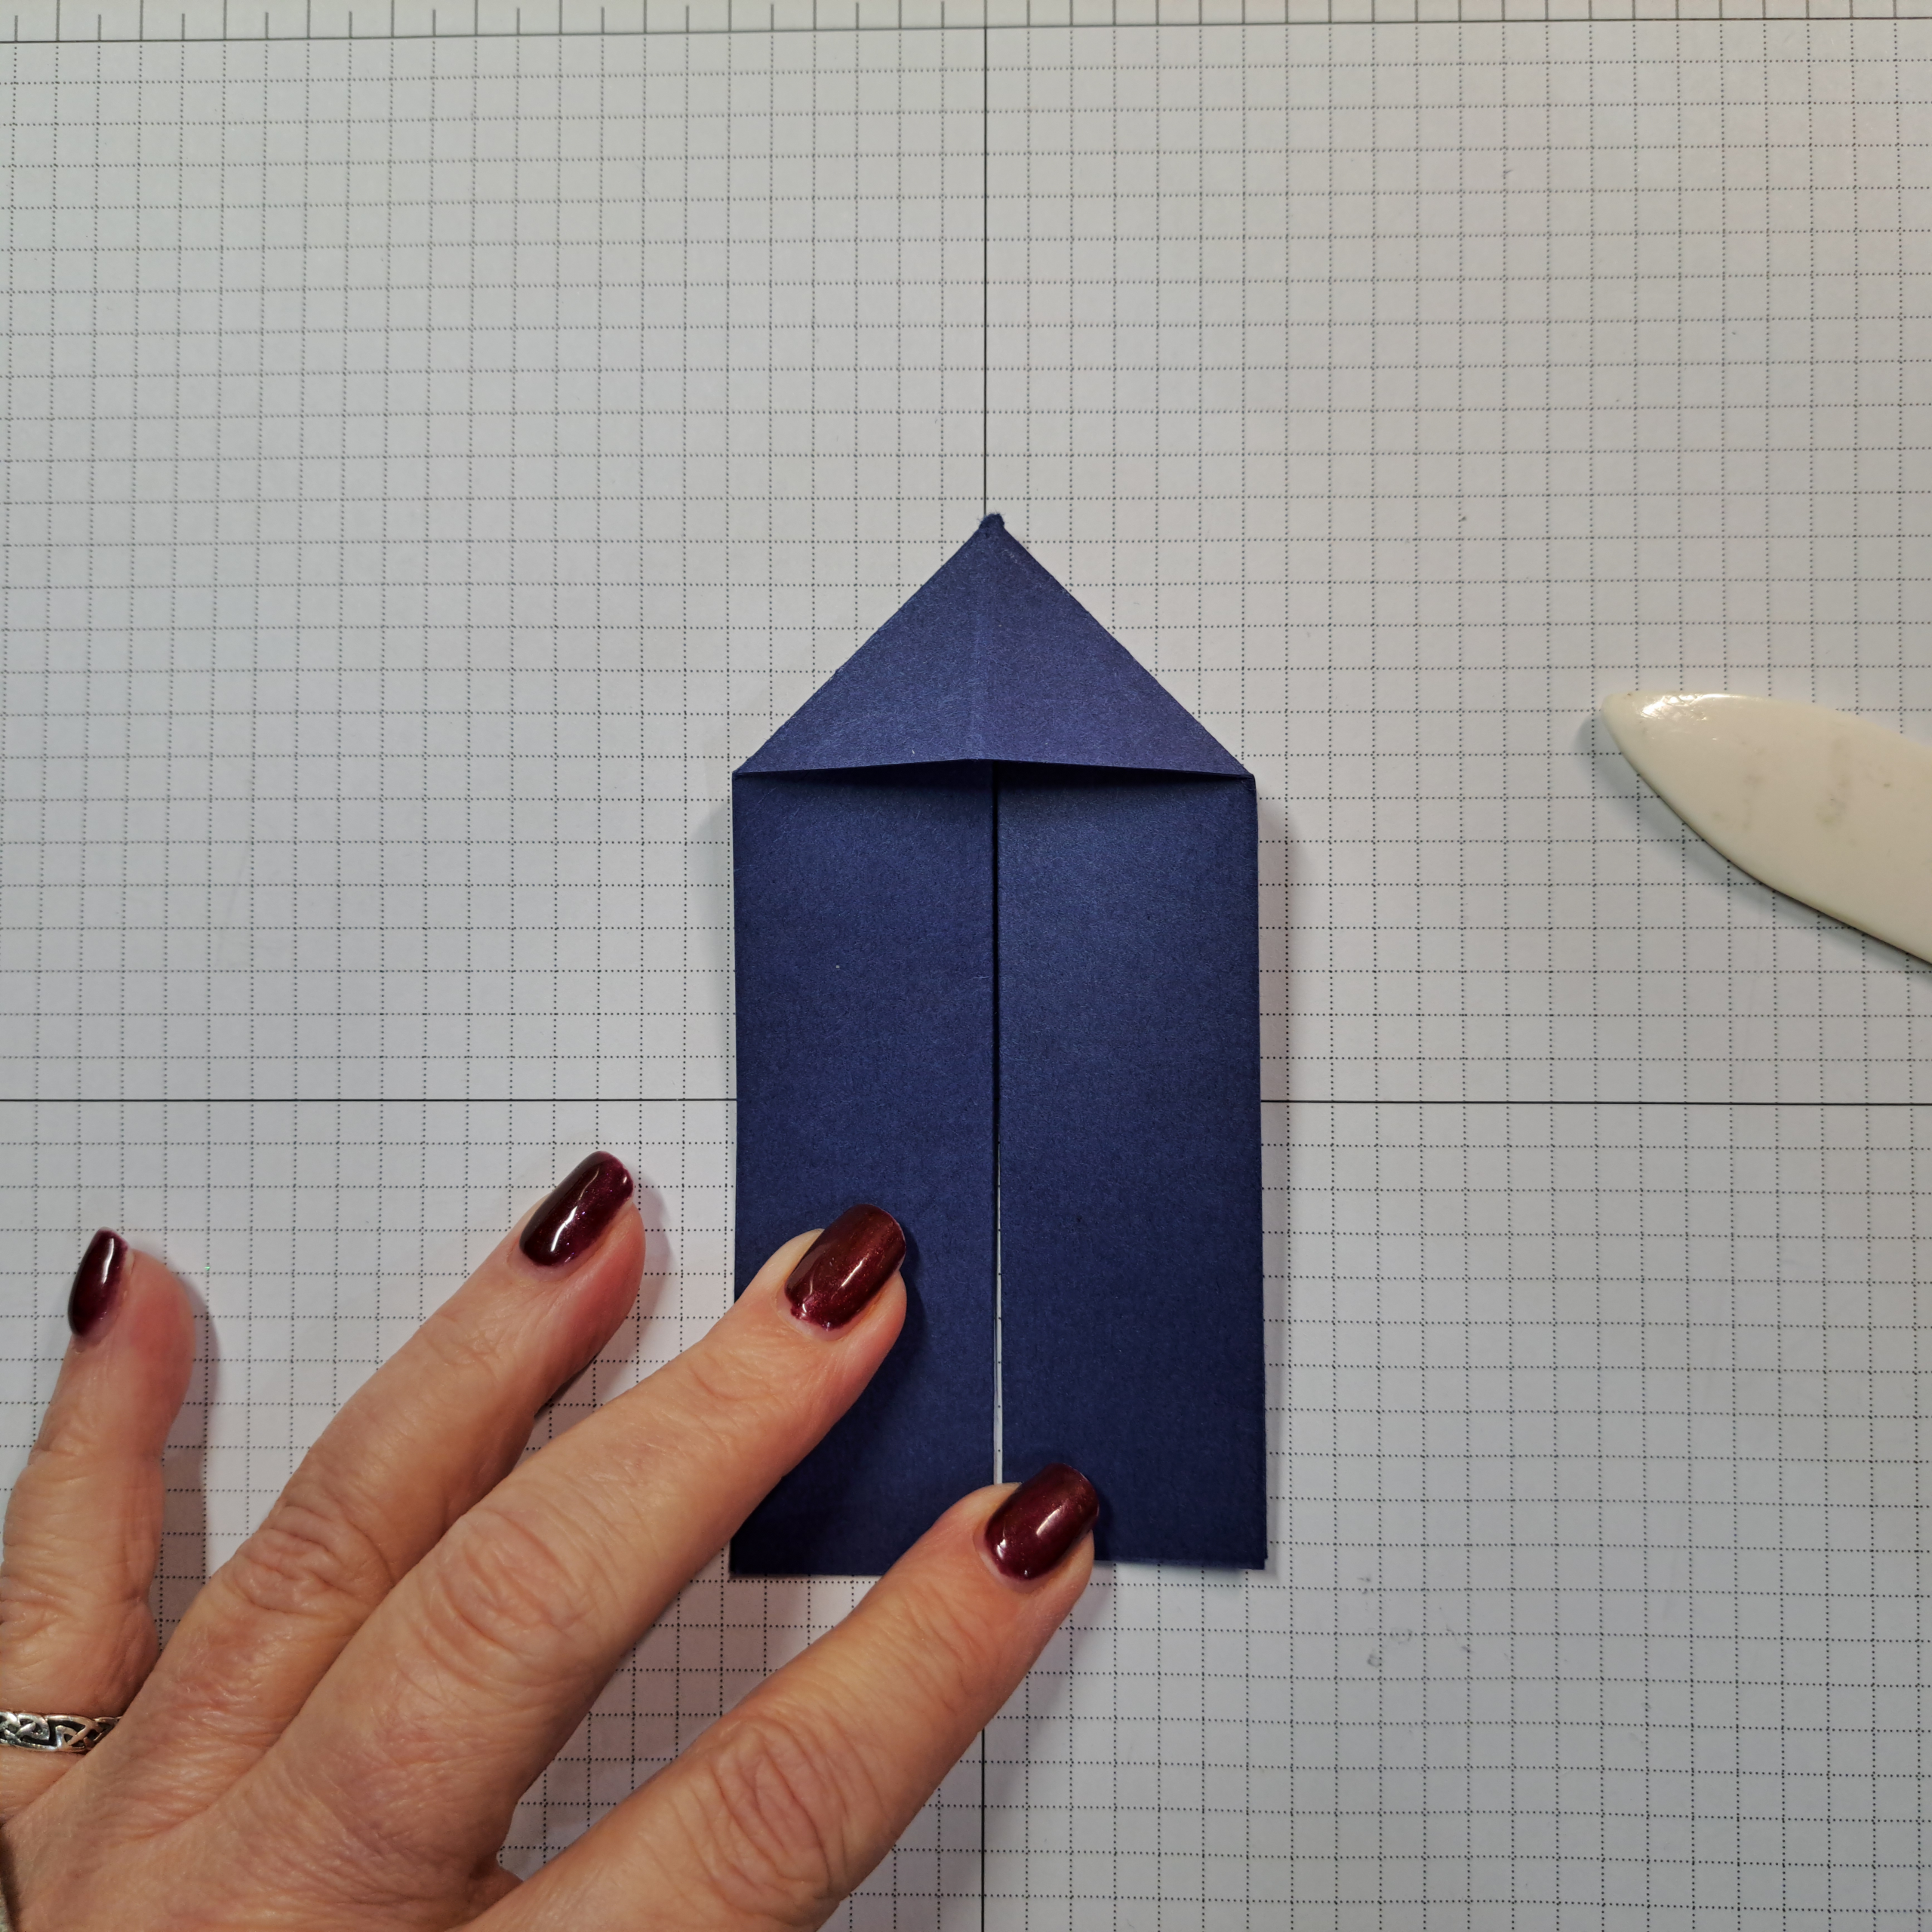
Now for the magic, pinch the ends of the strip closed along the center score line, one end in each hand. Move your hands together allowing the strip to fold inward on itself. The resulting shape should look somewhat like a house with a pointed roof. Lay the folded strip down on your work surface. Continue holding the ends together while you smooth out the triangle section with a bone folder. The fold lines are there but (again) we may need to manipulate them slightly so the folds remain even.

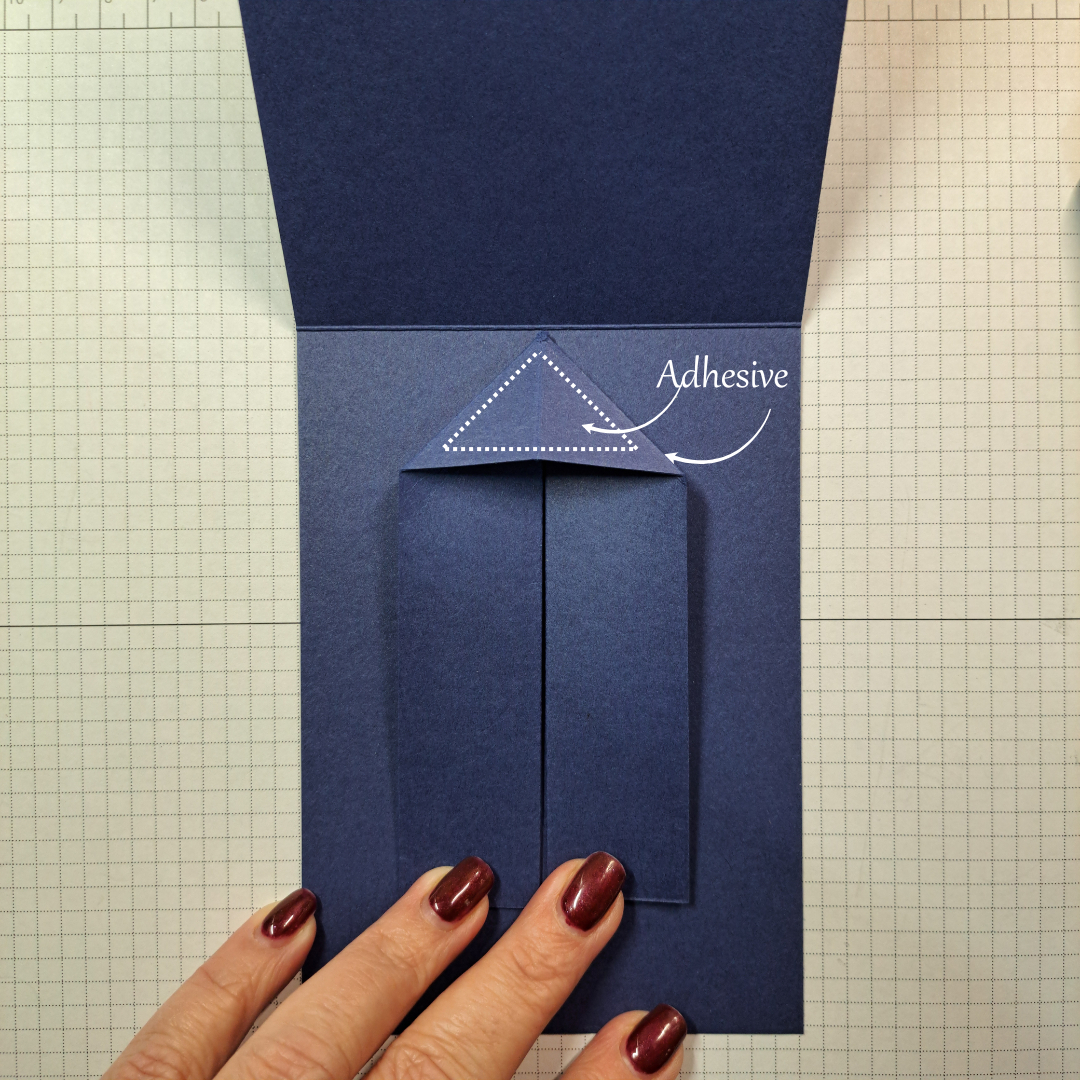
To install the mechanism open the card and place the point in the center of the card at the score line. Be sure to put the point up against the fold line but do not go over. Place adhesive on the triangle section only and adhere to the back of the card. Add adhesive to the front triangle and close the card firmly. I recommend using Tear & Tape for this. However I have had success with glue, the only down side is that you must let the card remain closed until the glue is completely dry on both sides before opening the card.
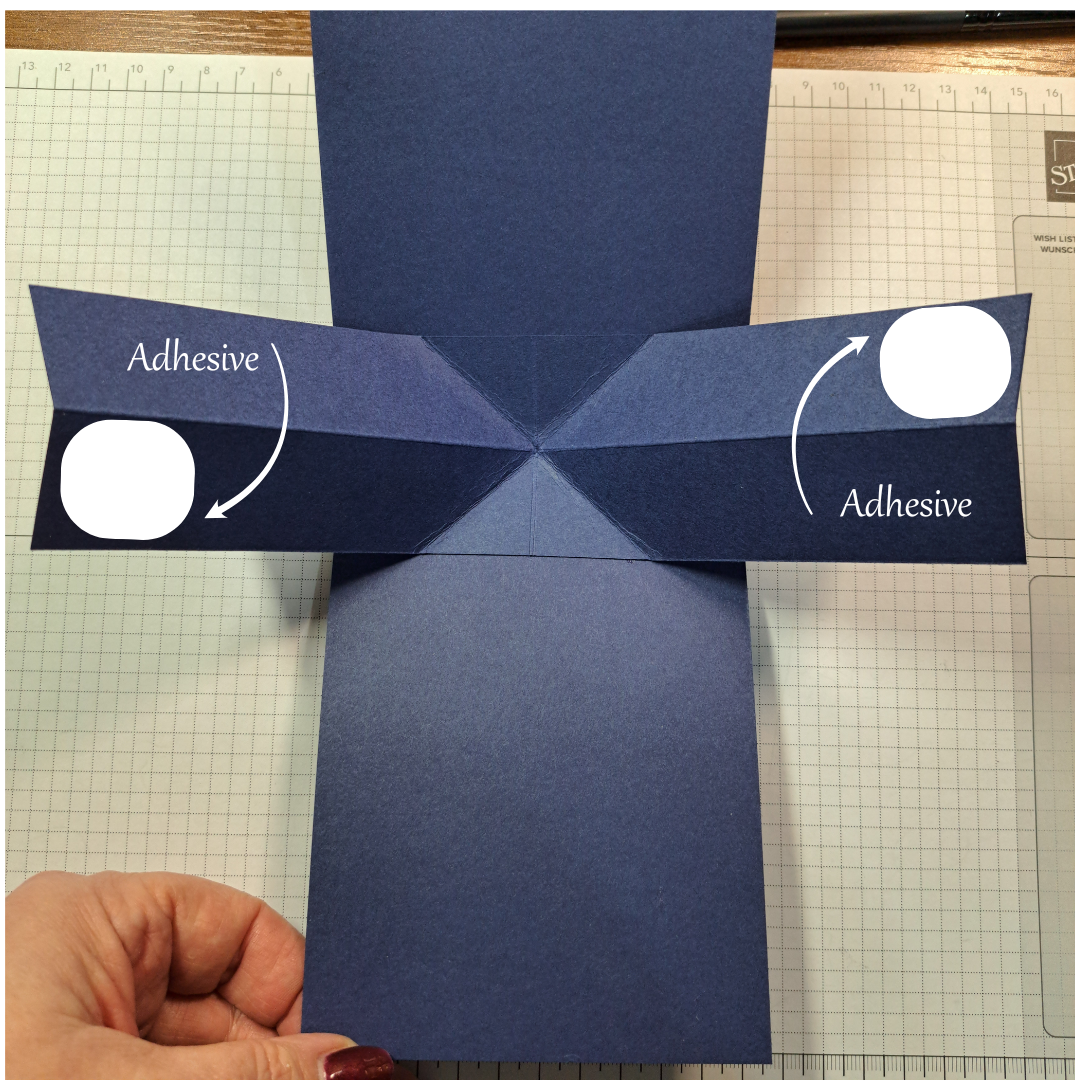
Open the card, the mechanism will spread out from the card, a bit like wings. Place adhesive on the far right wing above the score line. Next place adhesive on the far left wing below the score line. See photo.
Attach the first strip you created to these wings, align the ends. This should be easy as the strips are the same size. Be sure the center part of the W is facing up. If you look closely at the photo at the top of the page (you can enlarge it by clicking on it) you will see how the left and right sides are attached. The top left is left loose as is the bottom right with the left and right edges aligned on each strip.
Now carefully close the card allowing the ‘W’ strip to accordion fold close between the ‘legs’ of the house shaped mechanism. The first time you close the card you may have to help it fold a little bit. I had to do this with my paper example but the card stock folded up beautifully, probably because of the weight. (Another reason to decorate first). Press the closed card firmly to your work surface. Then open and close it several times to be sure the mechanism has seated.
Decorating
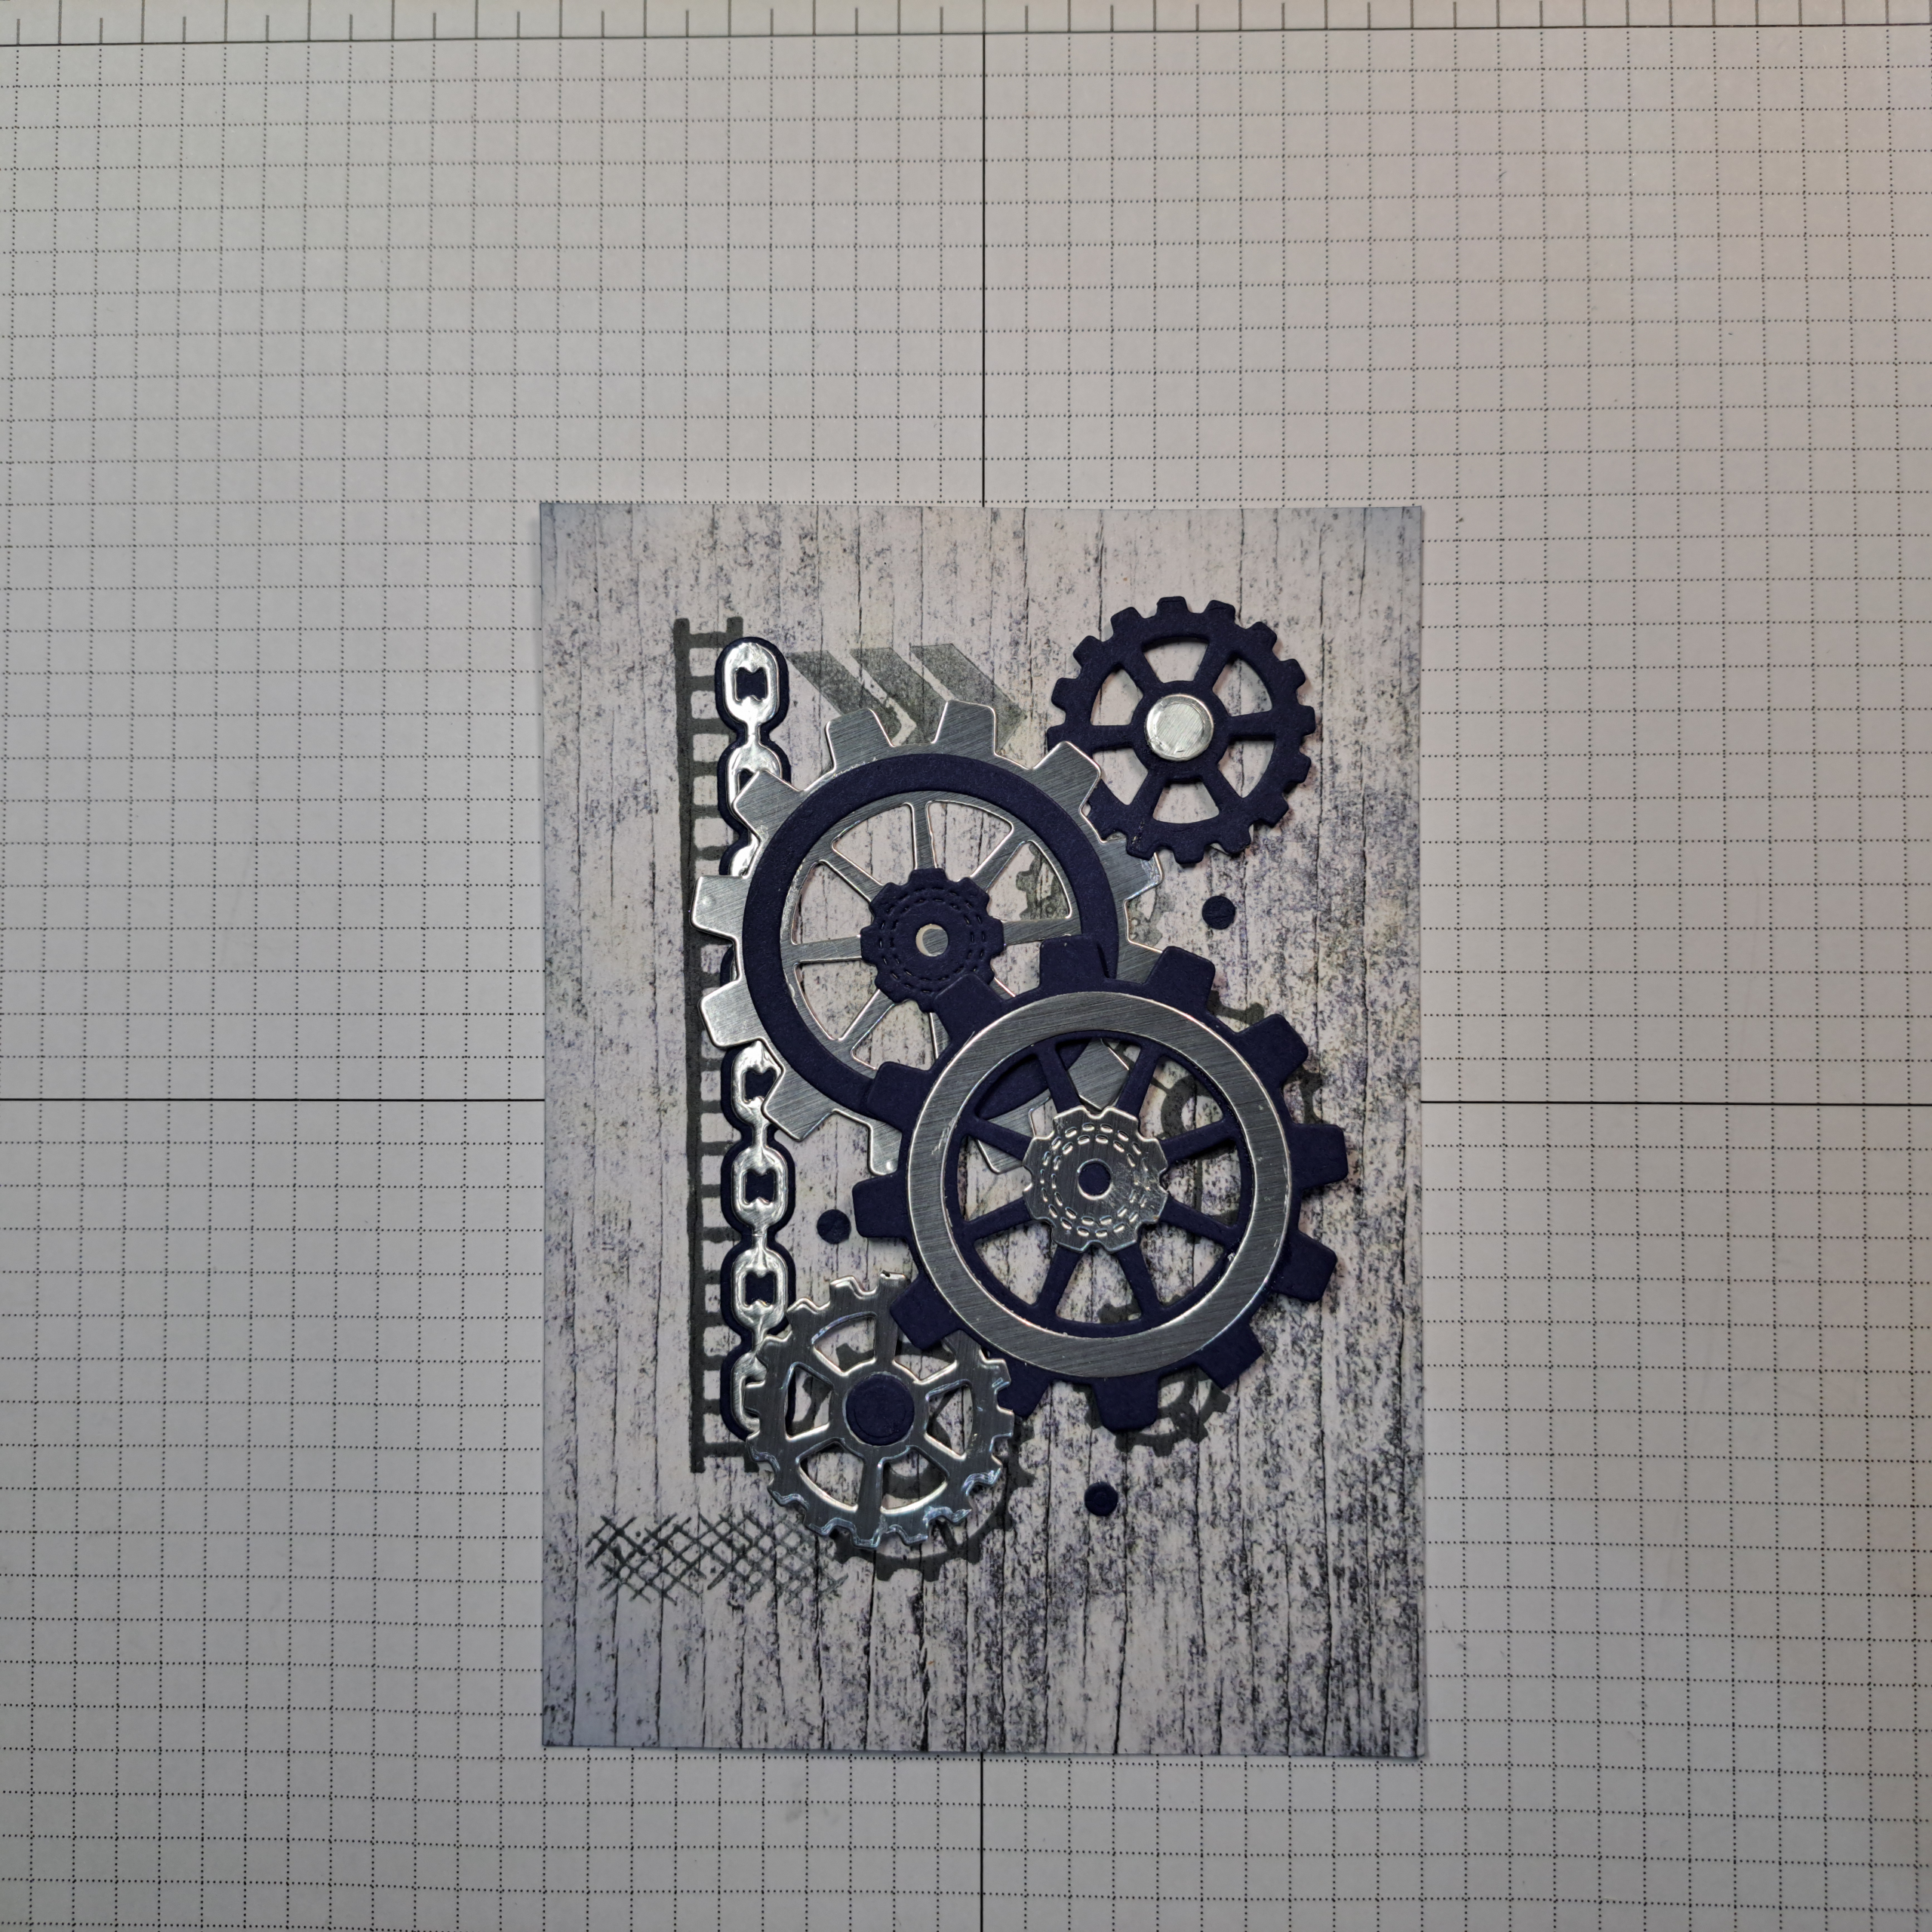
The card front was decorated with a background layer cut from the Country Woods Designer Series Paper, 10cm x 14.35cm (4″ x 5-1/4″). I stamped several of the images from the Gears & Textures stamp set using the Basic Gray Stampin’ Pad and the Night of Navy Stampin’ Pad. I wanted to ‘busy-up’ the back ground a little bit. The grey ink was probably not necessary, I could have achieved the same look by the stamping off technique to lighten the ink.
Several of the gear and strip shapes were cut from regular card stock scraps and foil card stock scraps. They are arranged on the card in layers using a combination of dimensionals and liquid glue.
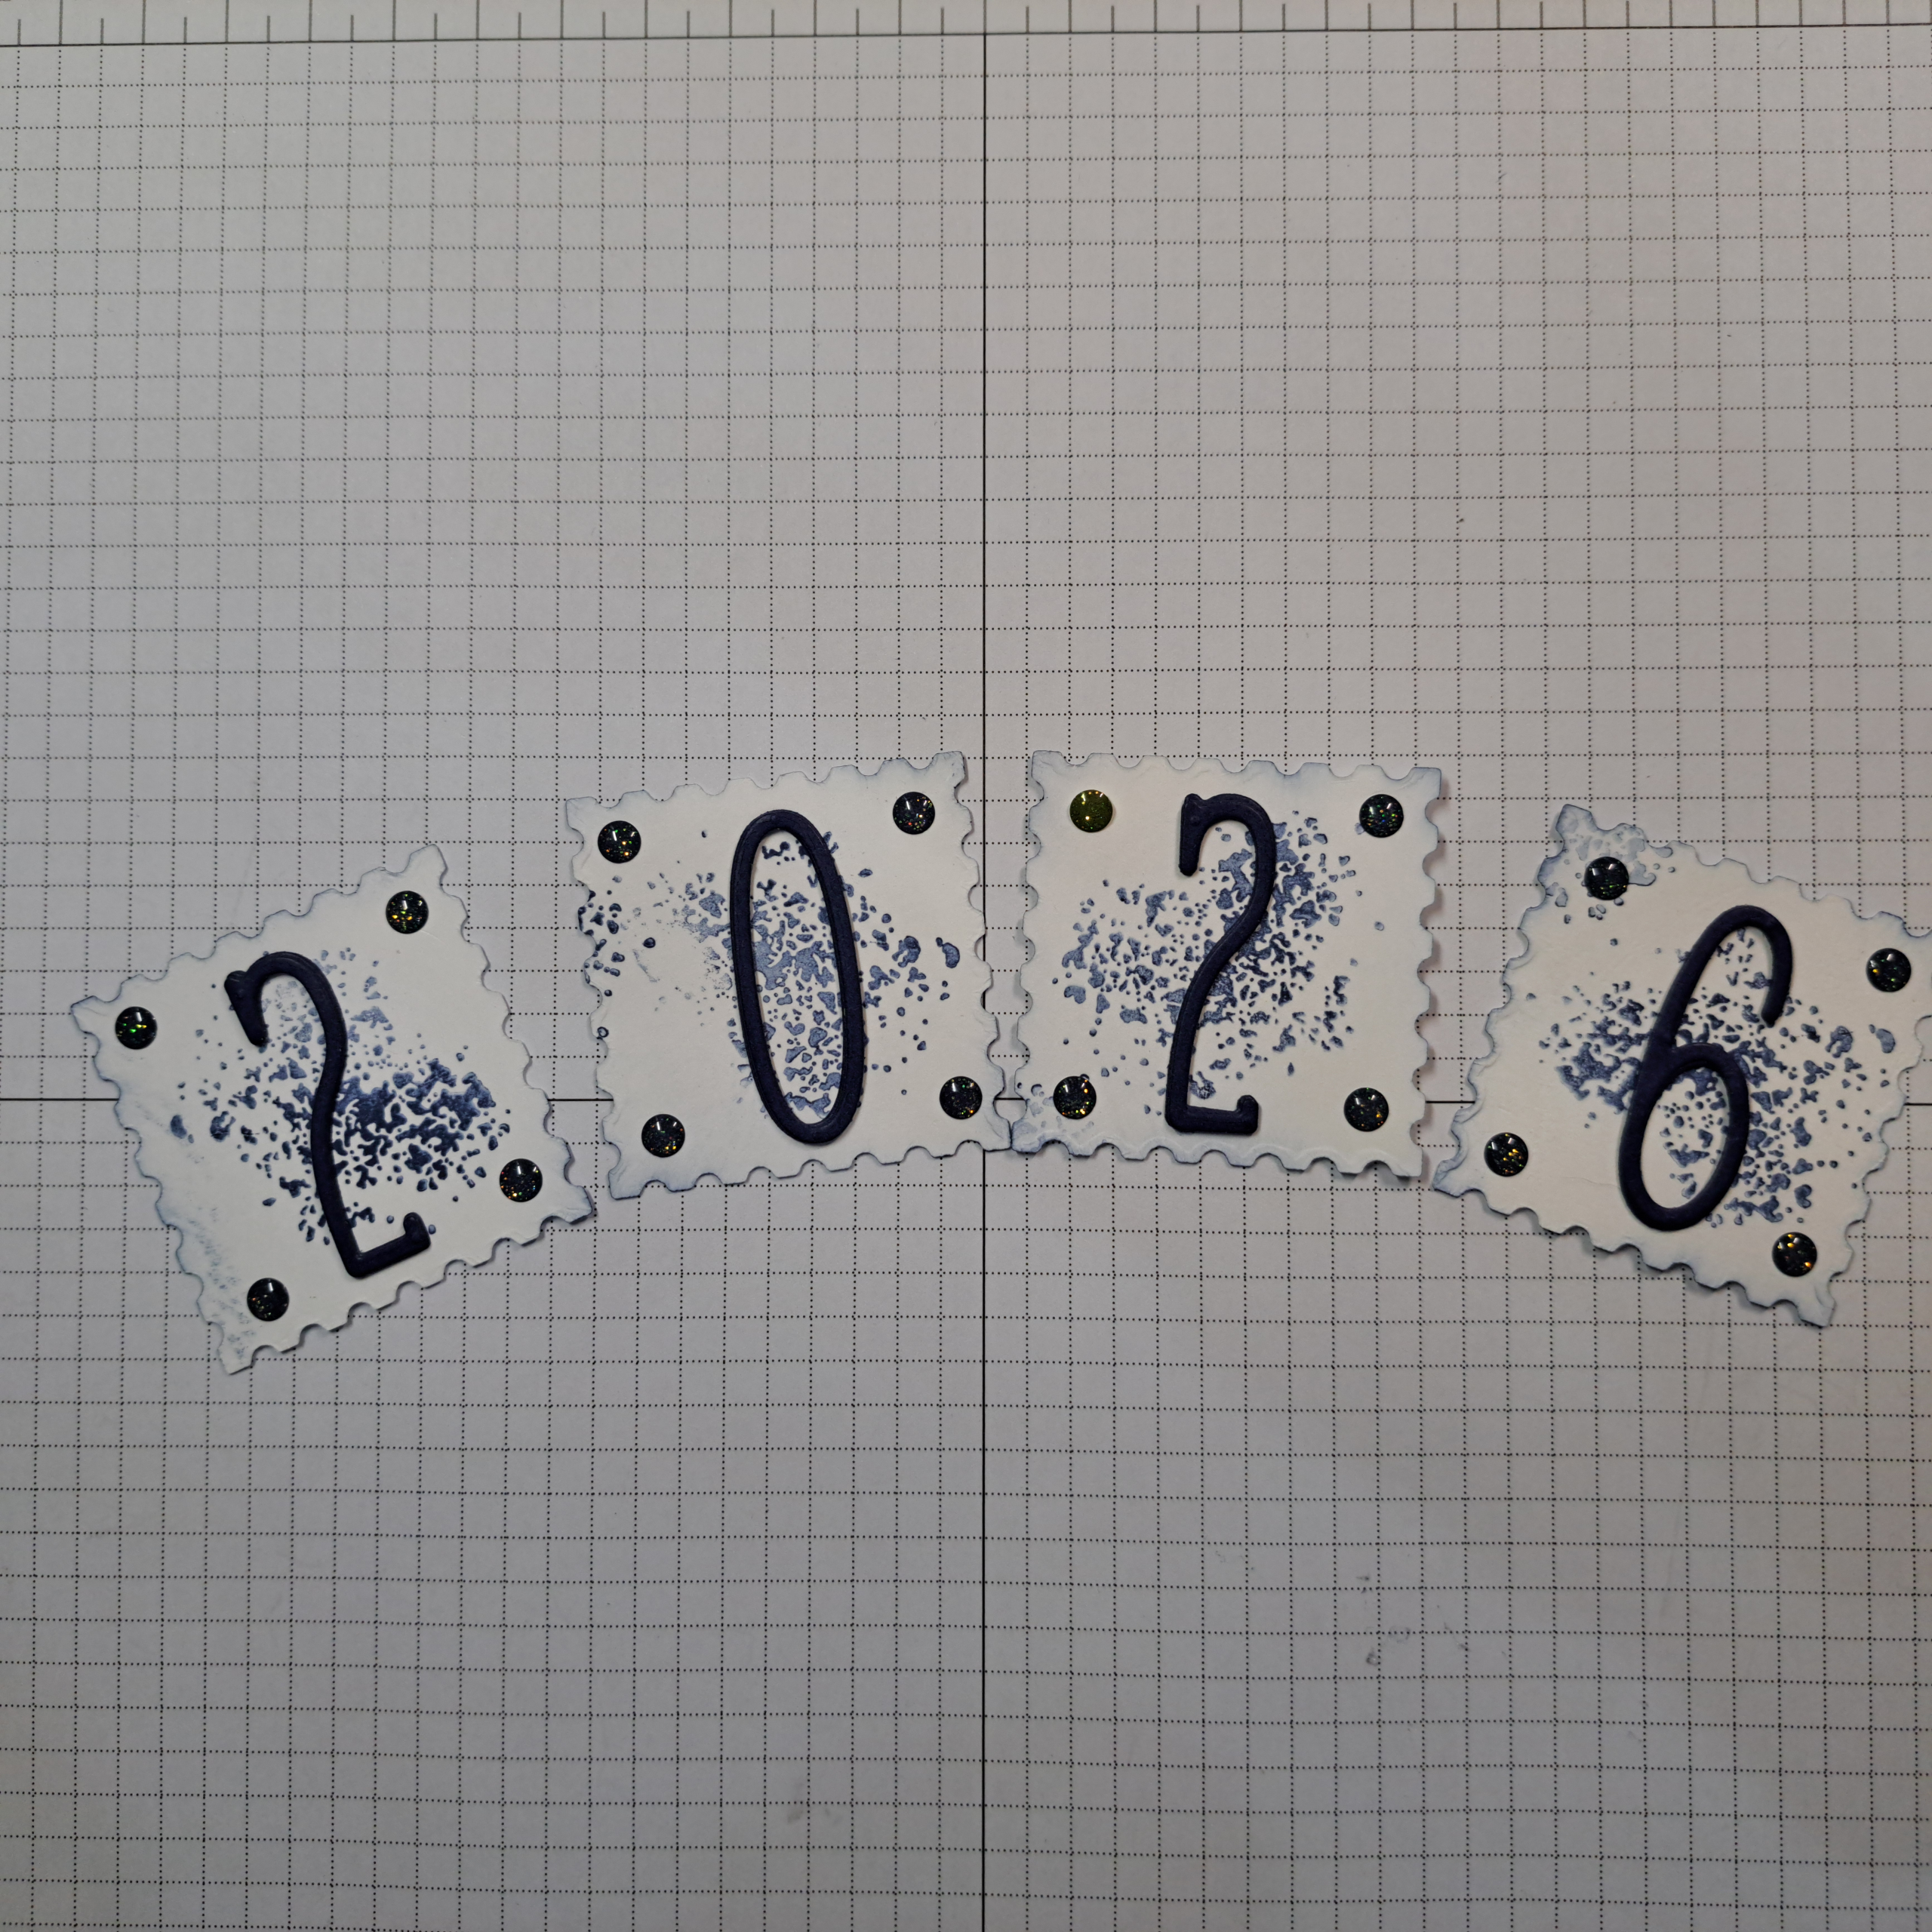
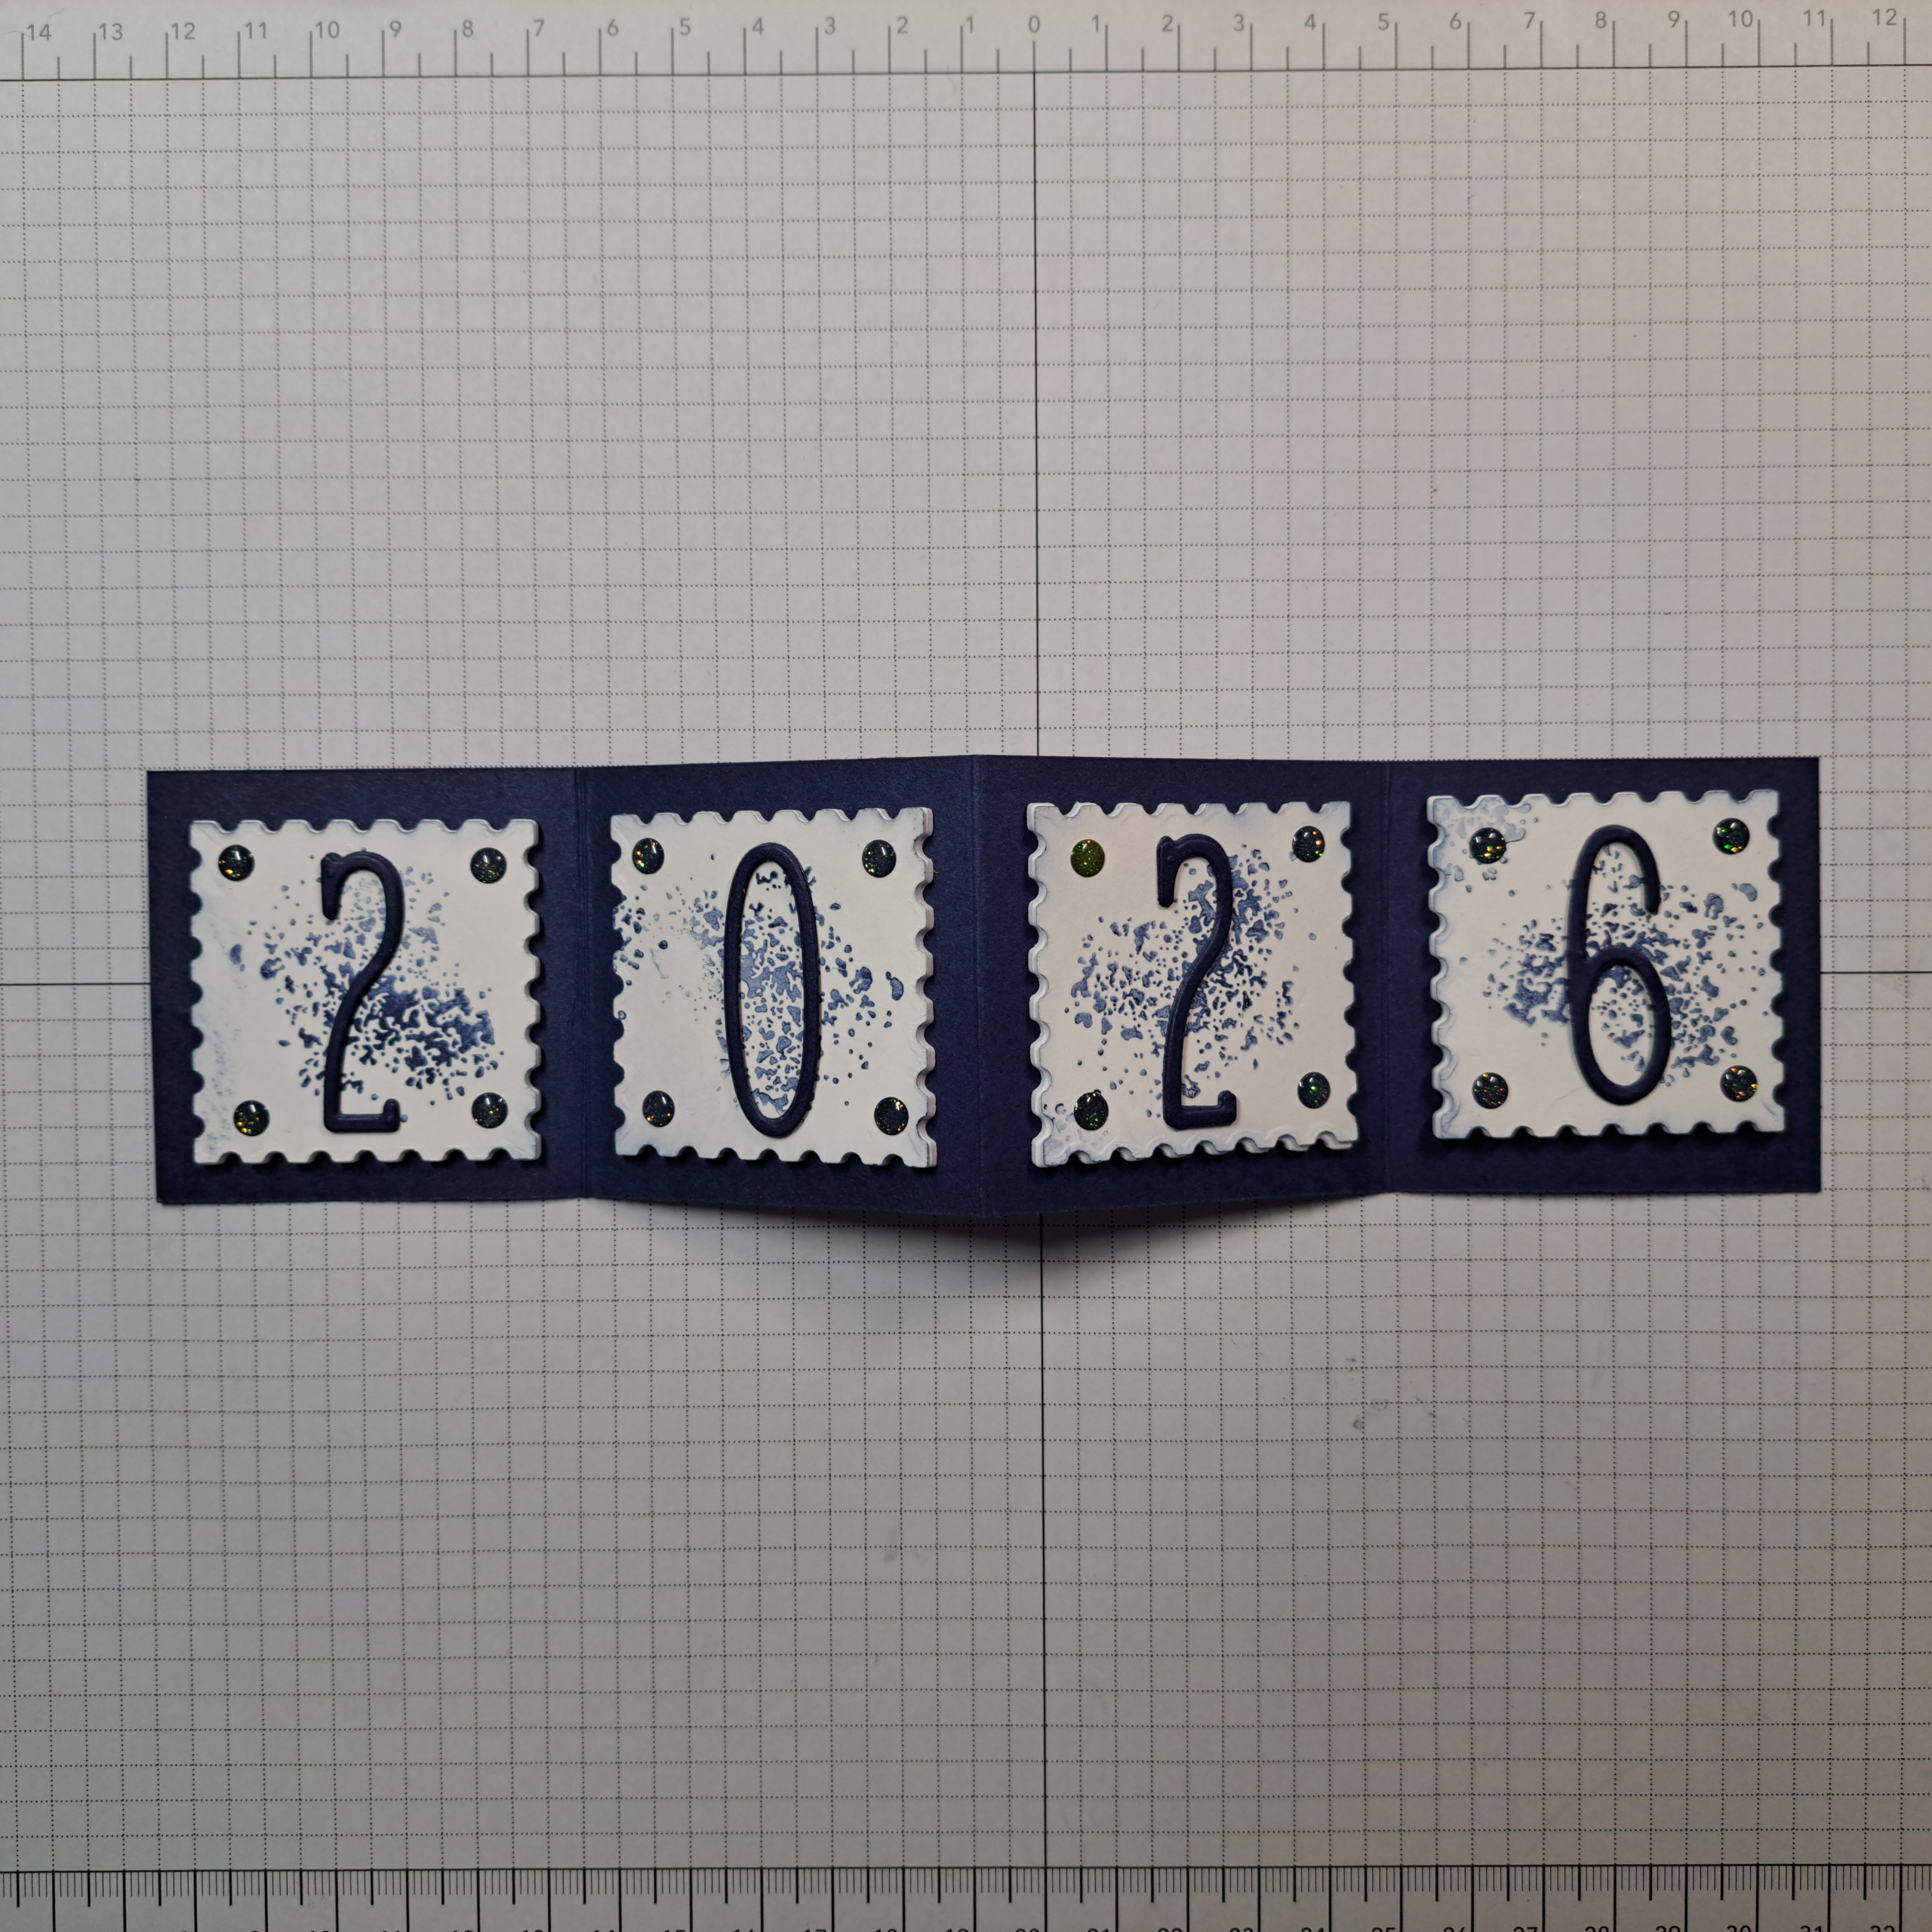
To decorate the pop-out strip, I die cut four of the smallest squares from the Perennial Postage die set, they measure approximately 5cm x 5cm (2″ x 2″). Each piece was stamped with one of texture images from the Gears & Textures Stamp Set using the Night of Navy Stampin’ Pad. The edges were shaded using the same ink and a blending brush.
The numbers are die cut from Night of Navy card stock using the numbers from the Alphabet-A-La-Mode die set. Before cutting I affixed some of the adhesive sheet to the back of the card stock. I highly recommend doing this as the numbers and letters from this set are so thin that they are difficult to glue down without making a mess. I also cut three of each of the numbers and stacked them up to create some dimension. This was just enough to give the numbers a little bit of pop without adding bulk.
I used Low Profile Sparkle Dots in each corner to look a bit like brads holding down the corners of the squares.
The inside card was finished with two rectangles 10cm x 10.5cm (4″ x X”) cut from the Country Woods Designer Series Paper. One placed to top and one placed at the bottom.
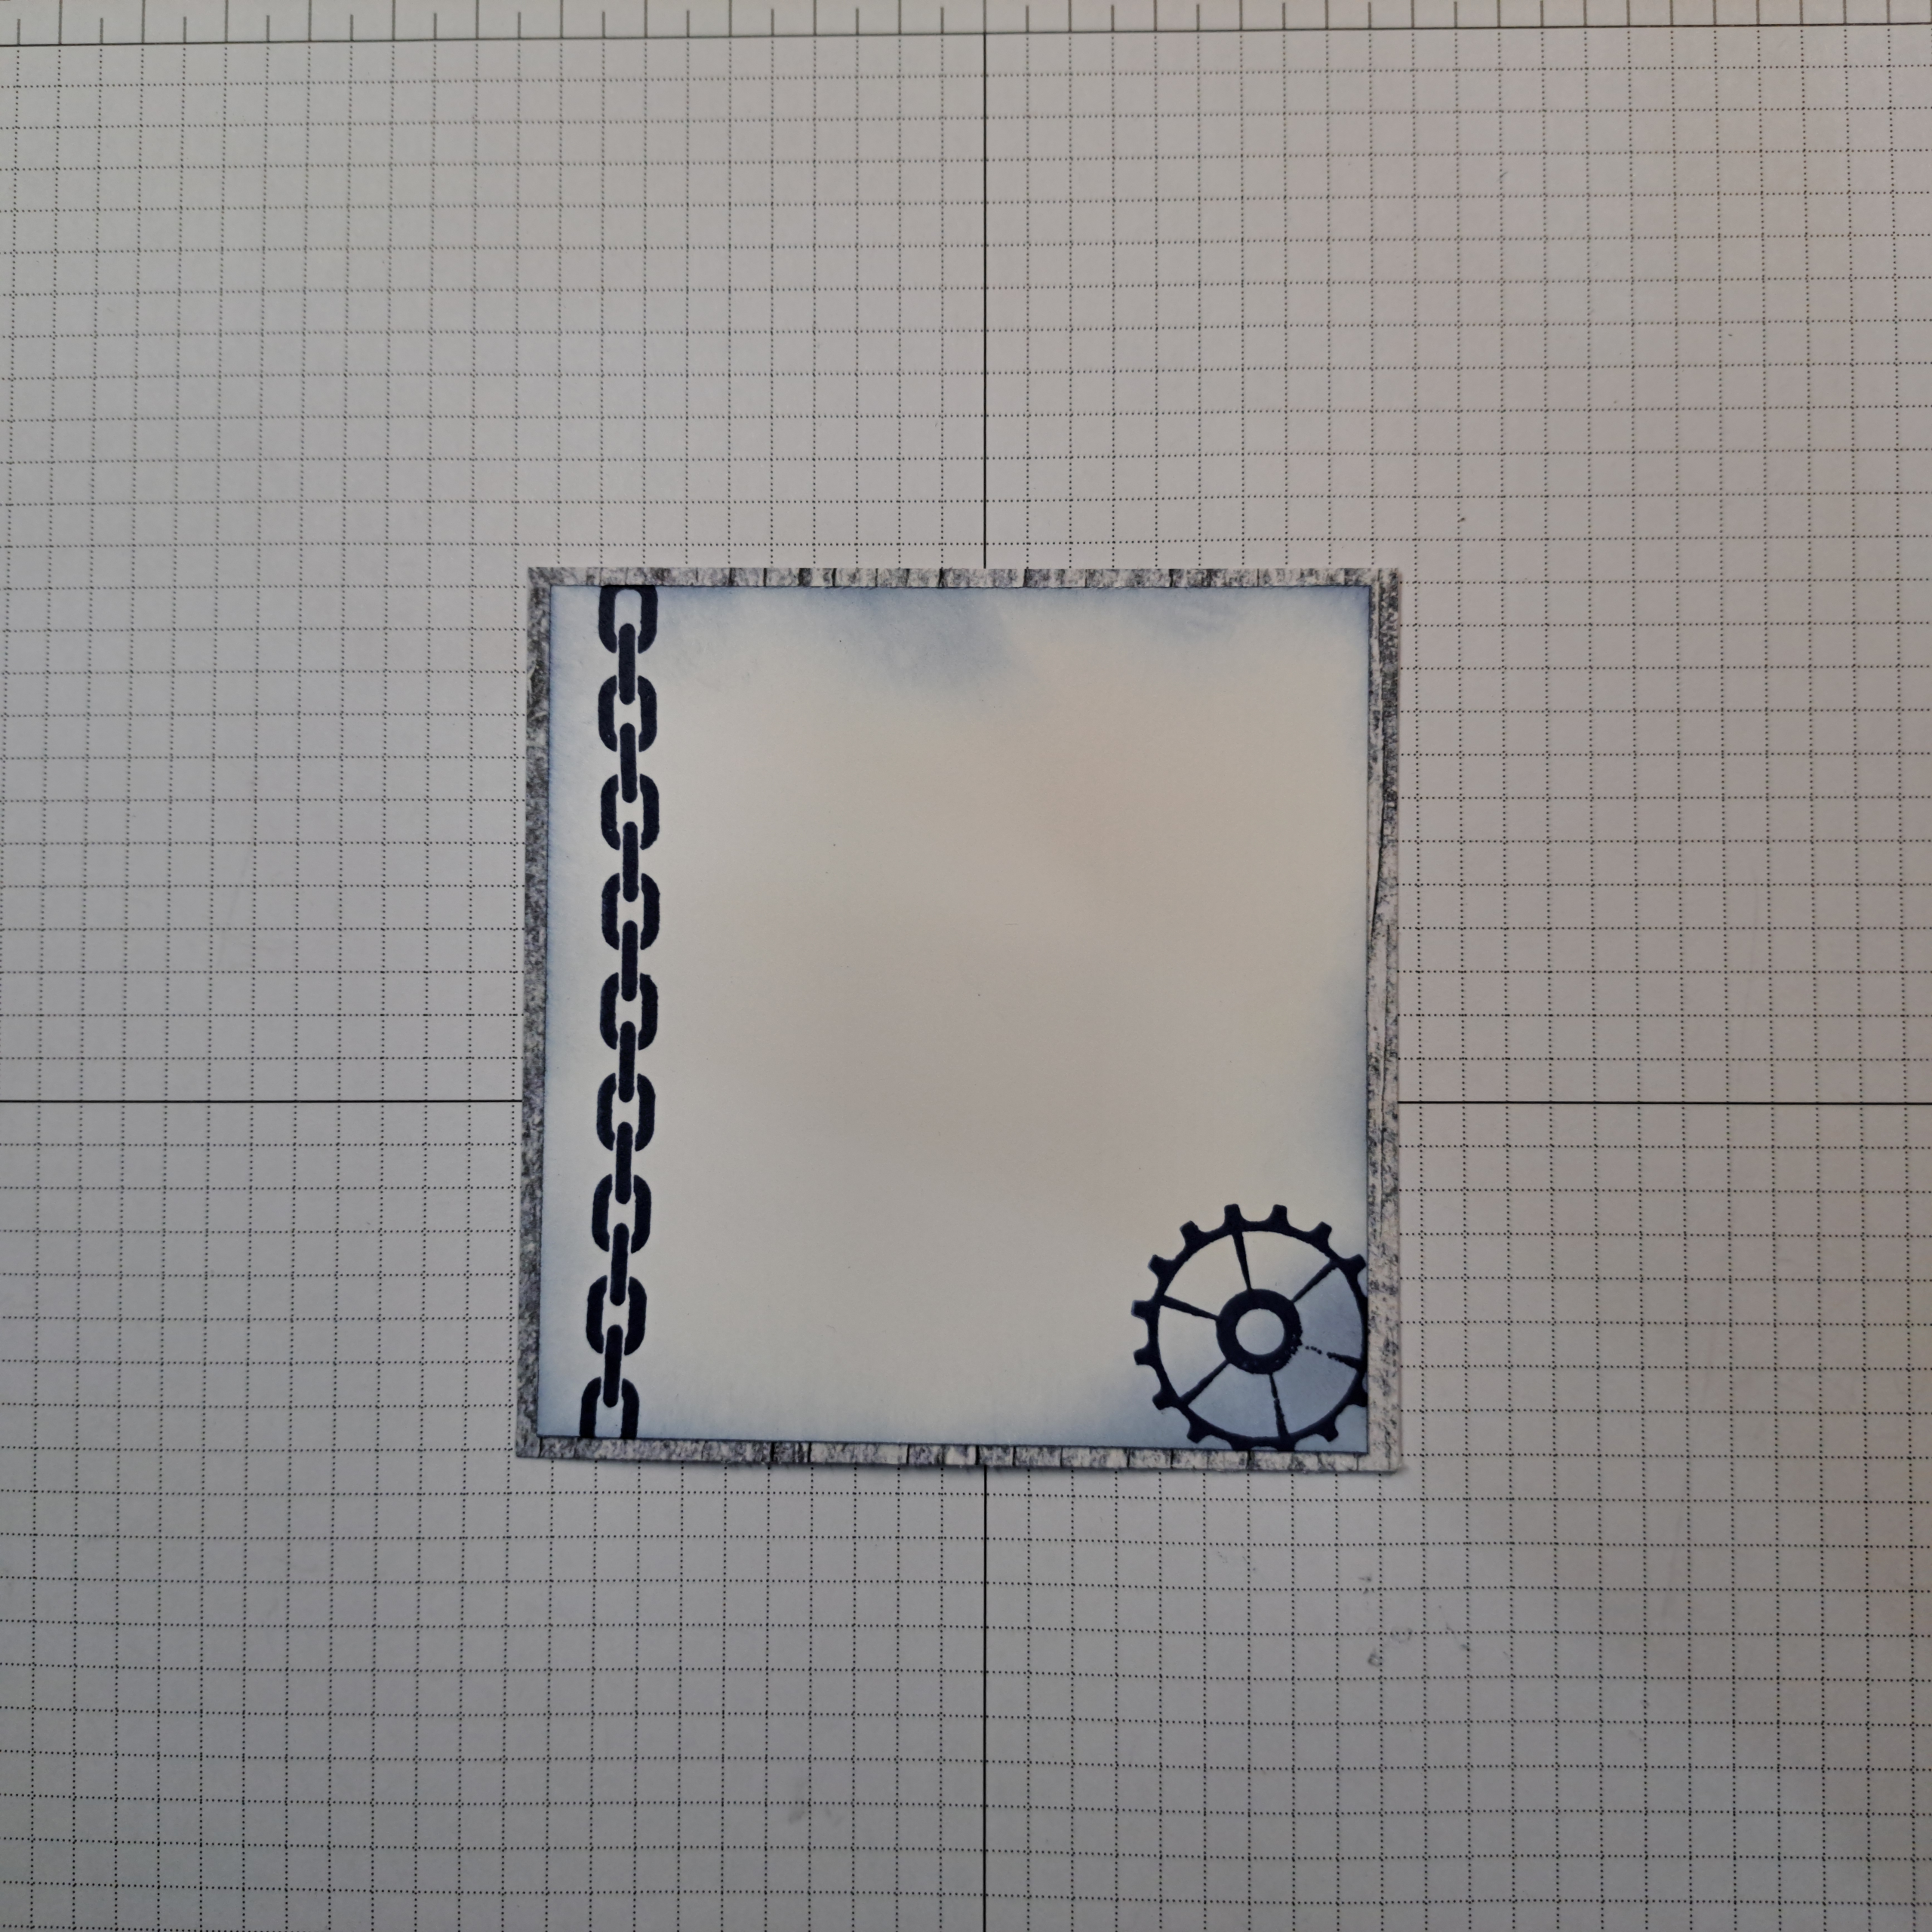
For the top, an additional white rectangle was stamped with images from the Gears & Textures stamp set and then had a small amount of Night of Navy ink blended around the edges. This piece was then glued over the top DSP rectangle (leaving a border of the DSP showing) This piece will provide a place to write a message to the card receiver.
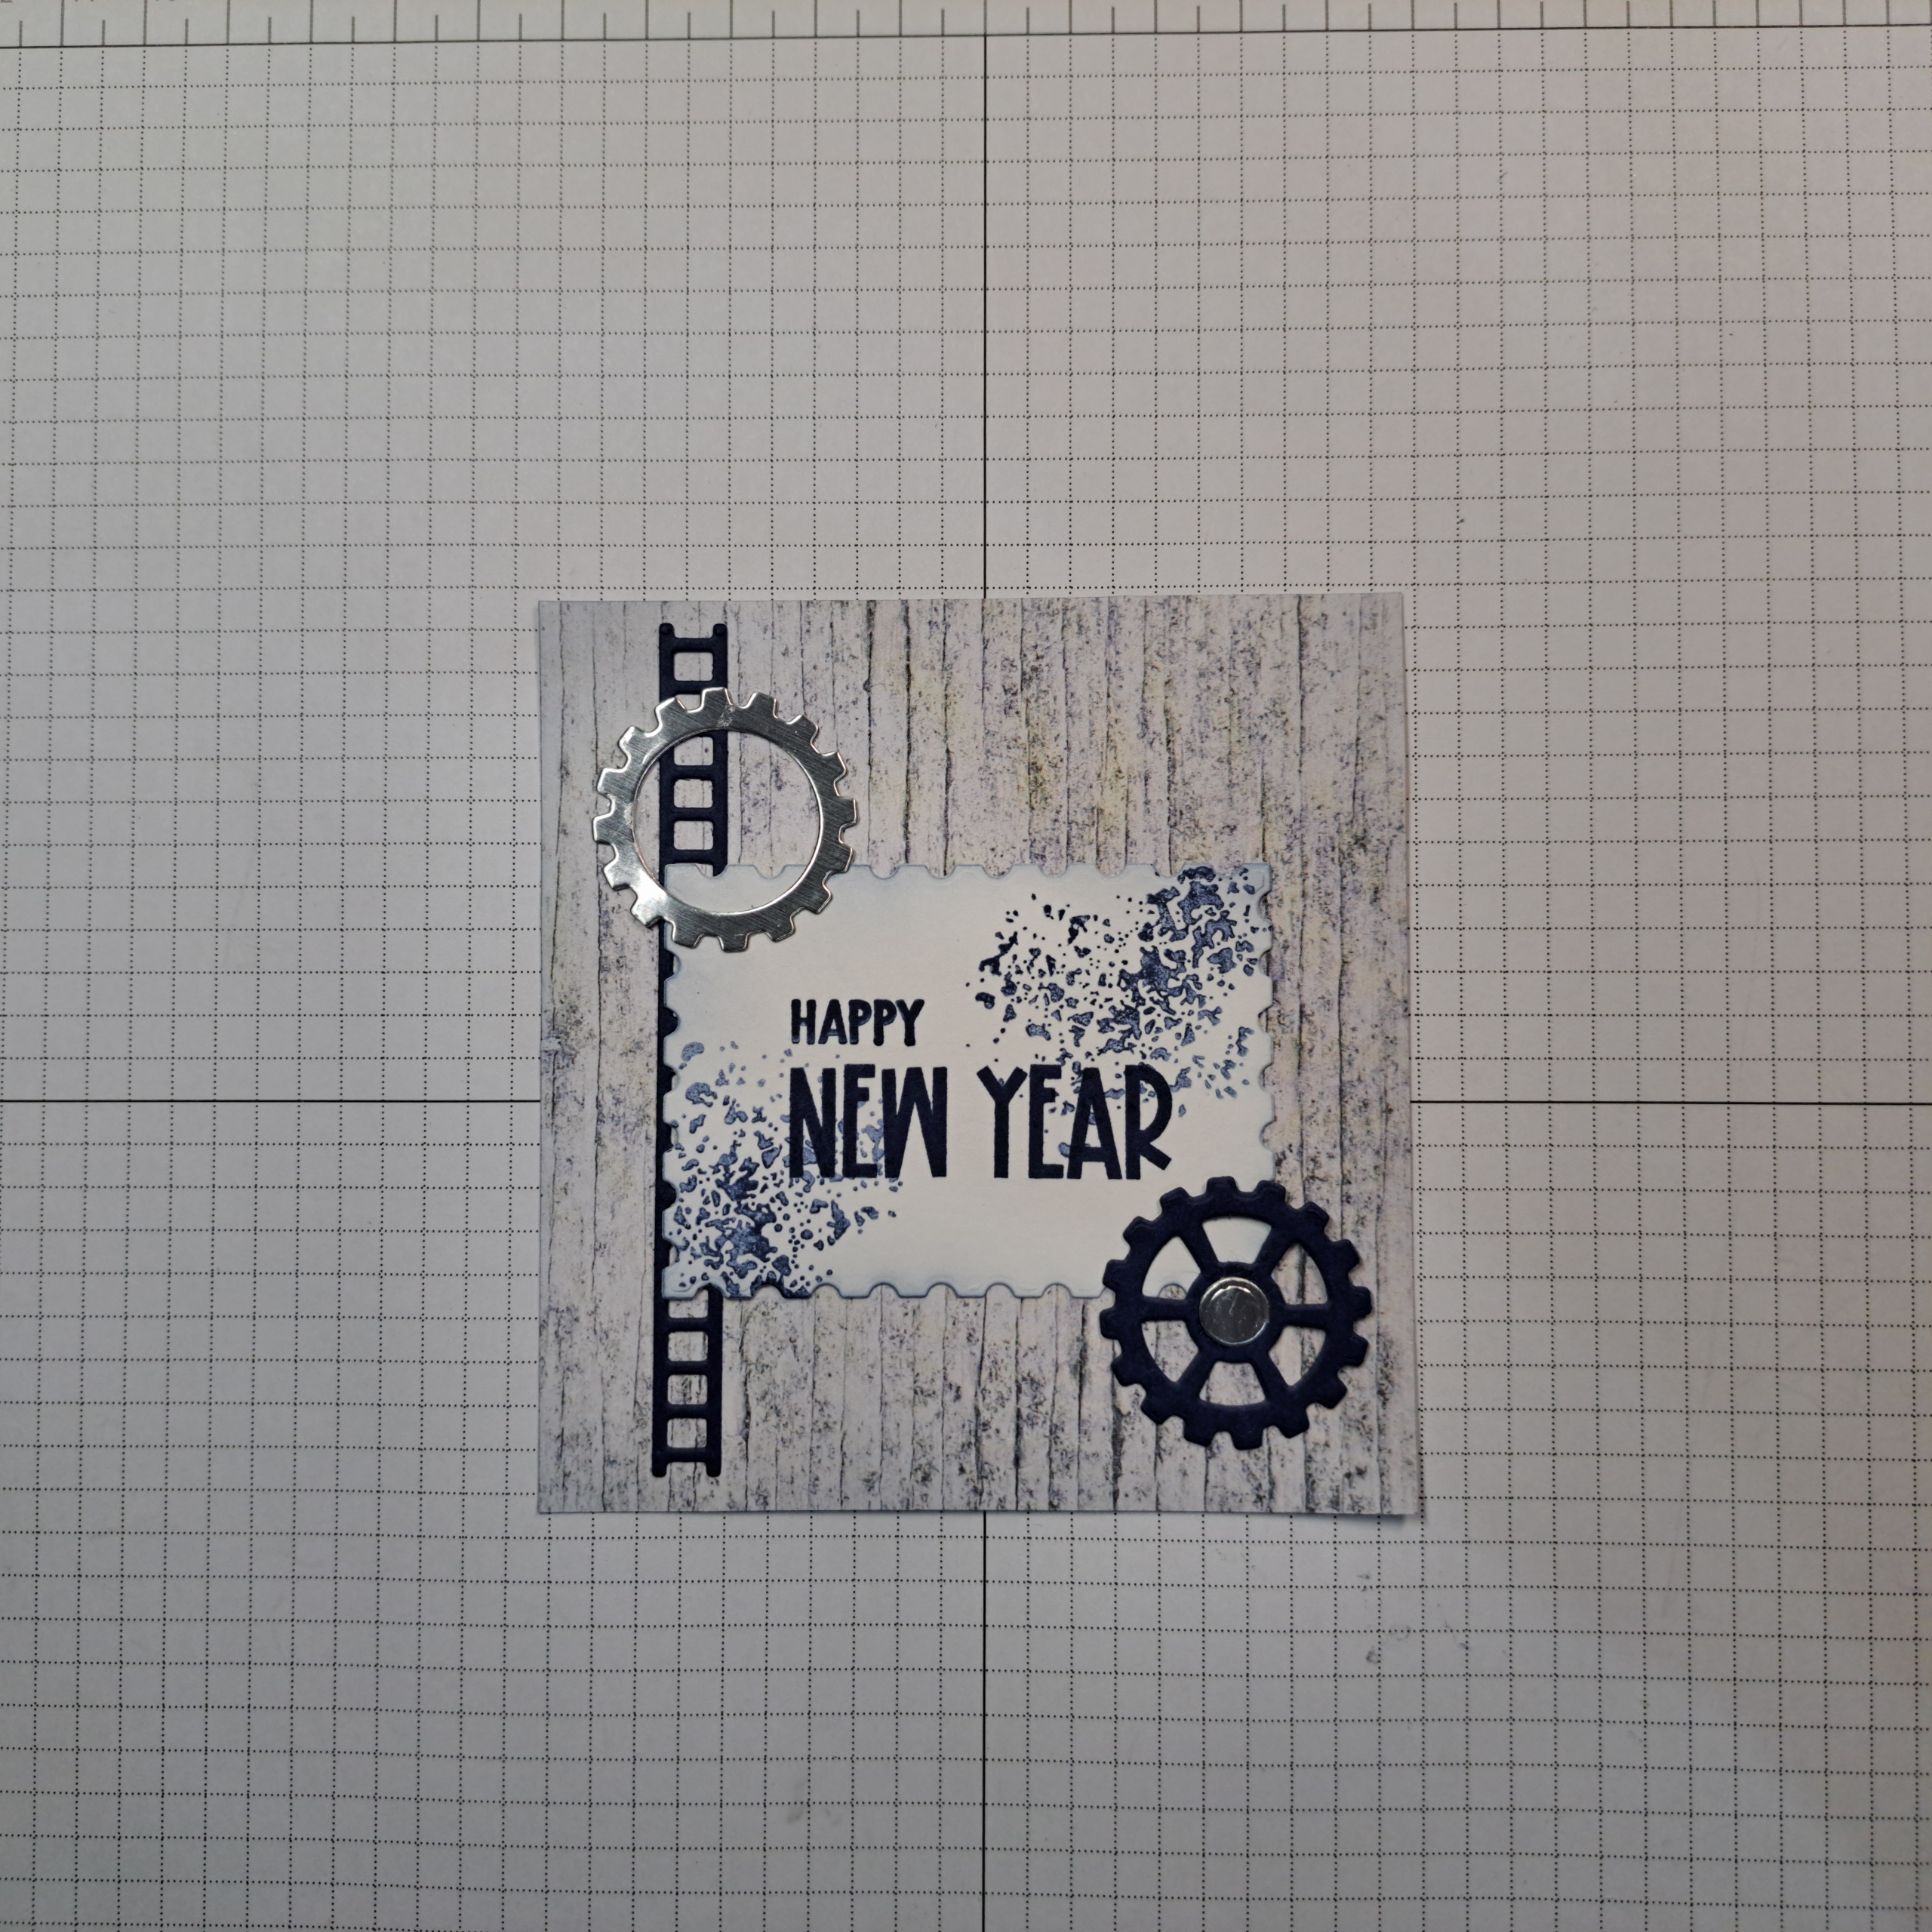
The bottom rectangle contains a greeting stamped onto white card stock using Night of Navy ink and cut out using the 5cm x 7cm (2″ x 2-1/2″) rectangle from the Perennial Postage die set. A texture was also stamped on to the greeting piece using the stamp-off method to lighten the ink color Die cuts were placed around the greeting piece and glued down flat to try to reduce bulk in the card.
Thank your for reading this post. I hope you will give this card a go. As mentioned above I saw this design several years ago, in a video from a Maymay Made It. I am linking this video because if you like this design she goes into detail on how to adapt it to any card shape or size. Not to mention I just love this creator, her designs are fun and easy and in my humble opinion always worth a watch! https://www.youtube.com/watch?v=4NZ2gz3eOEw
My other thoughts about this cool design are to maybe make a baby shower card, using little die cuts of baby things or even the word baby would look good here. I also can envision a kids birthday Zoo card. What fun a little person would have with this card!
Product List![Gears & Textures Photopolymer Stamp Set [ 166851 ]](https://assets1.tamsnetwork.com/images/EC042017NF/166851s.jpg "Gears & Textures Photopolymer Stamp Set [ 166851 ]")
![Gears & Textures Dies [ 166853 ]](https://assets1.tamsnetwork.com/images/EC042017NF/166853s.jpg "Gears & Textures Dies [ 166853 ]")
![Perennial Postage Dies [ 162607 ]](https://assets1.tamsnetwork.com/images/EC042017NF/162607s.jpg "Perennial Postage Dies [ 162607 ]")
![Reason To Celebrate Photopolymer Stamp Set (English) [ 166905 ]](https://assets1.tamsnetwork.com/images/EC042017NF/166905s.jpg "Reason To Celebrate Photopolymer Stamp Set (English) [ 166905 ]")
![Alphabet à La Mode Dies [ 160750 ]](https://assets1.tamsnetwork.com/images/EC042017NF/160750s.jpg "Alphabet à La Mode Dies [ 160750 ]")
![Country Woods 12" X 12" (30.5 X 30.5 Cm) Designer Series Paper [ 163393 ]](https://assets1.tamsnetwork.com/images/EC042017NF/163393s.jpg "Country Woods 12\" X 12\" (30.5 X 30.5 Cm) Designer Series Paper [ 163393 ]")
![Silver 12" X 12" (30.5 X 30.5 Cm) Foil Sheets [ 163387 ]](https://assets1.tamsnetwork.com/images/EC042017NF/163387s.jpg "Silver 12\" X 12\" (30.5 X 30.5 Cm) Foil Sheets [ 163387 ]")
![Night Of Navy A4 Card Stock [ 106577 ]](https://assets1.tamsnetwork.com/images/EC042017NF/106577s.jpg "Night Of Navy A4 Card Stock [ 106577 ]")
![Basic White A4 Cardstock [ 166781 ]](https://assets1.tamsnetwork.com/images/EC042017NF/166781s.jpg "Basic White A4 Cardstock [ 166781 ]")
![Night Of Navy Classic Stampin' Pad [ 147110 ]](https://assets1.tamsnetwork.com/images/EC042017NF/147110s.jpg "Night Of Navy Classic Stampin' Pad [ 147110 ]")
![Low Profile Sparkle Dots [ 166157 ]](https://assets1.tamsnetwork.com/images/EC042017NF/166157s.jpg "Low Profile Sparkle Dots [ 166157 ]")
![Adhesive Sheets [ 152334 ]](https://assets1.tamsnetwork.com/images/EC042017NF/152334s.jpg "Adhesive Sheets [ 152334 ]")
![Multipurpose Liquid Glue [ 154974 ]](https://assets1.tamsnetwork.com/images/EC042017NF/154974s.jpg "Multipurpose Liquid Glue [ 154974 ]")
![Tear & Tape Adhesive [ 154031 ]](https://assets1.tamsnetwork.com/images/EC042017NF/154031s.jpg "Tear & Tape Adhesive [ 154031 ]")
![Stampin' Dimensionals [ 104430 ]](https://assets1.tamsnetwork.com/images/EC042017NF/104430s.jpg "Stampin' Dimensionals [ 104430 ]")
![Paper Trimmer [ 152392 ]](https://assets1.tamsnetwork.com/images/EC042017NF/152392s.jpg "Paper Trimmer [ 152392 ]")
![Blending Brushes [ 153611 ]](https://assets1.tamsnetwork.com/images/EC042017NF/153611s.jpg "Blending Brushes [ 153611 ]")
![Stampin' Cut & Emboss Machine [ 149653 ]](https://assets1.tamsnetwork.com/images/EC042017NF/149653s.jpg "Stampin' Cut & Emboss Machine [ 149653 ]")