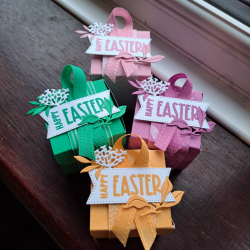
I have gotten my hands on the new Stamp Positioner from Stampin’Up! I thought you might like to see how to use it and what you can do with it. This is a review as well as a ‘how to’. And I can honestly say, after writing this blog and having a 4 day play “OMG! I LOVE THIS THING!”
Ok, review done. No need to read on unless you want deets on how to use this amazing product. Oh and to check out some ideas to try out.
At this point the Stampin’ Positioner is free as part of your kit when you sign up to be on my team as a Demonstrator for Stampin’Up! There are huge advantages to being a Demonstrator. I hope you will click on the Join My Team tab above to get more information. And maybe get your own Stampin’ Positioner.
Supplies
Stampin’ Positioner
Stampin’ Positioner Grid Paper
First up, how do I use this thing?
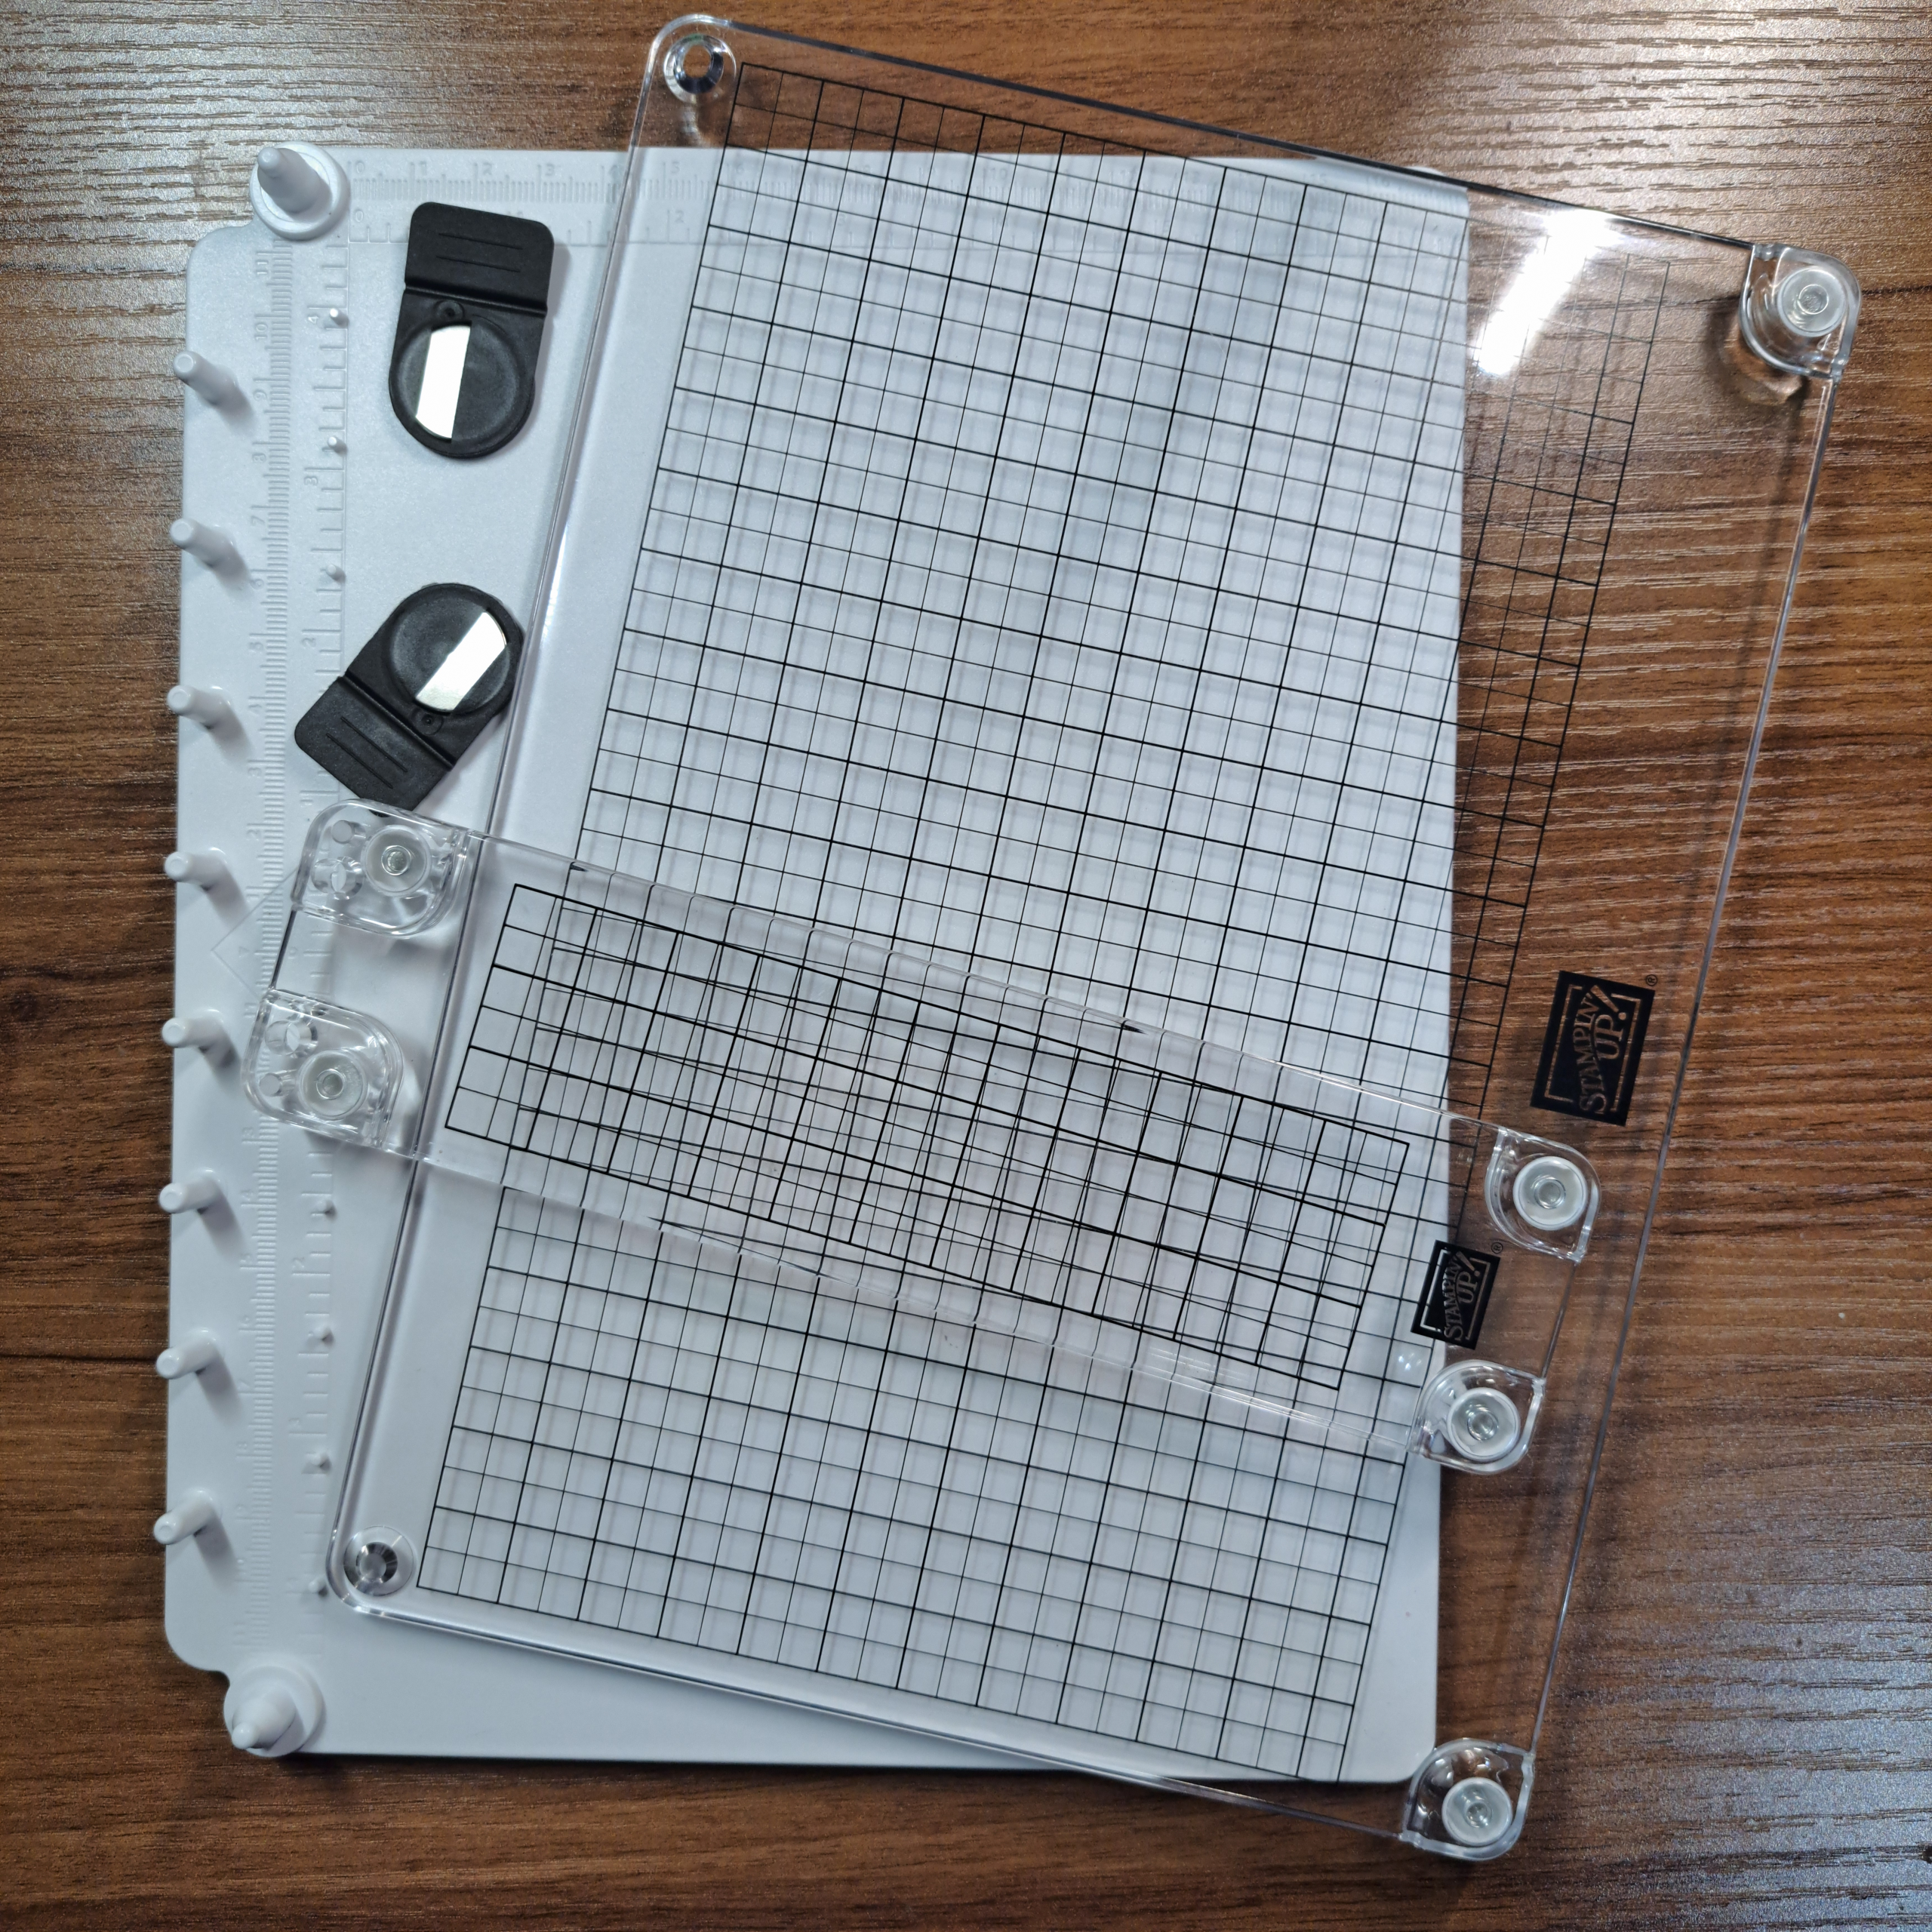
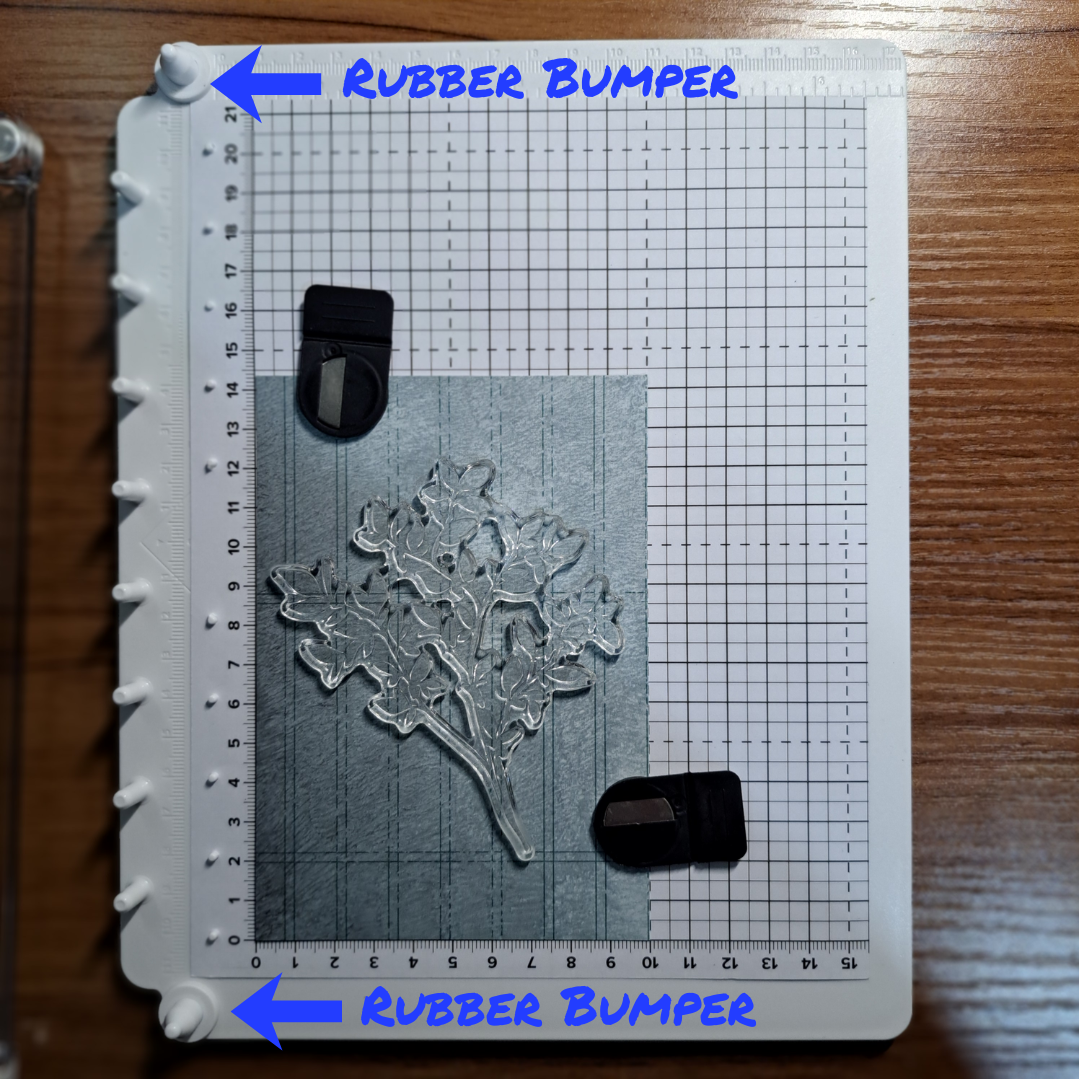
For this exercise place the base as shown in the photo with the pegs on the left. This is just my preference for illustration, you can just as easily orient the base with the pegs at the top. You may also note the grid present on the base. This is grid paper, it is sold separately and not necessary when using the Positioner. But I feel you will get much more out of this tool if you get yourself some to use. The paper has a metric grid on one one side and on the reverse the Imperial grid.
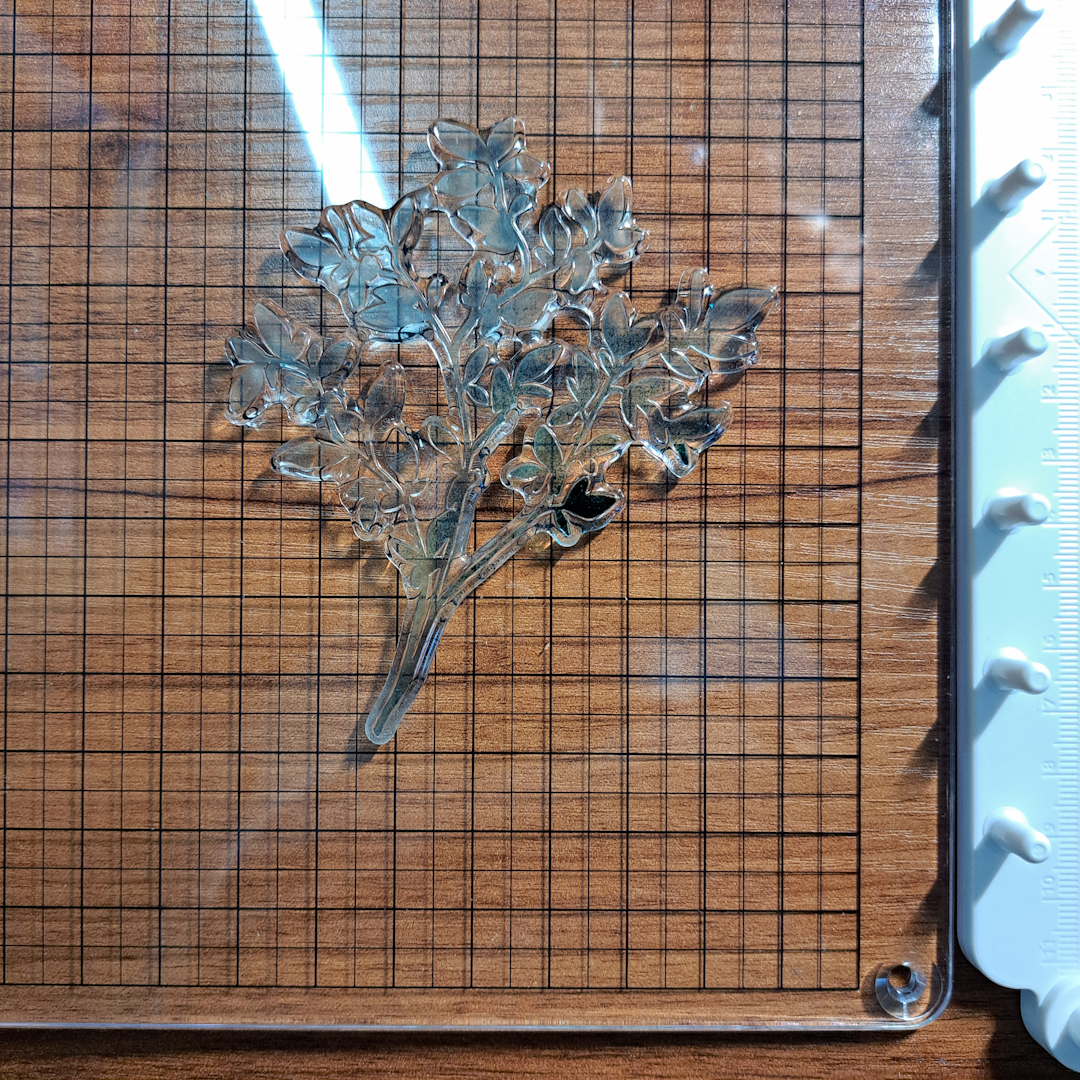
Position your paper on the base and use the magnets to hold the paper down. Place your stamp face down where you want it to be stamped onto your paper. Next, take a look at the clear plastic piece, you will notice that it has a hole in each of the four corners. Two of the holes are covered by rubber bumpers and two are left open. Place the open holes over the large pegs on the base. The clear plastic piece will rest on the pegs and their bumpers on one side and on the bumpers affixed to the clear plastic on the other.
Simply press down on the clear plastic piece to adhere the stamp to it. Lift the clear plastic piece straight up. If you have a new or a super sticky stamp it may pull up the paper beneath it when the stamp attaches to the clear cover. This should be no problem since all you have to do is realign the paper and place the magnets back down.
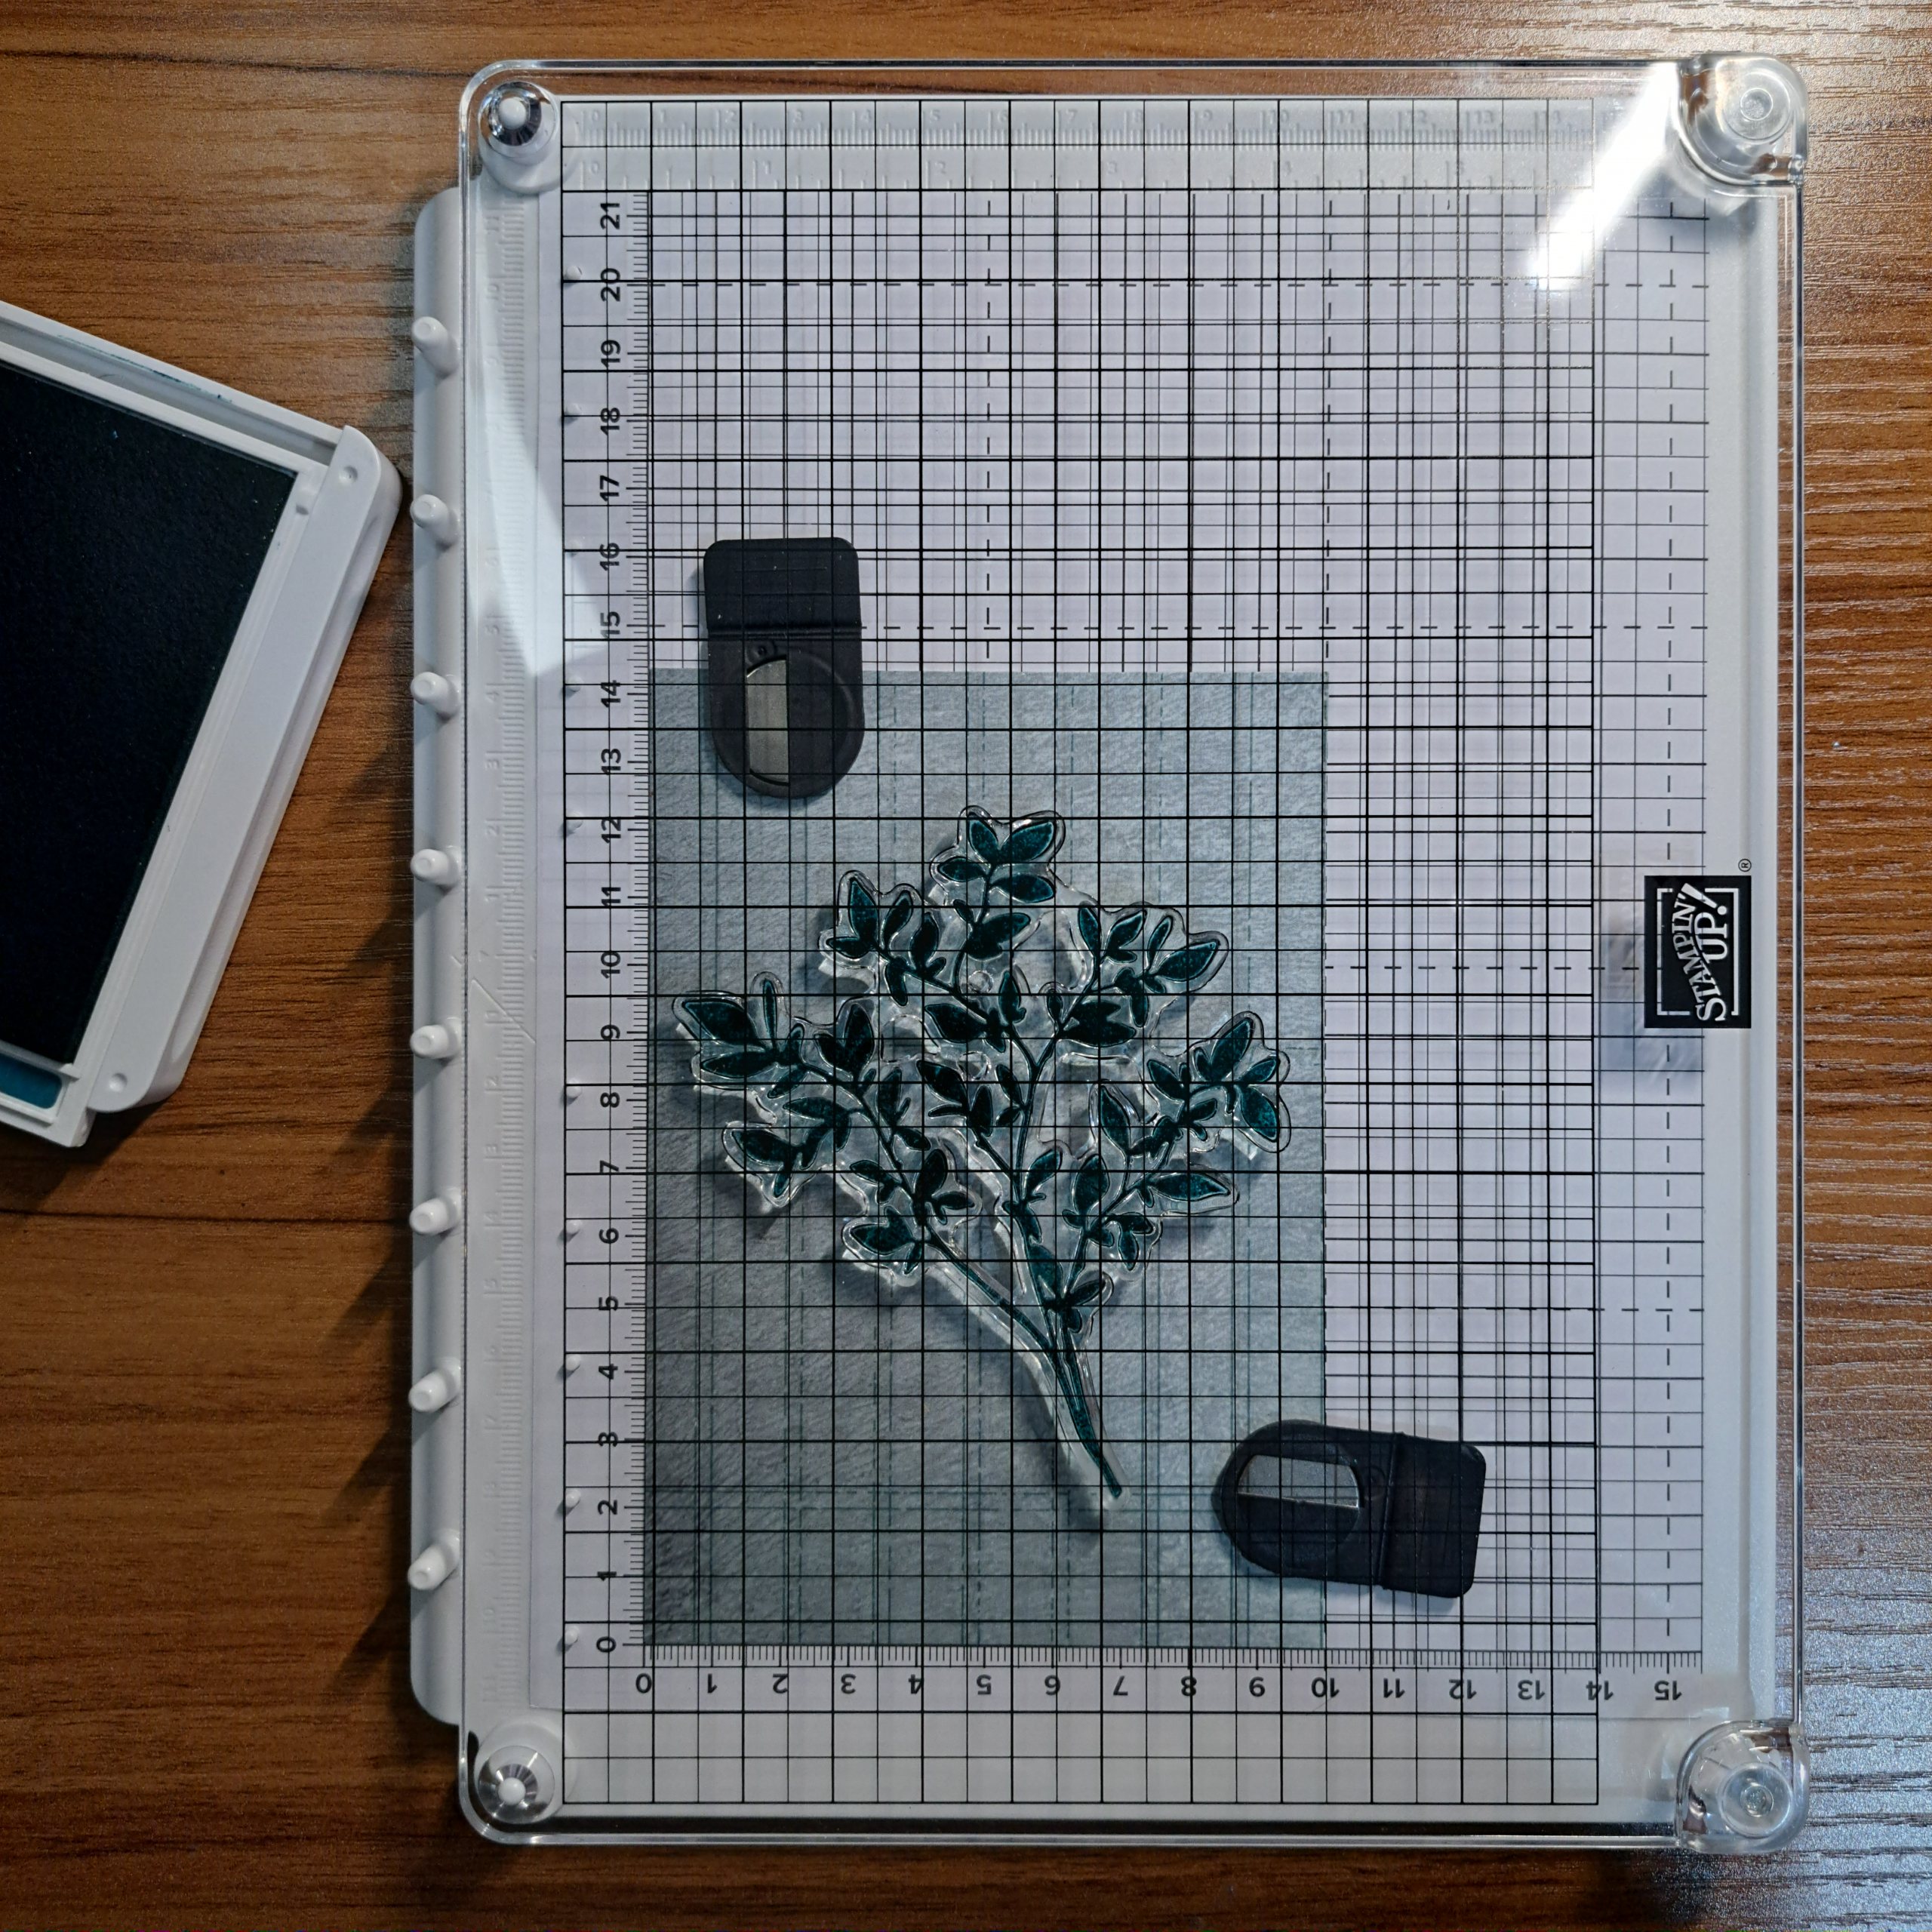
Now ink up the stamp while it is on the clear piece. I found it easier to bring the ink pad to the stamp instead of brining the large cover and it’s stamp to the ink pad. But as always, you do you!
Replace the clear piece back into the base in the same position you had it in when you picked up the stamp. Now all you have to do is to press down to make a perfect print. Smooth even pressure is recommended. When you release the clear cover it will pop back up into position and you can easily remove it from the base. It is easy to clean your stamp while it is on the clear positioner.
Or in my case, I wanted to make multiple cards so I inked up and stamped the image again on another piece of paper. This is one of the great advantages of using a positioner, the stamping process is effortless to repeat.
The Oops
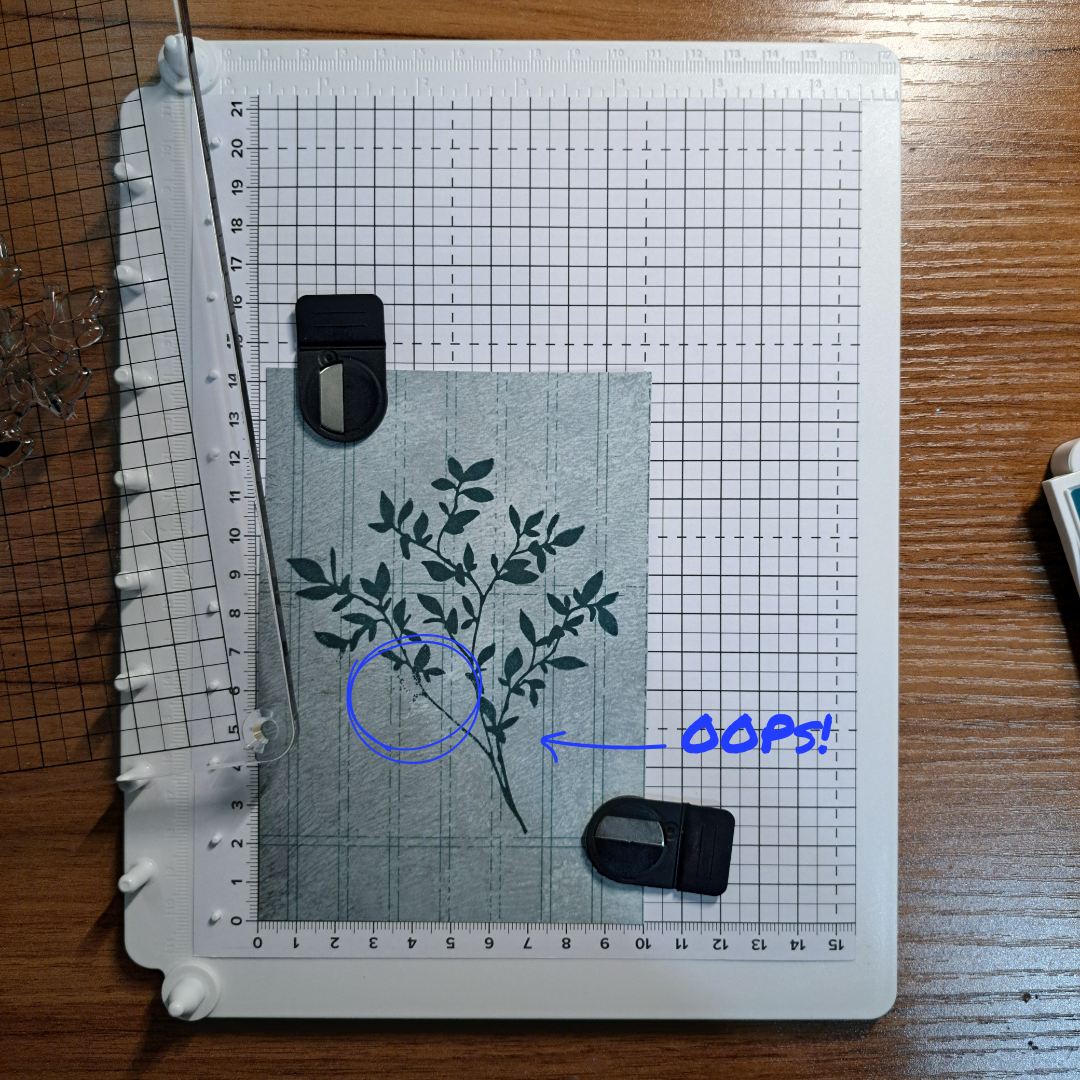
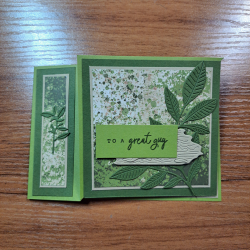
Oh wait, did I say perfect print above? Well if you did everything right it is a perfect print, but how many times have you tried to stamp a large stamp image and missed pressing down in one little spot? Well that is what happened to me here in the photo on the left. (To be fair this is the first time I stamped with it.)
I turned the clear piece over to lay it on my desk to clean the stamp and saw the ink still on the stamp. I admit to uttering a few choice words before I realized that this was the perfect opportunity to really test this thing. So I immediately flipped the clear piece, still with the stamp on it, over and placed back onto the base. I pressed down on the part of the stamp that I had missed, sending a little prayer up that this would work and ta-da! Success!
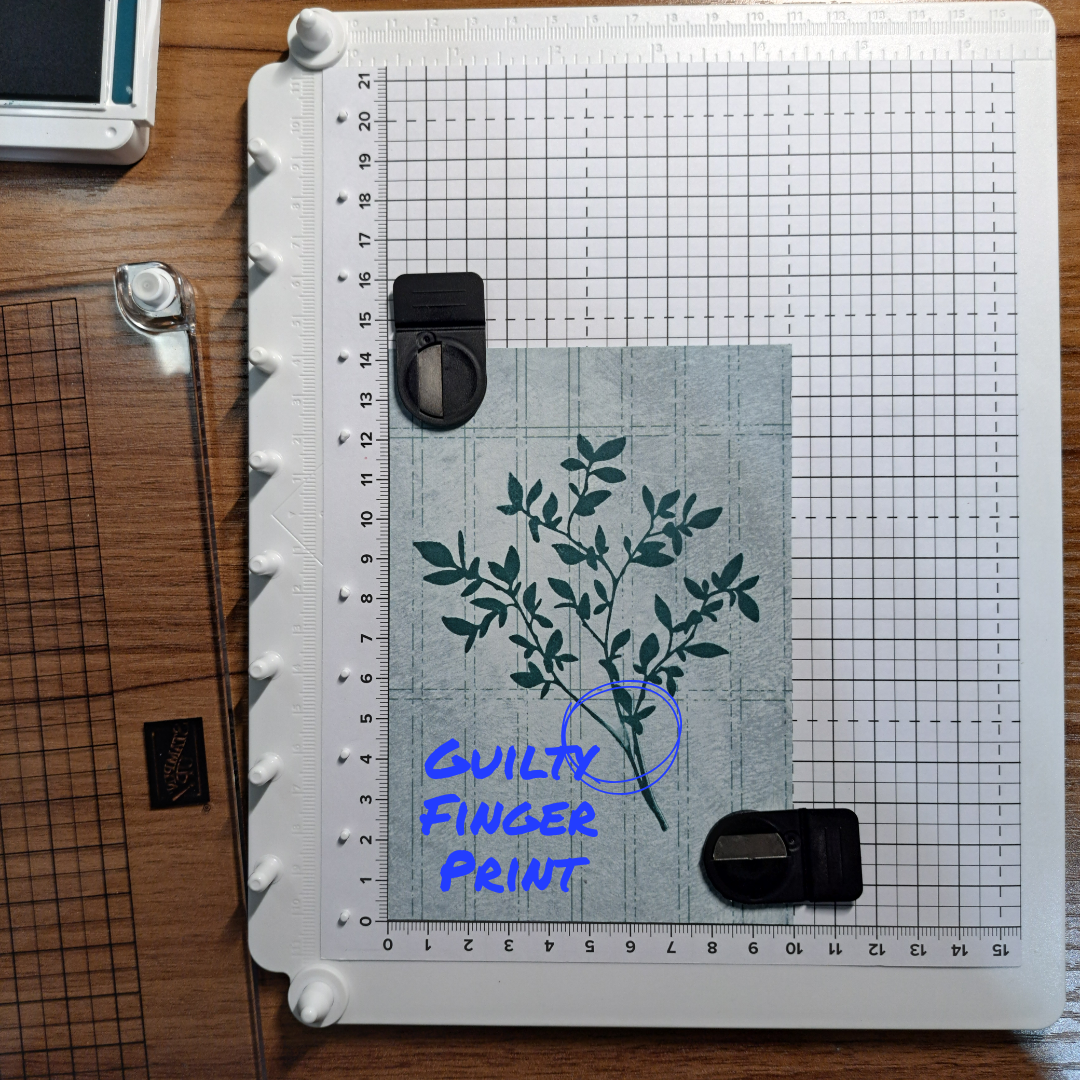
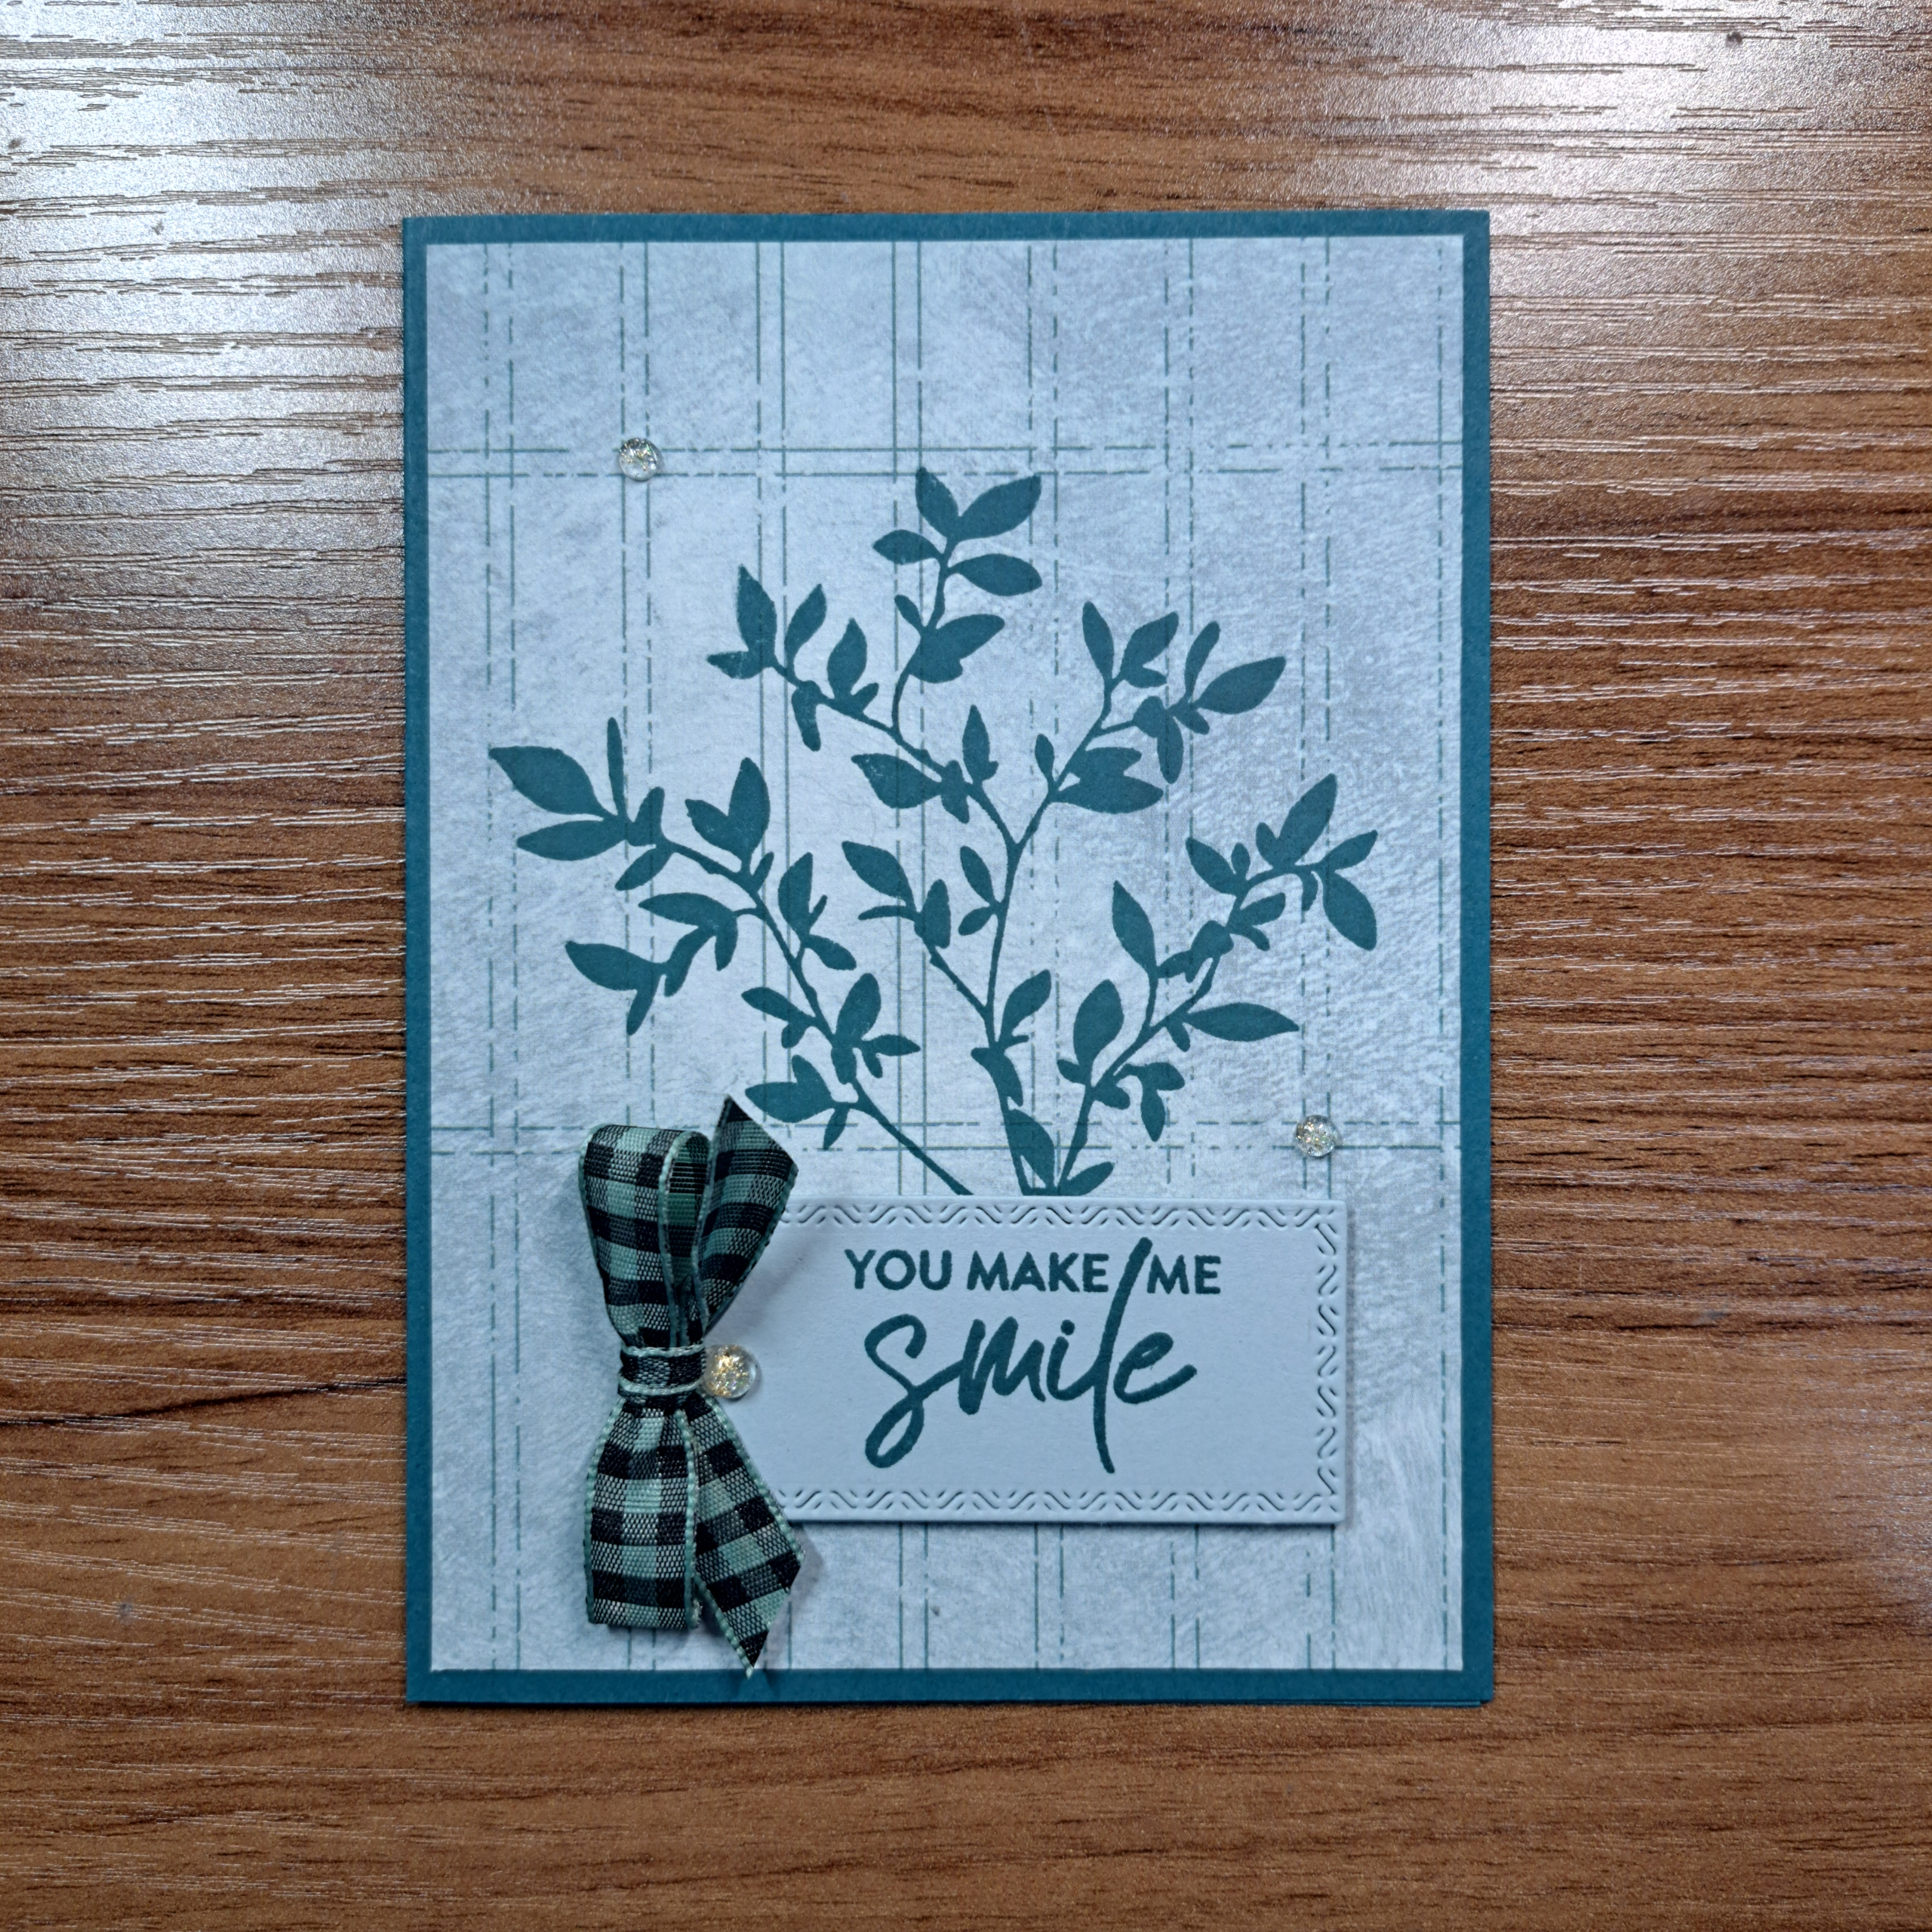
Ok, except that I put my inky finger down on my image at the join of two of the branches and made a smear that had nothing to do with the stamp or the paper and everything to do with the fact that I cannot get near an ink pad without getting ink on my fingers. Even when the ink pad is closed. And this is why positioning is so important, the greeting will just cover the finger print perfectly. But I could not have covered the inking error on the leaf part of the image.
So What’s Next?
Let’s try some tile stamping. While basic repeat stamping can be used with any stamp positioner (including the one Stampin’Up! used to sell) this next technique really highlights the brilliance of this little tool.
Begin by placing your paper onto the base and adding the magnets to hold it down. Be sure you make note of where the paper is placed in case the stamp pulls the paper up when attaching the stamp to the clear plate.
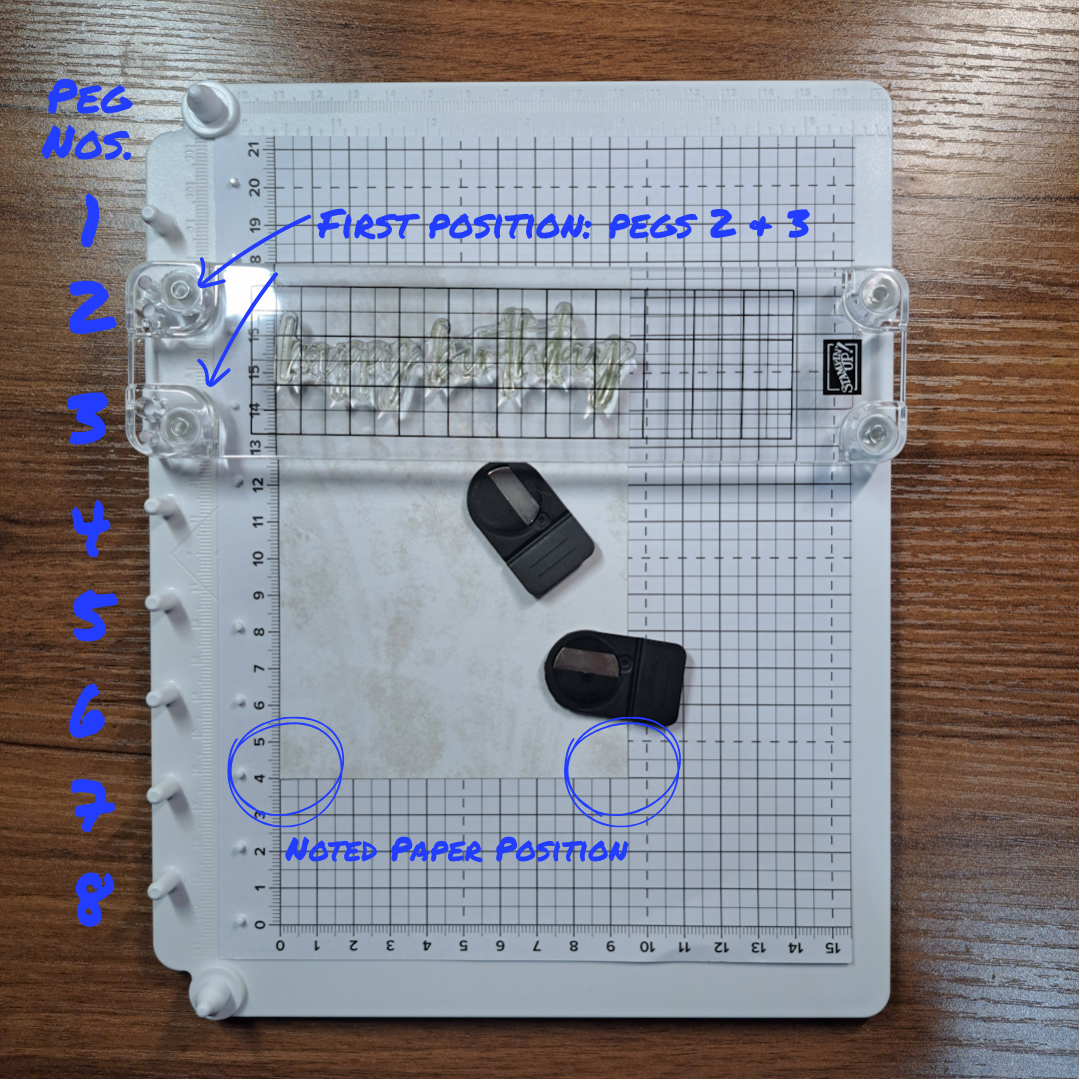
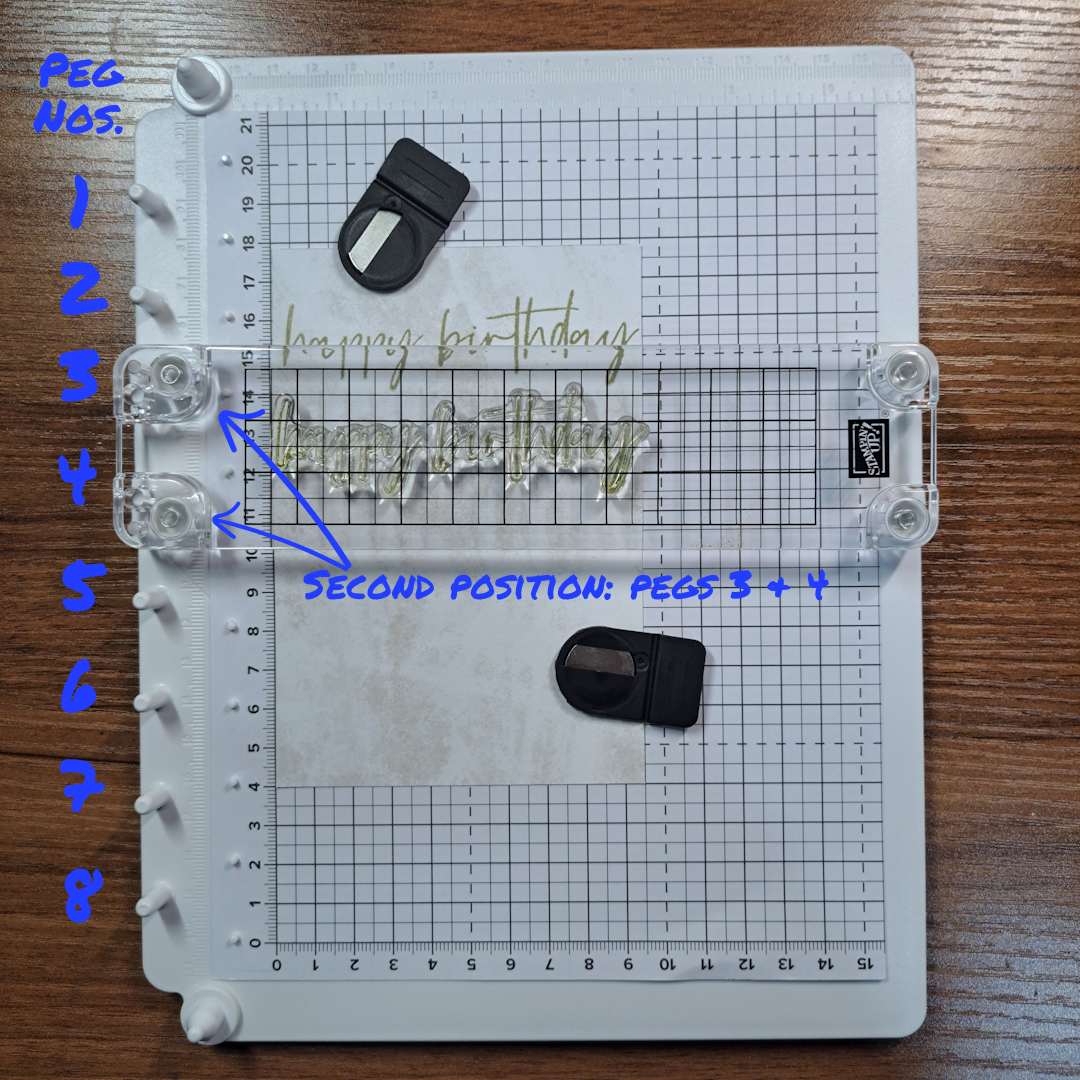
Position the stamp onto the paper at the start of your tile row. Place the narrow clear plate centered over your stamp. This clear plate will hook onto two of the pegs in the peg row. Once you have the plate down, press down the clear plate to pick up the stamp. Check your paper to be sure it is in it’s original position.
Ink up the stamp on the plate, flip the plate and place it face down over the original pegs used to pick up the stamp. Firmly and evenly press down on the clear plate to stamp the image. Lift the plate and turn it over to re-ink it.
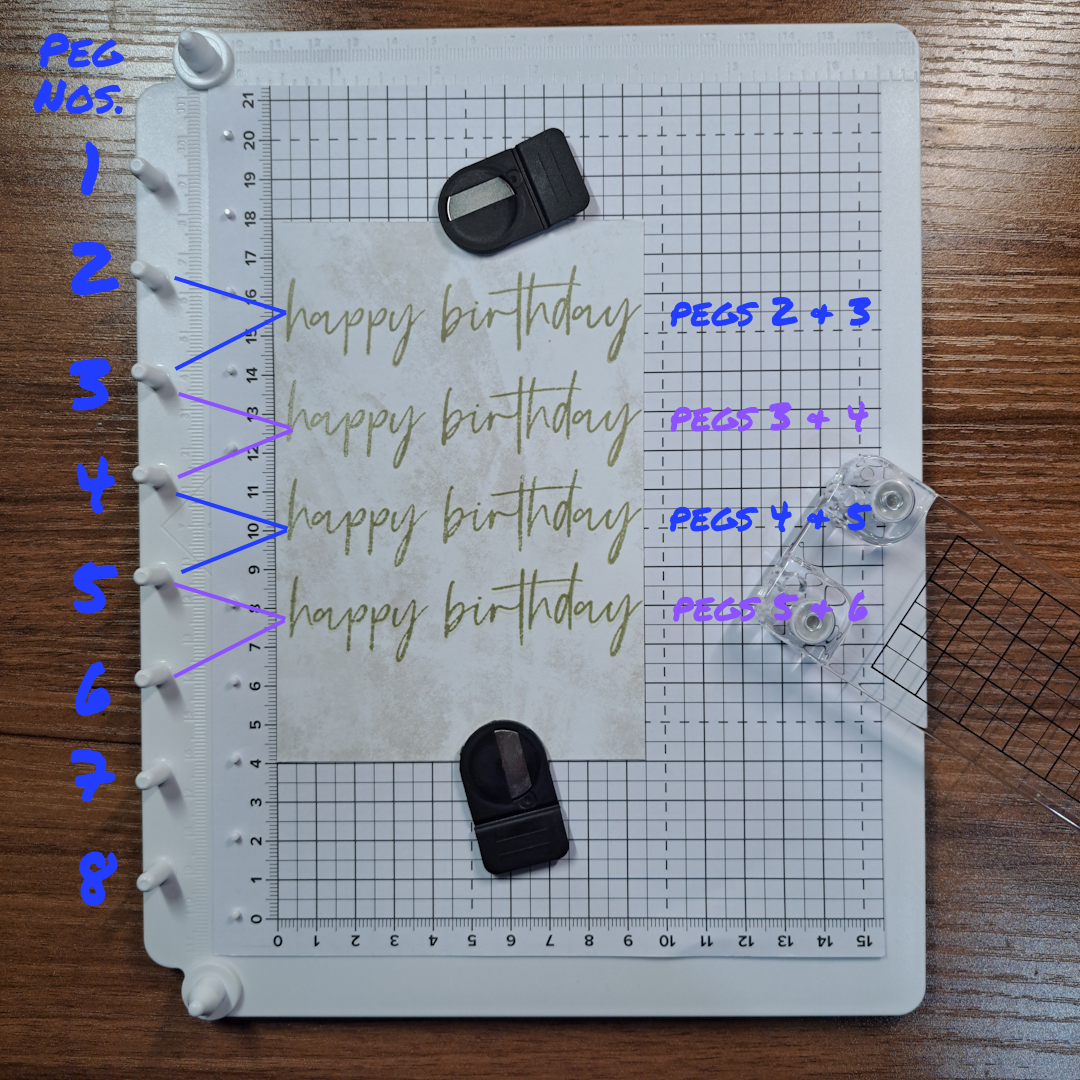
Now when you place the plate over the paper to stamp the image, move down one peg. Repeat the same pressing down action to stamp the second image. For this example I only moved down one peg at a time. But I would like to note that you can move the clear bar plate down as many times as you wish to create more space between images. I think it is easy to see that you can quickly stamp an evenly spaced row of images.
Stamping in a Circle
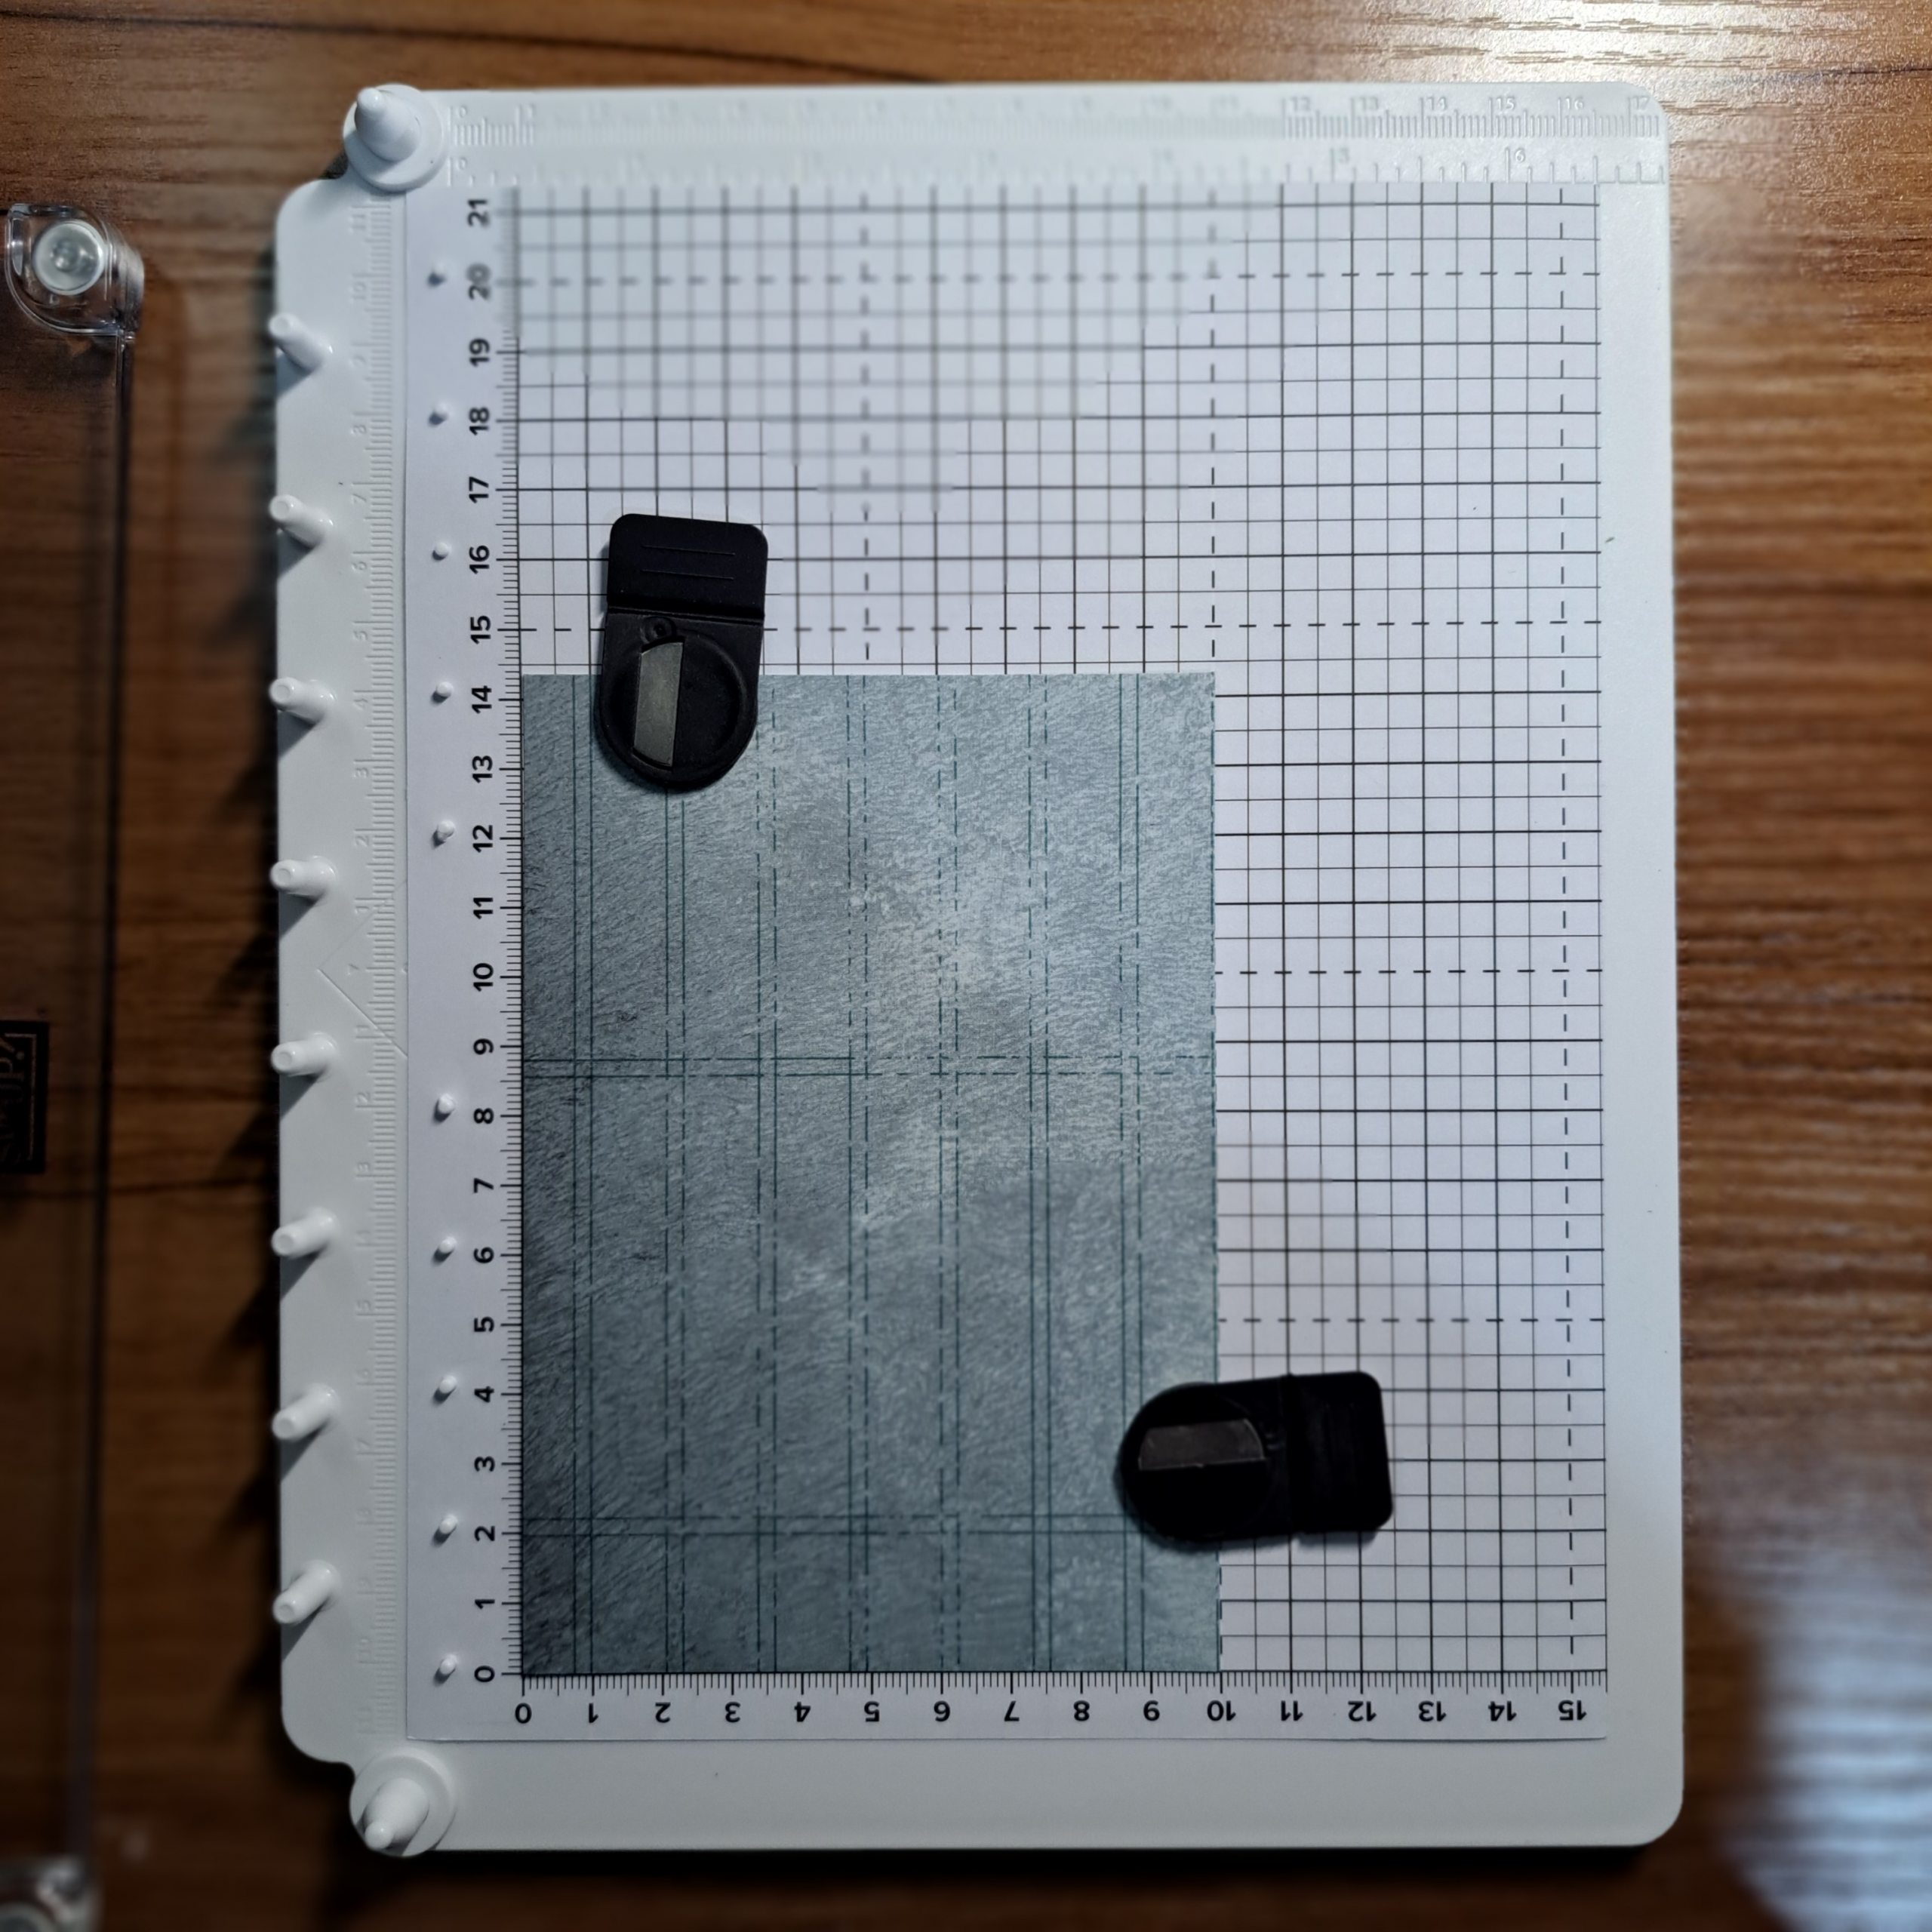
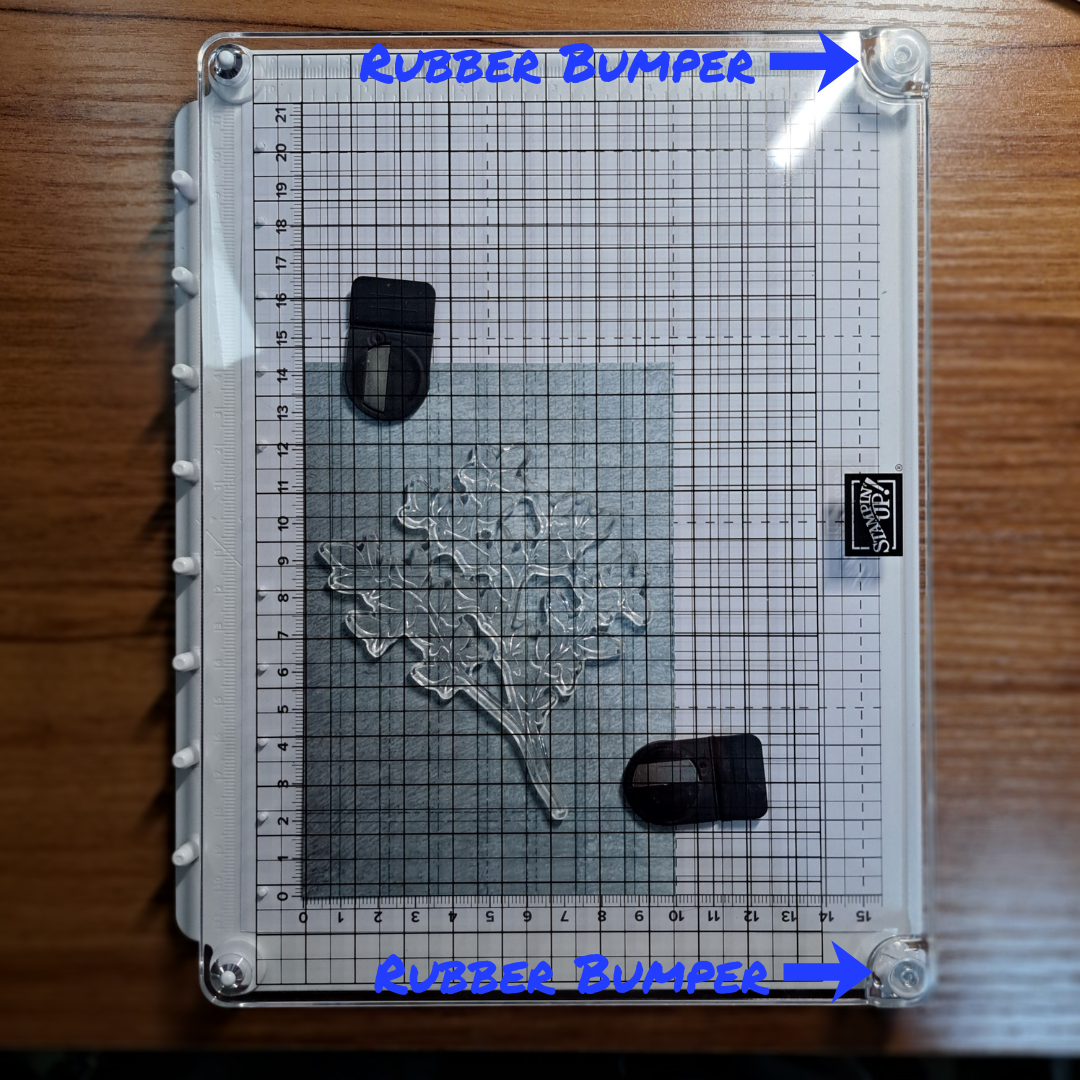
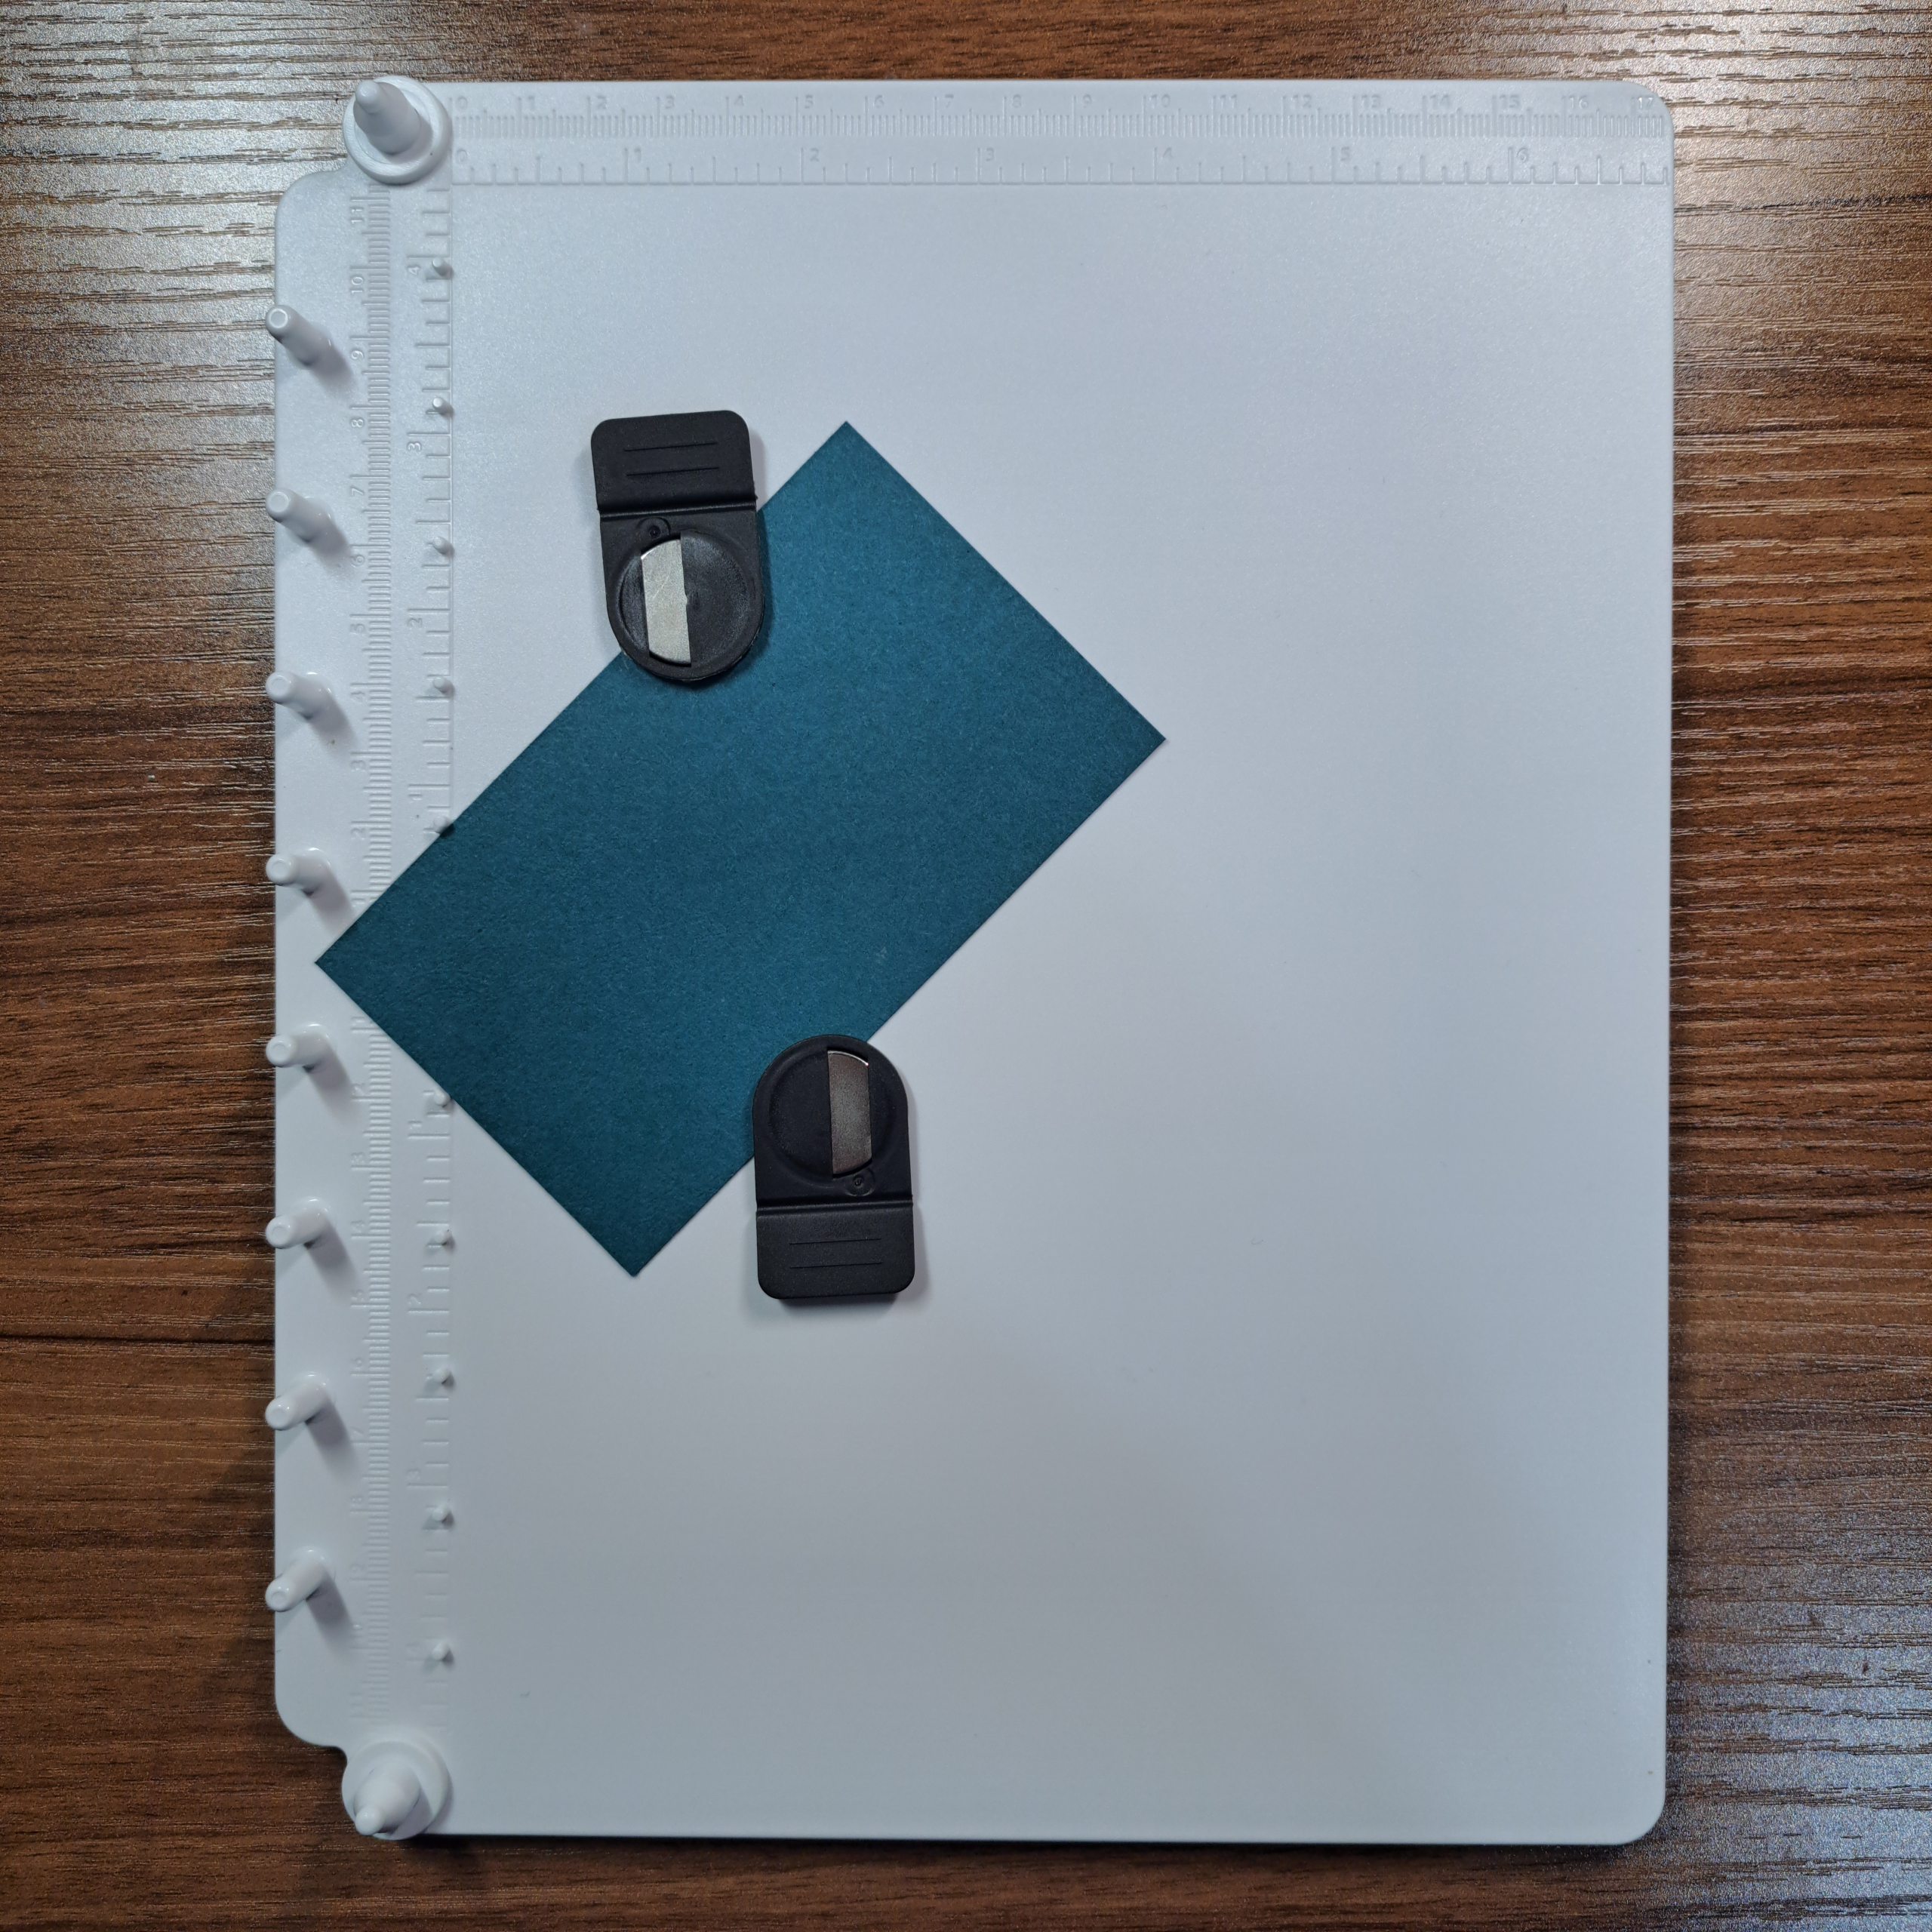
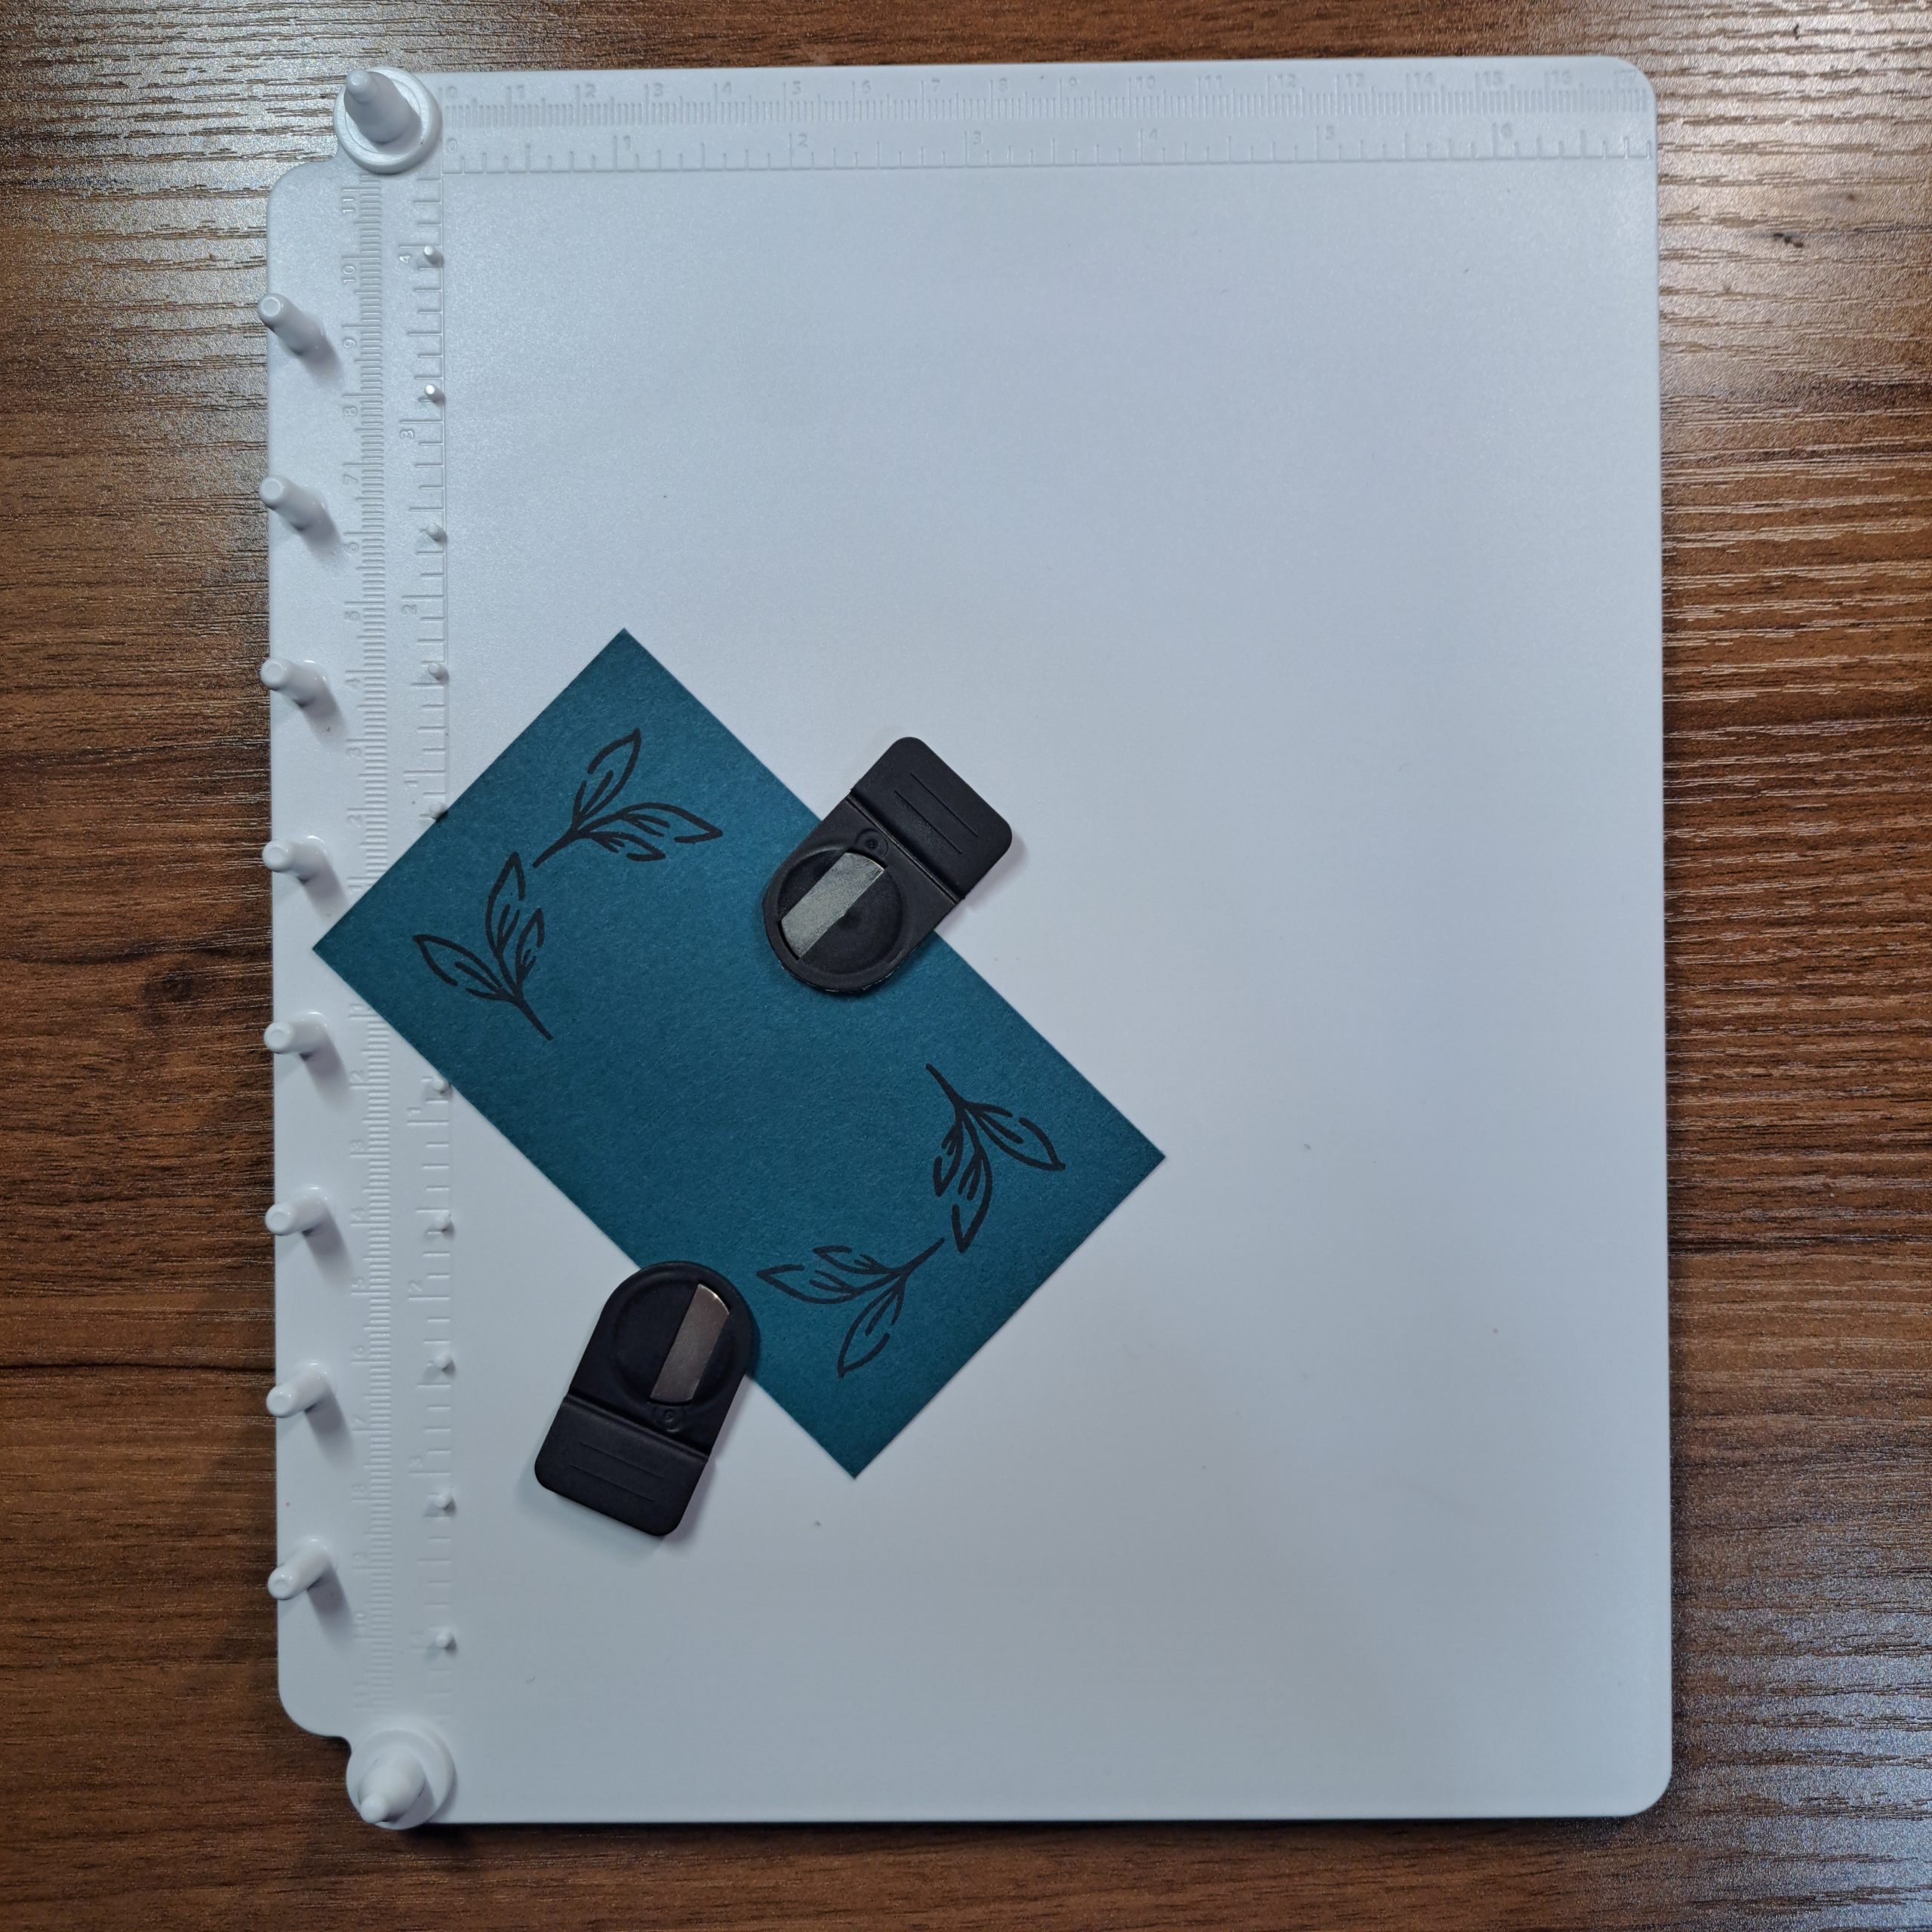
This is the technique that I have been dying to try out. The key here is in the position of the paper. If you examine the platform you will find a pair of lines between the 4th and the 5th peg. The lines are placed at a 90 degree angle. These are the lines you will be using to align your paper for this technique. (See photo on the right.)
Place your paper down on the above mentioned lines. For this example we are doing a simple corner stamping using the circle method. Place your stamp down onto the paper in first position.
Pick up the stamp using the large clear cover as seen the first example above. Ink up the stamp and return the clear cover to the platform/paper and press down for the first image.
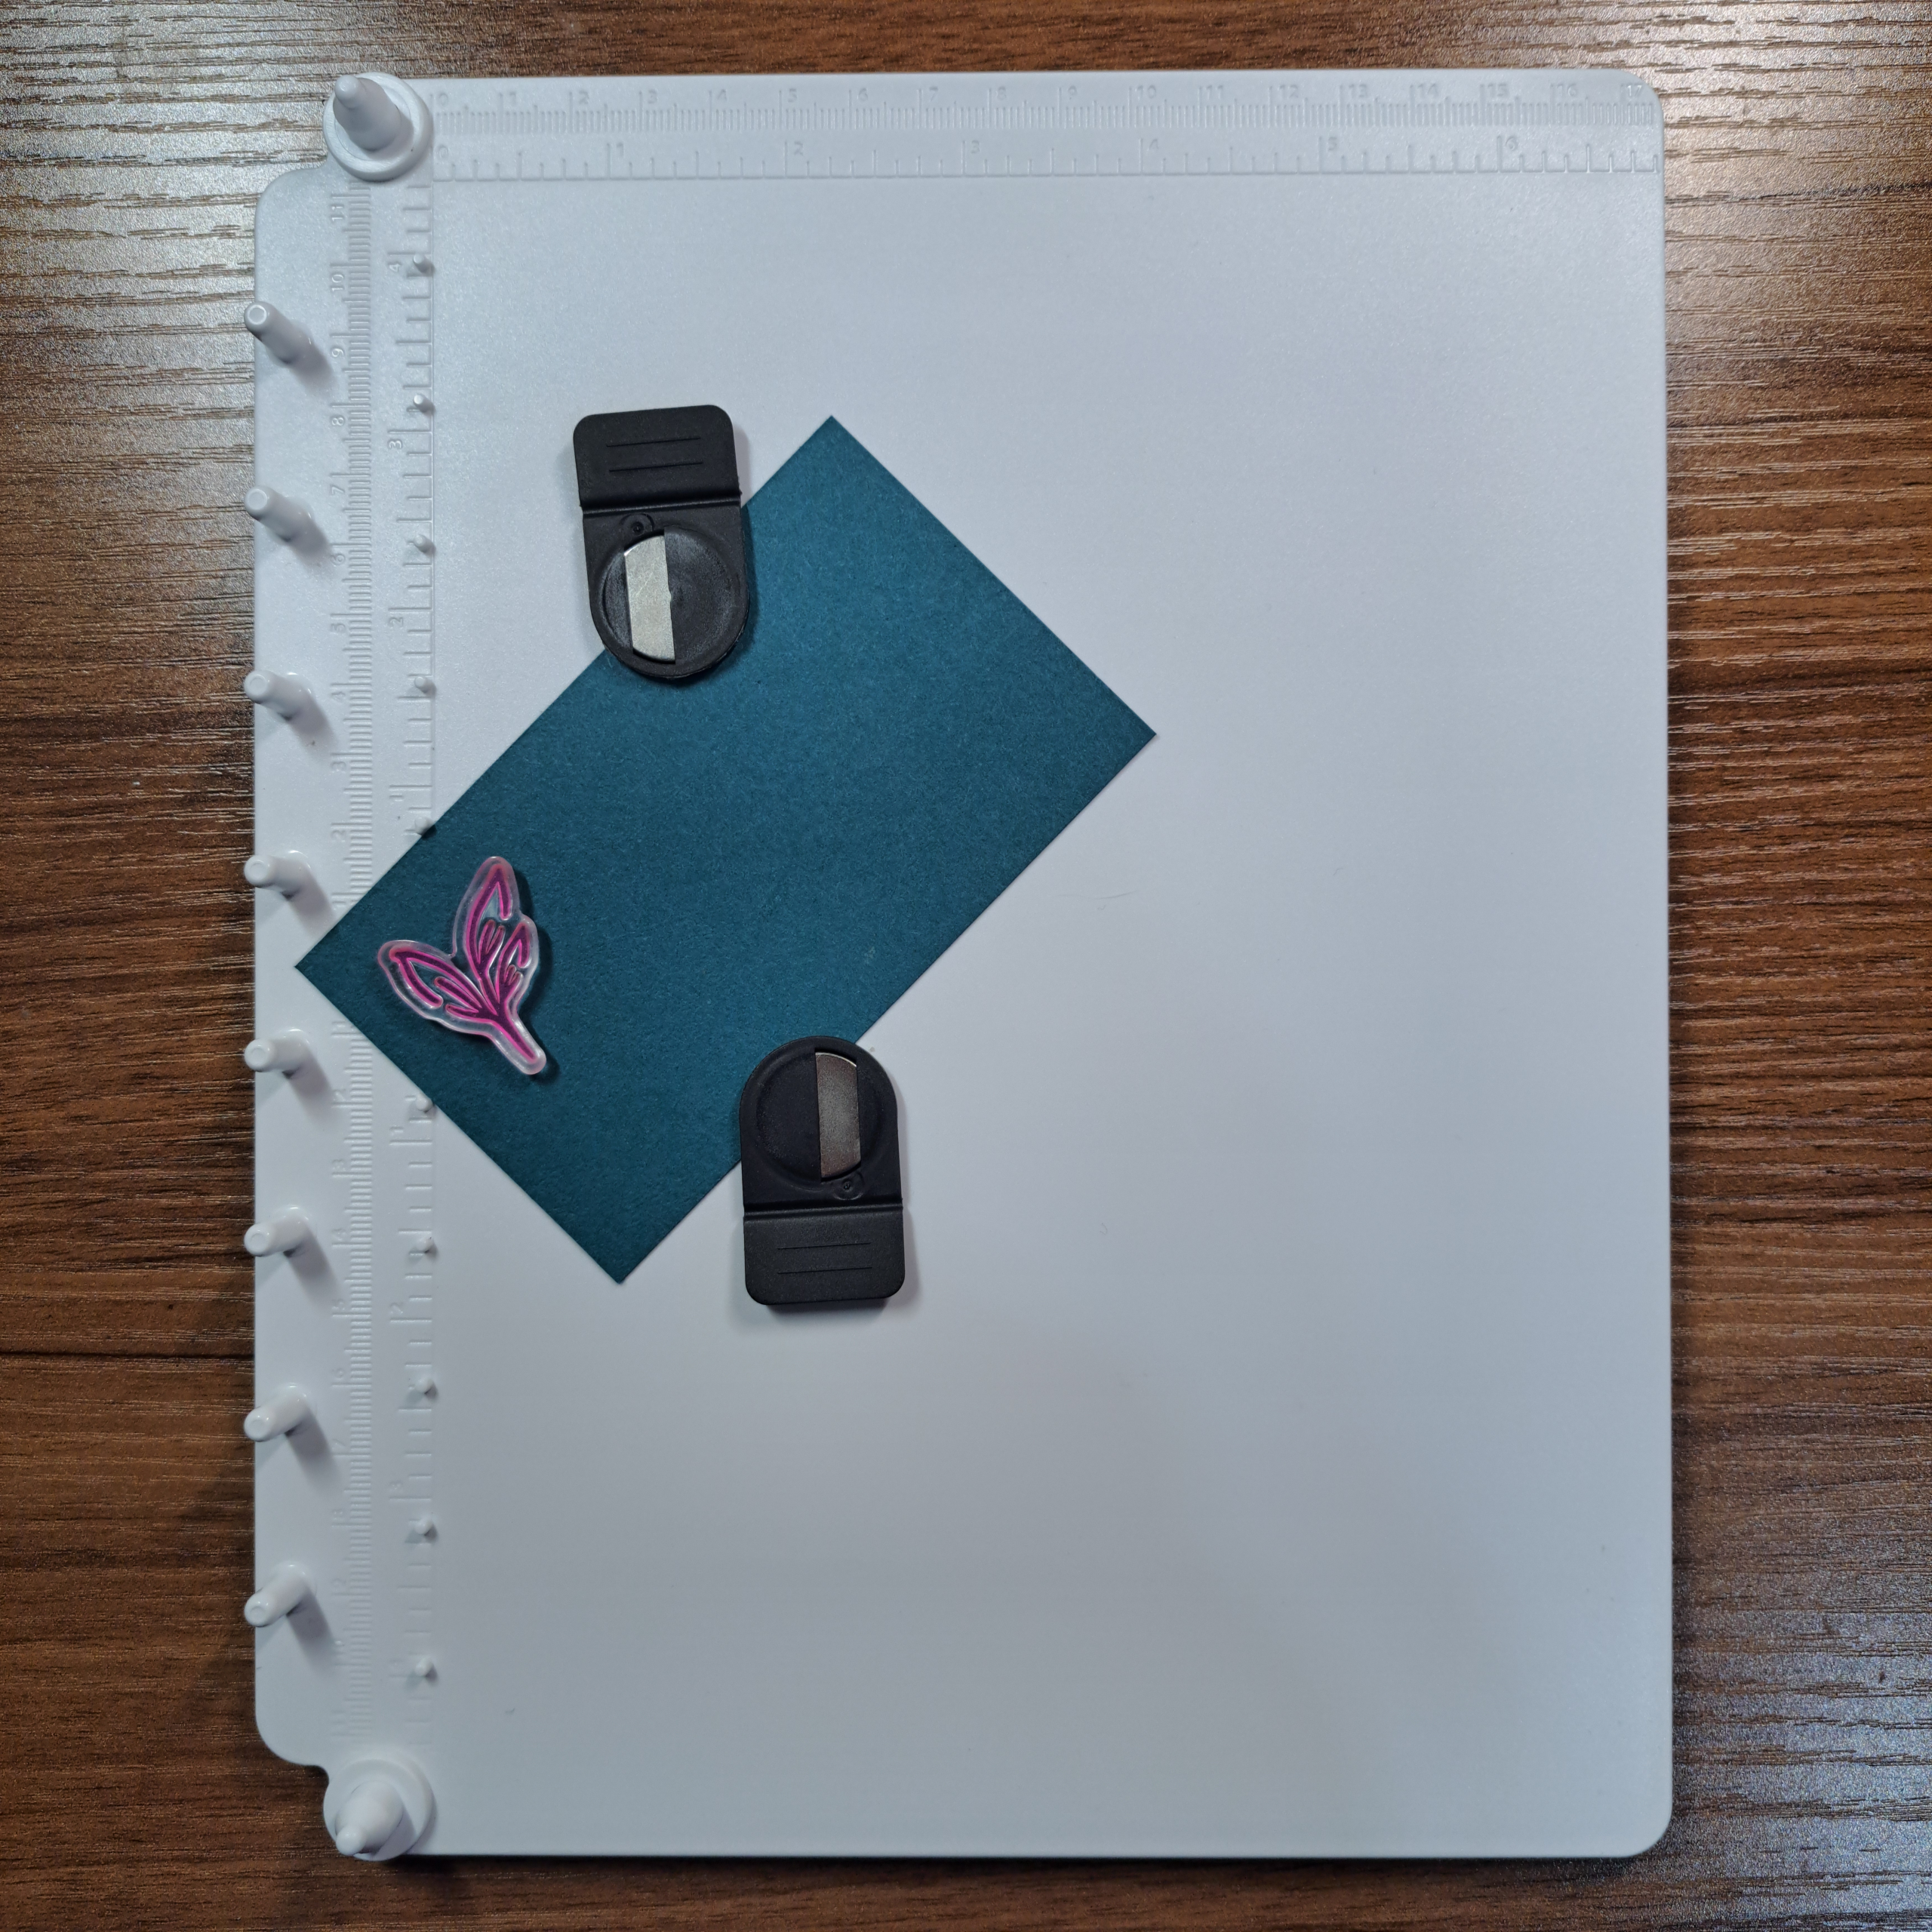
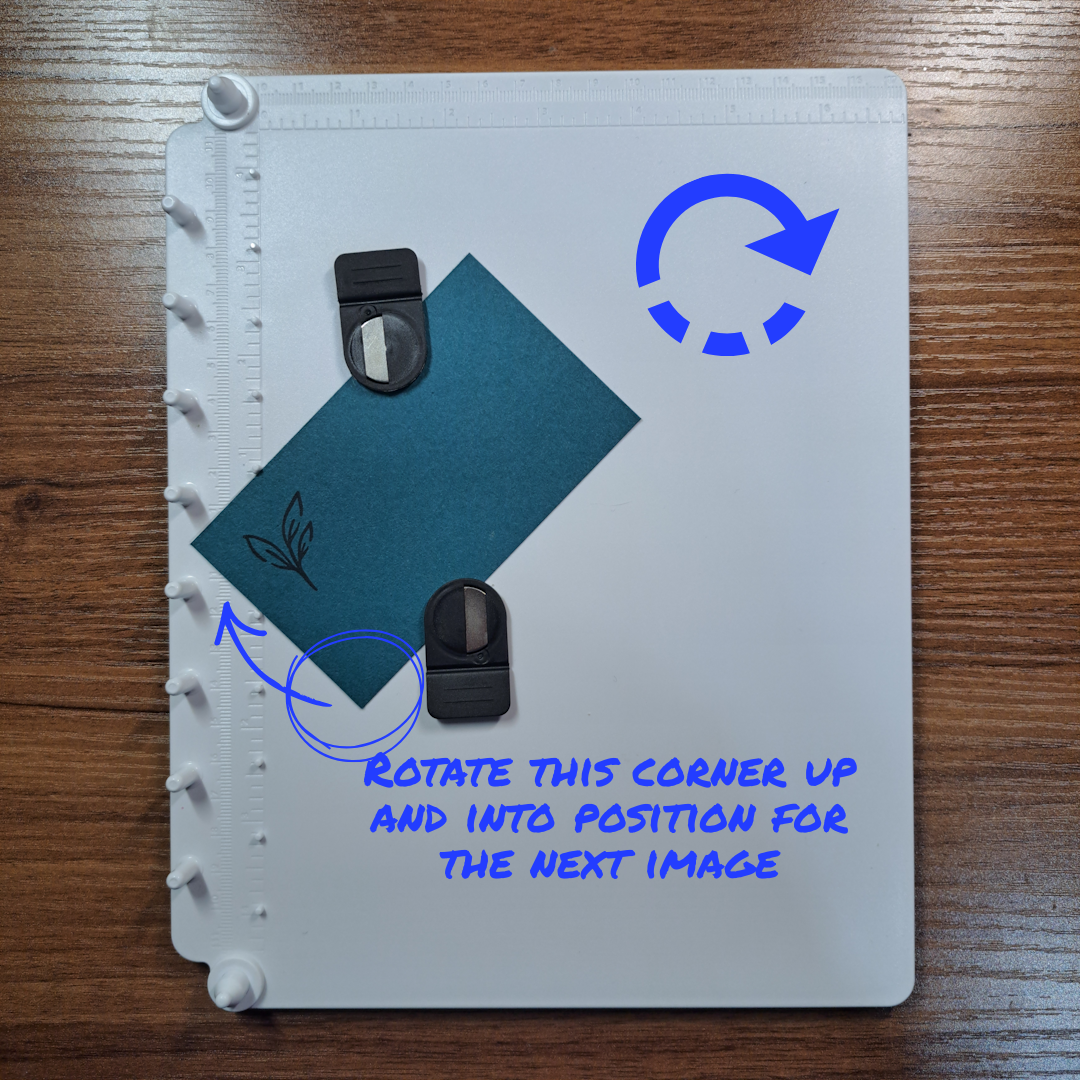
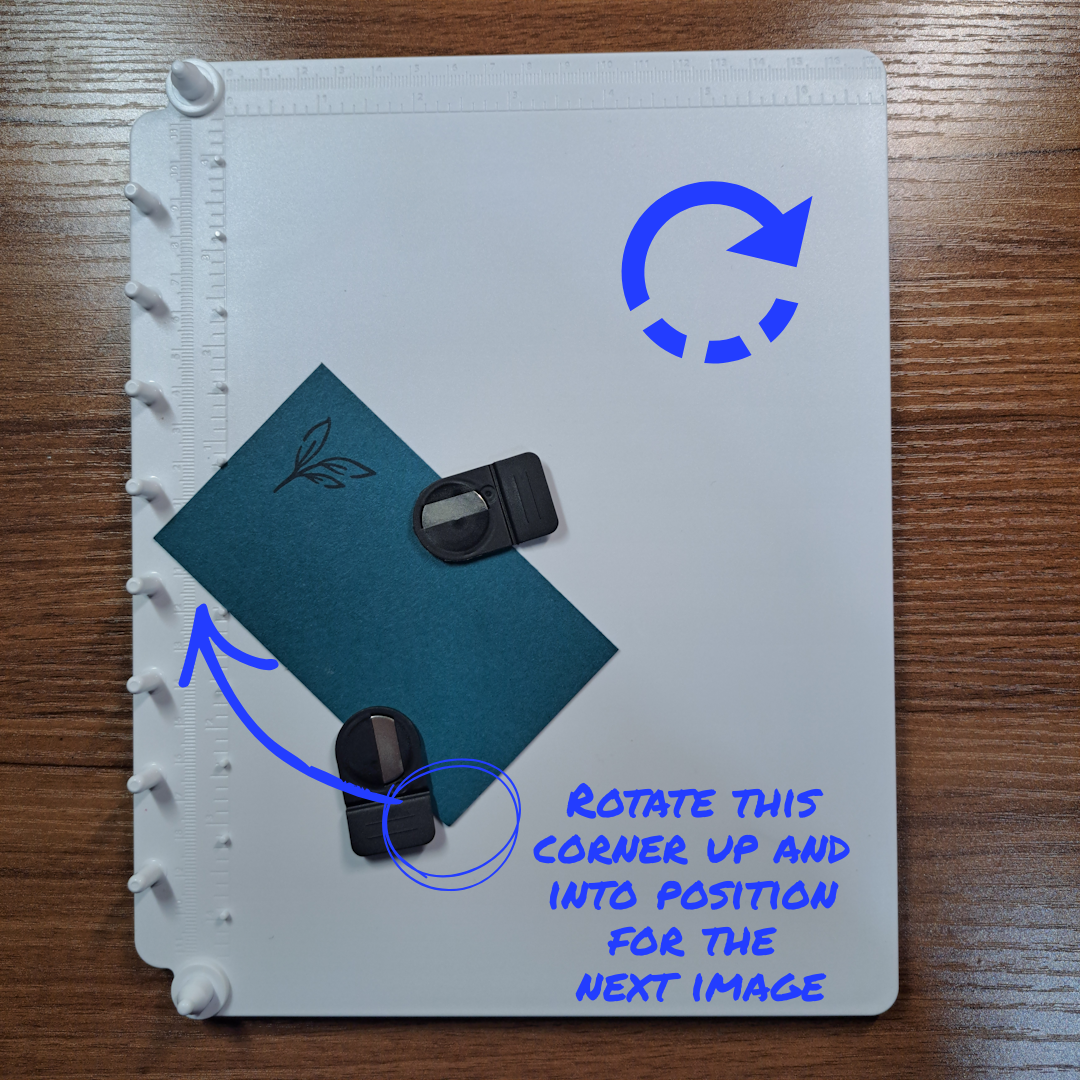
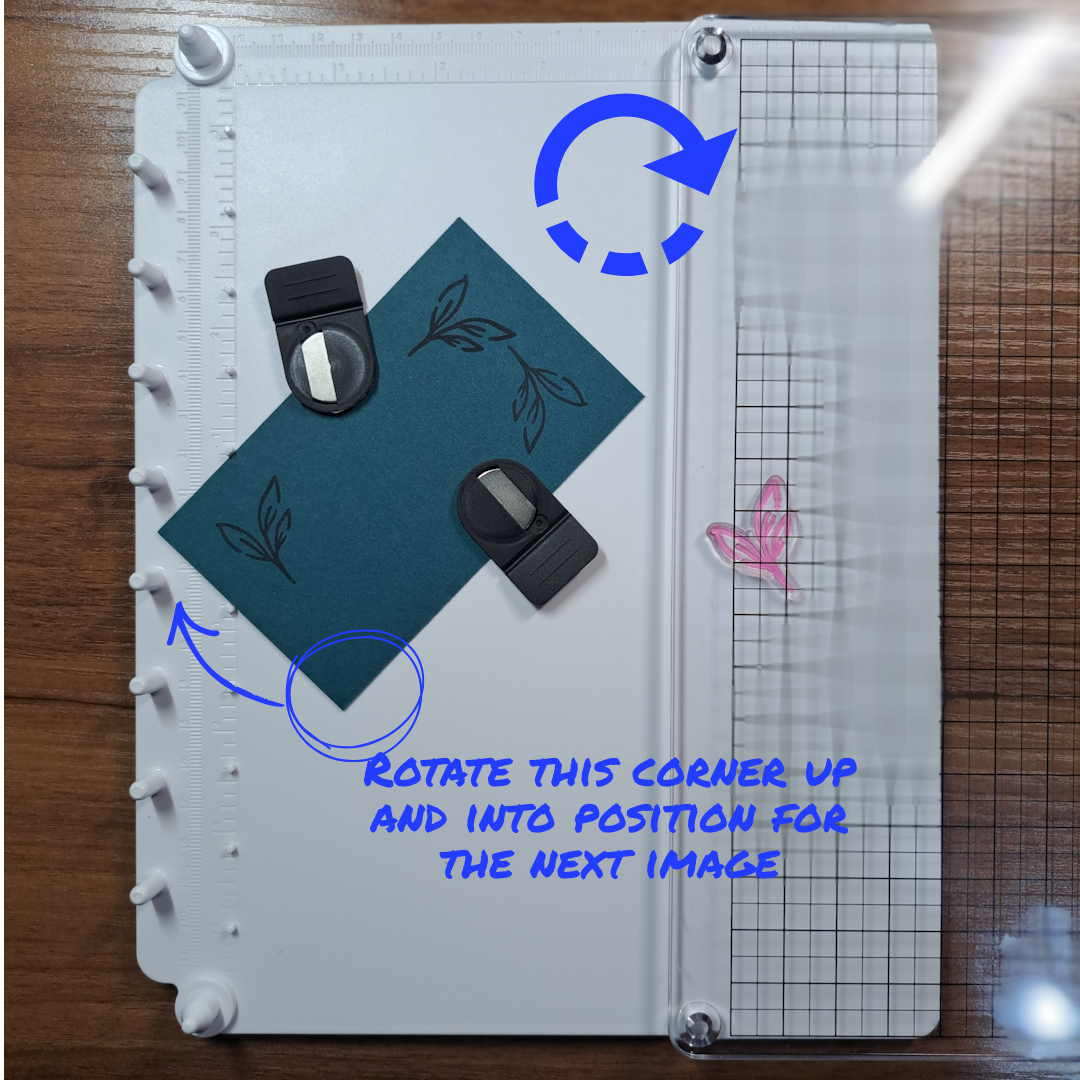
For the next image, rotate the paper and fit the next corner into the 90 degree guide. Without changing the position of the stamp, re-ink and apply the stamp (already attached to the clear cover) back onto the base and stamp. Lift off the cover, re-ink the stamp, rotate the paper to the right fitting the next corner into the slot and stamp again. Repeat one more time to close the circle (or in this case stamp all four corners).
Another Example of Circle Stamping
To actually make a round circle you will need to start with a square piece of paper (oh the irony!). In this example I chose to use the largest circle from the Stylish Shapes die set as my finished size. This circle has a diameter of 3″ or 7.6cm. To have enough room to use the die, I cut a square of paper 5cm or 1/4″ larger than the diameter. Yielding a paper size of 8.1cm x 8.1cm (3-1/8″ x 3-1/8″).
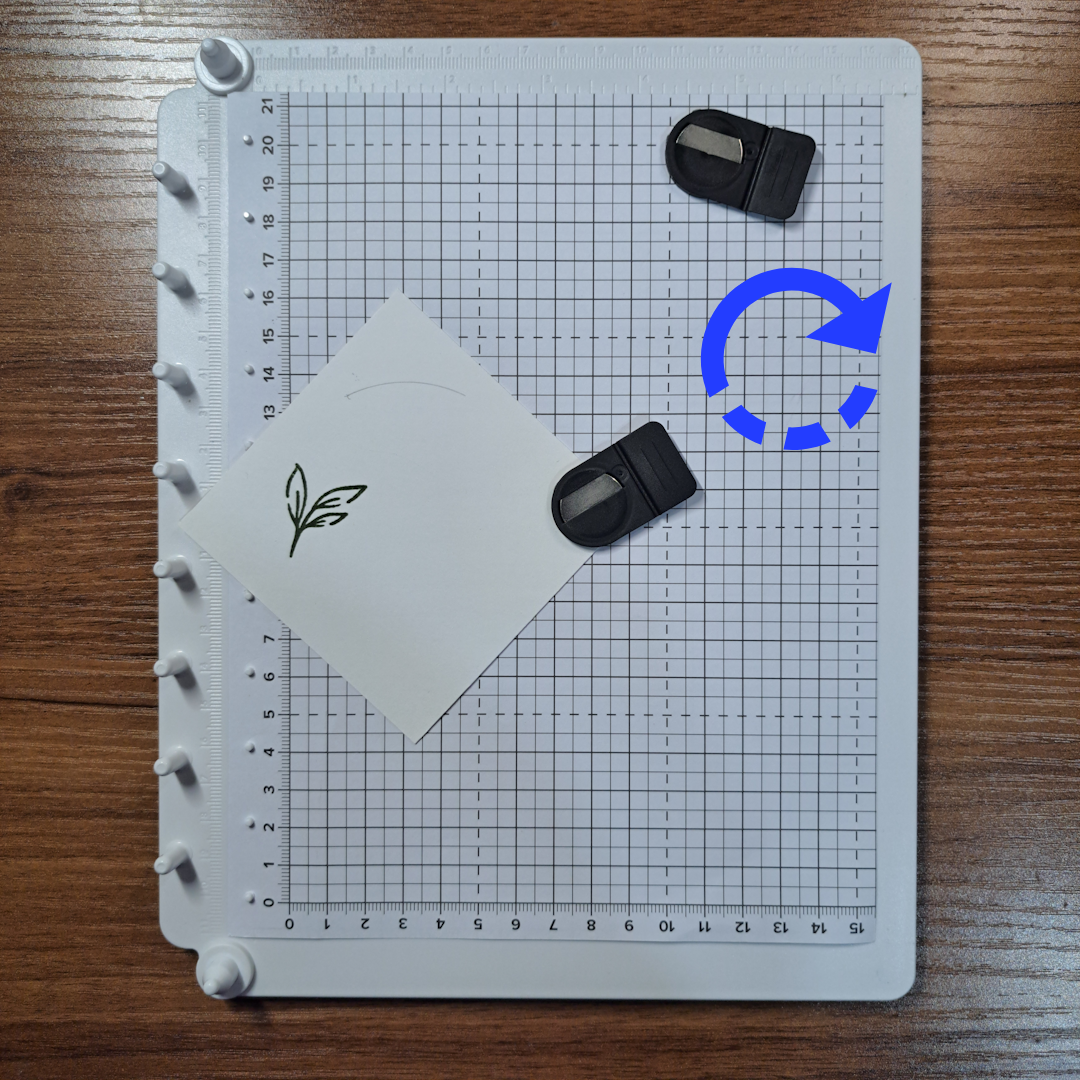
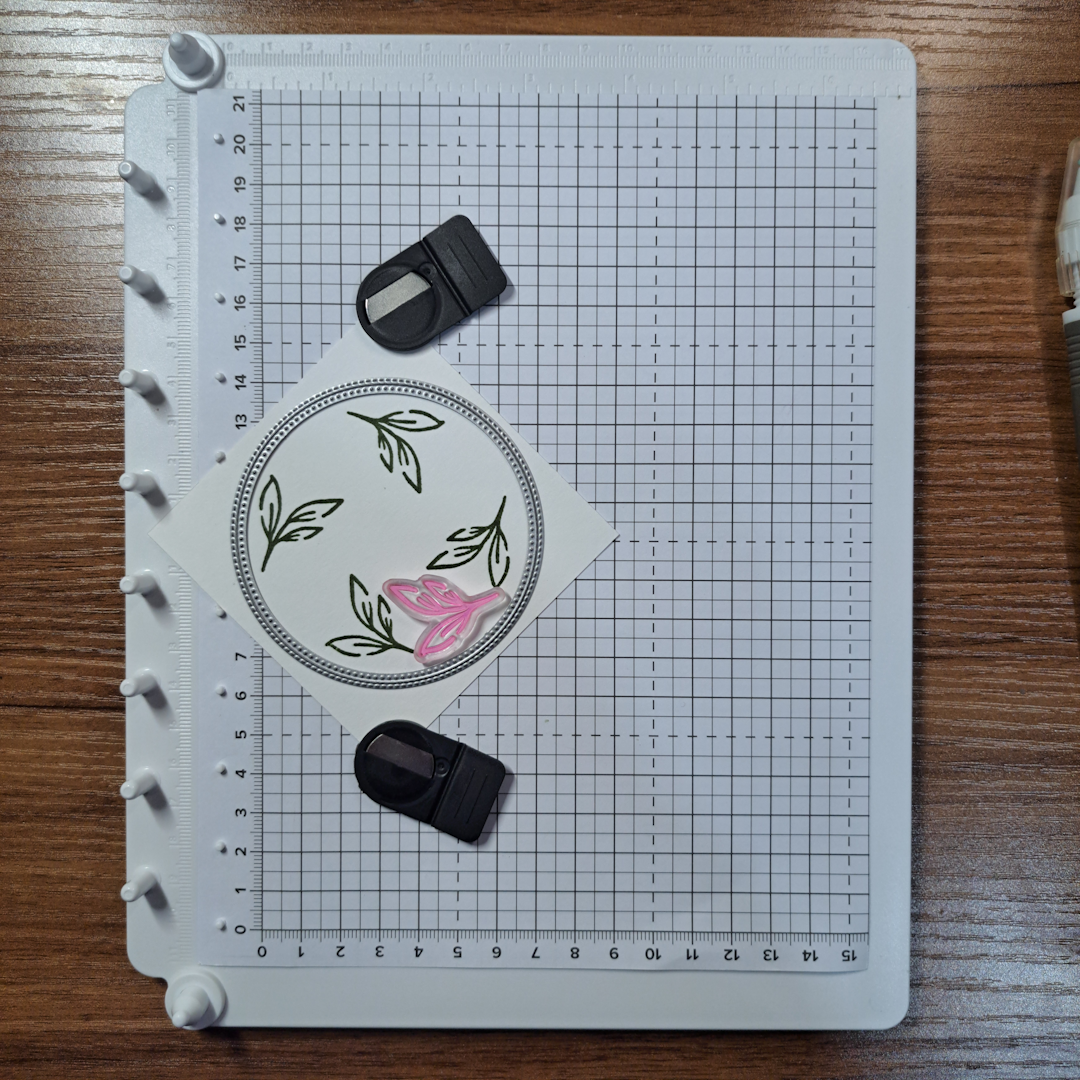
To help with stamp placement I lightly drew around the inside of the die with a pencil. In the photo above and to the left, I had already erased most of the circle when I realized this would be a great example photo. I was erasing it because once the stamp is placed on the clear cover you don’t move it and you don’t need the circle for this stamp placement any more.
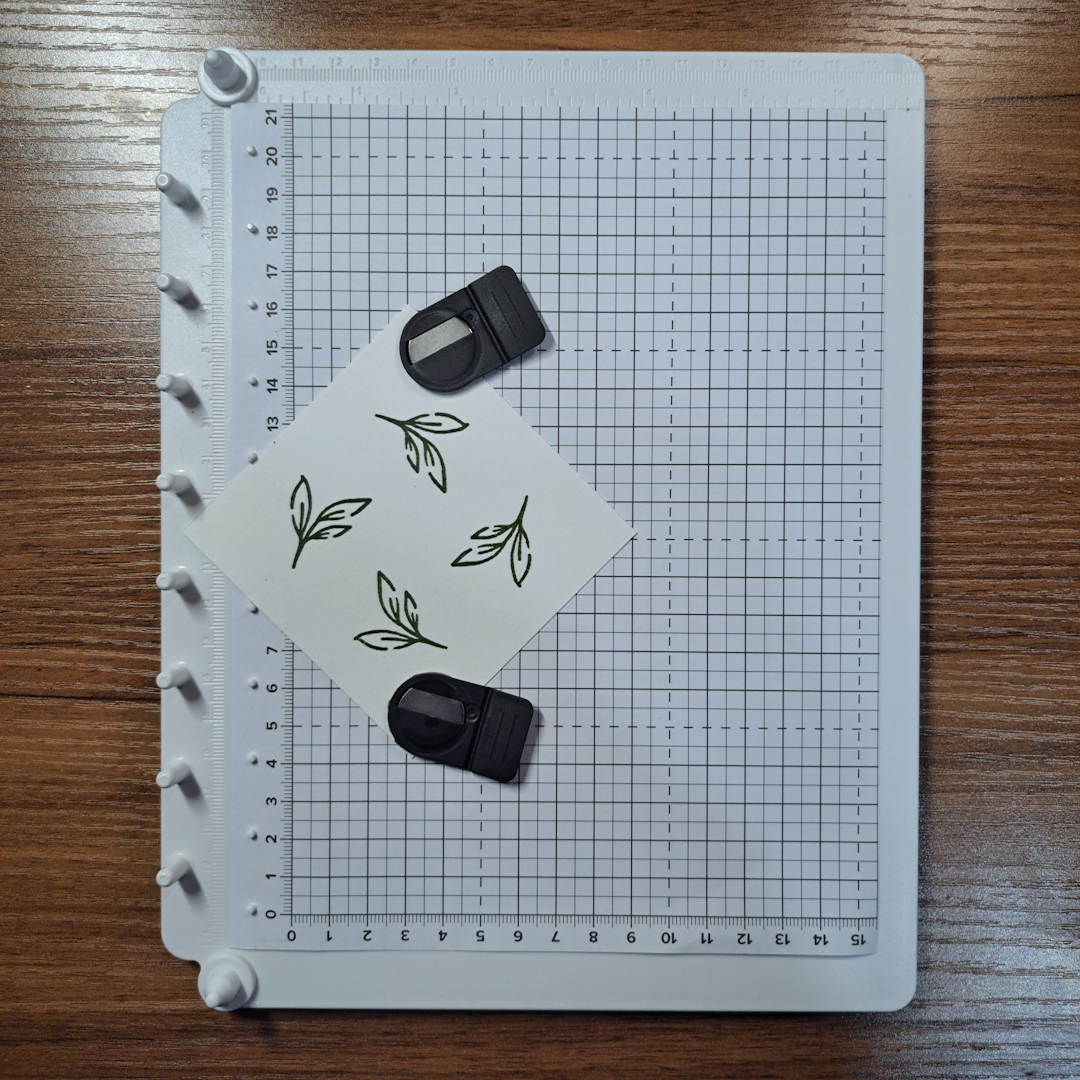
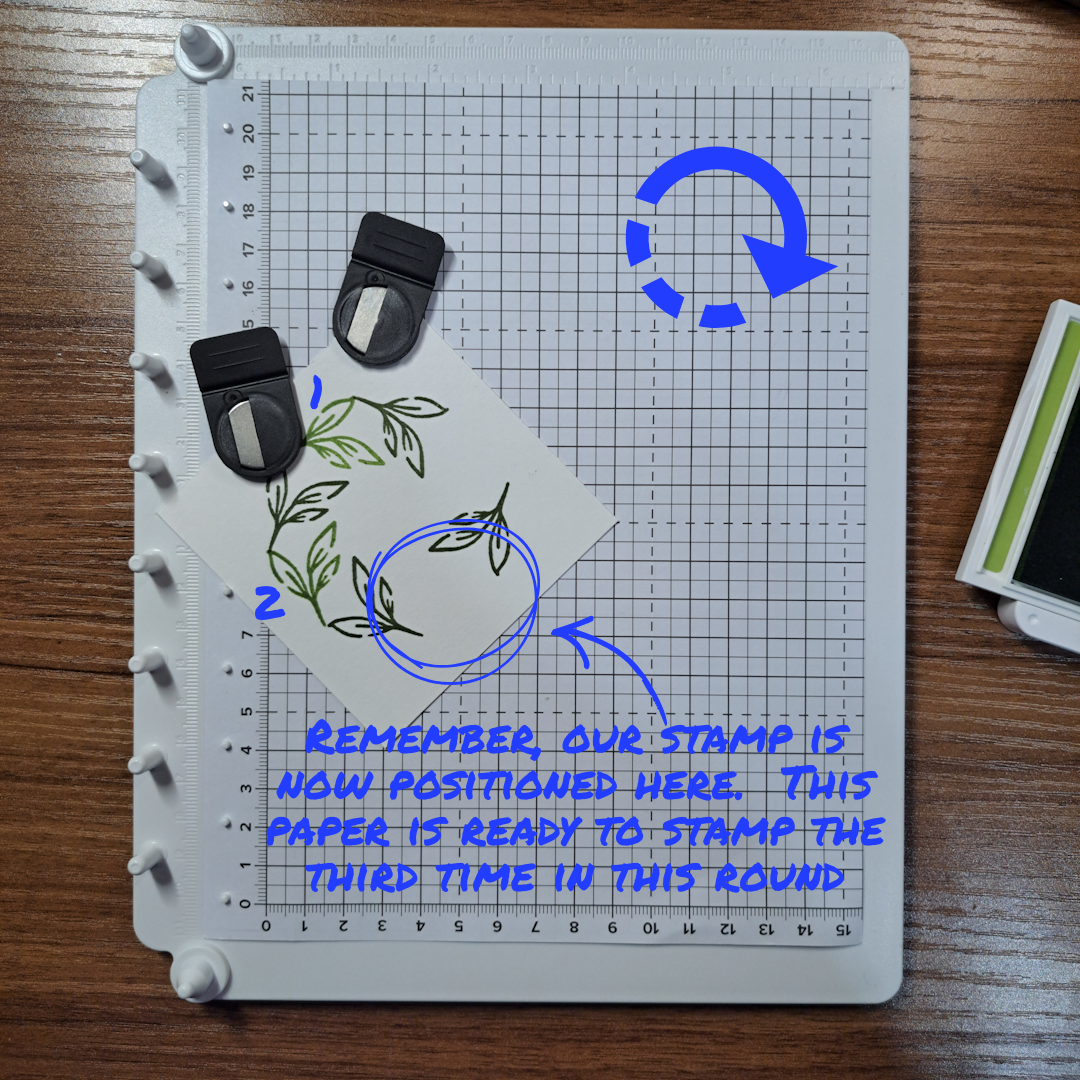
As instructed in the example above, rotate the paper to the right and stamp again, do this two more times. See the center photograph for how you piece should now look.
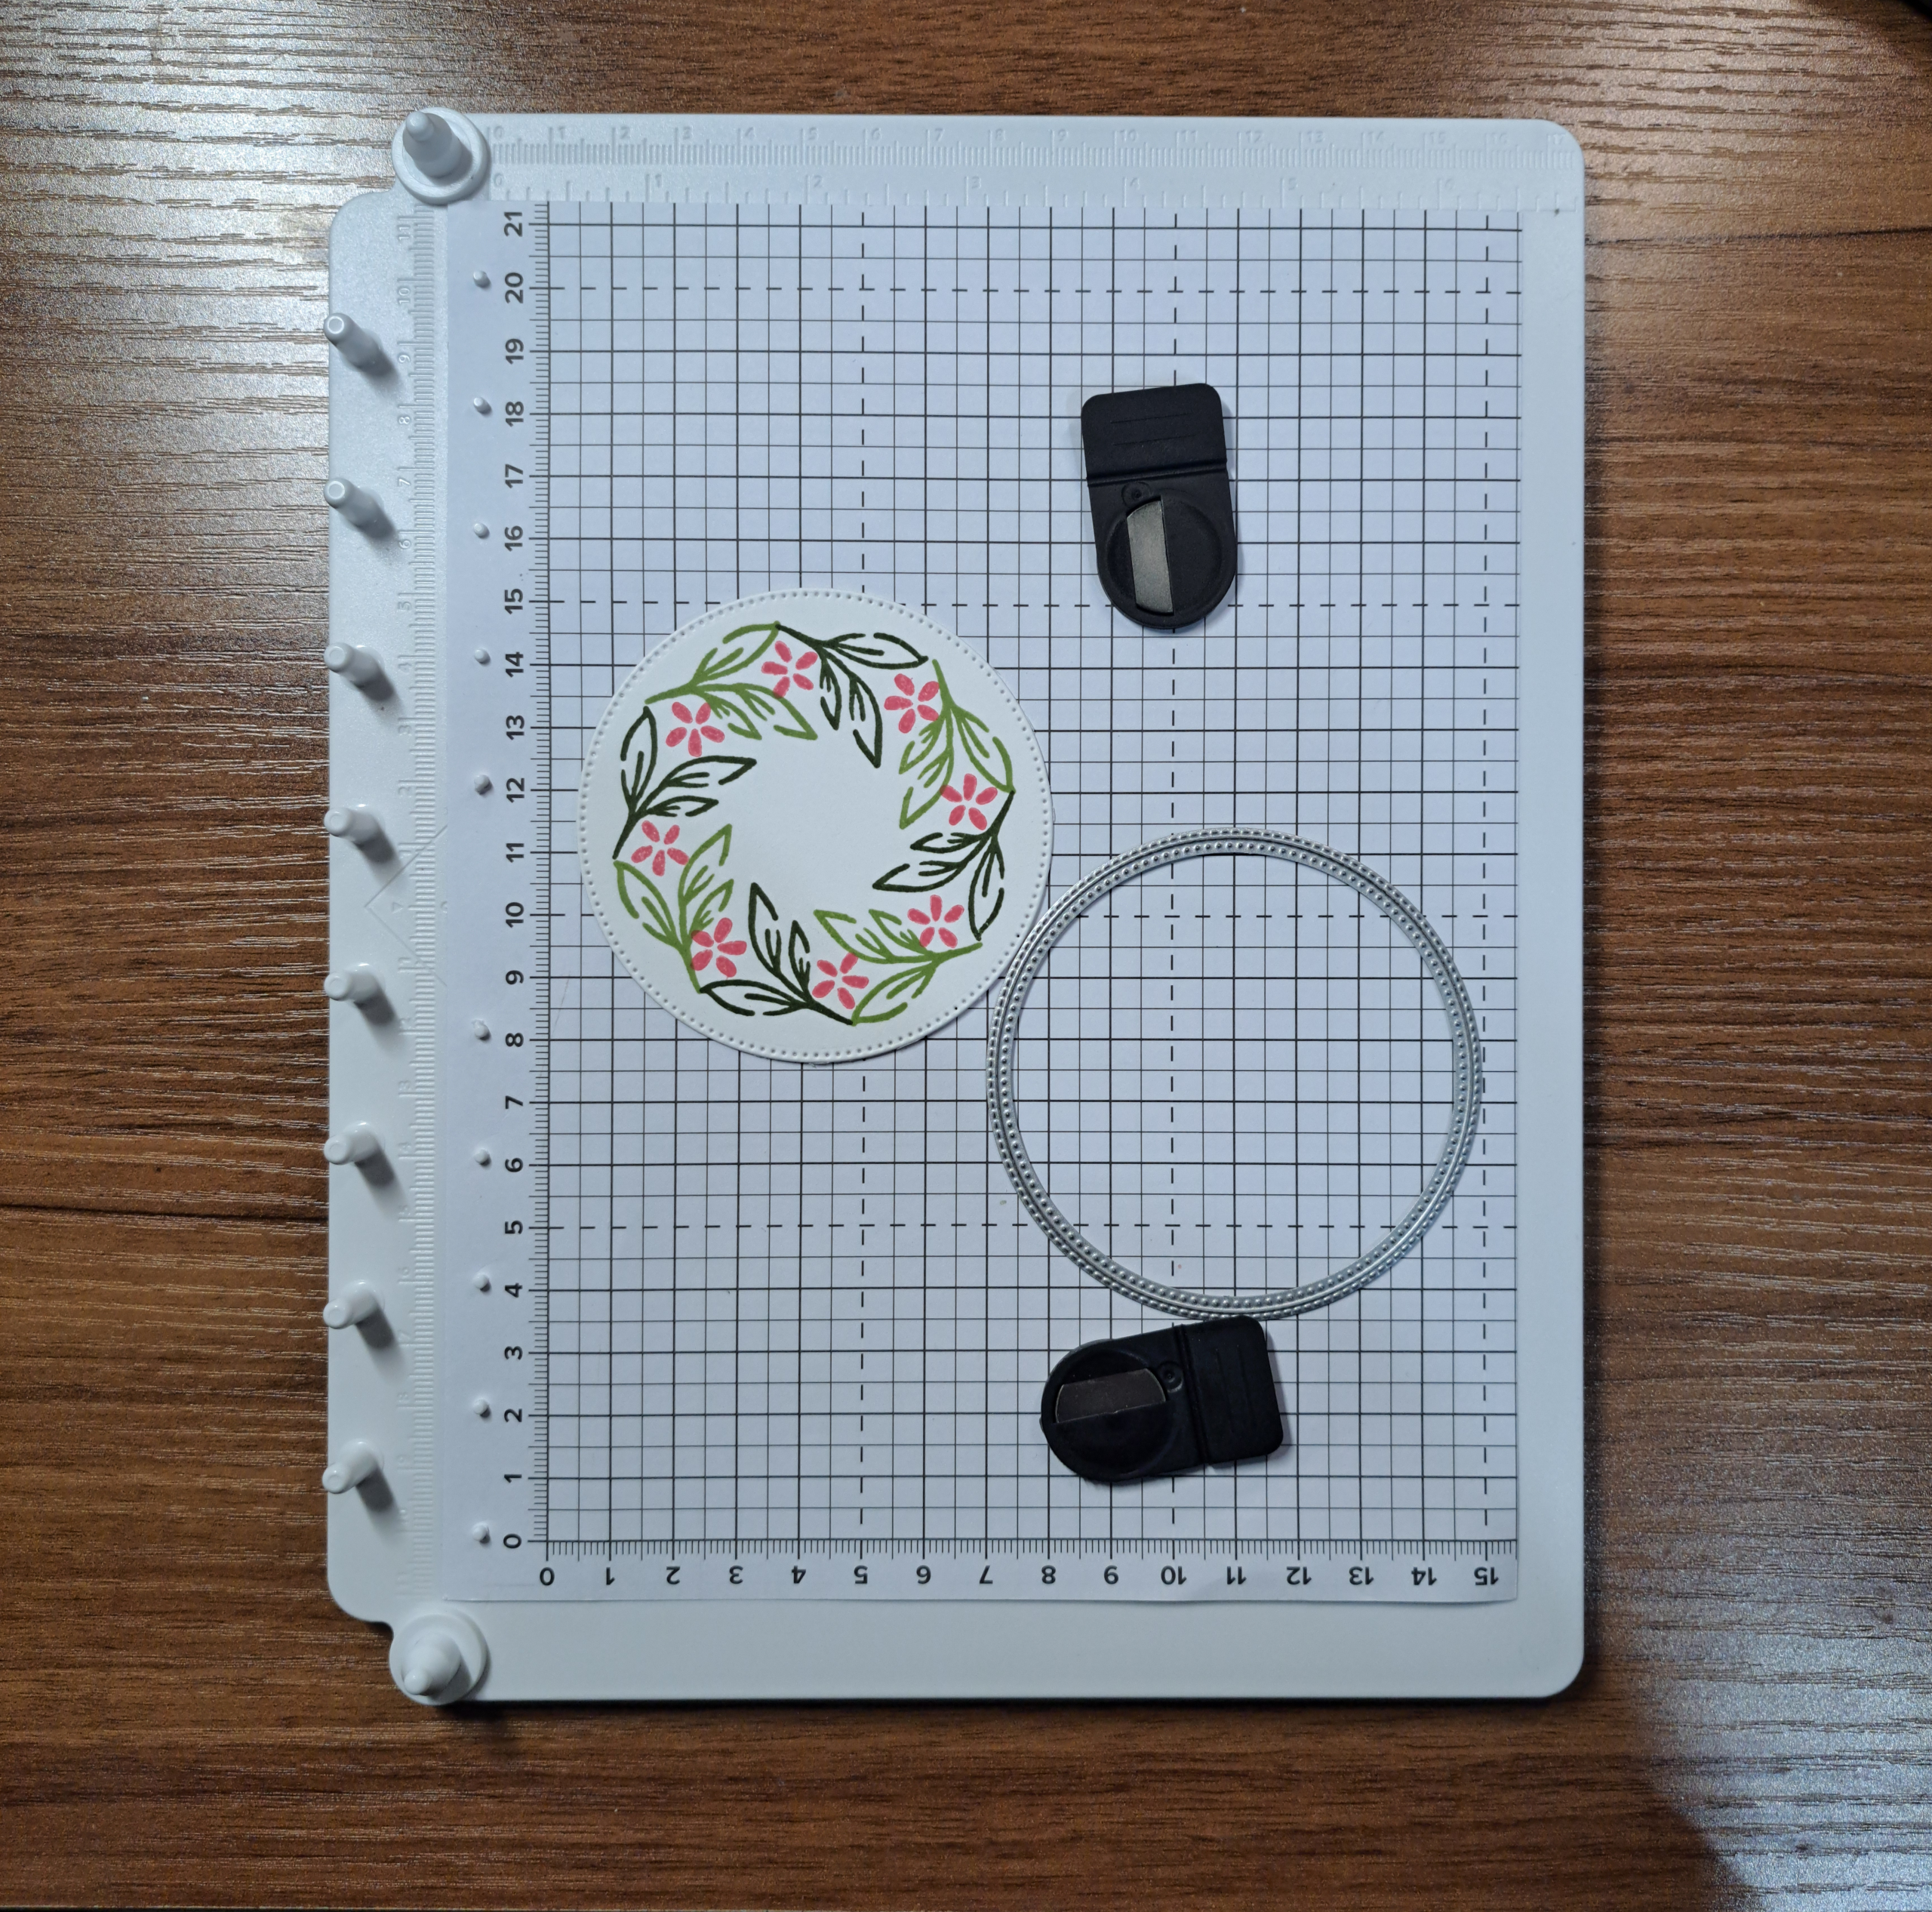
The third photograph illustrates the placement of the second round of stamping. The die is placed back down on the piece to check the placement (I should have left the pencil circle but never mind, I have the die and I will remember to not erase the circle next time.) I left the die in place and put the clear plastic cover over the top and pressed down to pick up the stamp. I moved it out of the way after picking up the die. It is this ability to place the stamp down and then pick it up ‘insitu’ that makes this stamping method work.
Working the same as in the first round I stamped, and then rotated my paper a quarter turn and stamped again without moving the stamp. Continuing on until I had stamped my paper four times in total.
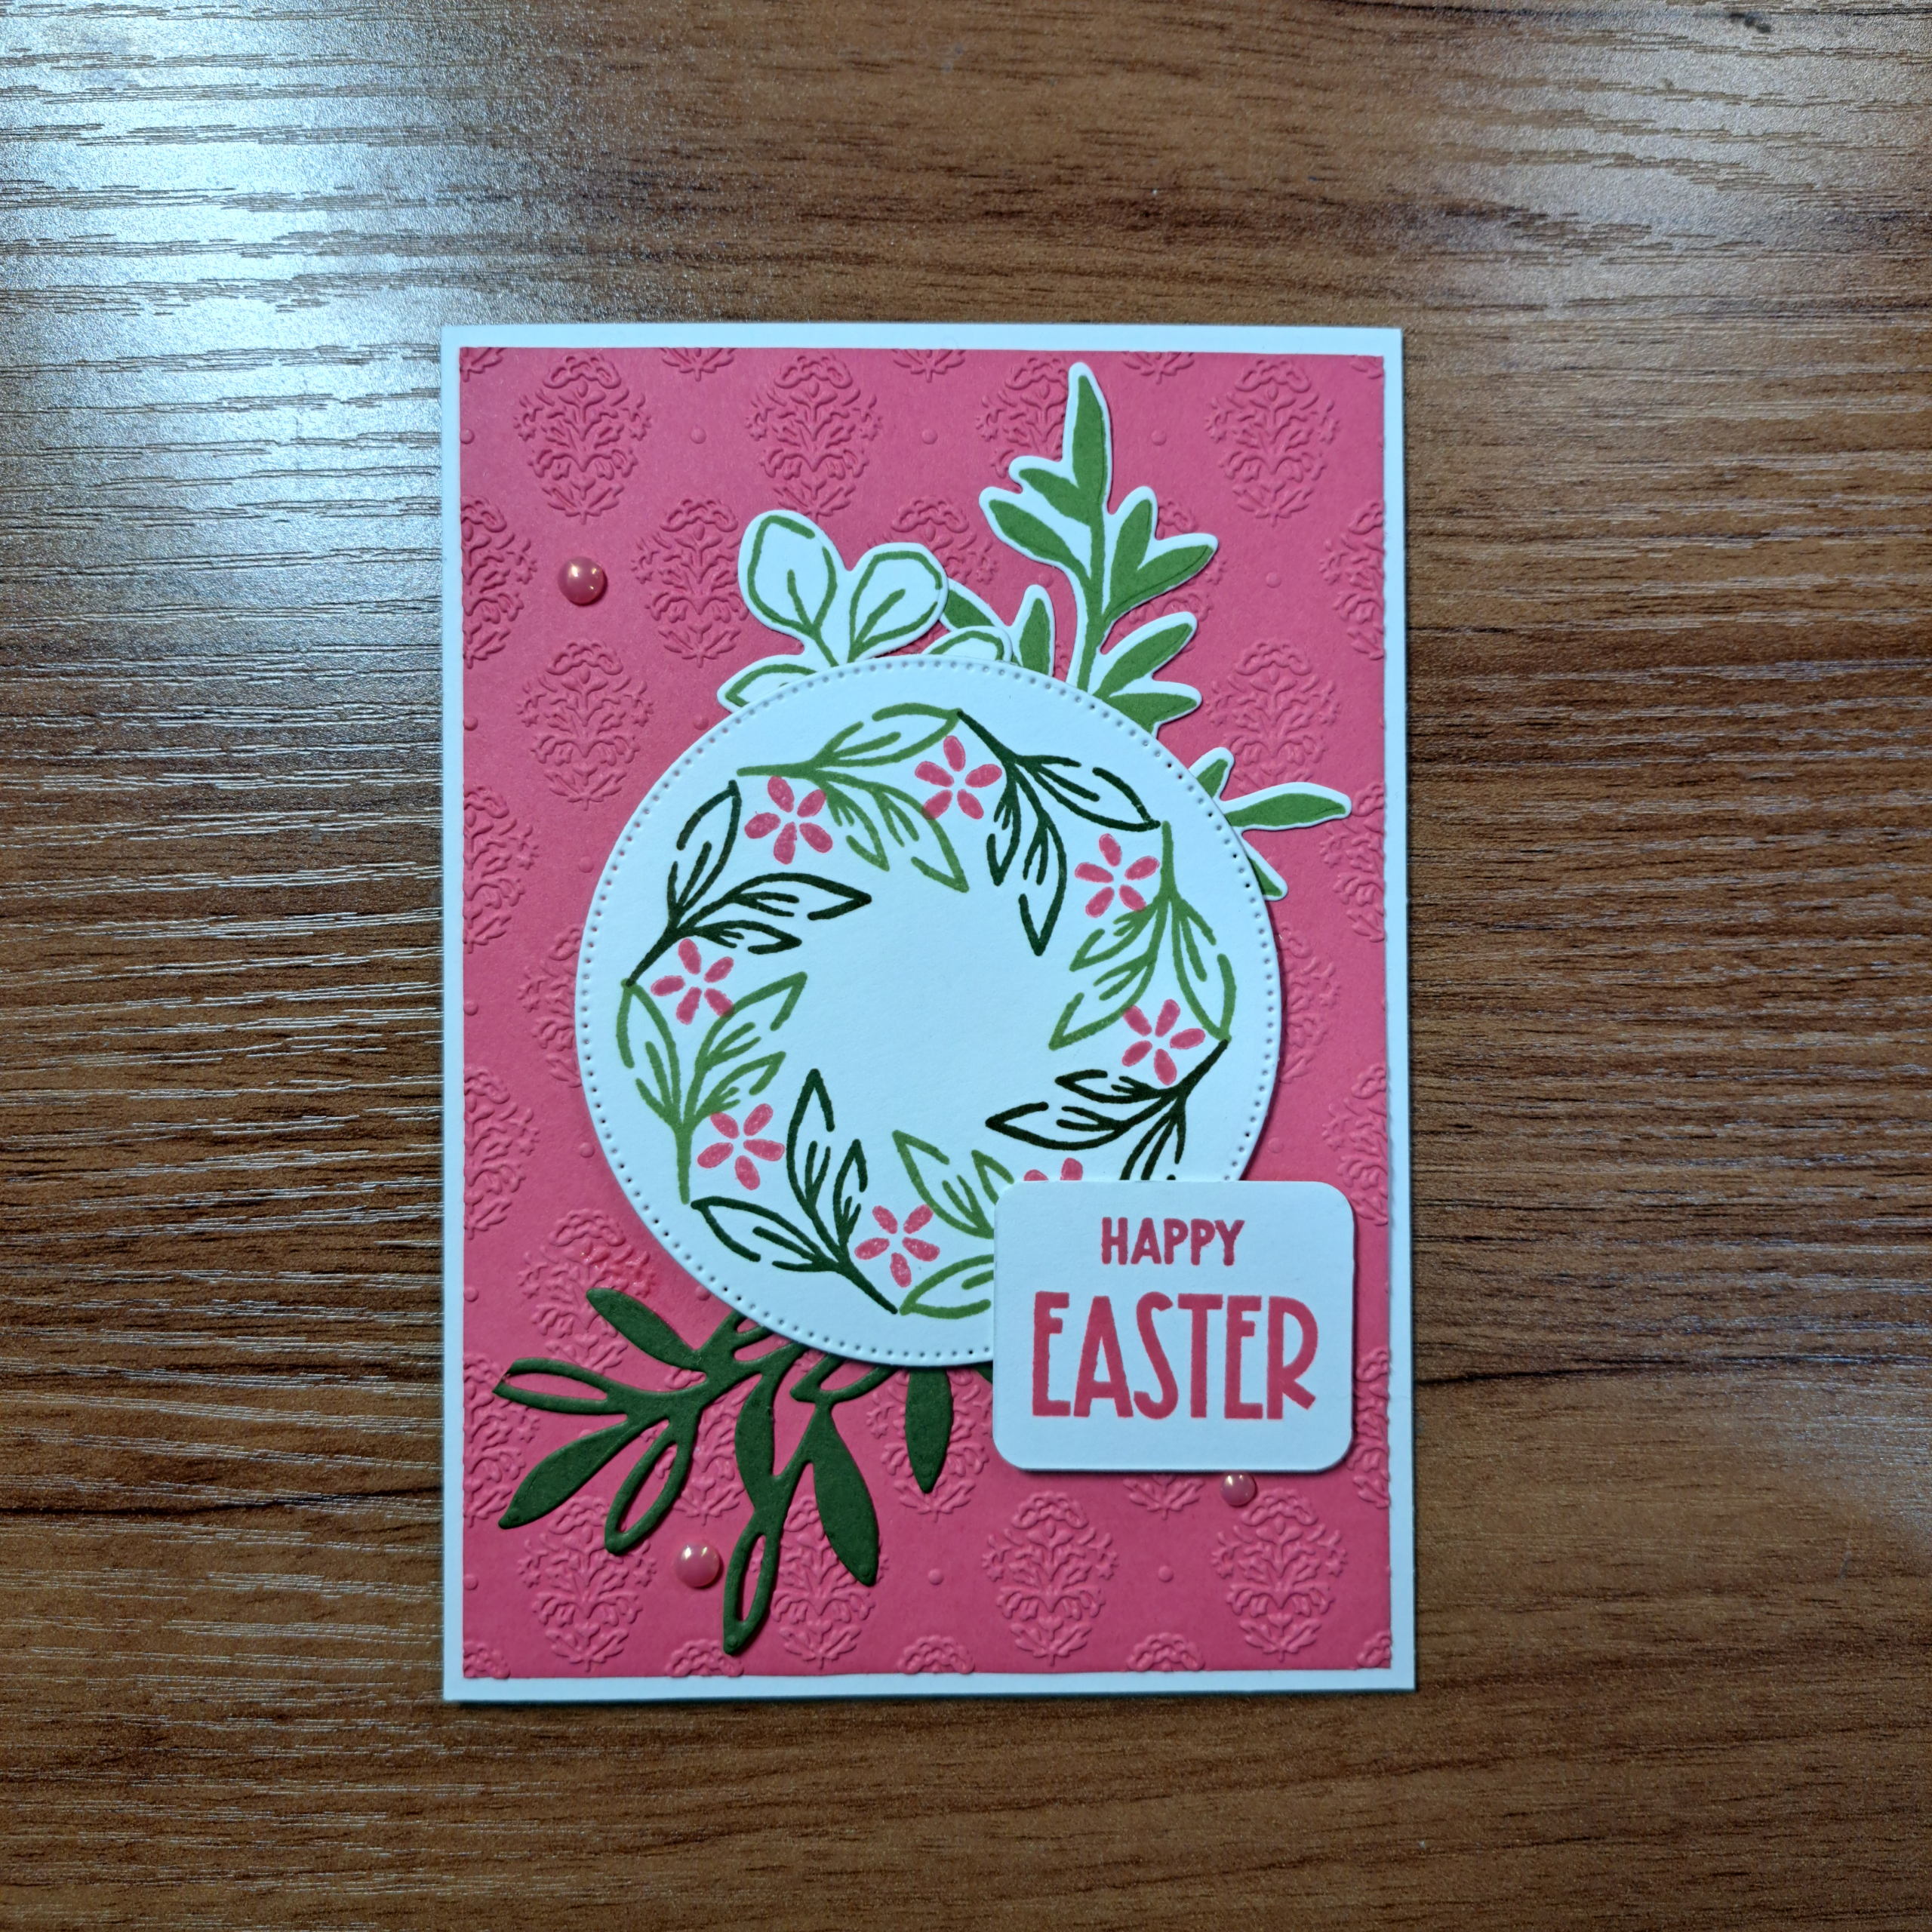
In the center picture above I added in some tiny flowers from the same stamp set. I could have just used a small block for this stamping but I actually found it easier to place the stamp down on my positioner and continue with the circle method. I did two rounds of stamping, changing up the position of the flower for the second round. The finished card is shown on the far right.
Thank you for reading with me today. This post is a bit longer than my usual diatribe. I hope you will forgive me. I am just so excited about this product! It was hard to keep it short. Until next time my friends, keeeeep stampin’
Product List![Nature's Symphony Photopolymer Stamp Set (English) [ 166919 ]](https://assets1.tamsnetwork.com/images/EC042017NF/166919s.jpg "Nature's Symphony Photopolymer Stamp Set (English) [ 166919 ]")
![Textured Notes Dies [ 165555 ]](https://assets1.tamsnetwork.com/images/EC042017NF/165555s.jpg "Textured Notes Dies [ 165555 ]")
![Nature Walk 12" X 12" (30.5 X 30.5 Cm) Designer Series Paper [ 166912 ]](https://assets1.tamsnetwork.com/images/EC042017NF/166912s.jpg "Nature Walk 12\" X 12\" (30.5 X 30.5 Cm) Designer Series Paper [ 166912 ]")
![Pretty Peacock A4 Cardstock [ 150886 ]](https://assets1.tamsnetwork.com/images/EC042017NF/150886s.jpg "Pretty Peacock A4 Cardstock [ 150886 ]")
![Cloud Cover A4 Cardstock [ 165293 ]](https://assets1.tamsnetwork.com/images/EC042017NF/165293s.jpg "Cloud Cover A4 Cardstock [ 165293 ]")
![Pretty Peacock Classic Stampin’ Pad [ 150083 ]](https://assets1.tamsnetwork.com/images/EC042017NF/150083s.jpg "Pretty Peacock Classic Stampin’ Pad [ 150083 ]")
![Black & Very Vanilla 3/8" (1 Cm) Large Check Ribbon [ 161982 ]](https://assets1.tamsnetwork.com/images/EC042017NF/161982s.jpg "Black & Very Vanilla 3/8\" (1 Cm) Large Check Ribbon [ 161982 ]")
![Iridescent Foil Gems [ 162842 ]](https://assets1.tamsnetwork.com/images/EC042017NF/162842s.jpg "Iridescent Foil Gems [ 162842 ]")
![Fabulous Sayings Photopolymer Stamp Set (English) [ 167972 ]](https://assets1.tamsnetwork.com/images/EC042017NF/167972s.jpg "Fabulous Sayings Photopolymer Stamp Set (English) [ 167972 ]")
![Peaceful Garden 12" X 12" (30.5 X 30.5 Cm) Designer Series Paper [ 165917 ]](https://assets1.tamsnetwork.com/images/EC042017NF/165917s.jpg "Peaceful Garden 12\" X 12\" (30.5 X 30.5 Cm) Designer Series Paper [ 165917 ]")
![Crumb Cake A4 Card Stock [ 121685 ]](https://assets1.tamsnetwork.com/images/EC042017NF/121685s.jpg "Crumb Cake A4 Card Stock [ 121685 ]")
![Crumb Cake Classic Stampin' Pad [ 147116 ]](https://assets1.tamsnetwork.com/images/EC042017NF/147116s.jpg "Crumb Cake Classic Stampin' Pad [ 147116 ]")
![Linen Thread [ 104199 ]](https://assets1.tamsnetwork.com/images/EC042017NF/104199s.jpg "Linen Thread [ 104199 ]")
![Pressed Flower Motifs [ 165215 ]](https://assets1.tamsnetwork.com/images/EC042017NF/165215s.jpg "Pressed Flower Motifs [ 165215 ]")
![Greenery Lane Photopolymer Stamp Set (English) [ 166870 ]](https://assets1.tamsnetwork.com/images/EC042017NF/166870s.jpg "Greenery Lane Photopolymer Stamp Set (English) [ 166870 ]")
![Lost Lagoon A4 Cardstock [ 133686 ]](https://assets1.tamsnetwork.com/images/EC042017NF/133686s.jpg "Lost Lagoon A4 Cardstock [ 133686 ]")
![Secret Sea Classic Stampin' Pad [ 165285 ]](https://assets1.tamsnetwork.com/images/EC042017NF/165285s.jpg "Secret Sea Classic Stampin' Pad [ 165285 ]")
![Secret Sea 3/8" (1 Cm) Bordered Open Weave Ribbon [ 166932 ]](https://assets1.tamsnetwork.com/images/EC042017NF/166932s.jpg "Secret Sea 3/8\" (1 Cm) Bordered Open Weave Ribbon [ 166932 ]")
![Reason To Celebrate Photopolymer Stamp Set (English) [ 166905 ]](https://assets1.tamsnetwork.com/images/EC042017NF/166905s.jpg "Reason To Celebrate Photopolymer Stamp Set (English) [ 166905 ]")
![Greenery Lane Dies [ 166876 ]](https://assets1.tamsnetwork.com/images/EC042017NF/166876s.jpg "Greenery Lane Dies [ 166876 ]")
![Damask Designs Embossing Folder [ 165214 ]](https://assets1.tamsnetwork.com/images/EC042017NF/165214s.jpg "Damask Designs Embossing Folder [ 165214 ]")
![Basic White A4 Cardstock [ 166781 ]](https://assets1.tamsnetwork.com/images/EC042017NF/166781s.jpg "Basic White A4 Cardstock [ 166781 ]")
![Strawberry Slush A4 Cardstock [ 165297 ]](https://assets1.tamsnetwork.com/images/EC042017NF/165297s.jpg "Strawberry Slush A4 Cardstock [ 165297 ]")
![Mossy Meadow A4 Cardstock [ 133683 ]](https://assets1.tamsnetwork.com/images/EC042017NF/133683s.jpg "Mossy Meadow A4 Cardstock [ 133683 ]")
![Old Olive Classic Stampin' Pad [ 147090 ]](https://assets1.tamsnetwork.com/images/EC042017NF/147090s.jpg "Old Olive Classic Stampin' Pad [ 147090 ]")
![Mossy Meadow Classic Stampin' Pad [ 147111 ]](https://assets1.tamsnetwork.com/images/EC042017NF/147111s.jpg "Mossy Meadow Classic Stampin' Pad [ 147111 ]")
![Strawberry Slush Classic Stampin' Pad [ 165286 ]](https://assets1.tamsnetwork.com/images/EC042017NF/165286s.jpg "Strawberry Slush Classic Stampin' Pad [ 165286 ]")
![2025–2027 In Color™ Flat Pearls [ 165192 ]](https://assets1.tamsnetwork.com/images/EC042017NF/165192s.jpg "2025–2027 In Color™ Flat Pearls [ 165192 ]")
![Multipurpose Liquid Glue [ 154974 ]](https://assets1.tamsnetwork.com/images/EC042017NF/154974s.jpg "Multipurpose Liquid Glue [ 154974 ]")
![Stampin' Dimensionals [ 104430 ]](https://assets1.tamsnetwork.com/images/EC042017NF/104430s.jpg "Stampin' Dimensionals [ 104430 ]")
![Paper Trimmer [ 152392 ]](https://assets1.tamsnetwork.com/images/EC042017NF/152392s.jpg "Paper Trimmer [ 152392 ]")
![Stampin' Cut & Emboss Machine [ 149653 ]](https://assets1.tamsnetwork.com/images/EC042017NF/149653s.jpg "Stampin' Cut & Emboss Machine [ 149653 ]")