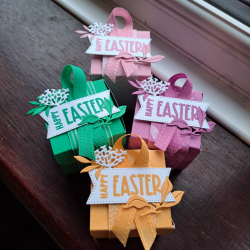
I originally planned this post for later in the month but with the advent of Stampin’Up’s flash sale on Two Tone Card Stock I felt you would like to see it now! Especially since this card is the perfect foil for the two toned action of this nifty product. The weight and feel of this relatively new card stock is unique but the gorgeous colors are all Stampin’ Up.
This card is not my design, I can only wish for the kind of talent it’s creator has. This simple fun fold card comes to us from, Gerry at Gerry’s Craft Room. I have linked her video below. I hope after viewing this post you will visit her channel to see the wonderful things she has to offer. Hint: it’s more than just card making!
Supplies
Textured Notes Cling Stamp Set
Textured Notes Die Set
Mixed Florals Die Set
Botanical Textures Designer Series Paper
Basic Black Card Stock
Basic White Card Stock
Basic Gray Stampin Pad
Baker’s Twine Essentials Pack
Multipurpose Liquid Glue
Tear and Tape
Mini Glue Dots
Dimensionals
Paper Trimmer
Mini Cut and Emboss Machine
Directions
Card Base
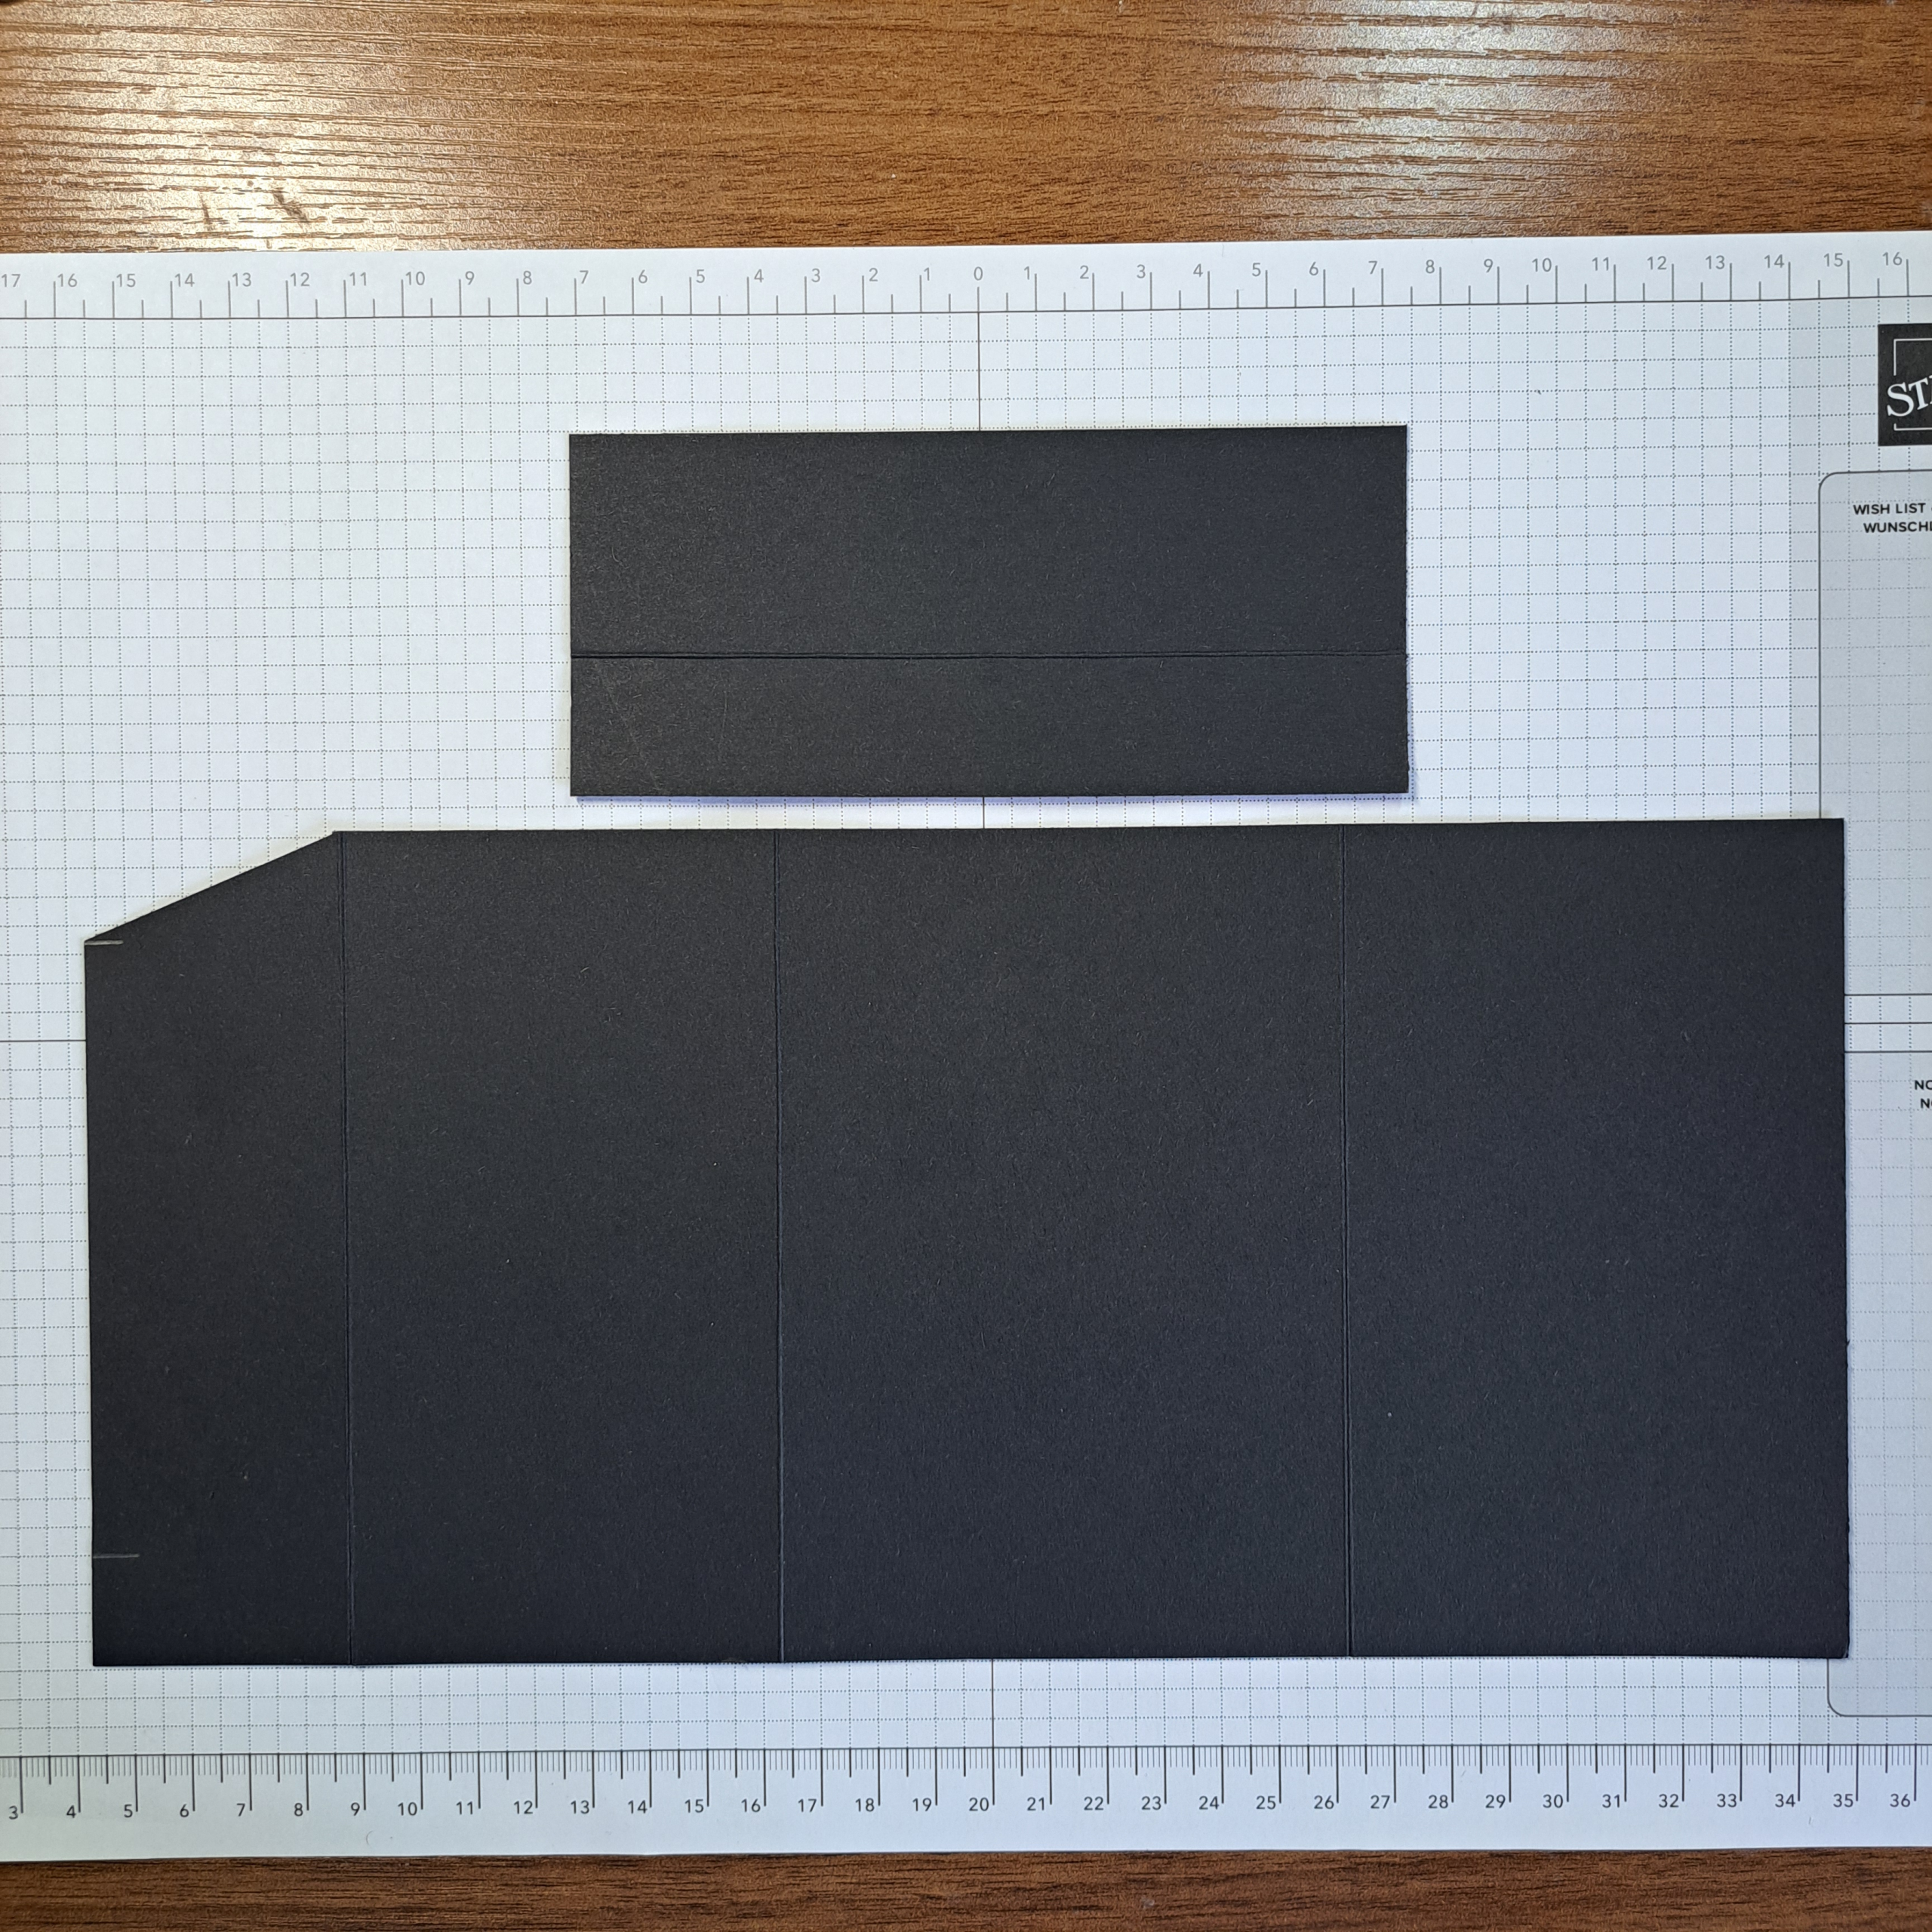
Card base is cut from a half sheet of 30.5cm x 30.5cm (12″ x 12″) card stock. Dimensions are: 30.5cm x 14.5cm (12″ x 5-3/4″).
Score at 4.5cm, 12cm, and 22cm (1-3/4″, 4-3/4″, and 8-3/4″).
Cut a flap for the card front from the same color card stock. Dimensions: 6.3cm x 14.5cm (2-1/2″ x 5-3/4″) Score this piece at 2.5cm (1″).
Fold and burnish all score lines. Be sure to fold each score line to the front and to the back.
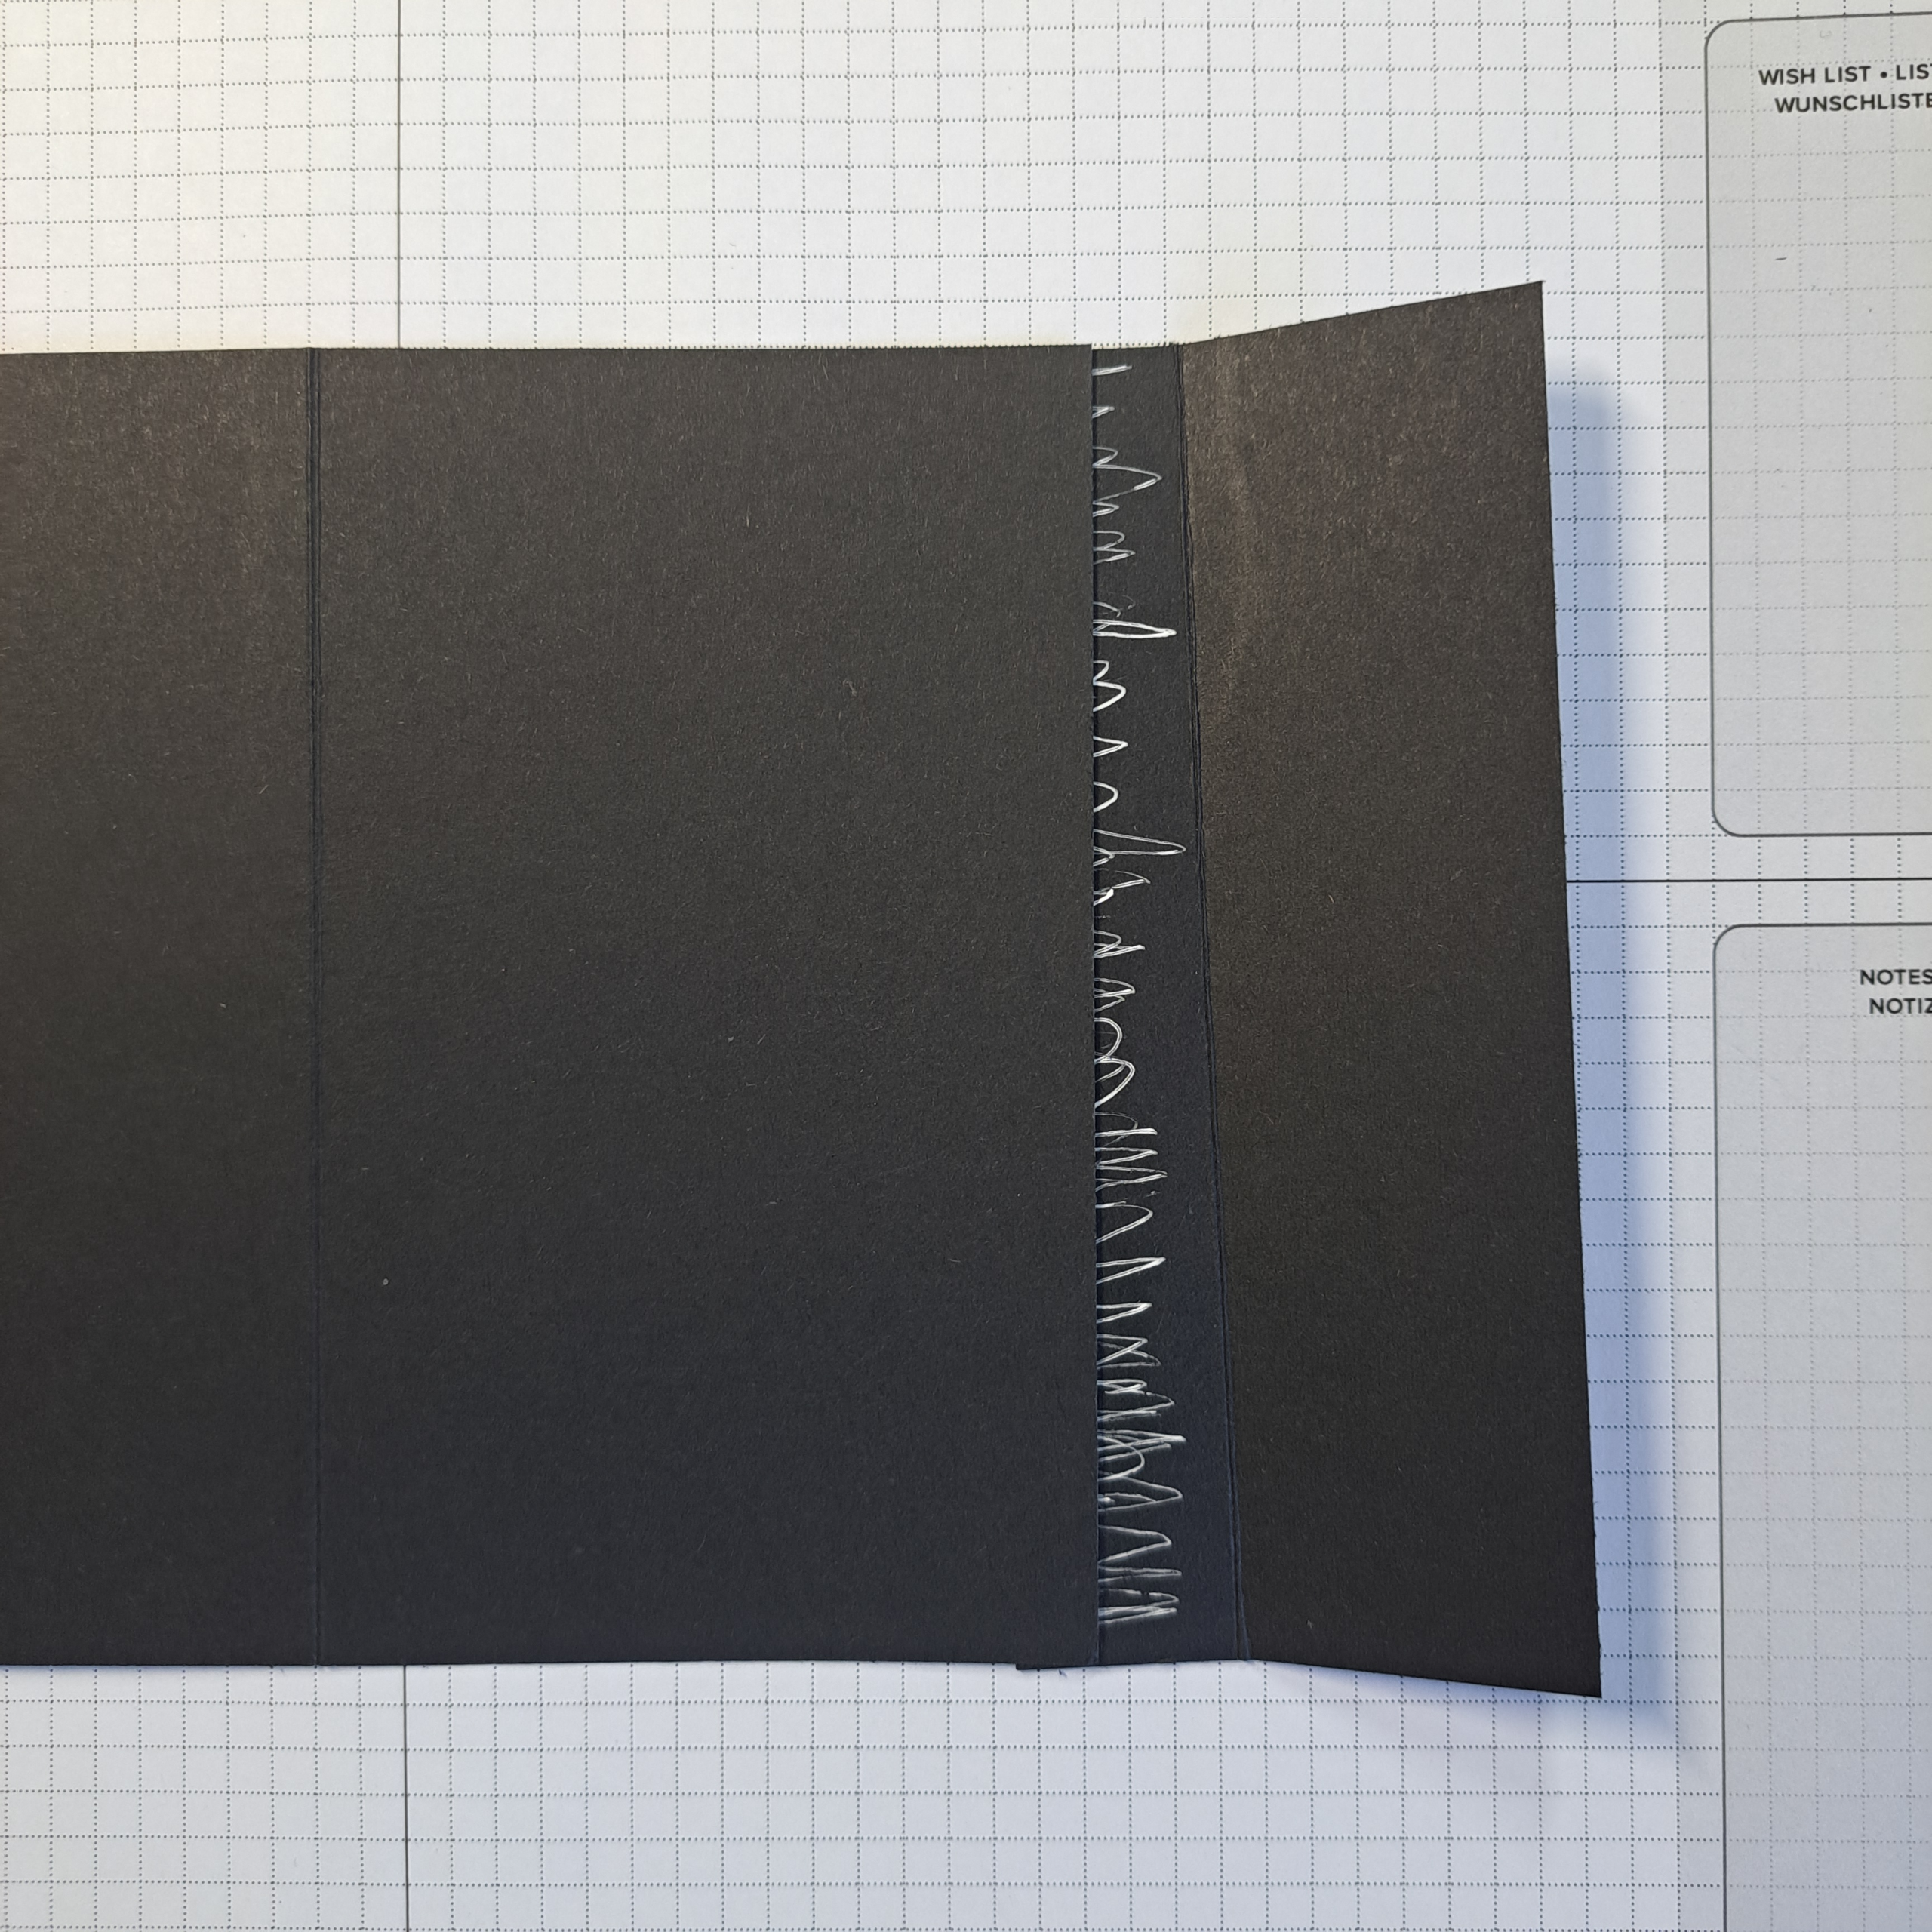
Lay the card base down as shown in the photo. Measure down 2cm (3/4″ and make a mark. Now measure up from the bottom and mark at 2cm (3/4″). At the top, cut from the mark up to the first score line at 4.5cm (1-3/4″). Repeat this step at the bottom of the card base. The photo shows the top triangle already cut out. Click on the photo to enlarge it, that will make it easier to see my original marks. Click your back button to return to the blog.
Place glue on the 2.5cm (1″) of the pocket piece. Adhere it to the right side of the card base. See photos below.
Add Decorative Paper
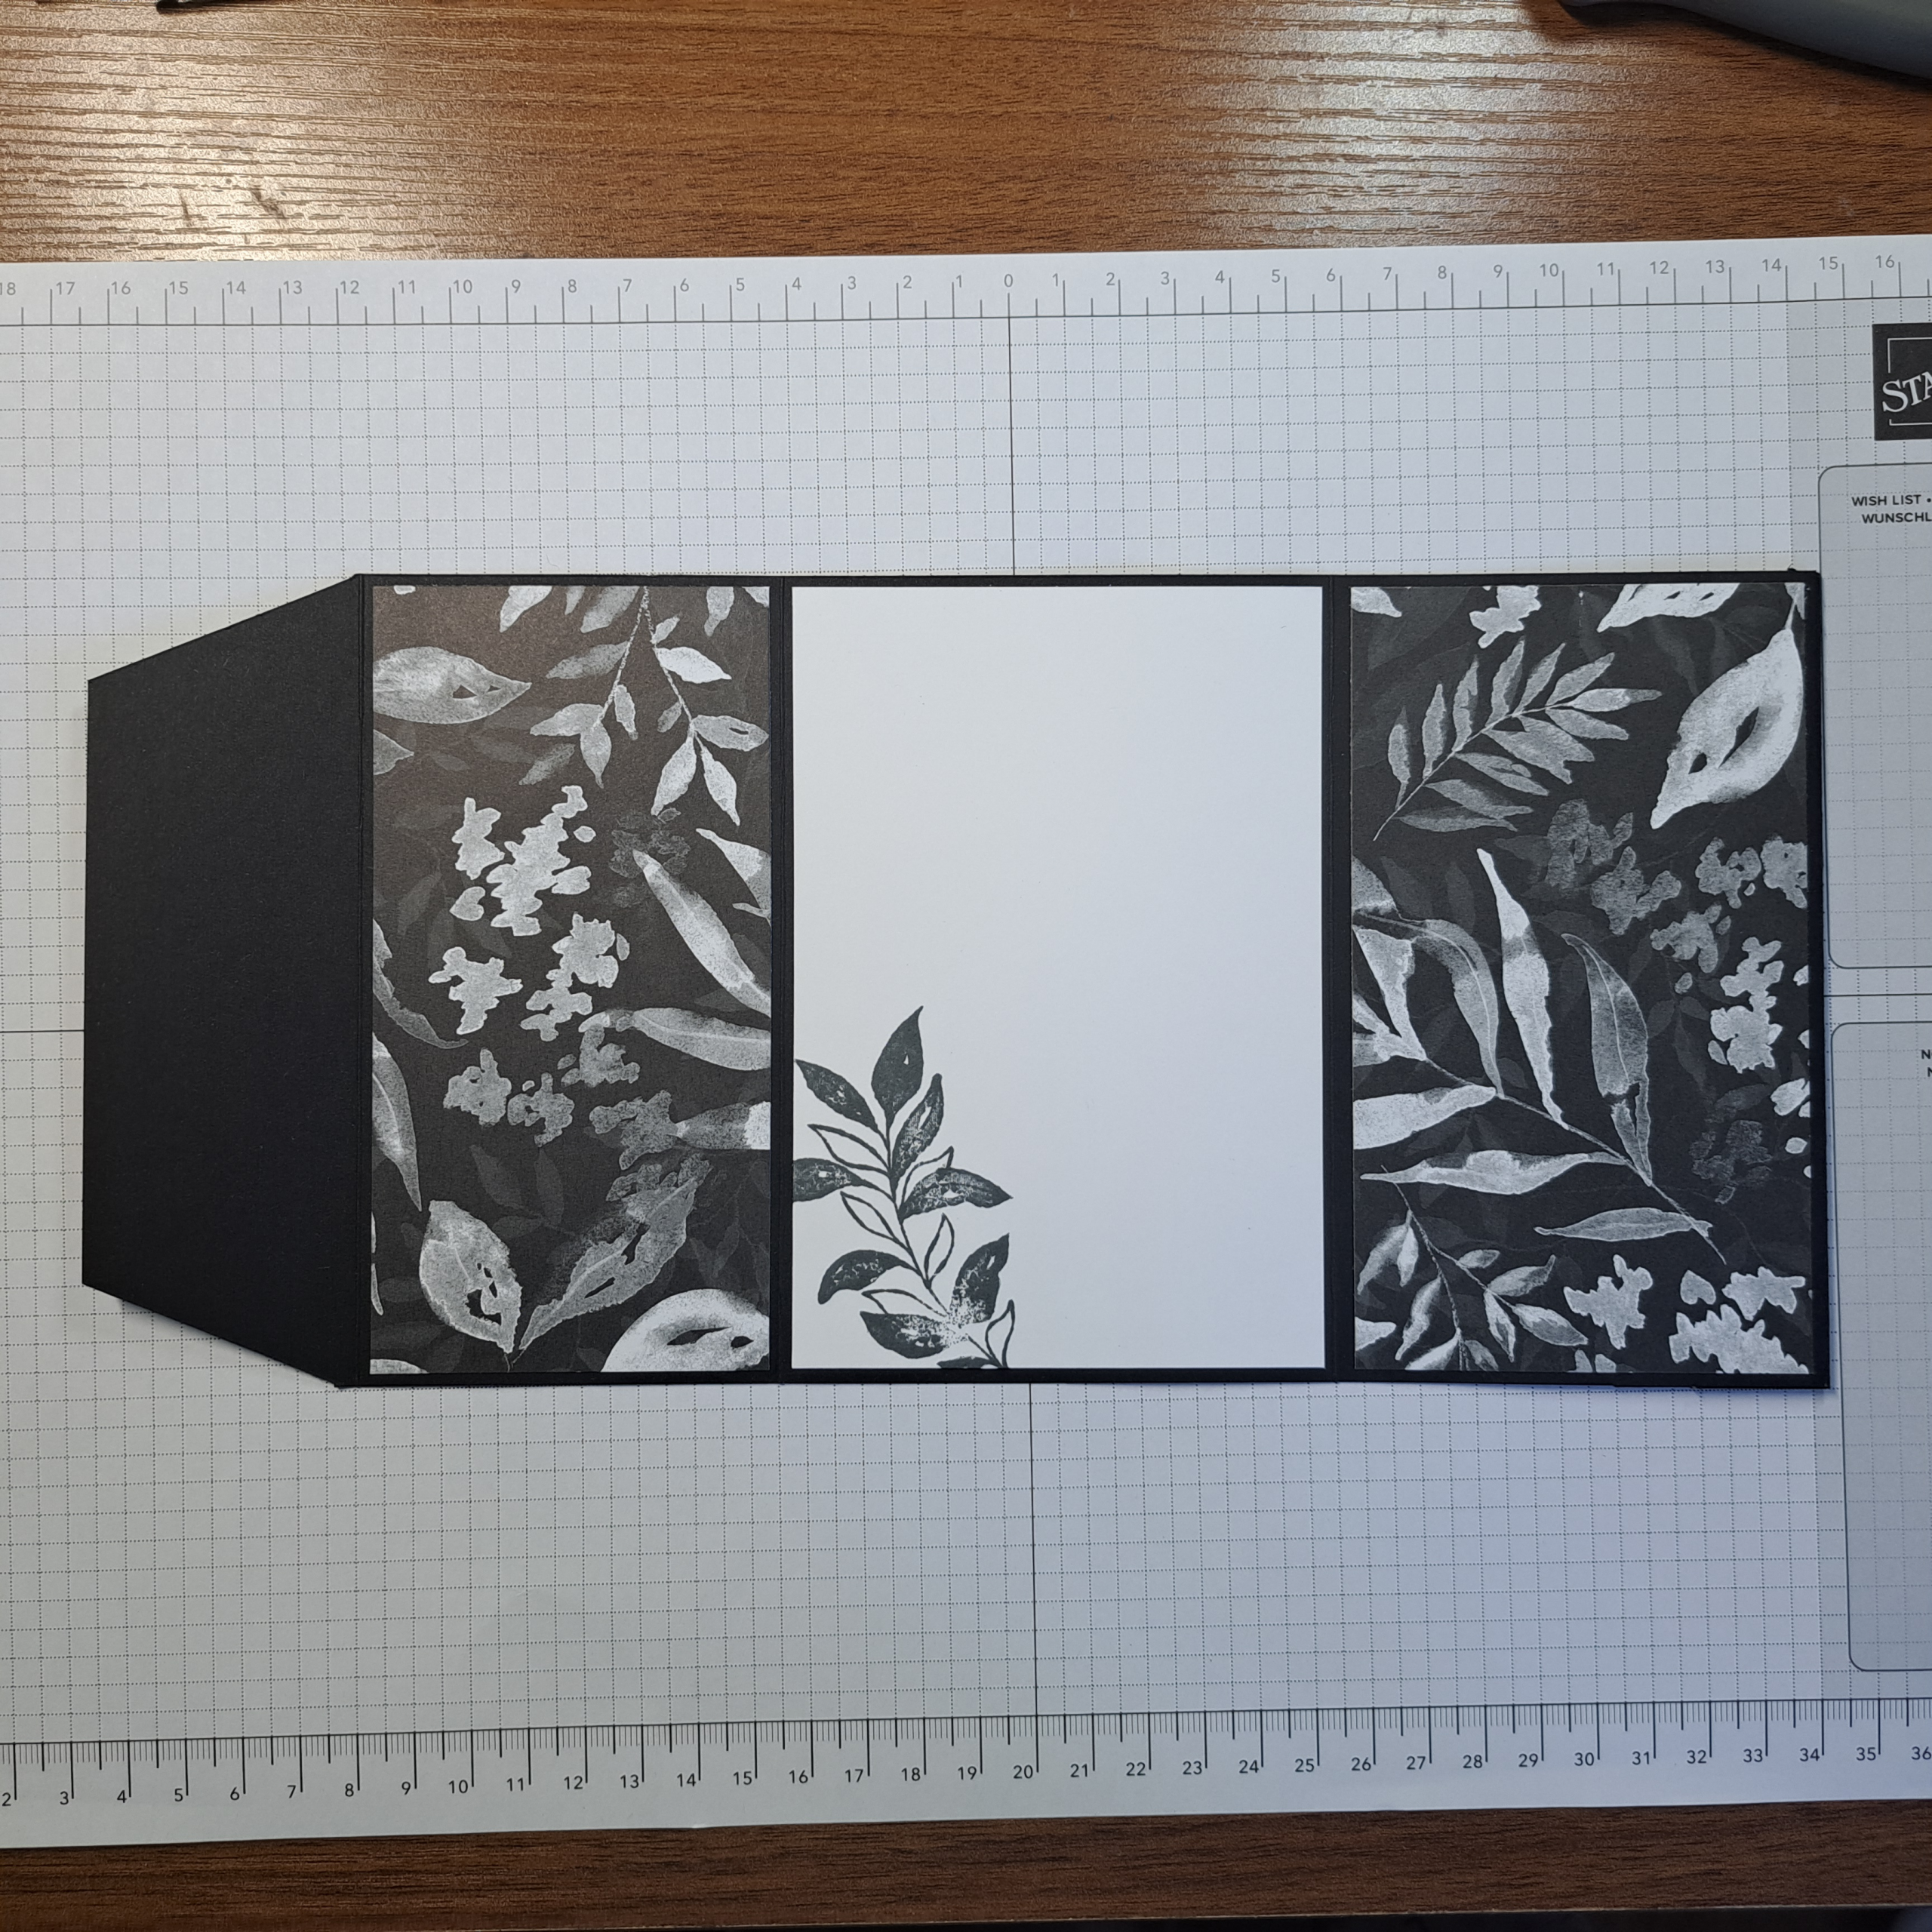
Cut a piece of white (or light colored card stock) to act as a liner, 9.5cm x 14cm (3-3/4″ x 5-1/2″). This piece can be stamped or decorated as desired. Additionally you can decorate the back of the card by cutting a piece of the Designer Series Paper to this same size.
Determine which side of the card stock will be turned out and which side will be the inside. Adhere the liner to the largest area in the center of the card.
Cut two pieces of your Designer Series Paper for the right and left sides of the card interior. The piece on the left is cut to 7cm x 14cm (2-3/4″ x 5-1/2″). The piece on the right is cut to 8.3cm x 14cm (3-1/4″ x 5-1/2″).
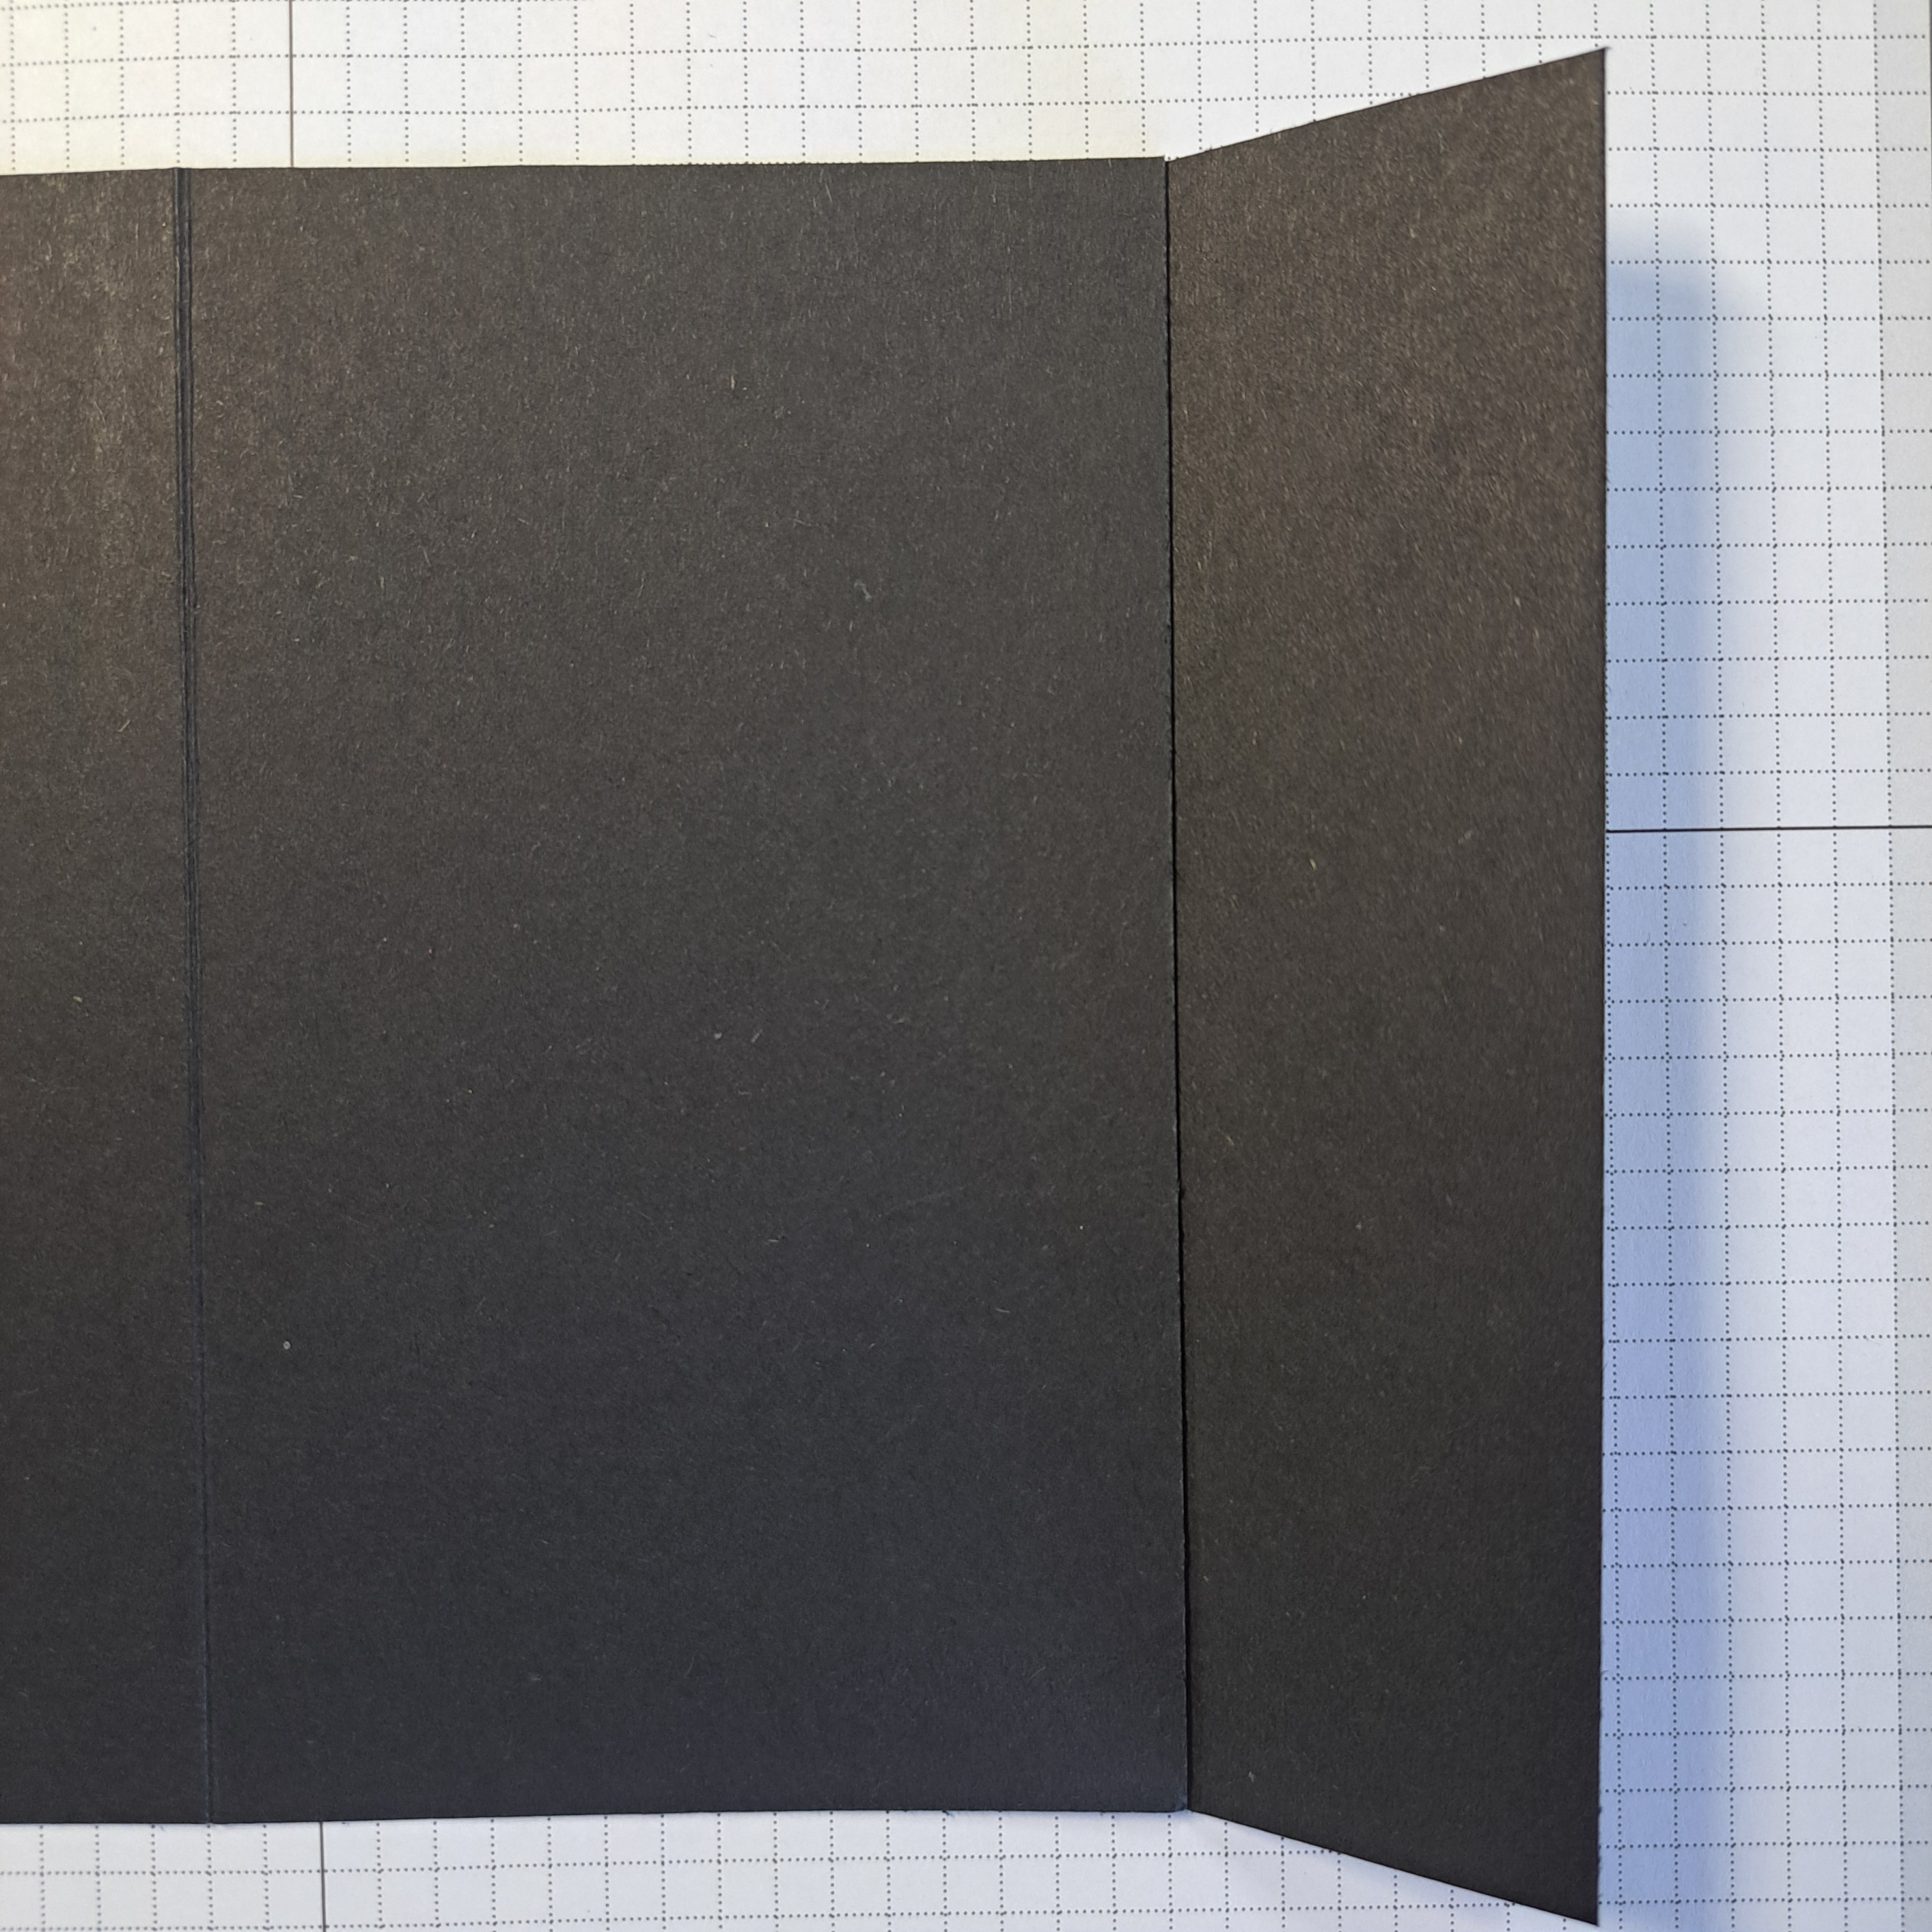
The photo is showing the inside of the card. Note, this side of the fold in flap is left blank. The right pocket piece has already been folded in and adhered down to the front side.
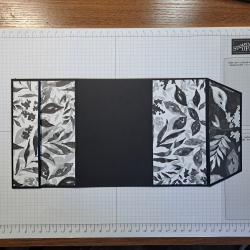
For the card’s front (outside) cut two pieces of Designer Series paper the same sizes as the left and right pieces for the interior. To repeat the measurements for the ‘inside’ photo: the piece on the left (with the pocket) is cut to 8.3cm x 14cm (3-1/4″ x 5-1/2″). The piece on the right next to the flap is cut to 7cm x 14cm (2-3/4″ x 5-1/2″).
To decorate the pocket piece you will need a strip of DSP cut to 3.3cm x 14cm (1-1/4″ x 5-1/2″).
Once you have applied the DSP to the right front of the card fold the pocket piece over and glue down top and bottom. I used a piece of Tear and Tape for each end to be sure the pocked adhered well and to keep the adhesive from moving into the pocket area.
For the fold in shaped flap cut a rectangle 4cm x 14cm (1-1/2″ x 5-1/2″). Align the DSP to the center of the flap (right and left sides equal) and match the length of the score line with the paper extending over the card stock. Trim the triangle edge away following the line of the card stock. Move the DSP so that it is centered right and left but double the distance from the angled edge. Trim away the over hanging triangle. Now you should be able to move the Designer Series Paper strip into a centered position with the same amount of card stock showing on all sides.
Adhere all DSP pieces. You can use the photos to determine which ‘side’ you are working on.
Something to note, when the card is closed the fold in flap will be hidden so it does not matter too much which of your DSP patterns you choose for this section.
Focal Point
To create the focal point die cut a base layer of basic black card stock using the 6.4cm x 9.5cm (2-1/2″ x 3-3/4″) rectangle from the Textured Notes Die set.
Next, stamp the large leaves image from the Textured Notes stamp set onto a scrap of white card stock using the Basic Gray ink. Die cut out this piece using the 4.5cm x 8.2cm (1-3/4″ x 3-1/4″) rectangle from the Textured Notes die set. Layer this piece over the black rectangle leaving an equal border on all sides.
Die cut the large floral leaf image from the Mixed Florals die set out of basic black card stock. Glue this piece over the stamped image.
Stamp the sentiment, in this case from the Textured notes stamp set with the Basic Gray ink onto a small scrap of basic white card stock. Die cut the sentiment using the 2.2cm x 5.7cm (3/4″ x 2-1/4″) rectangle from the Textured Notes die set. Adhere the greeting on to the focal point as shown in the finished photo.
Tie a small bow with the black baker’s twine from the Backer’s Twine Essentials Pack. Use a mini glue dot to stick the bow to the stamped background just under the edge of the greeting (see photo).
Place dimensionals on the back side of the focal piece and glue to the front of the card.
I hope you have enjoyed this post. As promised here is a link to Gerry’s video at Gerry’s Craft Room https://www.youtube.com/watch?v=yQ_o_VqS96Q&ab_channel=Gerry%27sCraftRoom. I so enjoy her videos and her enthusiasm! If you do give this card a try please post a picture here to on social media and tag me @LoriOthen. Thank you for hanging with me today!
Product List![Textured Notes Cling Stamp Set (English) [ 165548 ]](https://assets1.tamsnetwork.com/images/EC042017NF/165548s.jpg "Textured Notes Cling Stamp Set (English) [ 165548 ]")
![Textured Notes Dies [ 165555 ]](https://assets1.tamsnetwork.com/images/EC042017NF/165555s.jpg "Textured Notes Dies [ 165555 ]")
![Mixed Florals Dies [ 164641 ]](https://assets1.tamsnetwork.com/images/EC042017NF/164641s.jpg "Mixed Florals Dies [ 164641 ]")
![Botanical Textures 12" X 12" (30.5 X 30.5 Cm) Designer Series Paper [ 165545 ]](https://assets1.tamsnetwork.com/images/EC042017NF/165545s.jpg "Botanical Textures 12\" X 12\" (30.5 X 30.5 Cm) Designer Series Paper [ 165545 ]")
![Basic Black 12" X 12" (30.5 X 30.5 Cm) Cardstock [ 166786 ]](https://assets1.tamsnetwork.com/images/EC042017NF/166786s.jpg "Basic Black 12\" X 12\" (30.5 X 30.5 Cm) Cardstock [ 166786 ]")
![Basic White A4 Cardstock [ 166781 ]](https://assets1.tamsnetwork.com/images/EC042017NF/166781s.jpg "Basic White A4 Cardstock [ 166781 ]")
![Basic Gray Classic Stampin' Pad [ 149165 ]](https://assets1.tamsnetwork.com/images/EC042017NF/149165s.jpg "Basic Gray Classic Stampin' Pad [ 149165 ]")
![Baker's Twine Essentials Pack [ 155475 ]](https://assets1.tamsnetwork.com/images/EC042017NF/155475s.jpg "Baker's Twine Essentials Pack [ 155475 ]")
![Tear & Tape Adhesive [ 154031 ]](https://assets1.tamsnetwork.com/images/EC042017NF/154031s.jpg "Tear & Tape Adhesive [ 154031 ]")

![Mini Glue Dots [ 103683 ]](https://assets1.tamsnetwork.com/images/EC042017NF/103683s.jpg "Mini Glue Dots [ 103683 ]")
![Stampin' Dimensionals [ 104430 ]](https://assets1.tamsnetwork.com/images/EC042017NF/104430s.jpg "Stampin' Dimensionals [ 104430 ]")

![Stampin' Cut & Emboss Machine [ 149653 ]](https://assets1.tamsnetwork.com/images/EC042017NF/149653s.jpg "Stampin' Cut & Emboss Machine [ 149653 ]")