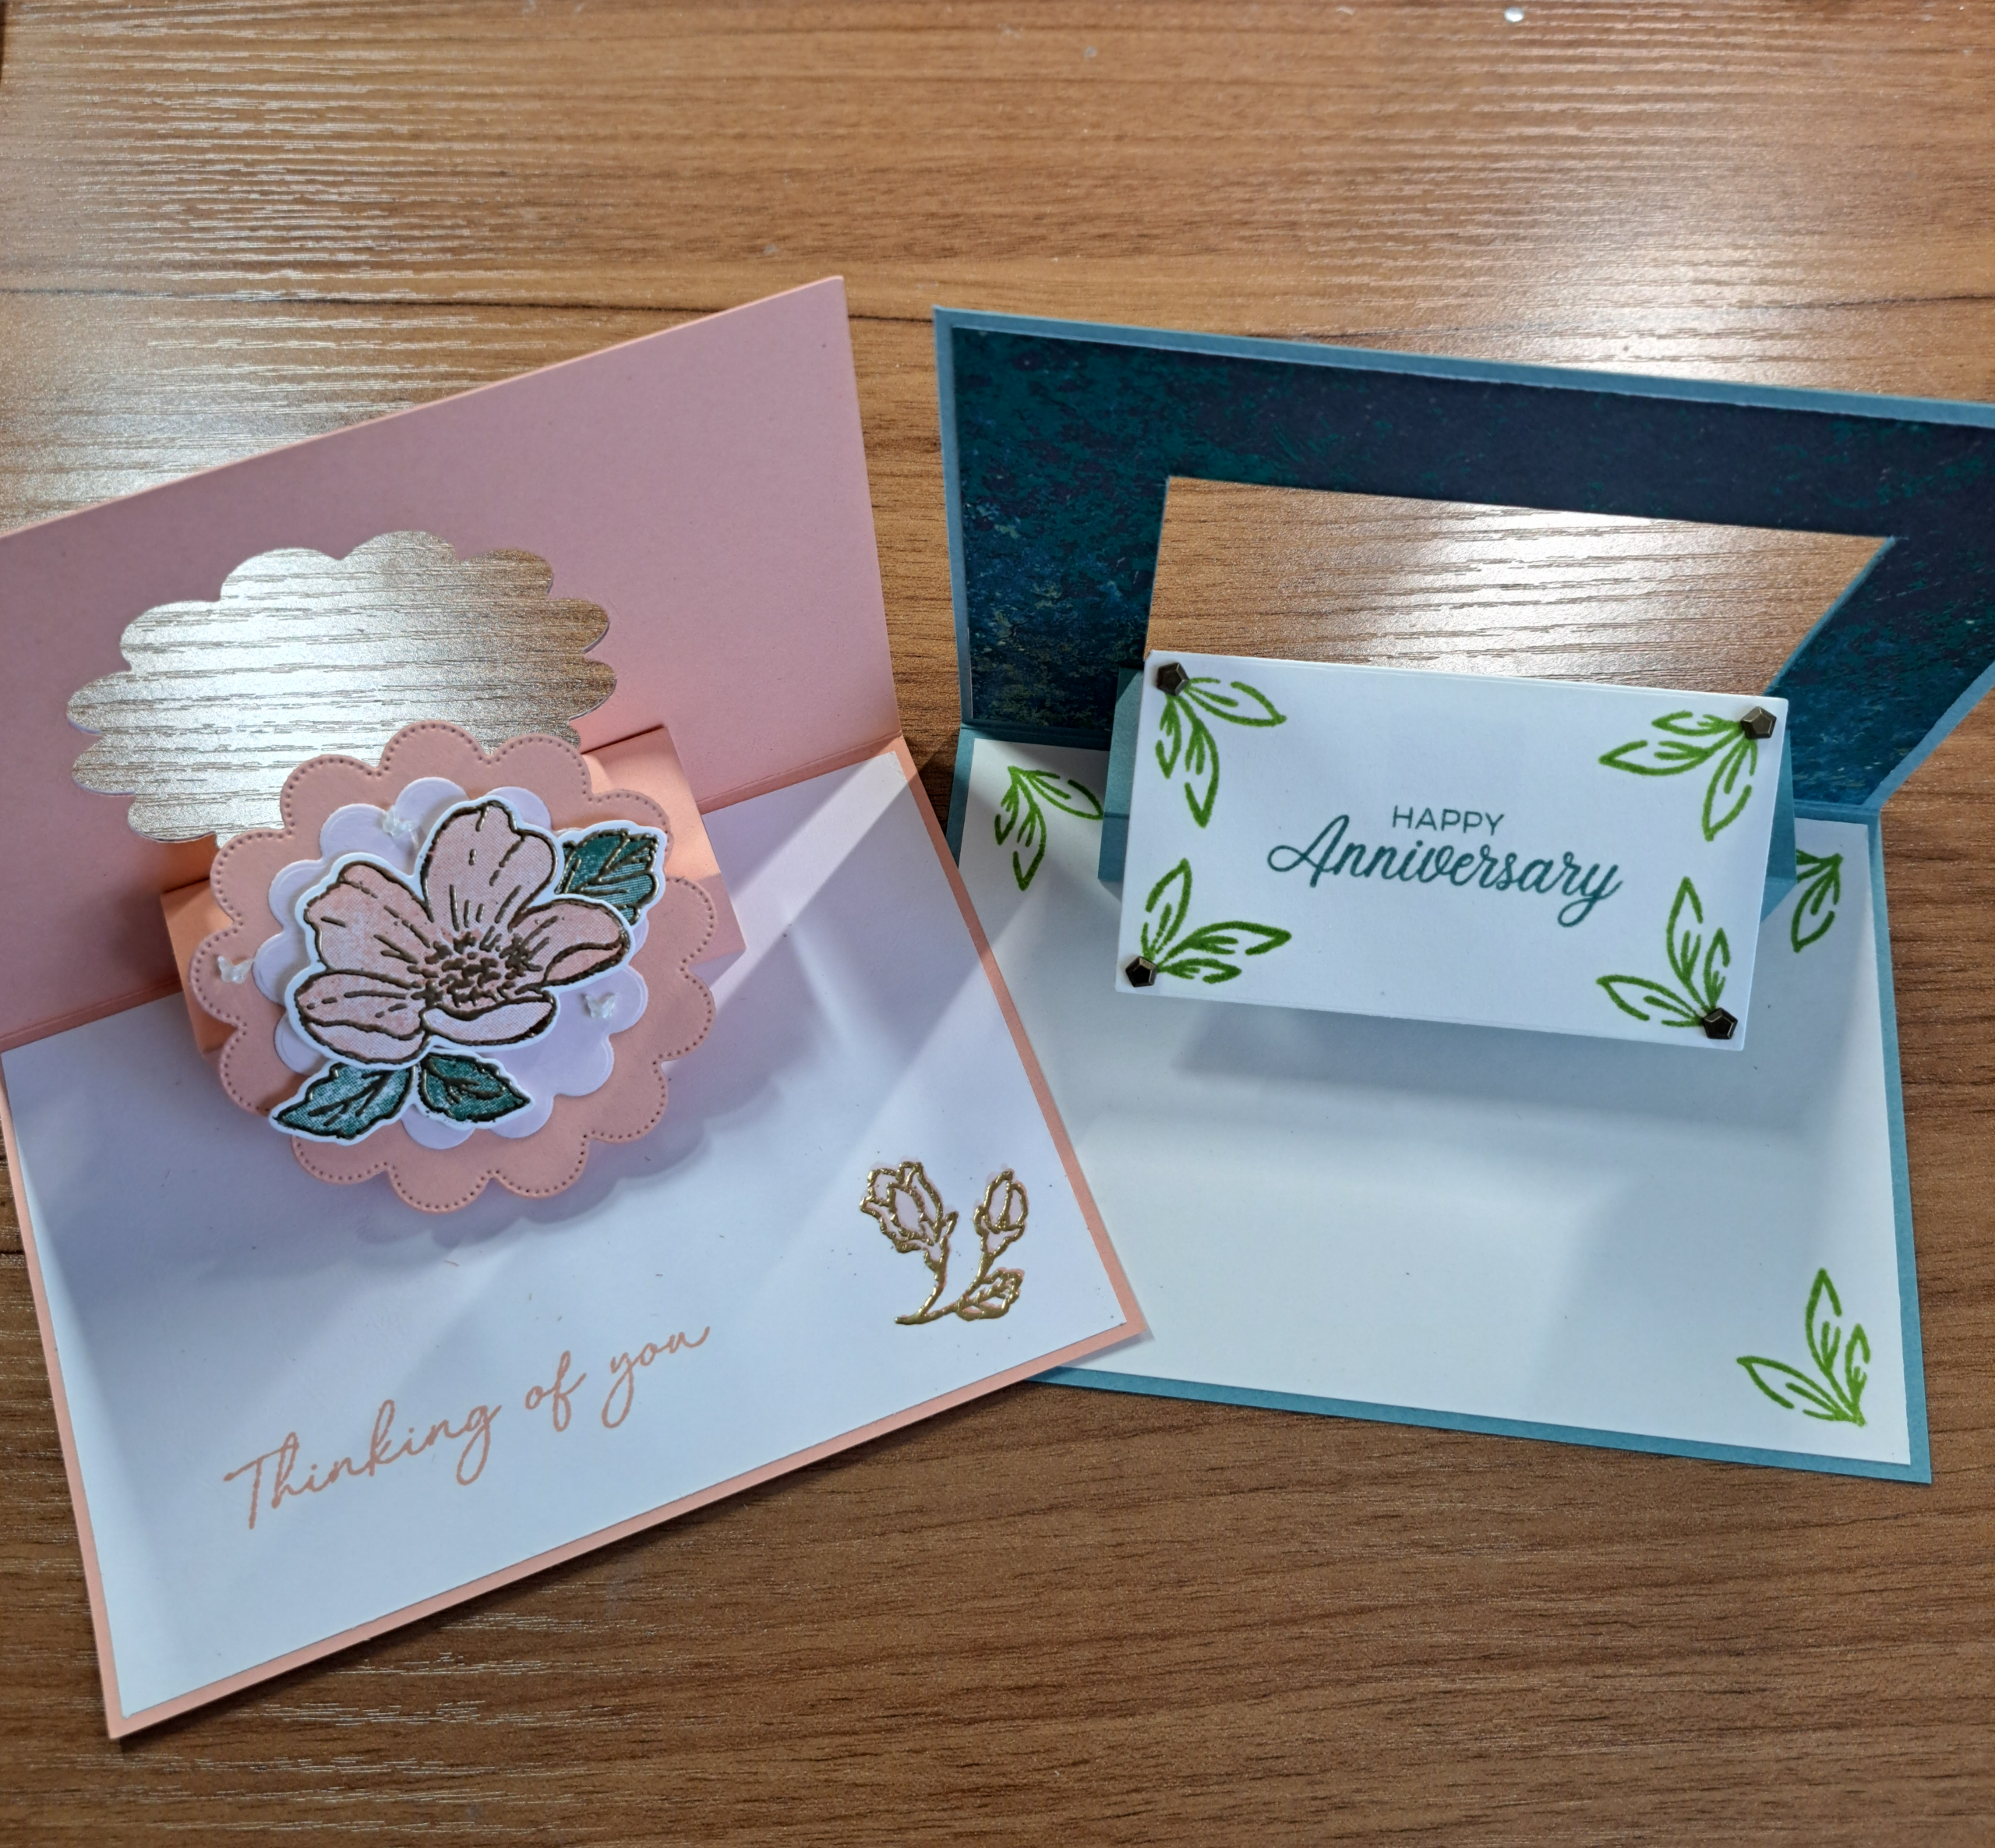
Why make a card that has one basic pop up when you can one that has a hover element? In this pop up card tutorial I will show you a design that is quite simple to execute and has very little bulk. This makes the cost of mailing only slightly more than a regular flat card. This design is from Dawn’s Stamping Thoughts. I have linked her pop up card tutorial video at the bottom along with some variations I think you will enjoy. It’s play time folks!
Supplies
Boutique Blossoms Stamp Set
Boutique Blossoms Die Set
Scalloped Blooms Die Set
Bloom Boutique Designer Series Paper
Crips Cantaloupe Card Stock
Barely Blush Card Stock *small scrap
Basic White Card Stock
Crisp Cantaloupe Stampin’Pad
Peaceful Pine Stampin’Pad
Versa Mark Stamp Pad
Metallics Wow! Gold Embossing Powder
2026-28 In Color Butterflies
Embossing Addition Tool Kit *optional
Heat Tool
Paper Trimmer
Cut and Emboss Machine
Directions
Cutting the Pieces
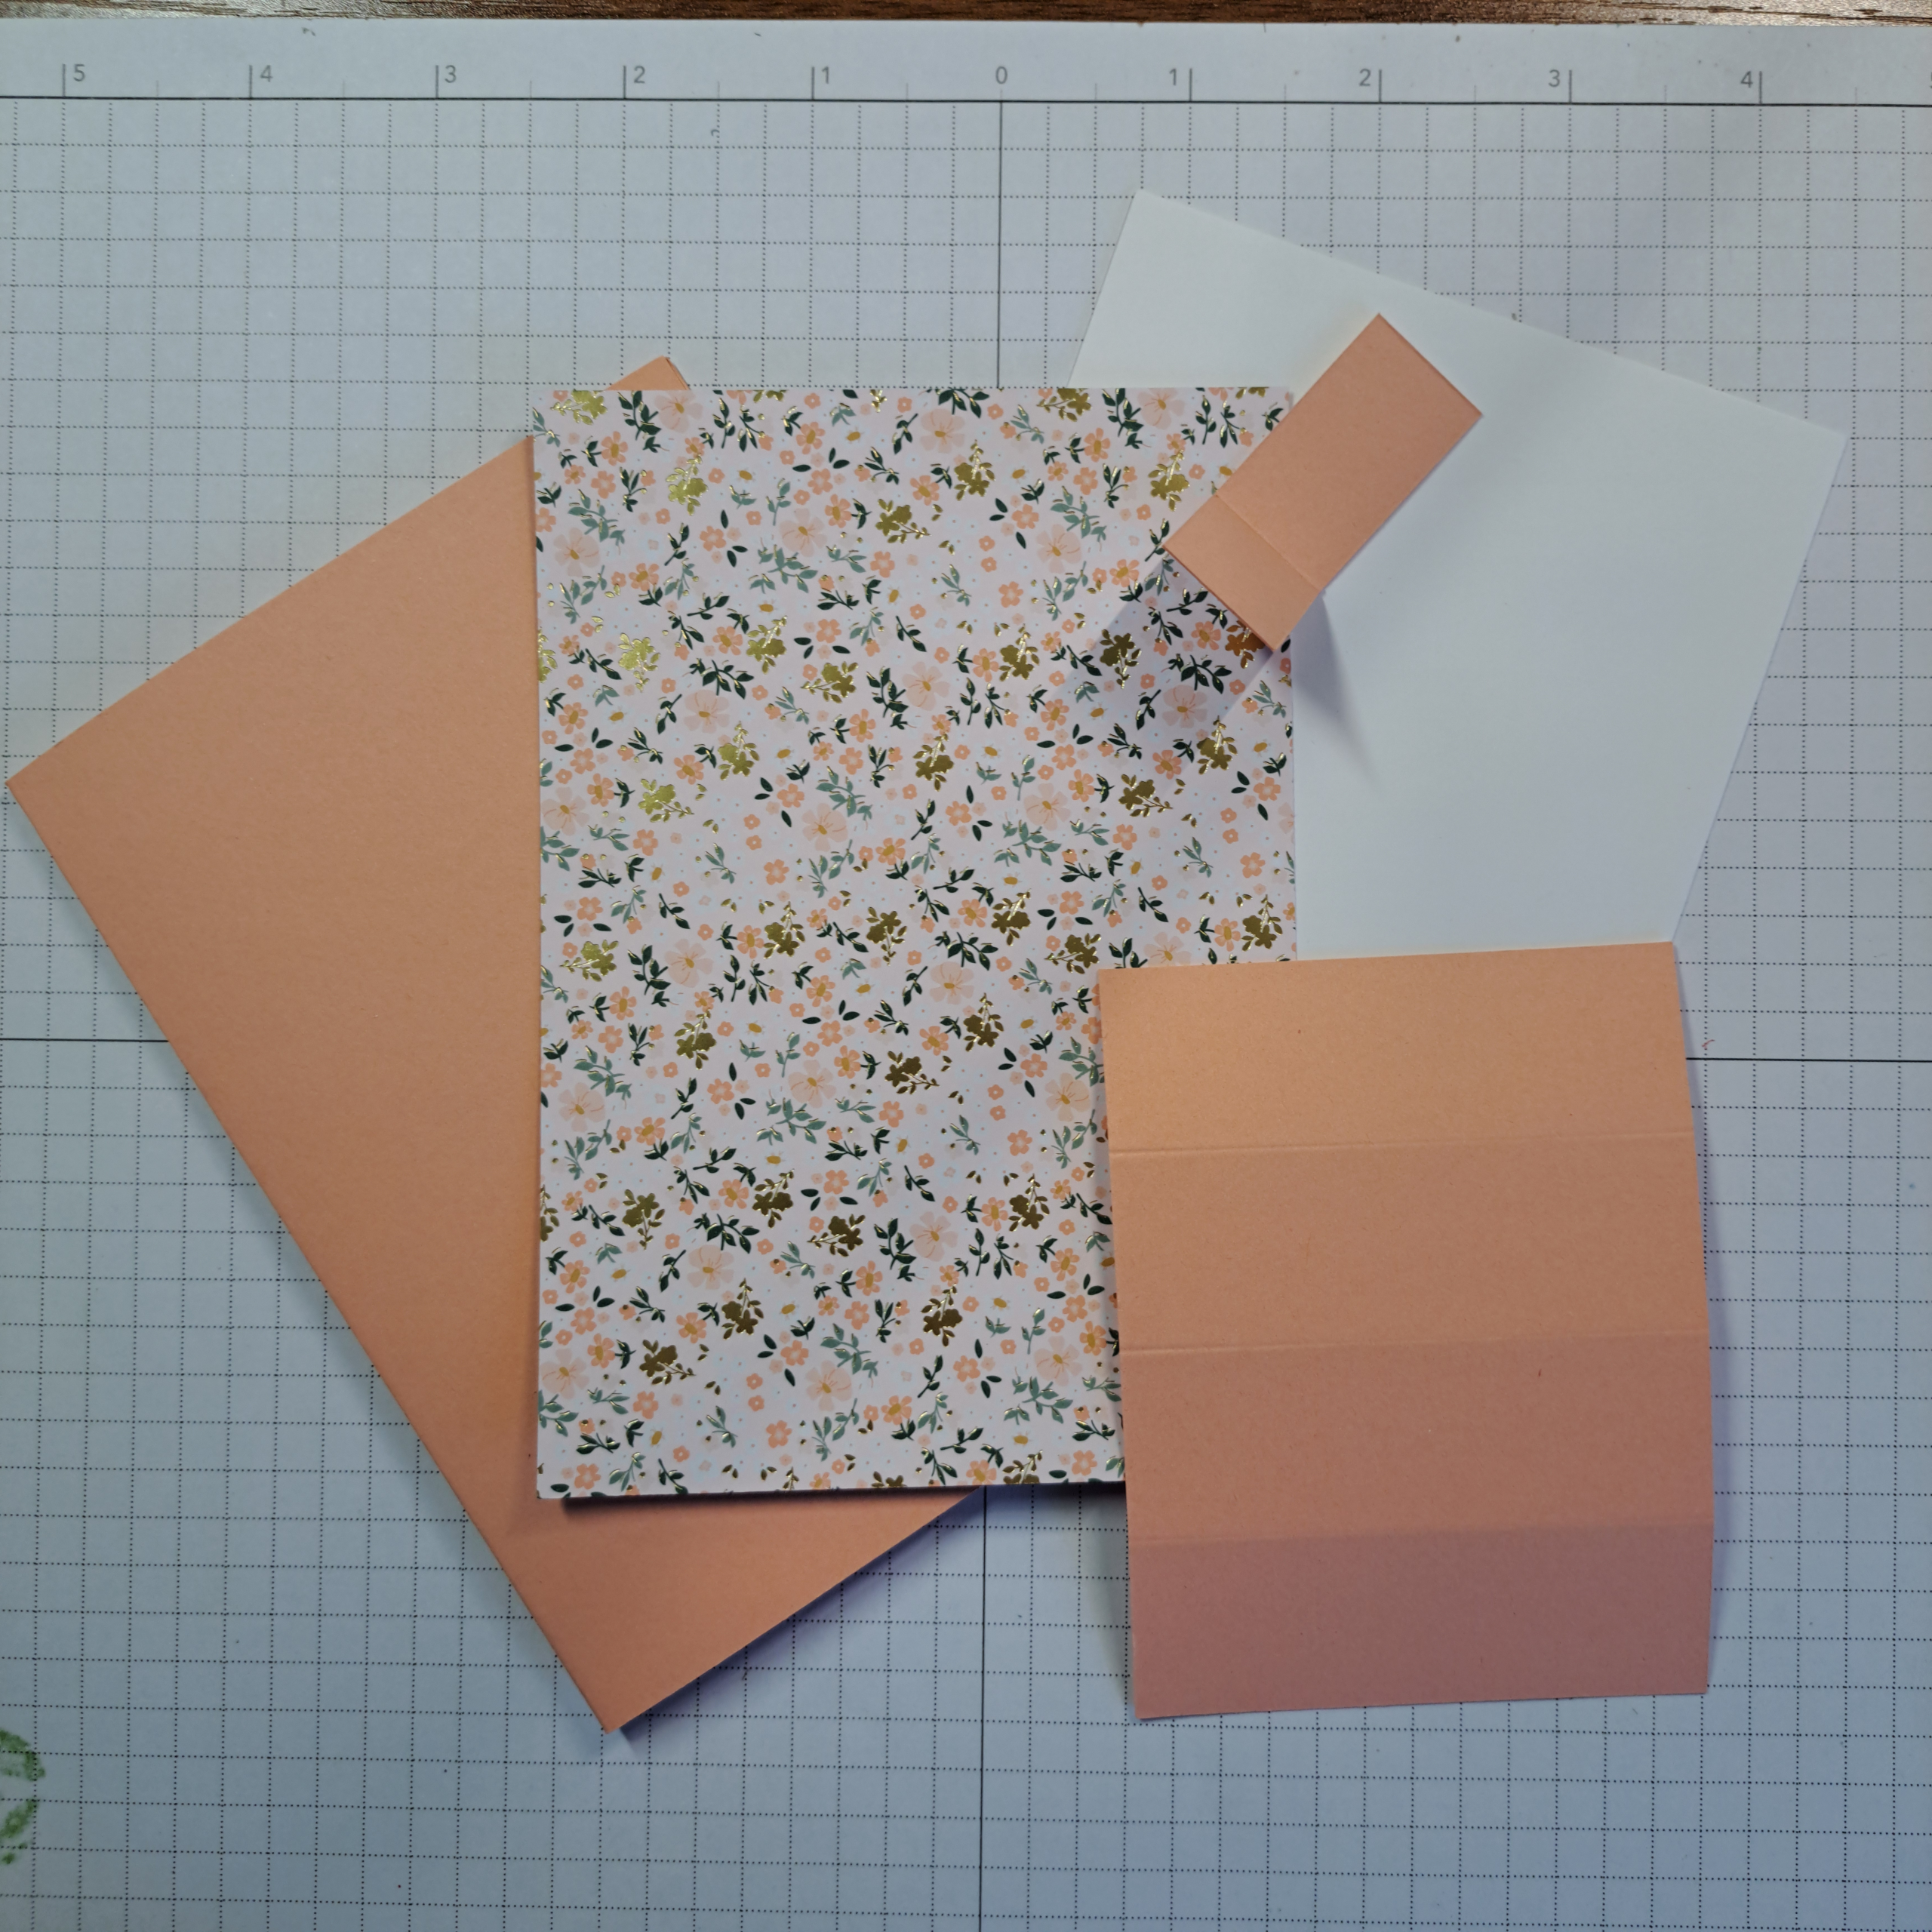
Cut a ‘standard’ card base from the Crisp Cantaloupe card stock and score at the half mark. If you are making a metric card the measurements are 14.85cm x 21cm, score at 10.5. For an imperial sized card the measurements are 5-1/2″ x 8-1/2″, score at 4-1/4″.
Using Bloom Boutique Designer Series Paper cut large rectangle to fit over the front of the card, 10cm x 14.35cm (4″ x 5-1/4″). Using these same dimensions cut a card liner from basic white or what ever light neutral color that matches your card stock.
There are two parts to the pop-up mechanism. For the first part cut a rectangle measuring 7.6cm x 10cm (3″ x 4″). The second piece is much smaller, measuring 5.7 x 1.9cm (2-1/4″ x 3/4″)
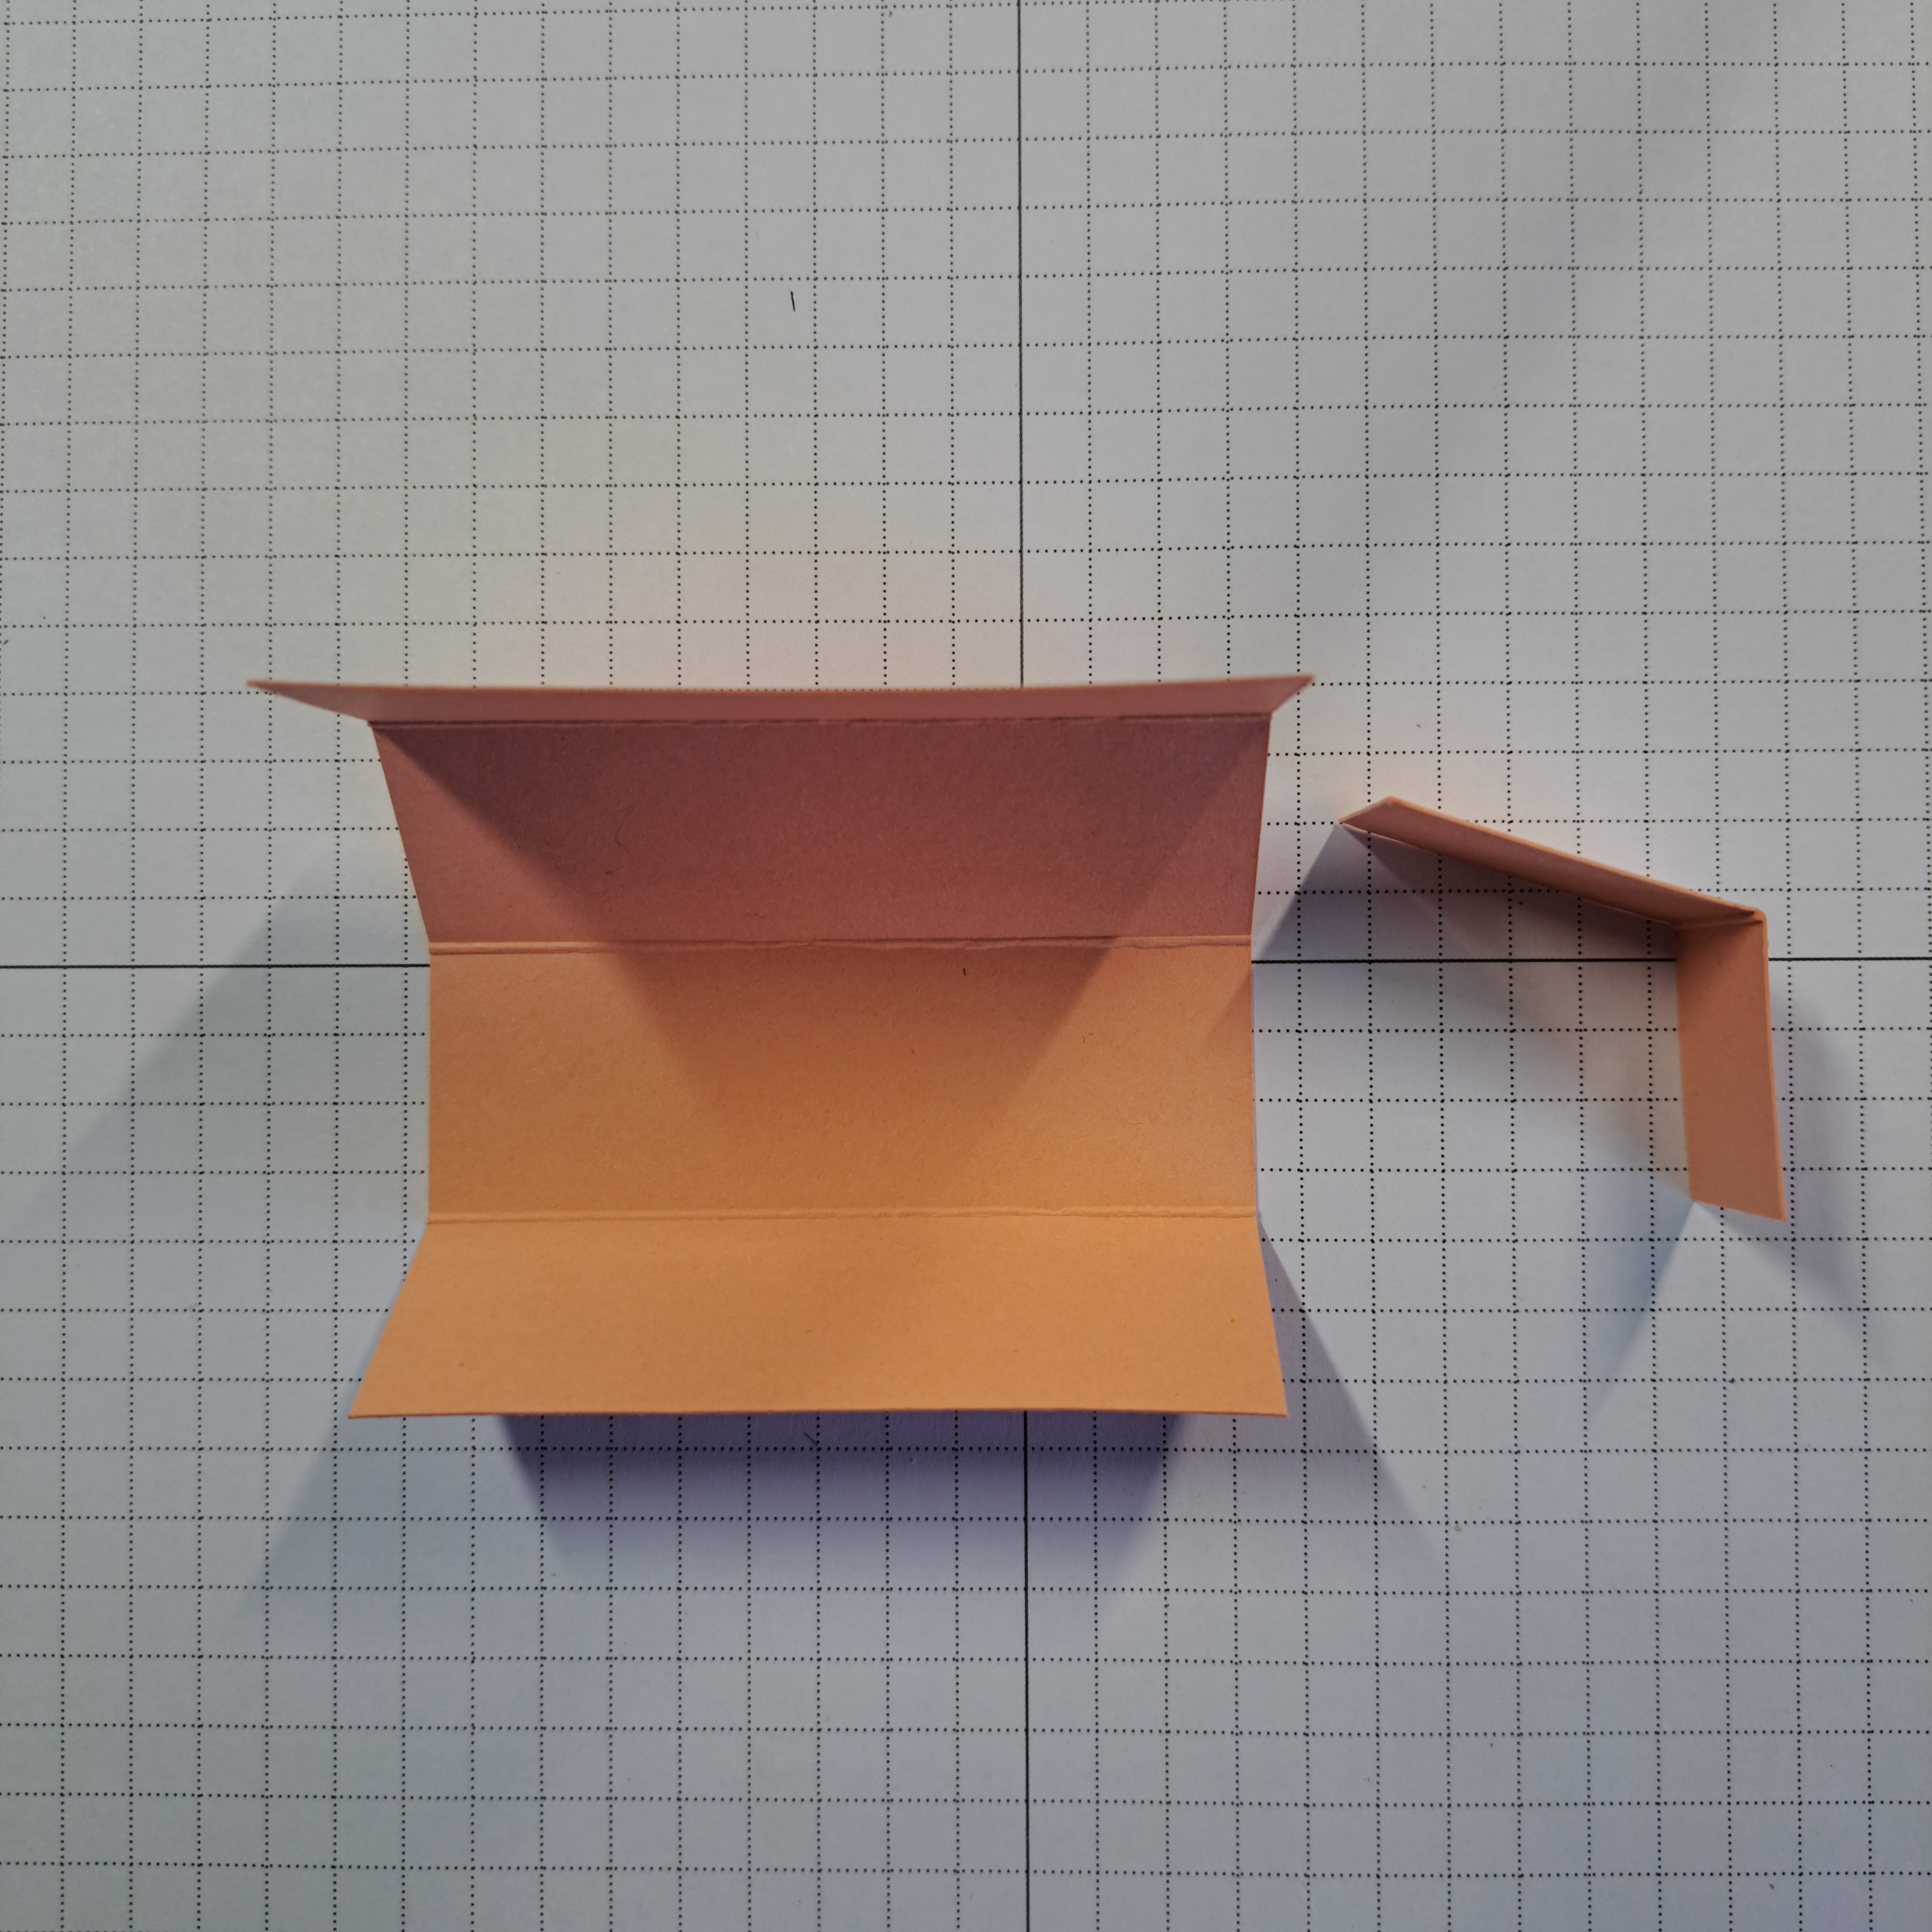
With the long side along the top of your score tool, score the large rectangle at 2.5cm, 5cm and 7.5cm (1″, 2″ and 3″). Fold inward along the score lines and burnish well. For the smaller rectangle, place the long side at the top of your score board and score at 3.2 (1-1/4″). Fold and burnish.
Assembling the Card

Place adhesive around the outside edges of the back side of the Designer Series Paper rectangle. Adhere to the card front leaving a narrow border of the card stock showing on all sides of the DSP.
If you are going to do any stamping on the inside of the card/card liner stamp it now. Adhere the card liner to the inside of the card leaving a narrow border of card stock showing on all sides.
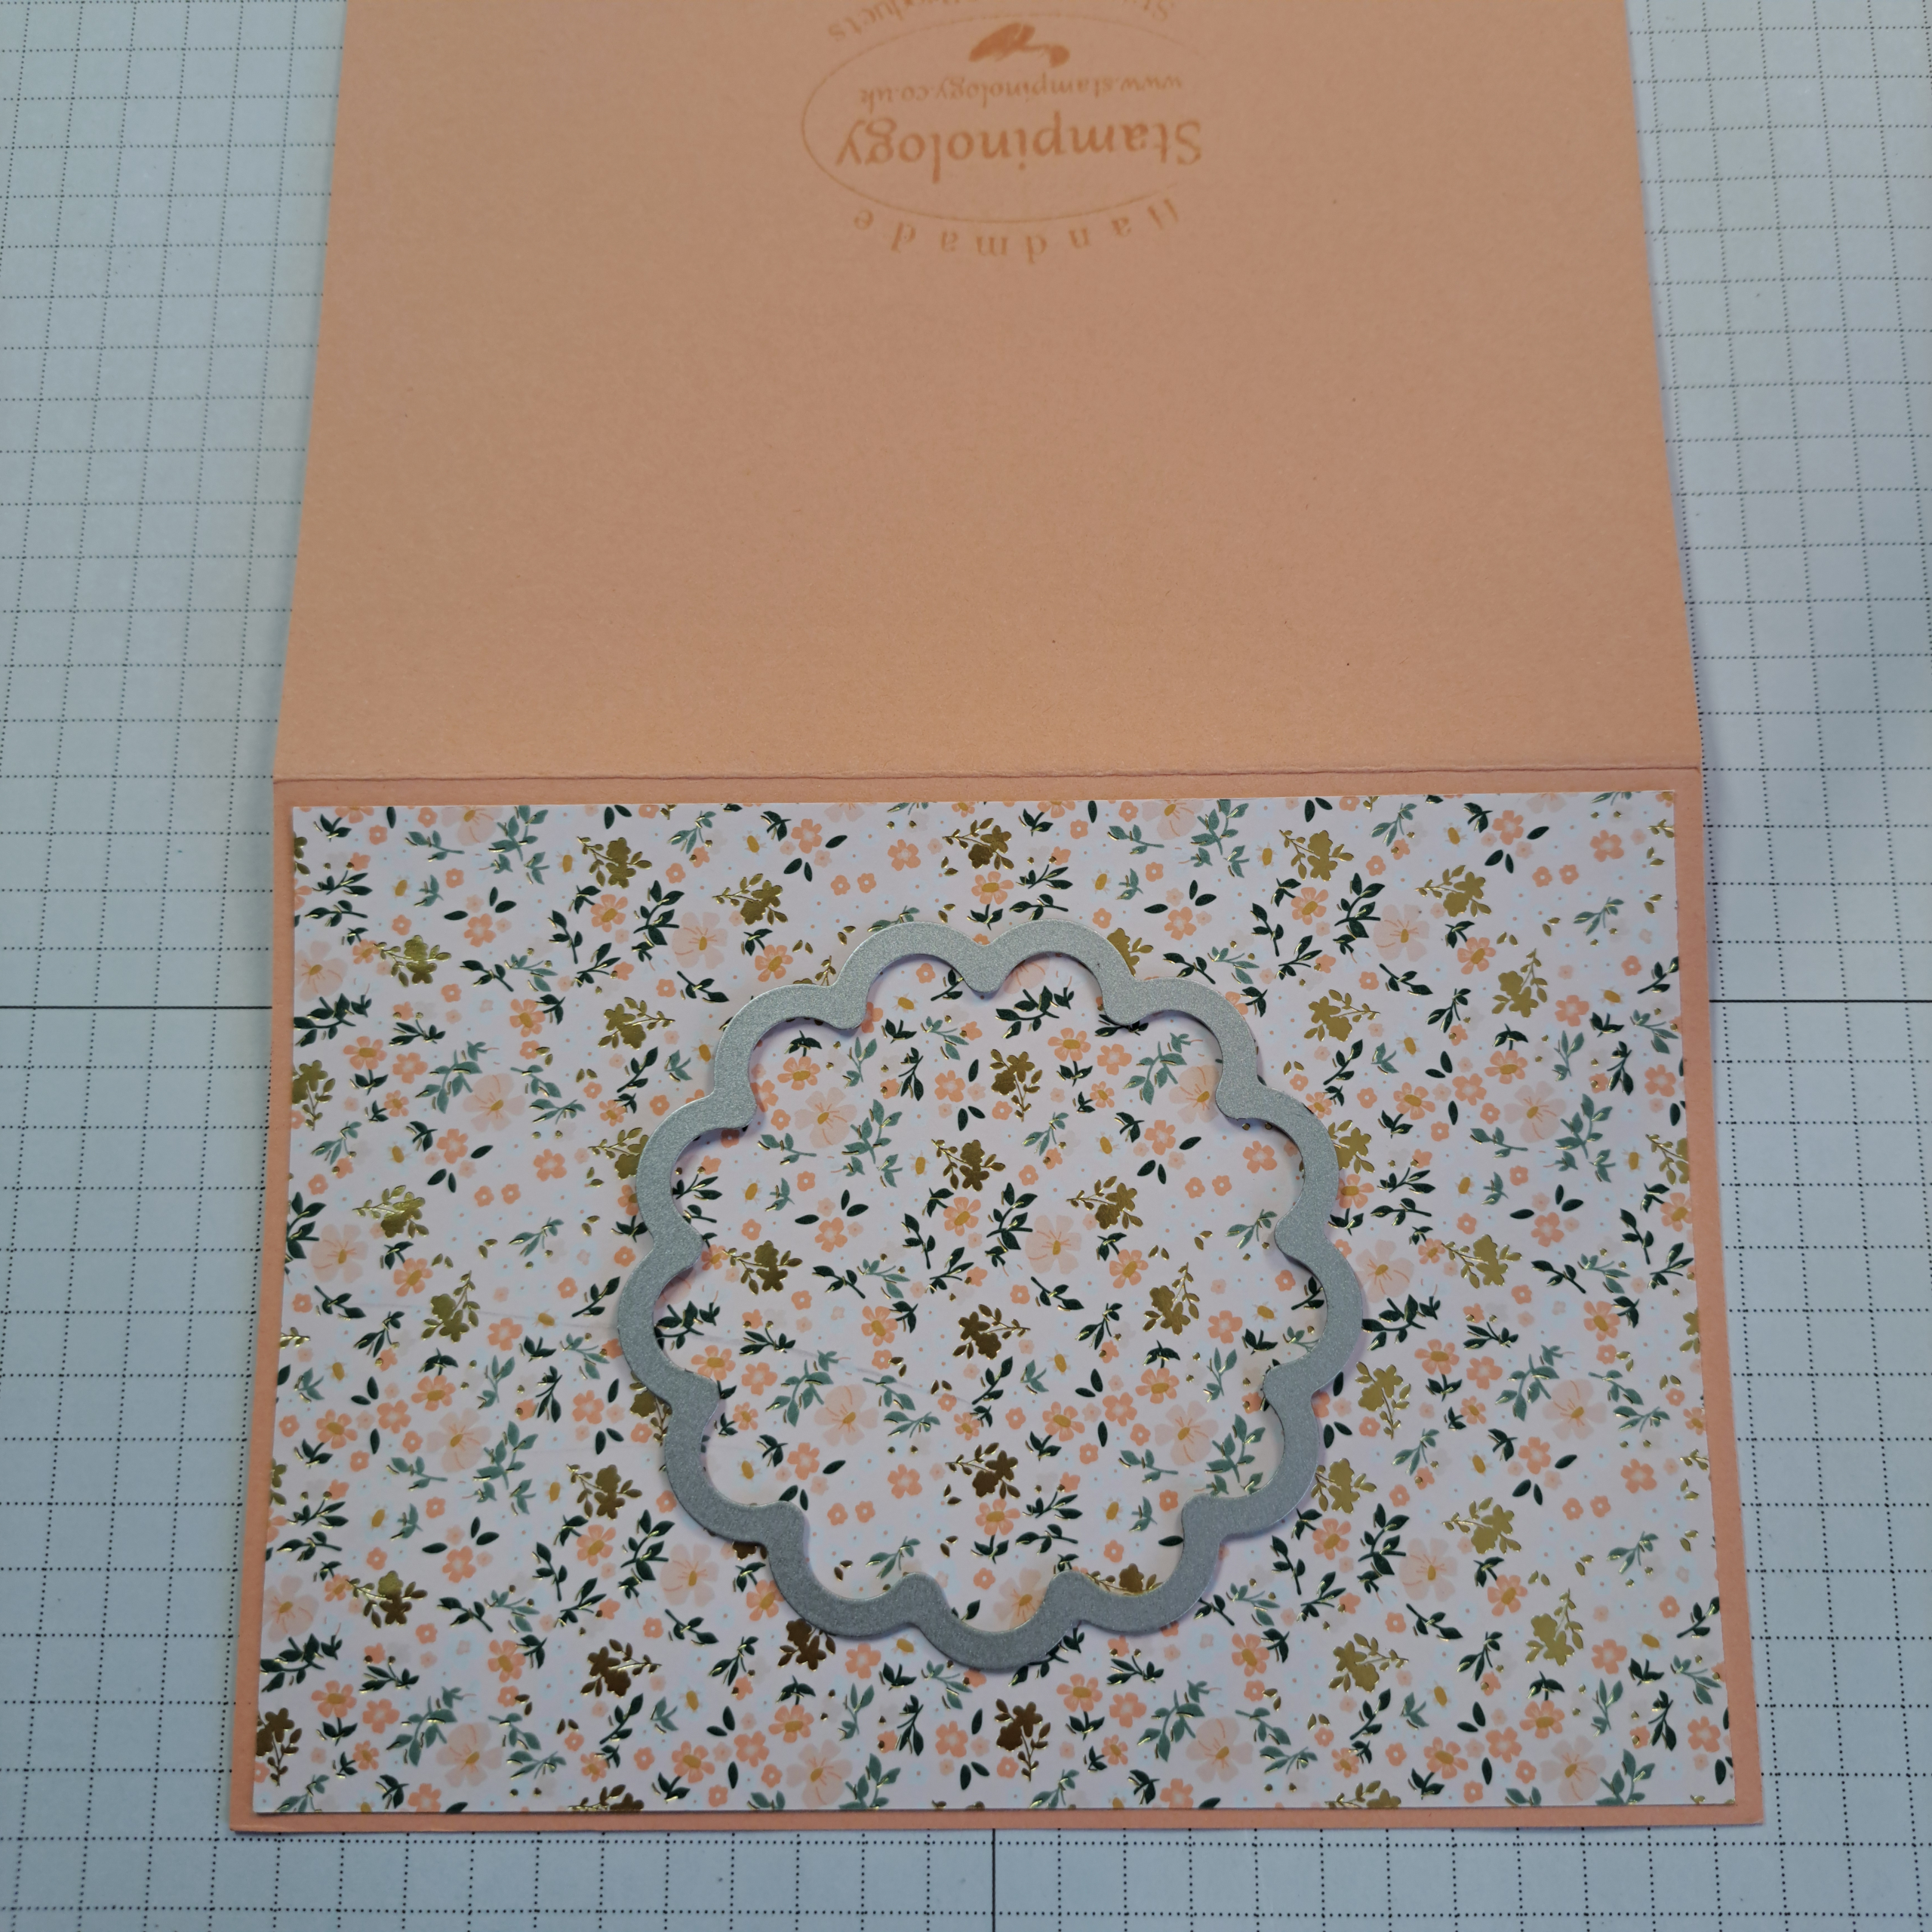
Open the card out flat on your table face-down. Center the 7.5cm (3″) scalloped circle die on Designer Series Paper side. Die cut the circle. I had no problems with the die cutting through both pieces, the card stock and the DSP. But if you have concerns run the die cutting ‘sandwich’ through your machine again. Remove the scalloped circles. Save the card stock circle, and set aside the DSP scallop for another project.
Notes: For this card design the shape of the cut out is not as important as the amount of space between the top front card edge and the bottom front card edge. You want to leave a minimum of about 2.5cm (1″). This card is pushing this limit a bit but because the card stock and Designer Series Paper both have good weight, it works out well.
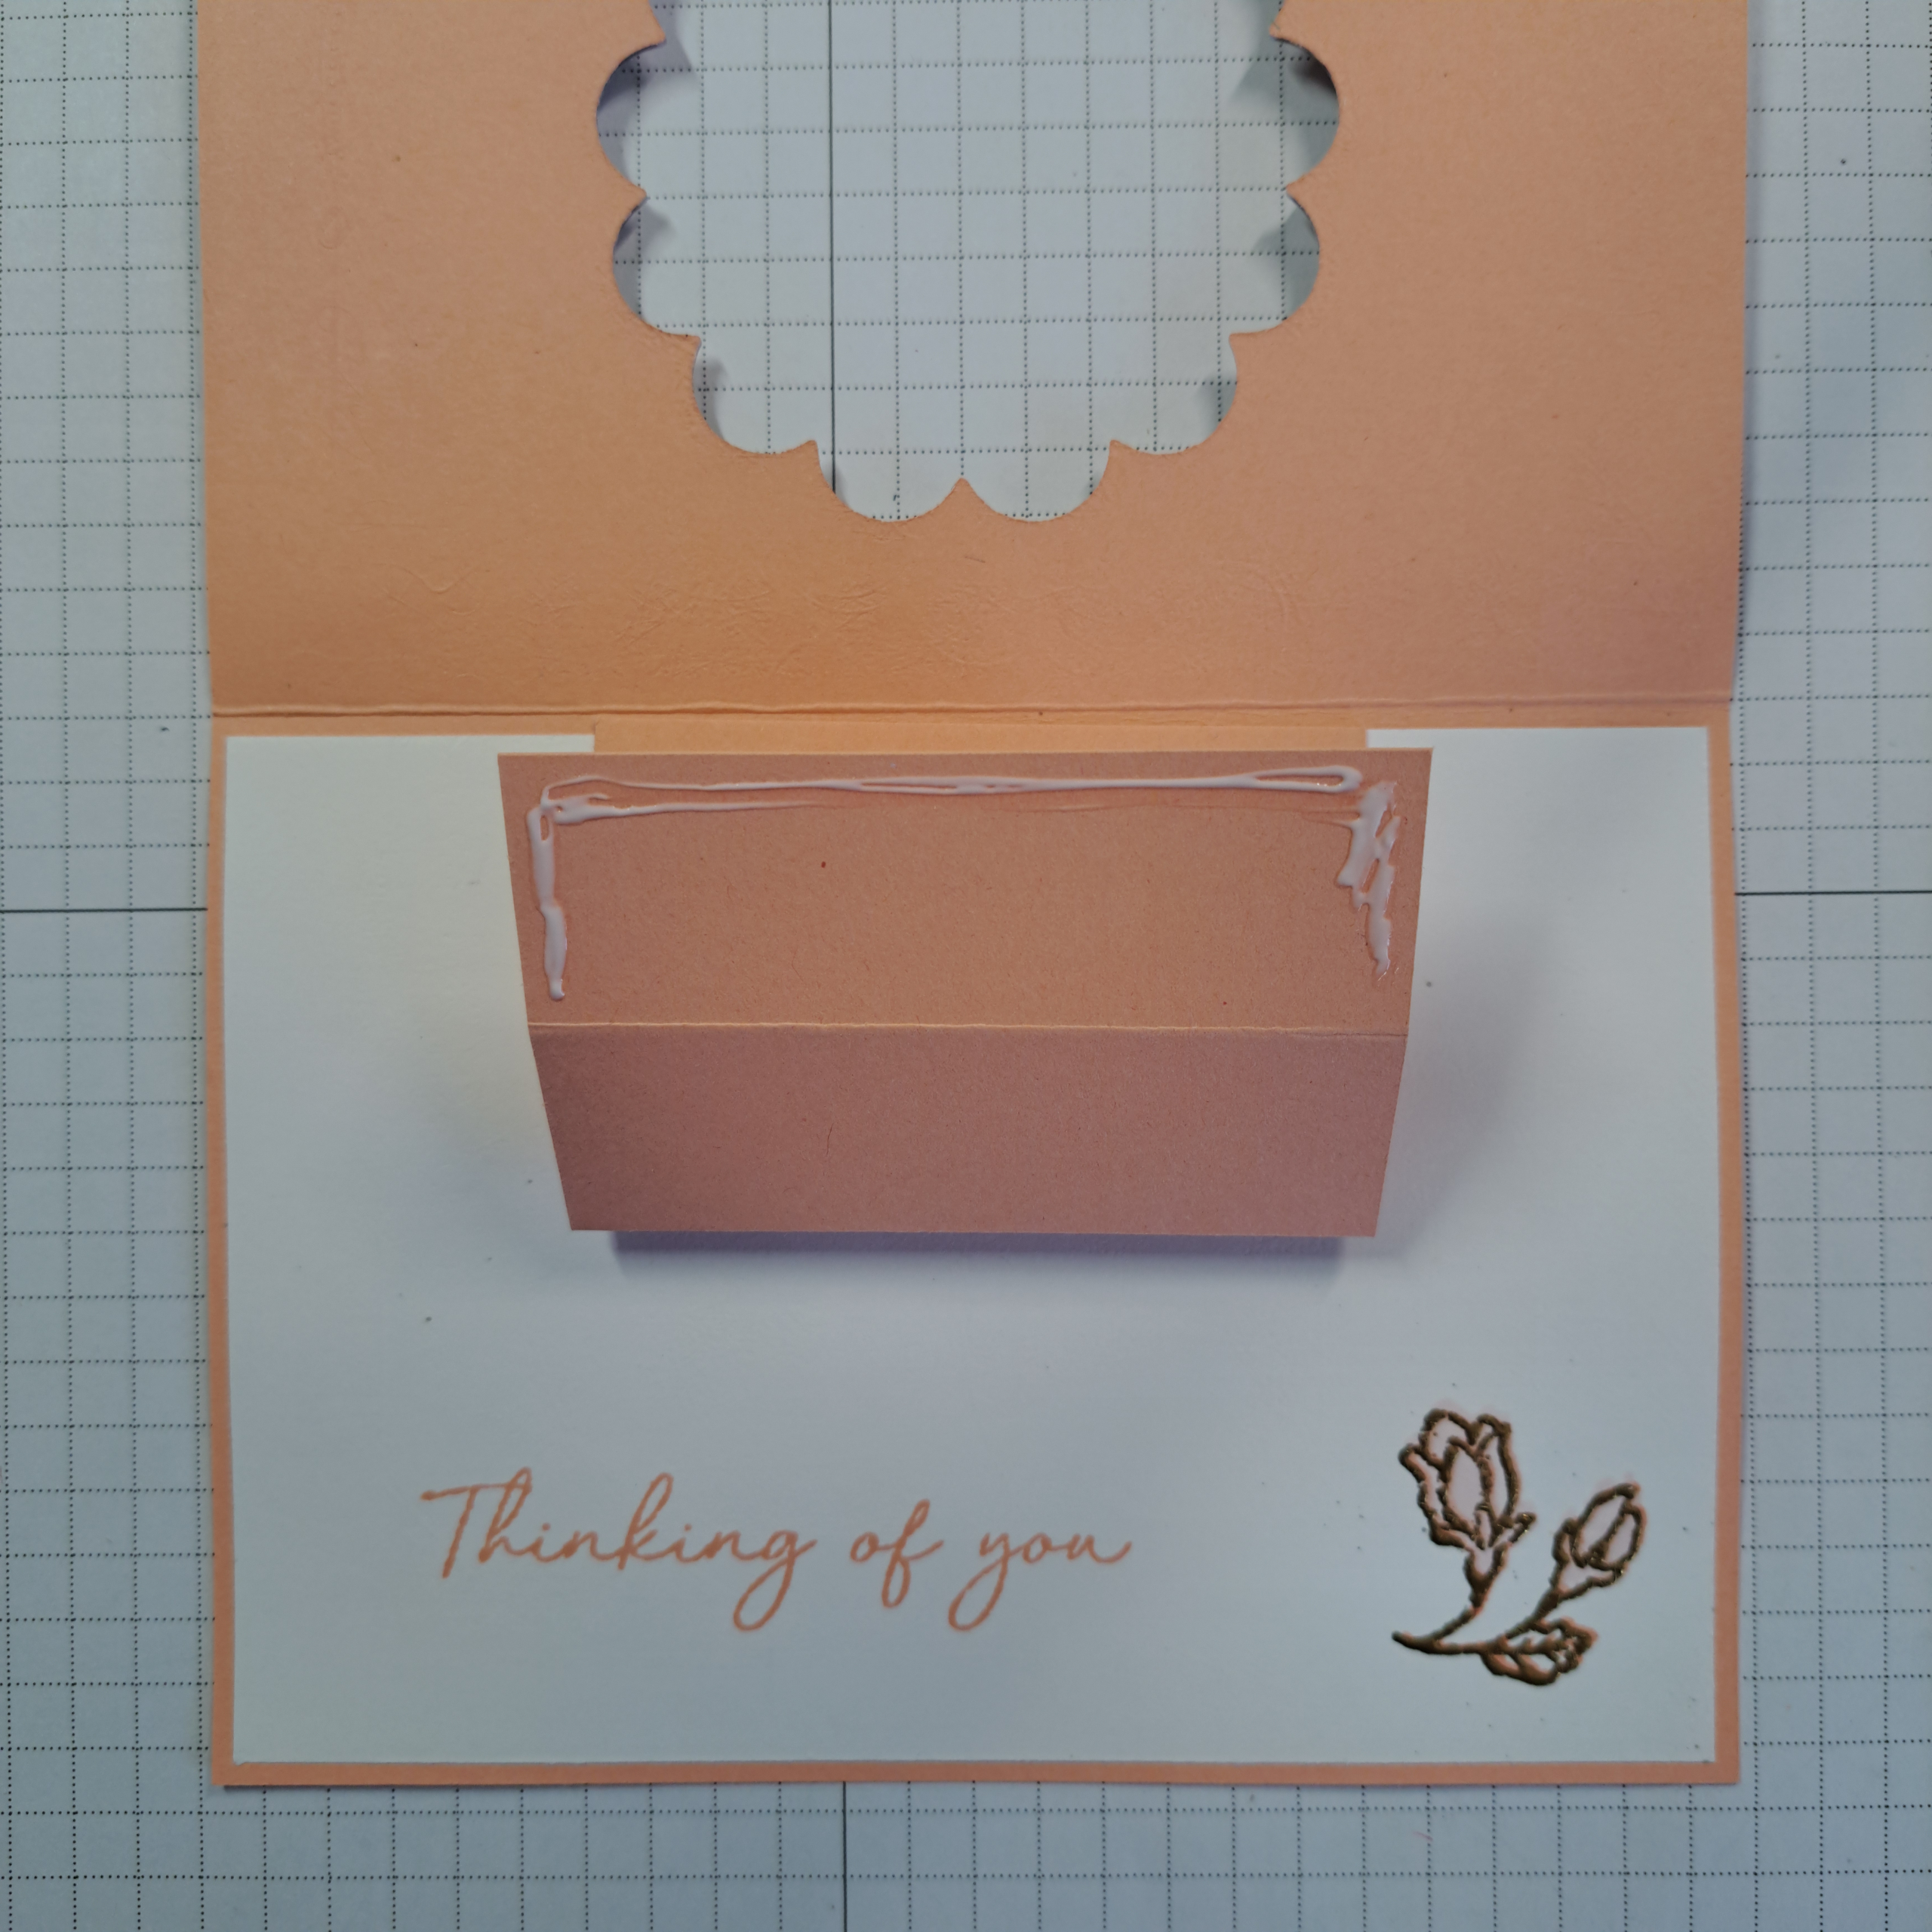
To install the mechanism, fold it in half along the center score. Place adhesive on the space above the next score line; see photo. Turn the piece over and place it (glue side down) onto the inside center of the card, push it up next to the card’s center fold line. Be sure the edge of the piece does not go over the fold. Now place adhesive on the upper portion of the mechanism and fold the card closed; see photo. If you are using liquid adhesive wait a moment or two before opening the card to allow the glue to set.
You will notice that the mechanism shows through the cut out area on the card front. The second part of the mechanism is installed here. Fold the small rectangle on the score line and place adhesive on the ‘long’ side. Adhere this piece by pushing the narrow edge up to the edge of the cut out area, pressing this piece down to the already installed mechanism. See photos.
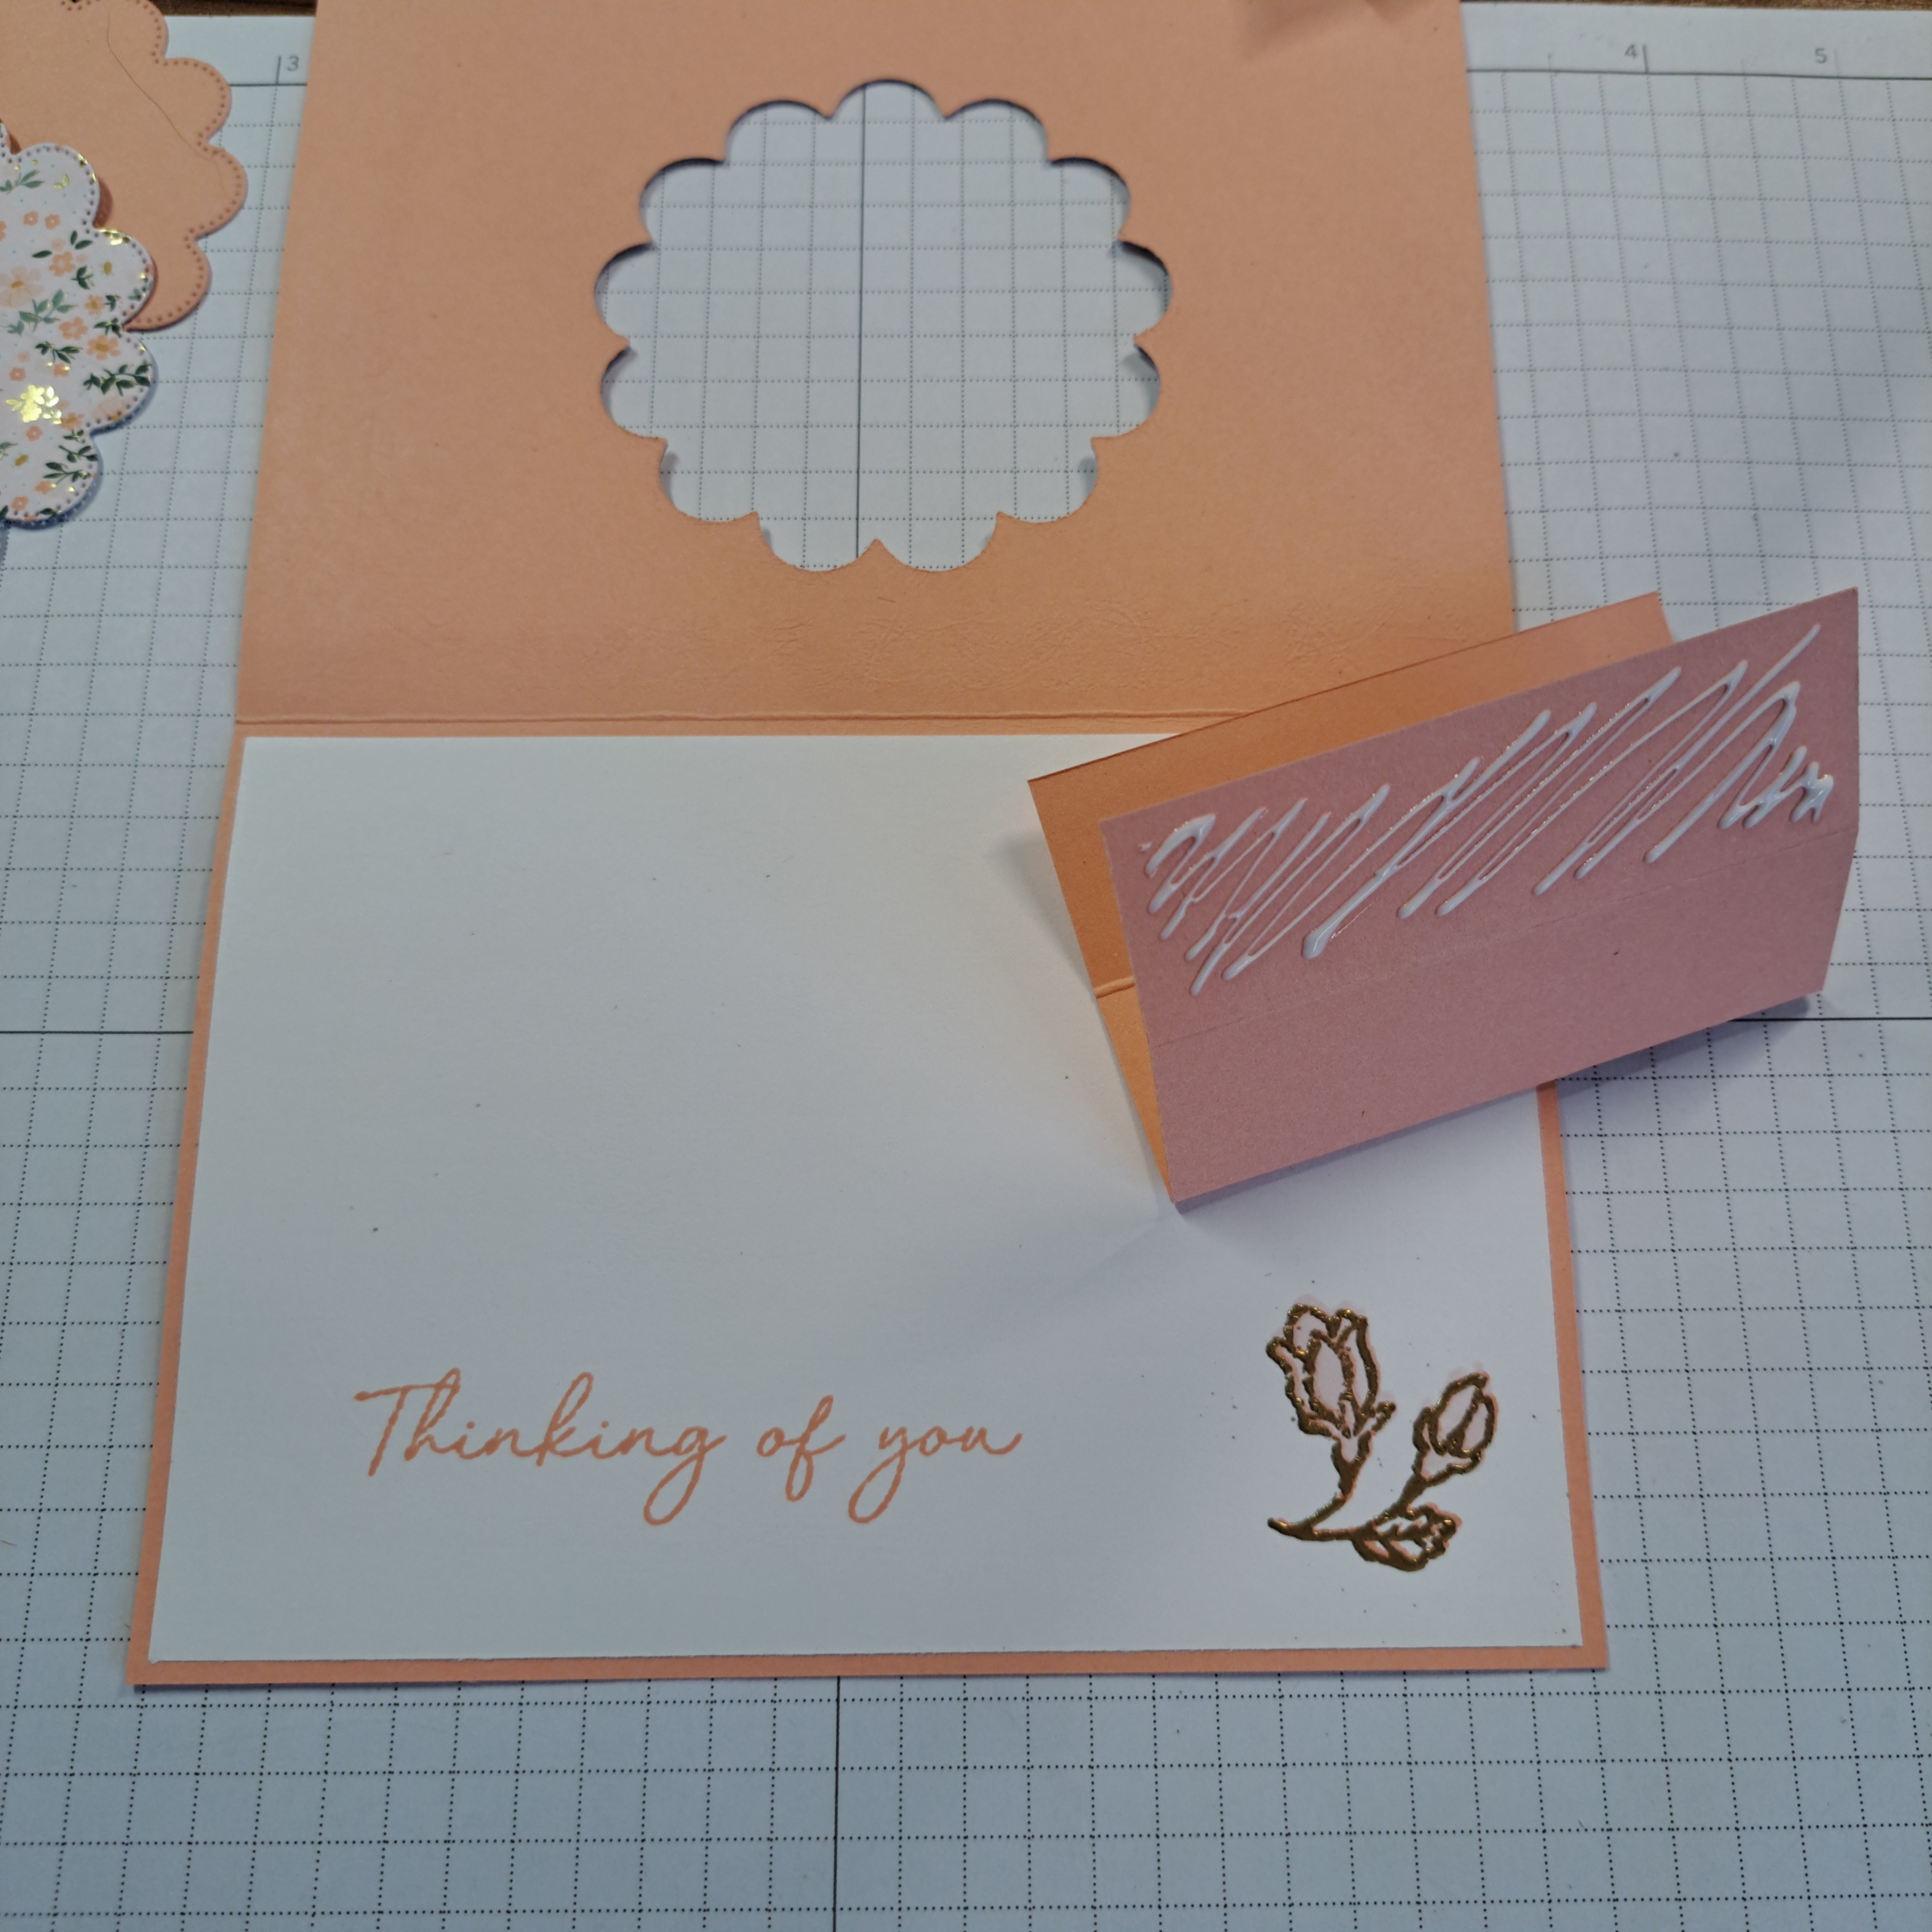
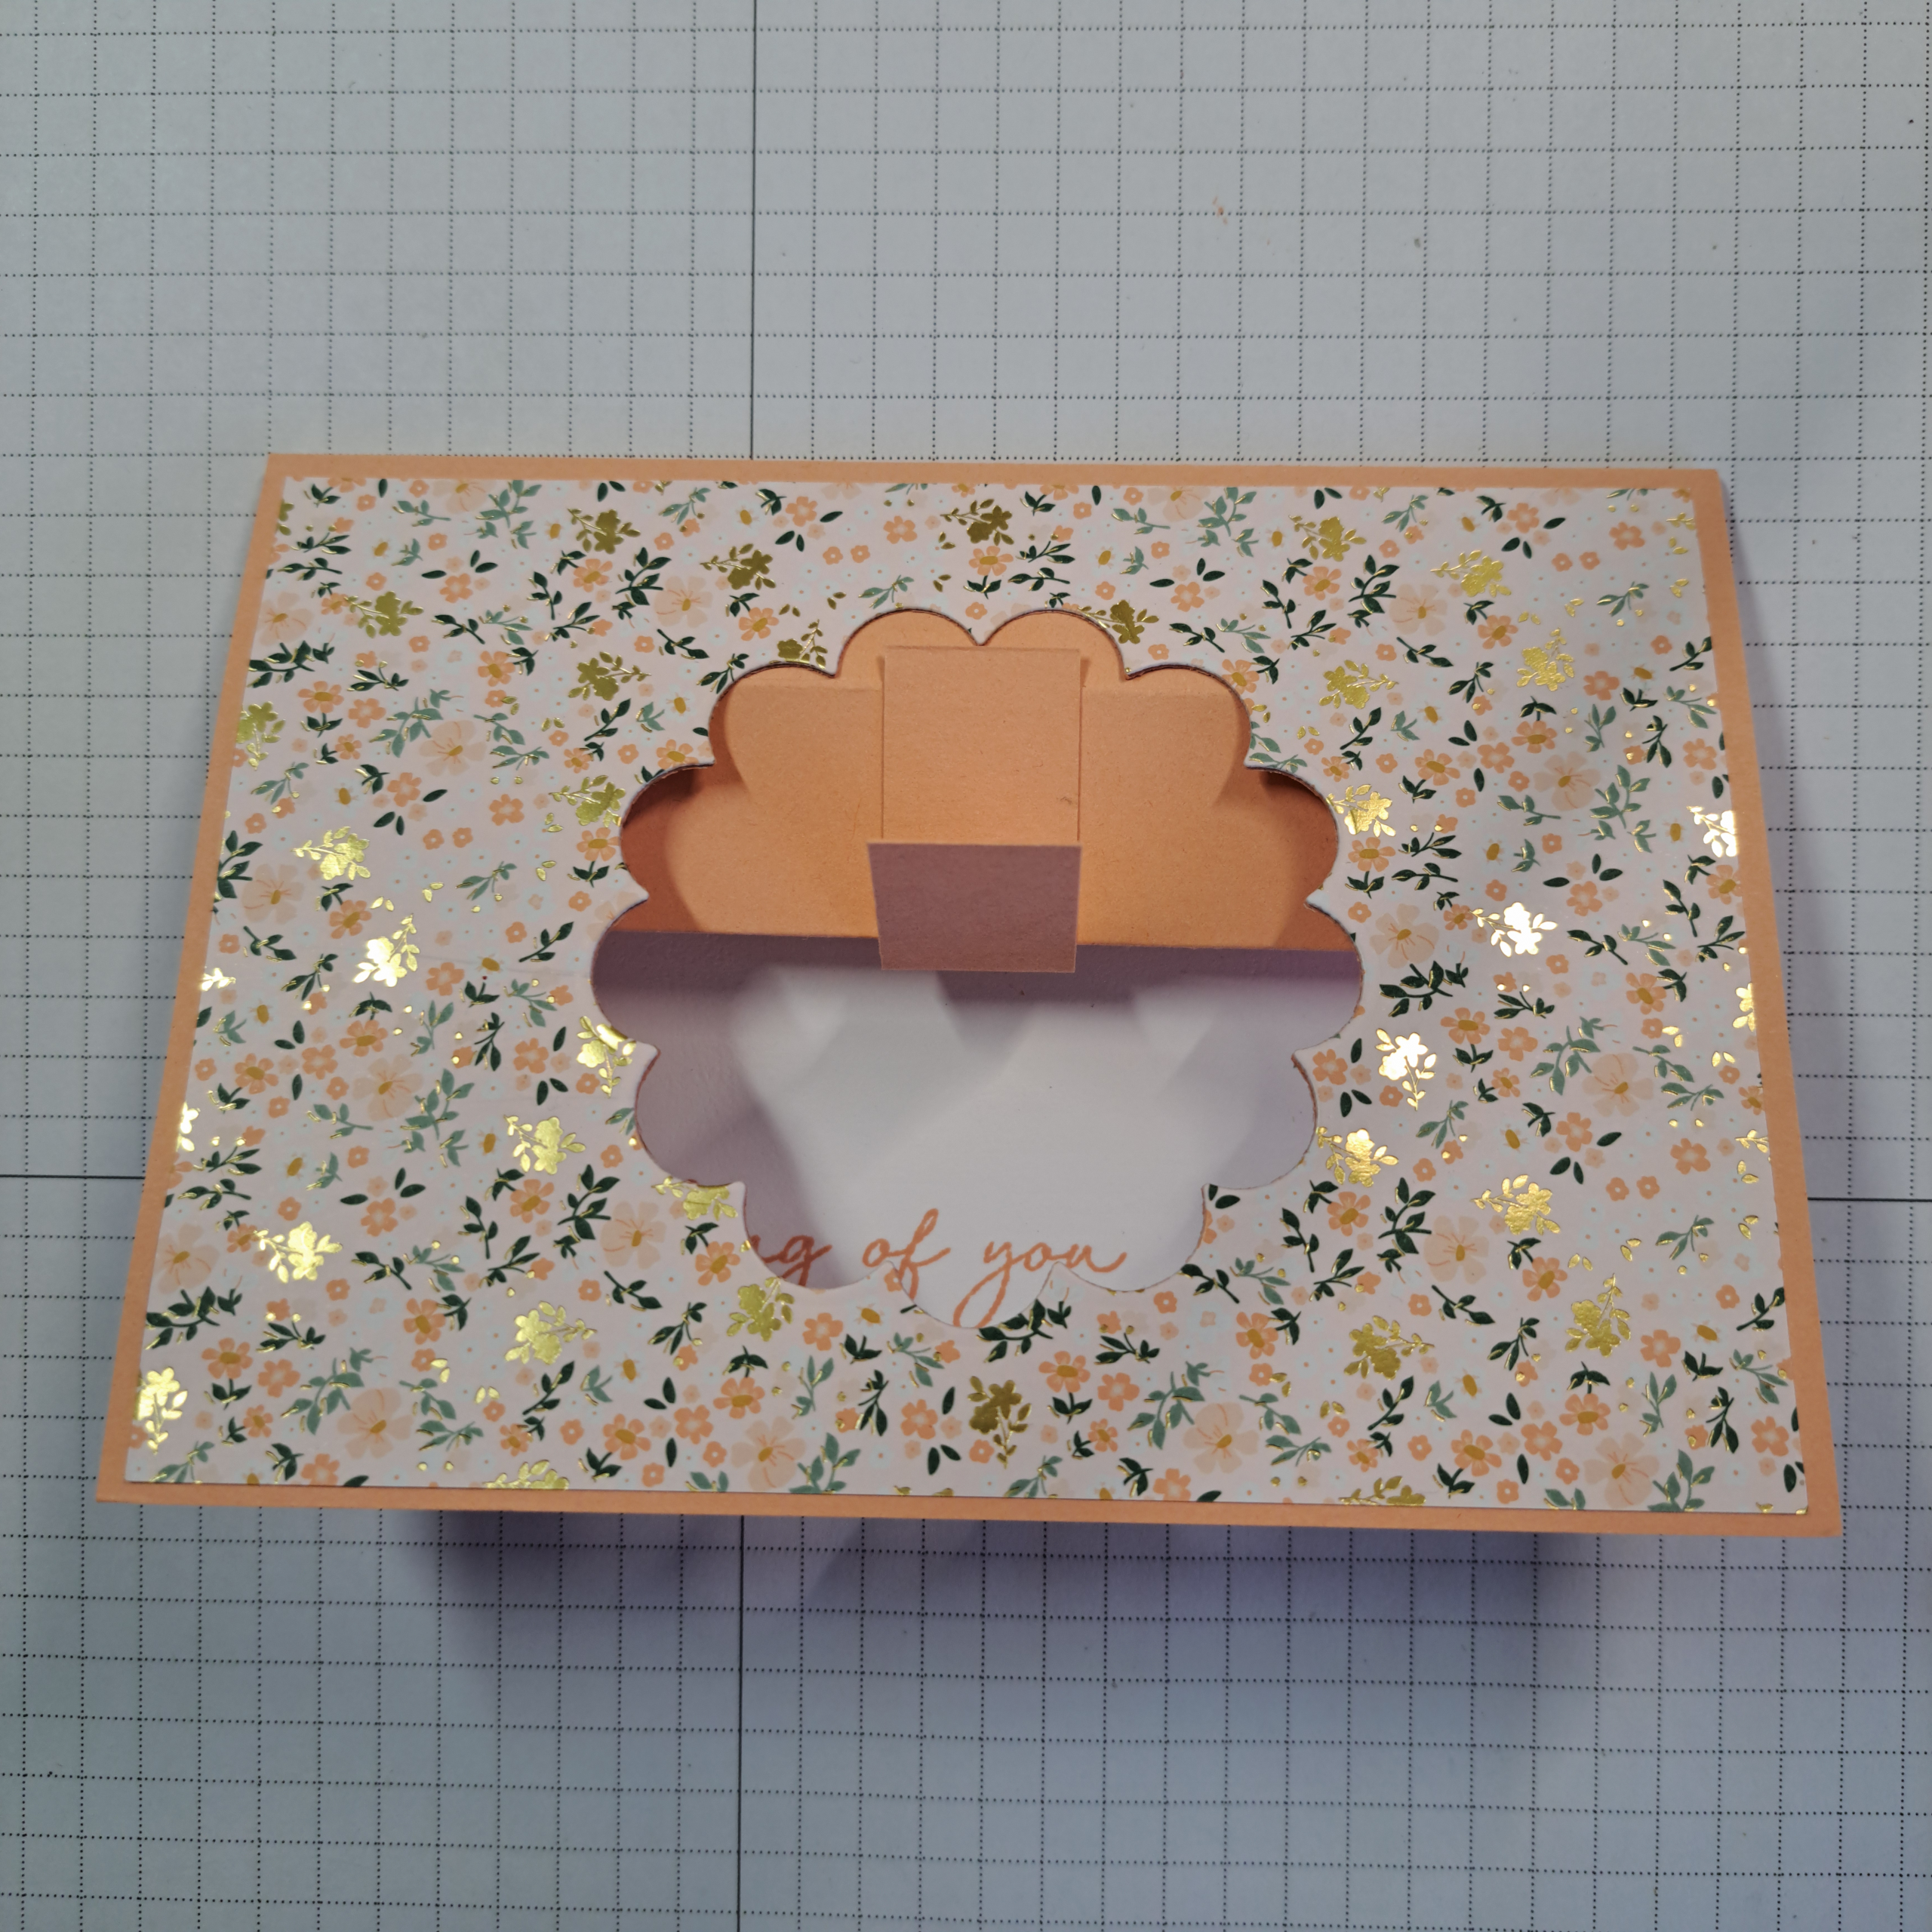
Place adhesive on the short side of the small rectangle. Place the cut out scalloped shape back in the card front from where it was cut. Press down firmly so that it sticks to the small rectangle. If you are using liquid glue give it a moment to dry before opening the card. In this example I found it easier to decorate the scallop before adhering it to the mechanism. However, you could absolutely adhere the Crisp Cantaloupe scallop circle at this point.
Decorating the Card
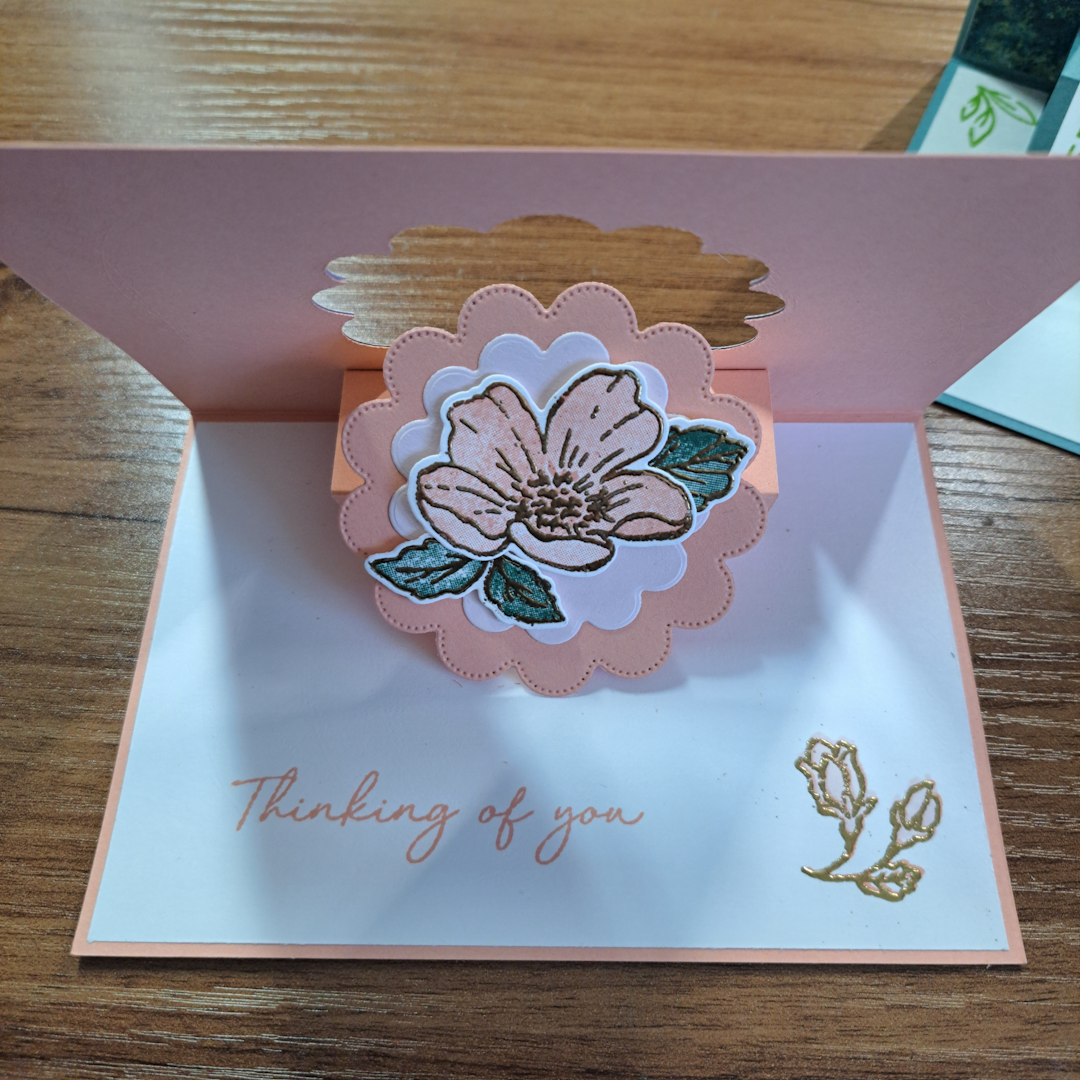
Die cut the next smaller scallop circle (5.5cm or 2-1/4″) out of the scrap of Barely Blush card stock. We will build the next elements onto this piece.
Stamp the following elements onto basic white card stock. First we will use the ‘fill-in’ stamps. Using the Crisp Cantaloupe ink stamp the fill in stamp for your chosen flower. Onto the same piece of card stock use the Peaceful Pine ink to stamp two of the ‘fill-in’ stamps for the leaves. Give the ink a moment to dry before continuing on to the next step.
Wipe over your stamped images using an embossing buddy to cut down on static. Now use the outline stamps for you chosen images and stamp with Versa Mark ink. Moving quickly coat the ink in gold embossing powder and tap off the excess. Heat set the powdered outline images. Die cut out the images using the matching dies.
Note: I found it helpful to use the new Stampin’ Positioner for this project. It made things a lot easier (and more exact) being able to lay the outline stamp on top of the image to align it. Just be sure and align your stamps before using the embossing buddy.
Arrange your die cuts onto the Barely There scalloped circle and adhere using Stampin’ Dimensionals. Adhere this scalloped circle to the larger Crisp Cantaloupe scalloped circle. At this point I adhered the Crisp Cantaloupe scalloped circle to the card front as described above. After making more than one of these cards I found that it did not really matter which order you attached the card’s pop out center piece.
I finished the card with a trio of butterflies from the 2026-28 In Color Butterflies collection.
Thank you for reading with me today. I sincerely hope you give this card a try. If you do please post a pic here in the comments or tag me on soical media @loriothen. As mentioned above this card was CASE’d from Dawn at Dawn’s Stamping Thoughts. Here is the video address: youtube.com/watch?v=X4OMHrqBa48 If you have time please visit Dawn and give her a big thumbs up for sharing this awesome card.
I first saw this card several years ago and made a note to give it a try. A while later I saw Patty Bennett’s video and was amazed and how similar the cards were so I made note of that one too (See Patty’s vide here: https://www.youtube.com/watch?v=3yZCGozOVco). Now comes another favorite lady of mine Ardyth who released a video CASEing Patty’s, this is where I said, OK message received this is a great design and I need to share it!! I am also sharing Ardyth’s video as she has some great water color backgrounds to share with you. https://www.youtube.com/watch?v=d2wrBTSydDo&t=169s And lastly, I am also including this variation for you to play with also from Patty Bennett: https://www.youtube.com/watch?v=B8h1_9cl894&t=6s
Product List![Boutique Blossoms Photopolymer Stamp Set [ 167652 ]](https://assets1.tamsnetwork.com/images/EC042017NF/167652s.jpg "Boutique Blossoms Photopolymer Stamp Set [ 167652 ]")
![Boutique Blossoms Dies [ 167653 ]](https://assets1.tamsnetwork.com/images/EC042017NF/167653s.jpg "Boutique Blossoms Dies [ 167653 ]")
![Scalloped Blooms Dies [ 167646 ]](https://assets1.tamsnetwork.com/images/EC042017NF/167646s.jpg "Scalloped Blooms Dies [ 167646 ]")
![Bloom Boutique 12" X 12" (30.5 X 30.5 Cm) Specialty Designer Series Paper [ 167637 ]](https://assets1.tamsnetwork.com/images/EC042017NF/167637s.jpg "Bloom Boutique 12\" X 12\" (30.5 X 30.5 Cm) Specialty Designer Series Paper [ 167637 ]")
![Crisp Cantaloupe A4 Cardstock [ 167694 ]](https://assets1.tamsnetwork.com/images/EC042017NF/167694s.jpg "Crisp Cantaloupe A4 Cardstock [ 167694 ]")
![Barely Blush A4 Cardstock [ 167690 ]](https://assets1.tamsnetwork.com/images/EC042017NF/167690s.jpg "Barely Blush A4 Cardstock [ 167690 ]")
![Basic White A4 Cardstock [ 166781 ]](https://assets1.tamsnetwork.com/images/EC042017NF/166781s.jpg "Basic White A4 Cardstock [ 166781 ]")
![Crisp Cantaloupe Classic Stampin Pad [ 167680 ]](https://assets1.tamsnetwork.com/images/EC042017NF/167680s.jpg "Crisp Cantaloupe Classic Stampin Pad [ 167680 ]")
![Peaceful Pine Classic Stampin Pad [ 167679 ]](https://assets1.tamsnetwork.com/images/EC042017NF/167679s.jpg "Peaceful Pine Classic Stampin Pad [ 167679 ]")
![Versamark Pad [ 102283 ]](https://assets1.tamsnetwork.com/images/EC042017NF/102283s.jpg "Versamark Pad [ 102283 ]")
![Metallics Wow! Embossing Powder [ 165678 ]](https://assets1.tamsnetwork.com/images/EC042017NF/165678s.jpg "Metallics Wow! Embossing Powder [ 165678 ]")
![Multipurpose Liquid Glue [ 154974 ]](https://assets1.tamsnetwork.com/images/EC042017NF/154974s.jpg "Multipurpose Liquid Glue [ 154974 ]")
![Embossing Additions Tool Kit [ 159971 ]](https://assets1.tamsnetwork.com/images/EC042017NF/159971s.jpg "Embossing Additions Tool Kit [ 159971 ]")
![Heat Tool - Uk Plug [ 129054 ]](https://assets1.tamsnetwork.com/images/EC042017NF/129054s.jpg "Heat Tool - Uk Plug [ 129054 ]")
![Stampin' Positioner [ 167768 ]](https://assets1.tamsnetwork.com/images/EC042017NF/167768s.jpg "Stampin' Positioner [ 167768 ]")
![Paper Trimmer [ 152392 ]](https://assets1.tamsnetwork.com/images/EC042017NF/152392s.jpg "Paper Trimmer [ 152392 ]")
![Stampin' Cut & Emboss Machine [ 149653 ]](https://assets1.tamsnetwork.com/images/EC042017NF/149653s.jpg "Stampin' Cut & Emboss Machine [ 149653 ]")

