Everyone loves an interactive card. As card crafters we know this and we see it every time one of our creations is opened to the sound of: “Oh! Look at this!” But we also know that some of these genius interactive elements can get quite complicated or are not flexible enough to put our own spin on it. So today, I have for you a simple and totally flexible design for one of those “Oh! Look at this!” cards we love to make.
Supplies
Words and Wishes Dies
Balloon Festoon Photopolymer Stamps
Balloon Festoon Dies
Bloom Boutique Designer Series Paper
2026-28 In Color Pearlized Specialty Paper
Basic White Card Stock
White embroidery thread
Multipurpose Liquid Glue
Mini Glue Dots
Stampin’ Dimensionals
Double Sided Adhesive Sheet (optional)
Take Your Pick Tool (or other scoring tool)
Paper Trimmer
Cut and Emboss Machine
Directions
Card Base
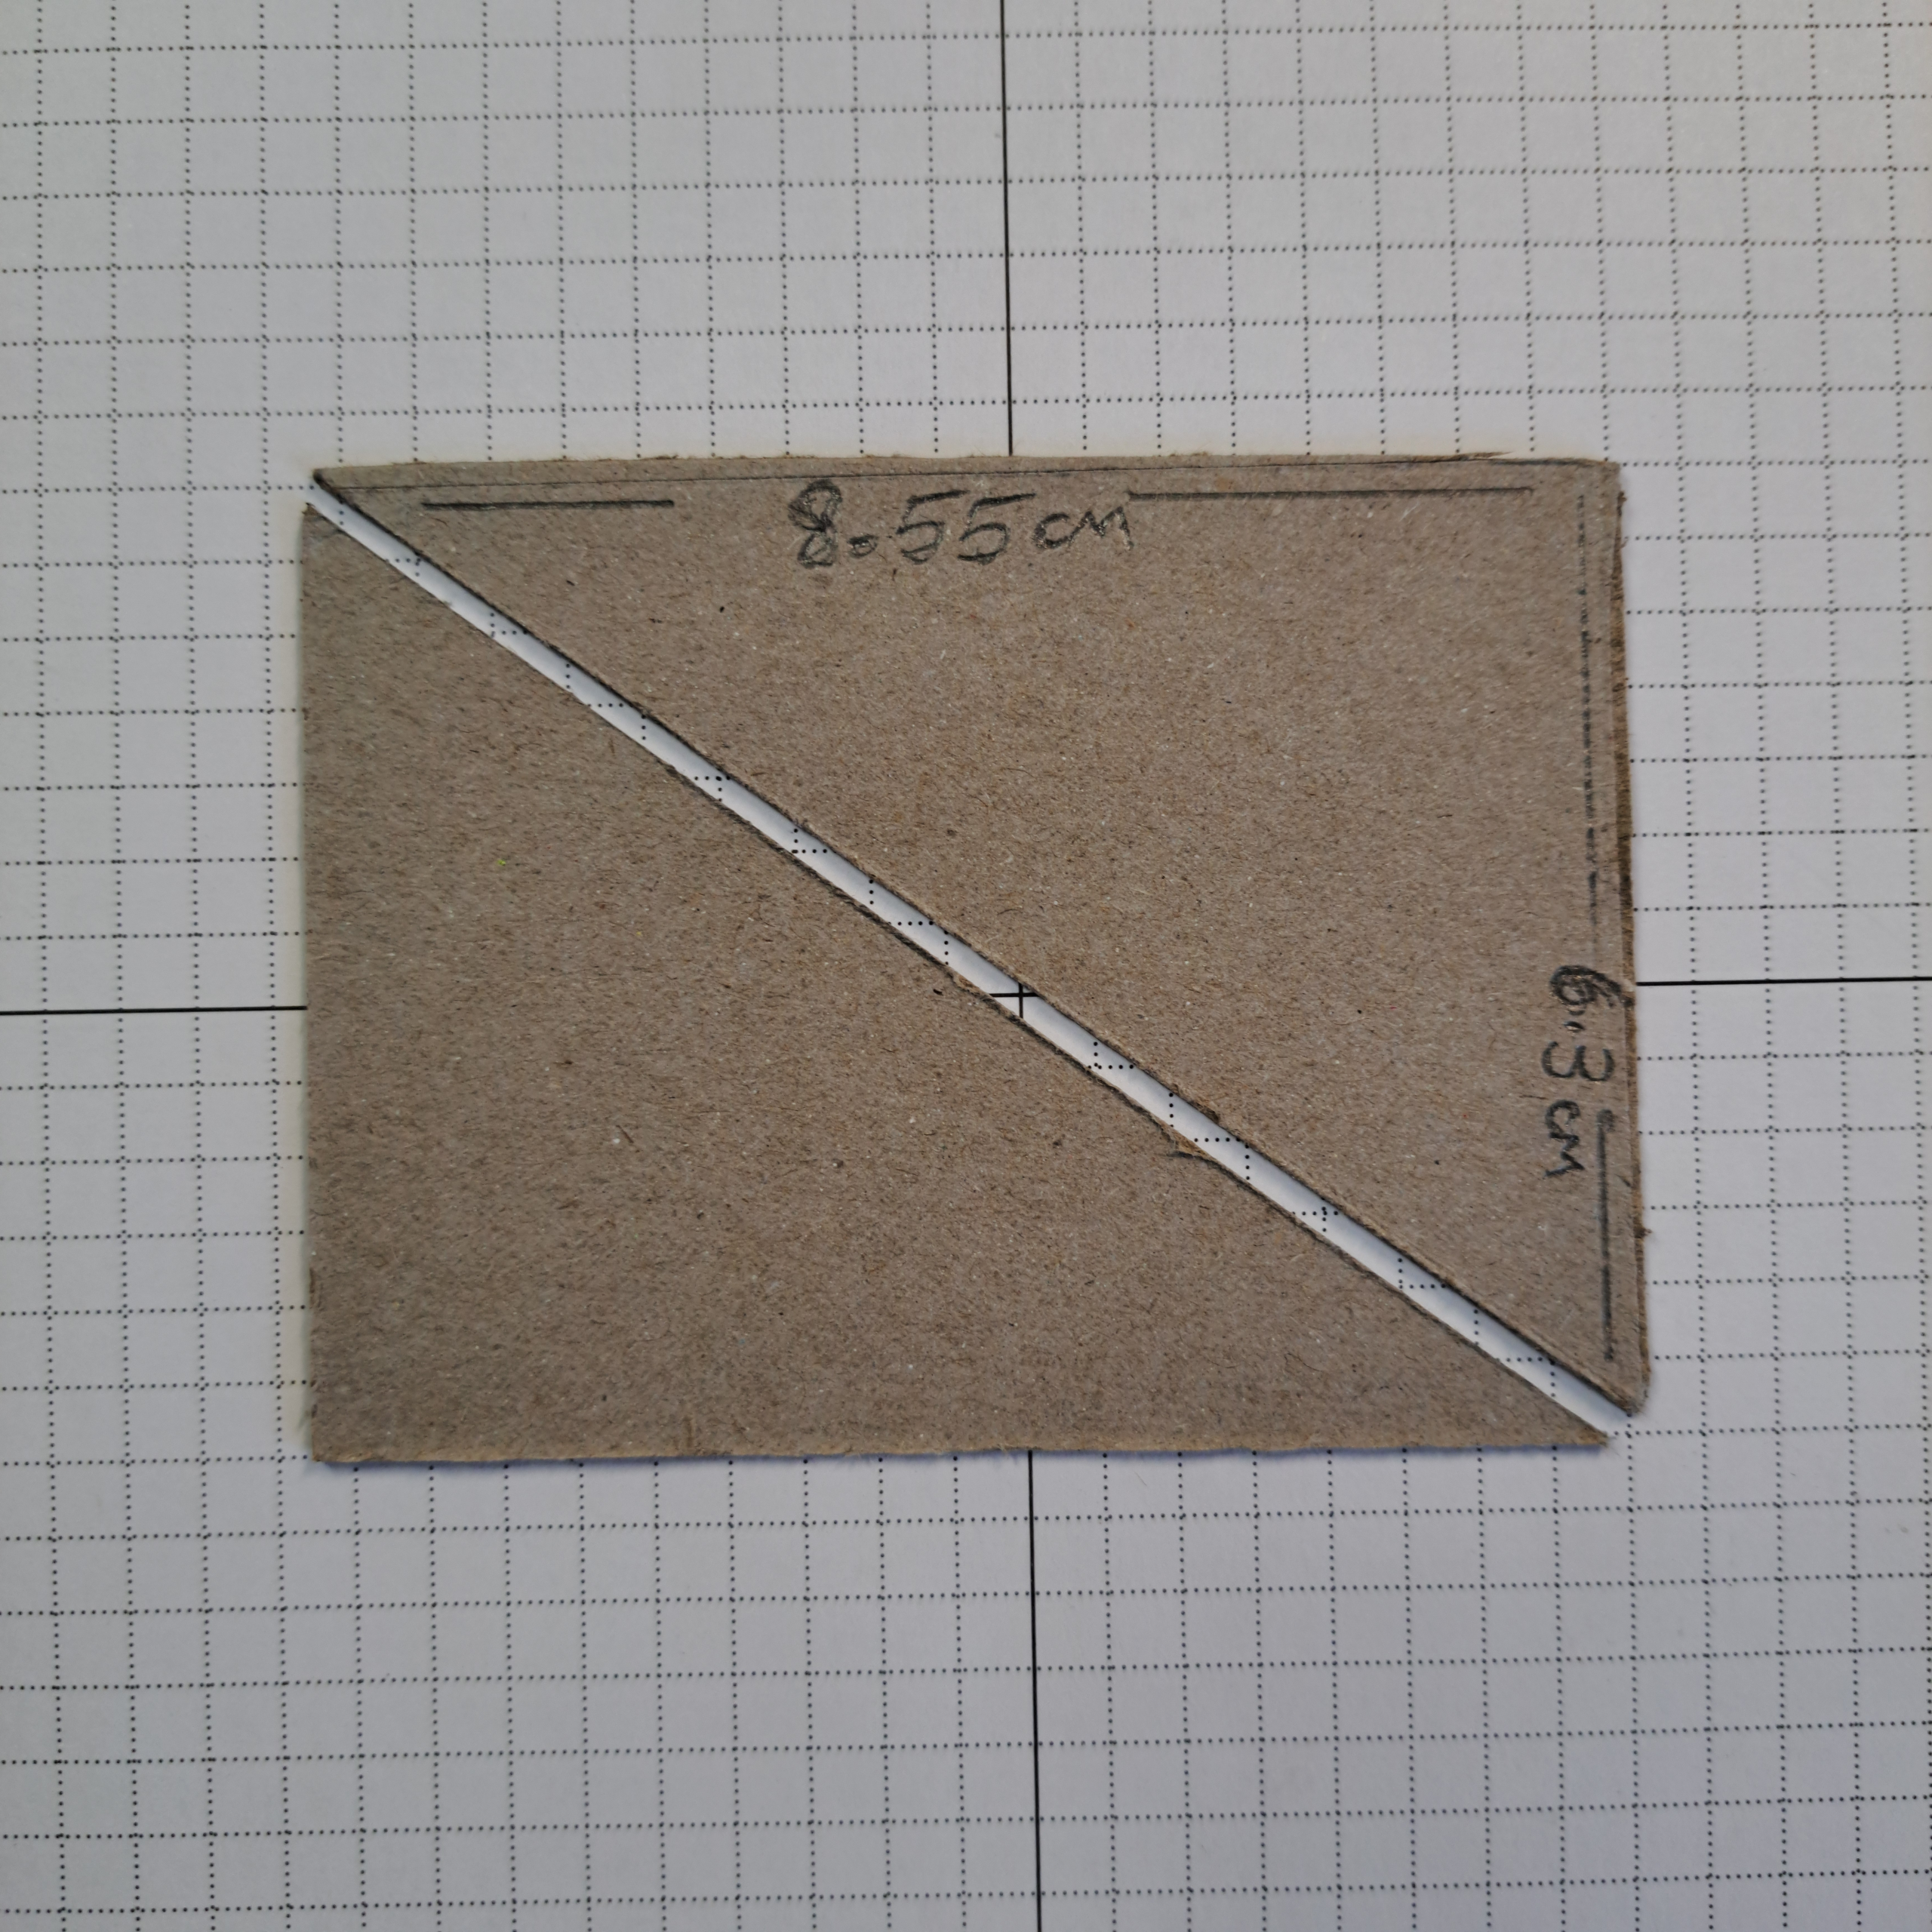
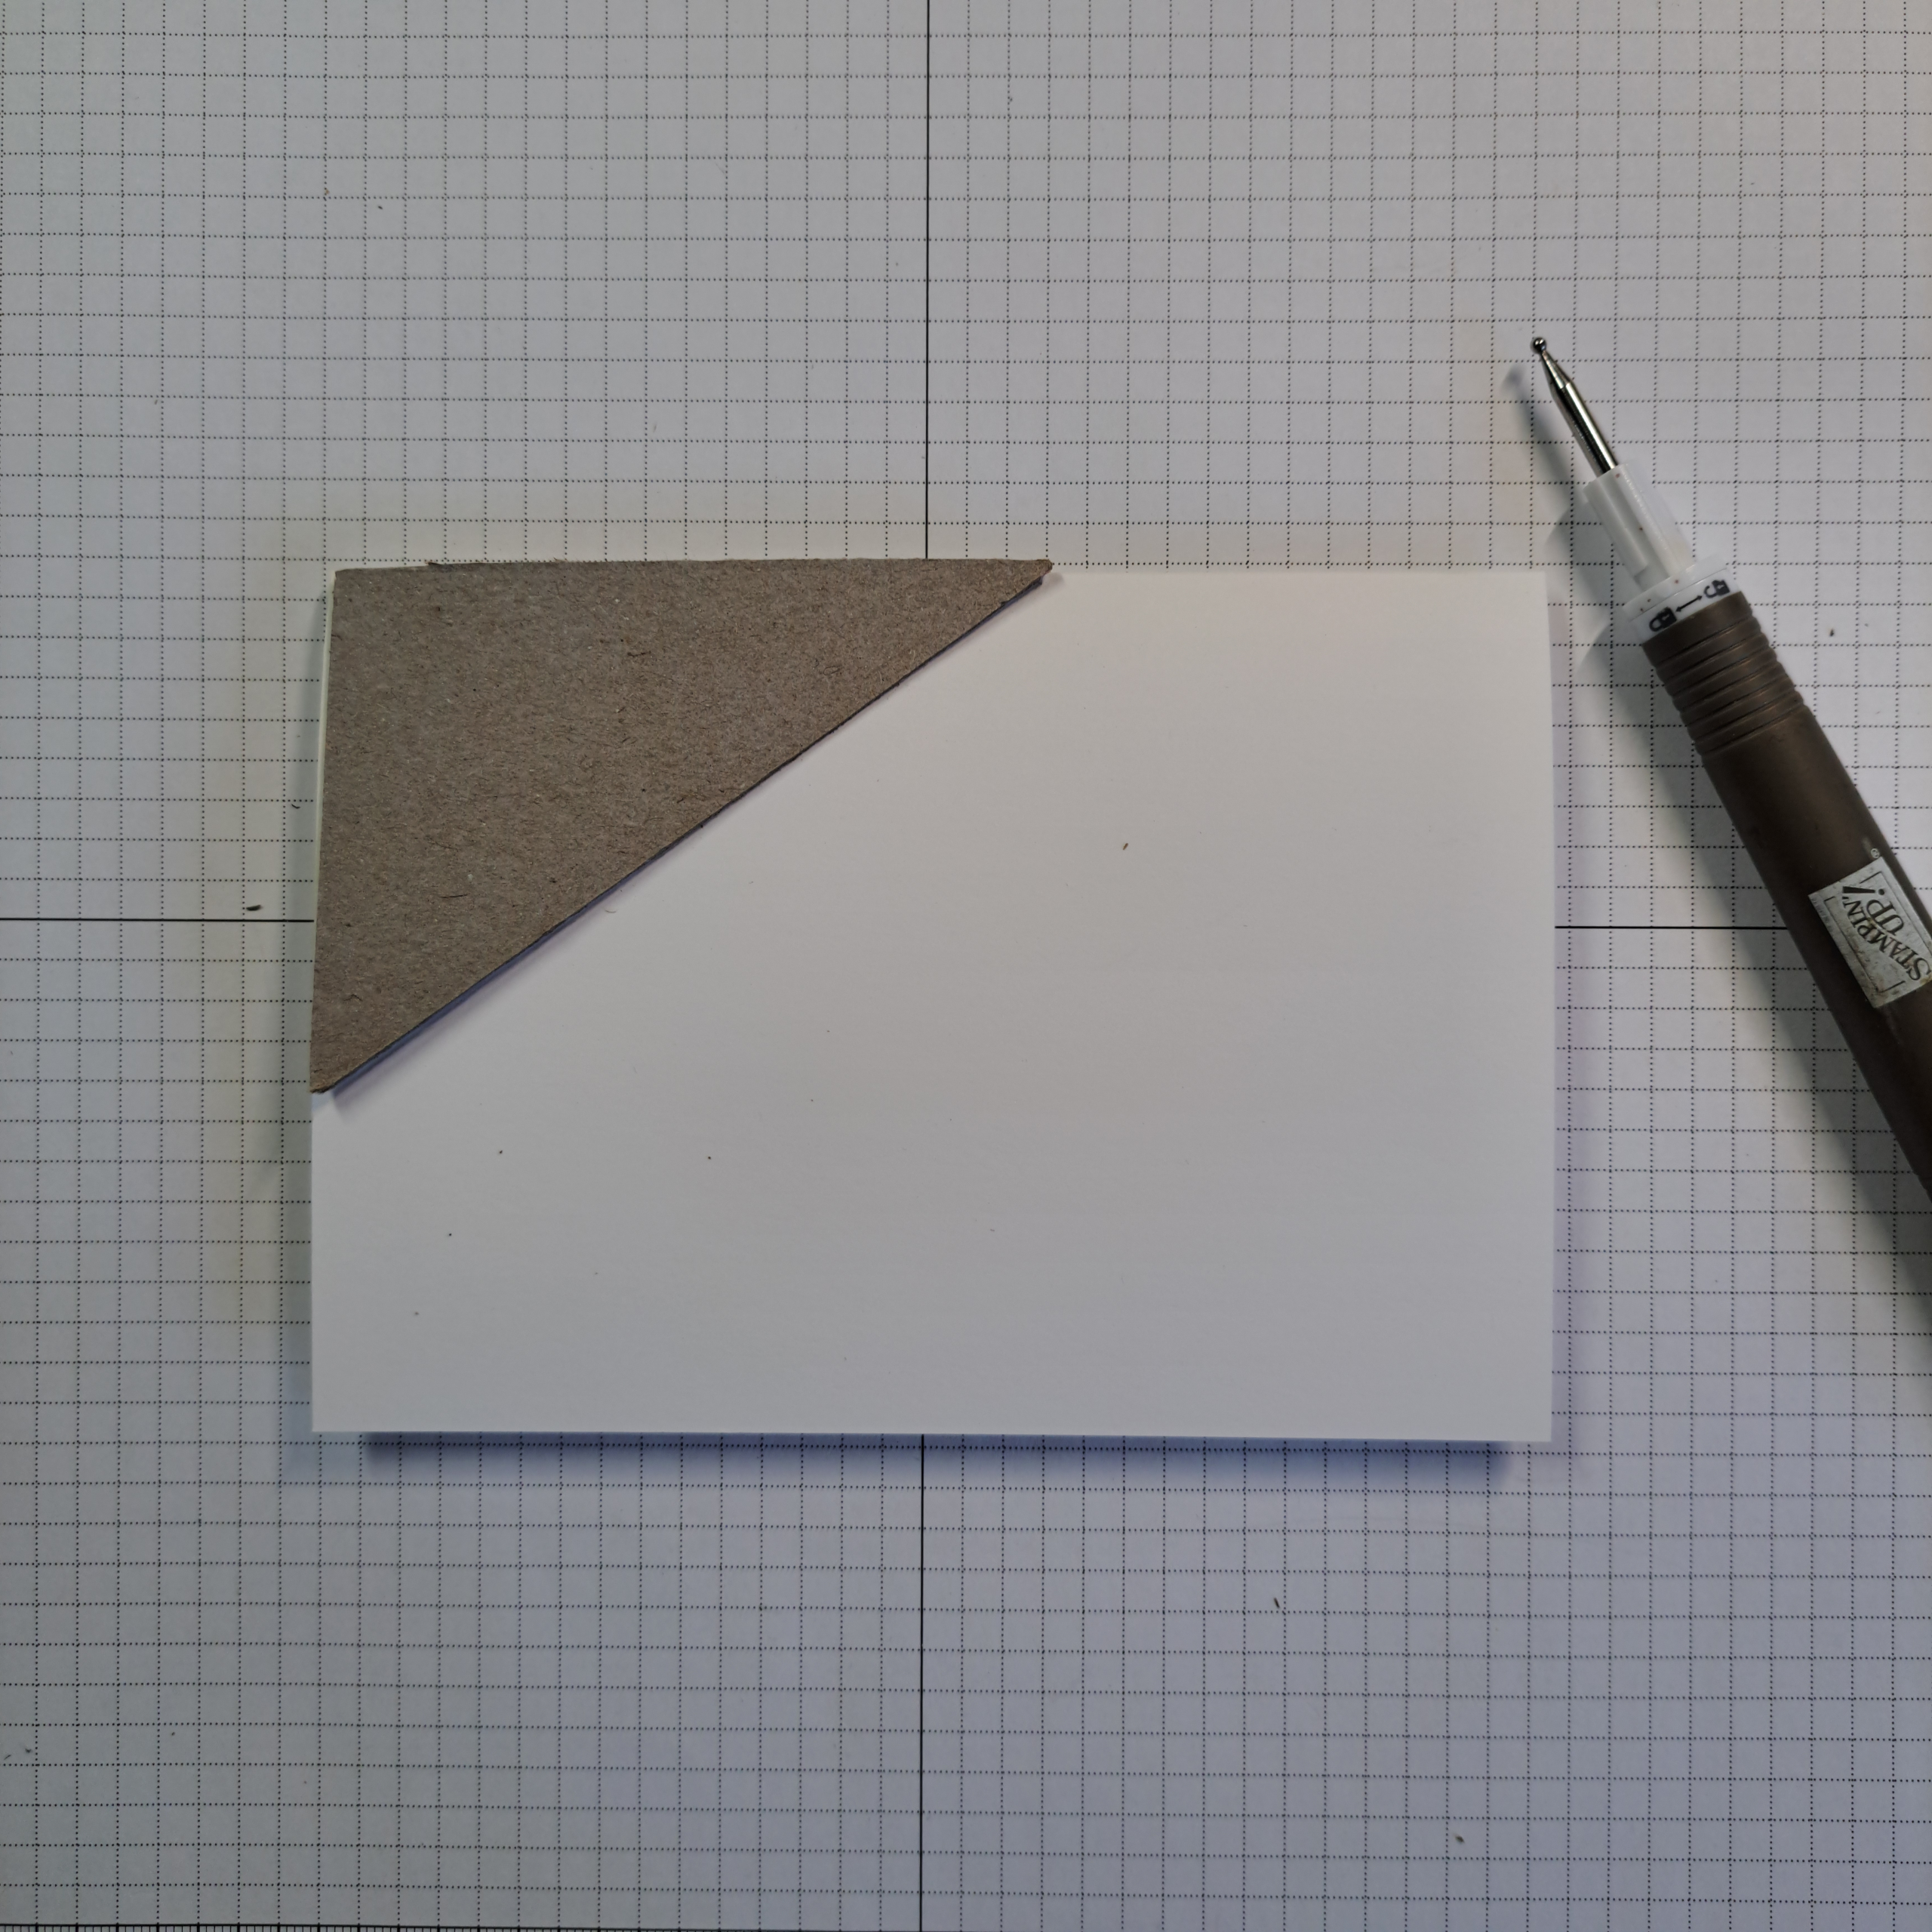
Make a rectangular template sized 8.55cm x 6.3cm (2-1/2″ x 3-1/4″). Cut this rectangle diagonally to form two triangles. This can be cut from heavy card stock but it is recommended to use some light weight chip board like the kind that comes packaged in your Designer Series Paper or the type that is found on the back side of a legal pad. You will only need the ‘upper’ triangle for this project. Note: Even though the rectangles for the metric version and the imperial version will look almost the same, the sizes are different and are not interchangeable.
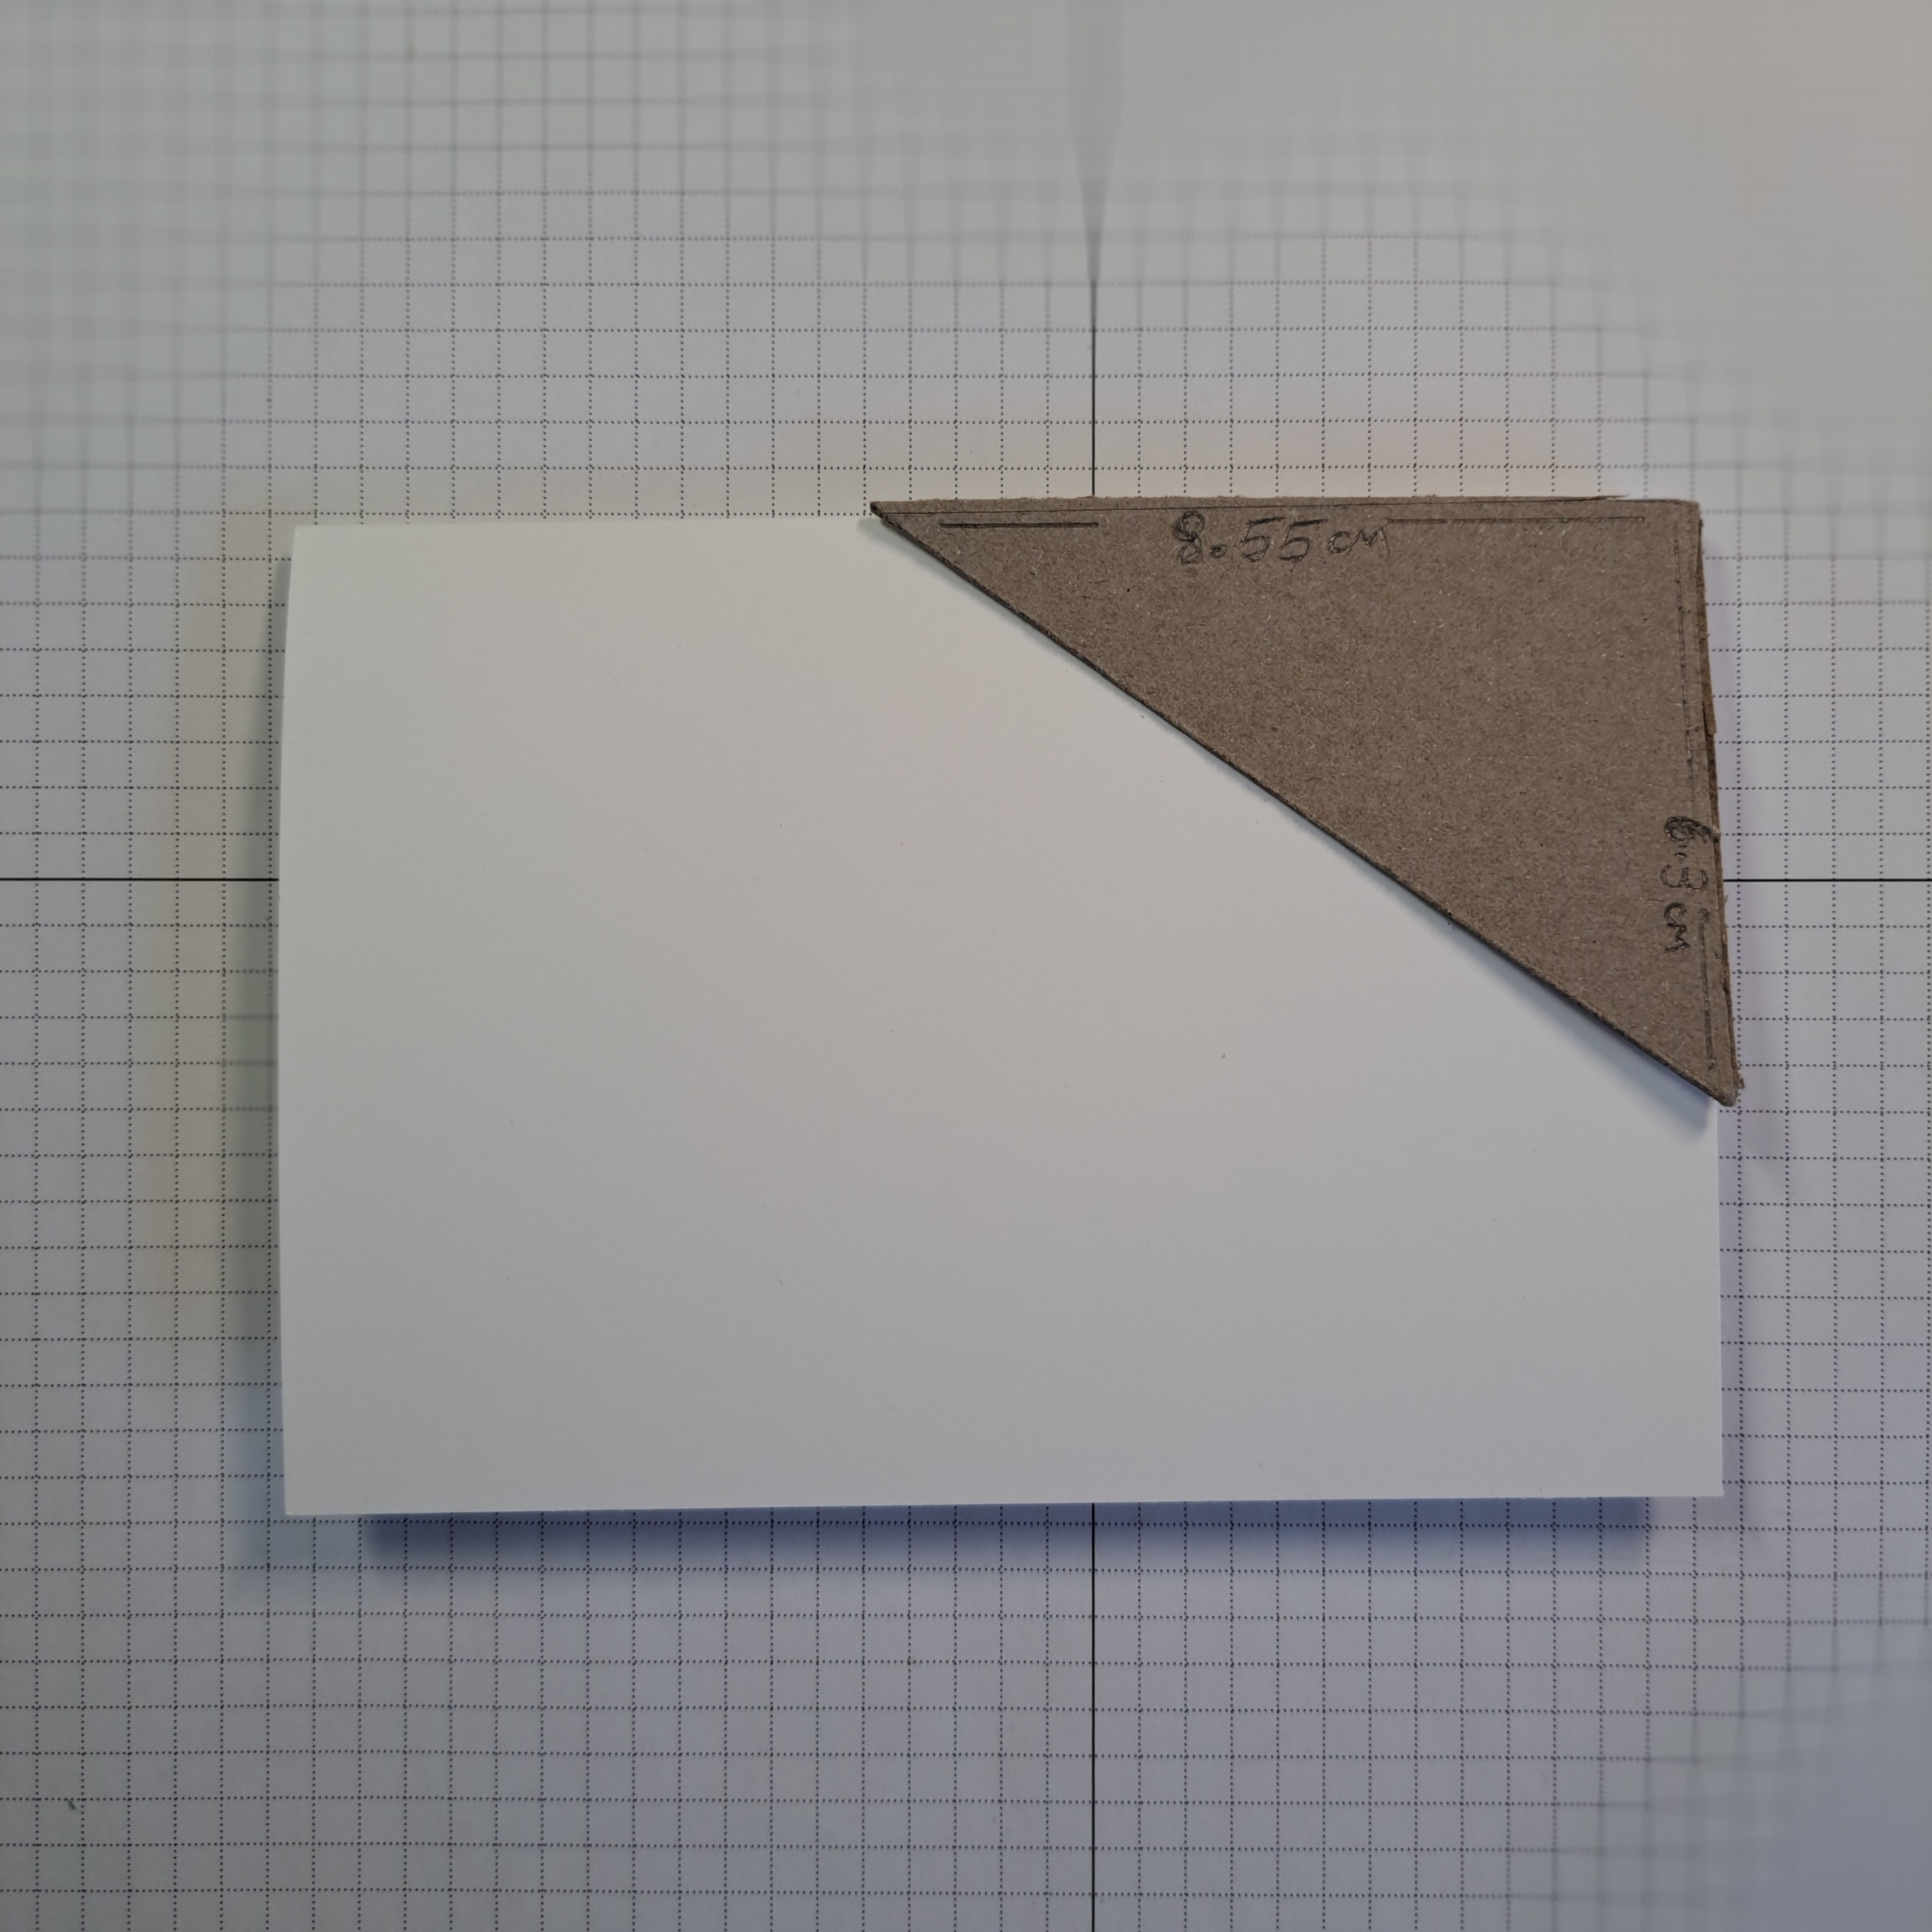
Cut card base 21cm x 14.85cm (8-1/2″ x 5-1/2″). Score half way at 10.5cm (4-1/4″). Decide on which side you want to have your corner fold. Right or left does not matter, for this card I choose right corner. Align the triangle template so that the long side is even with the fold of your card and the short side is even with the edge.
Hold tightly to the template and score the card stock along the bottom of the triangle template. flip the card over and score the reverse side in the same manner.
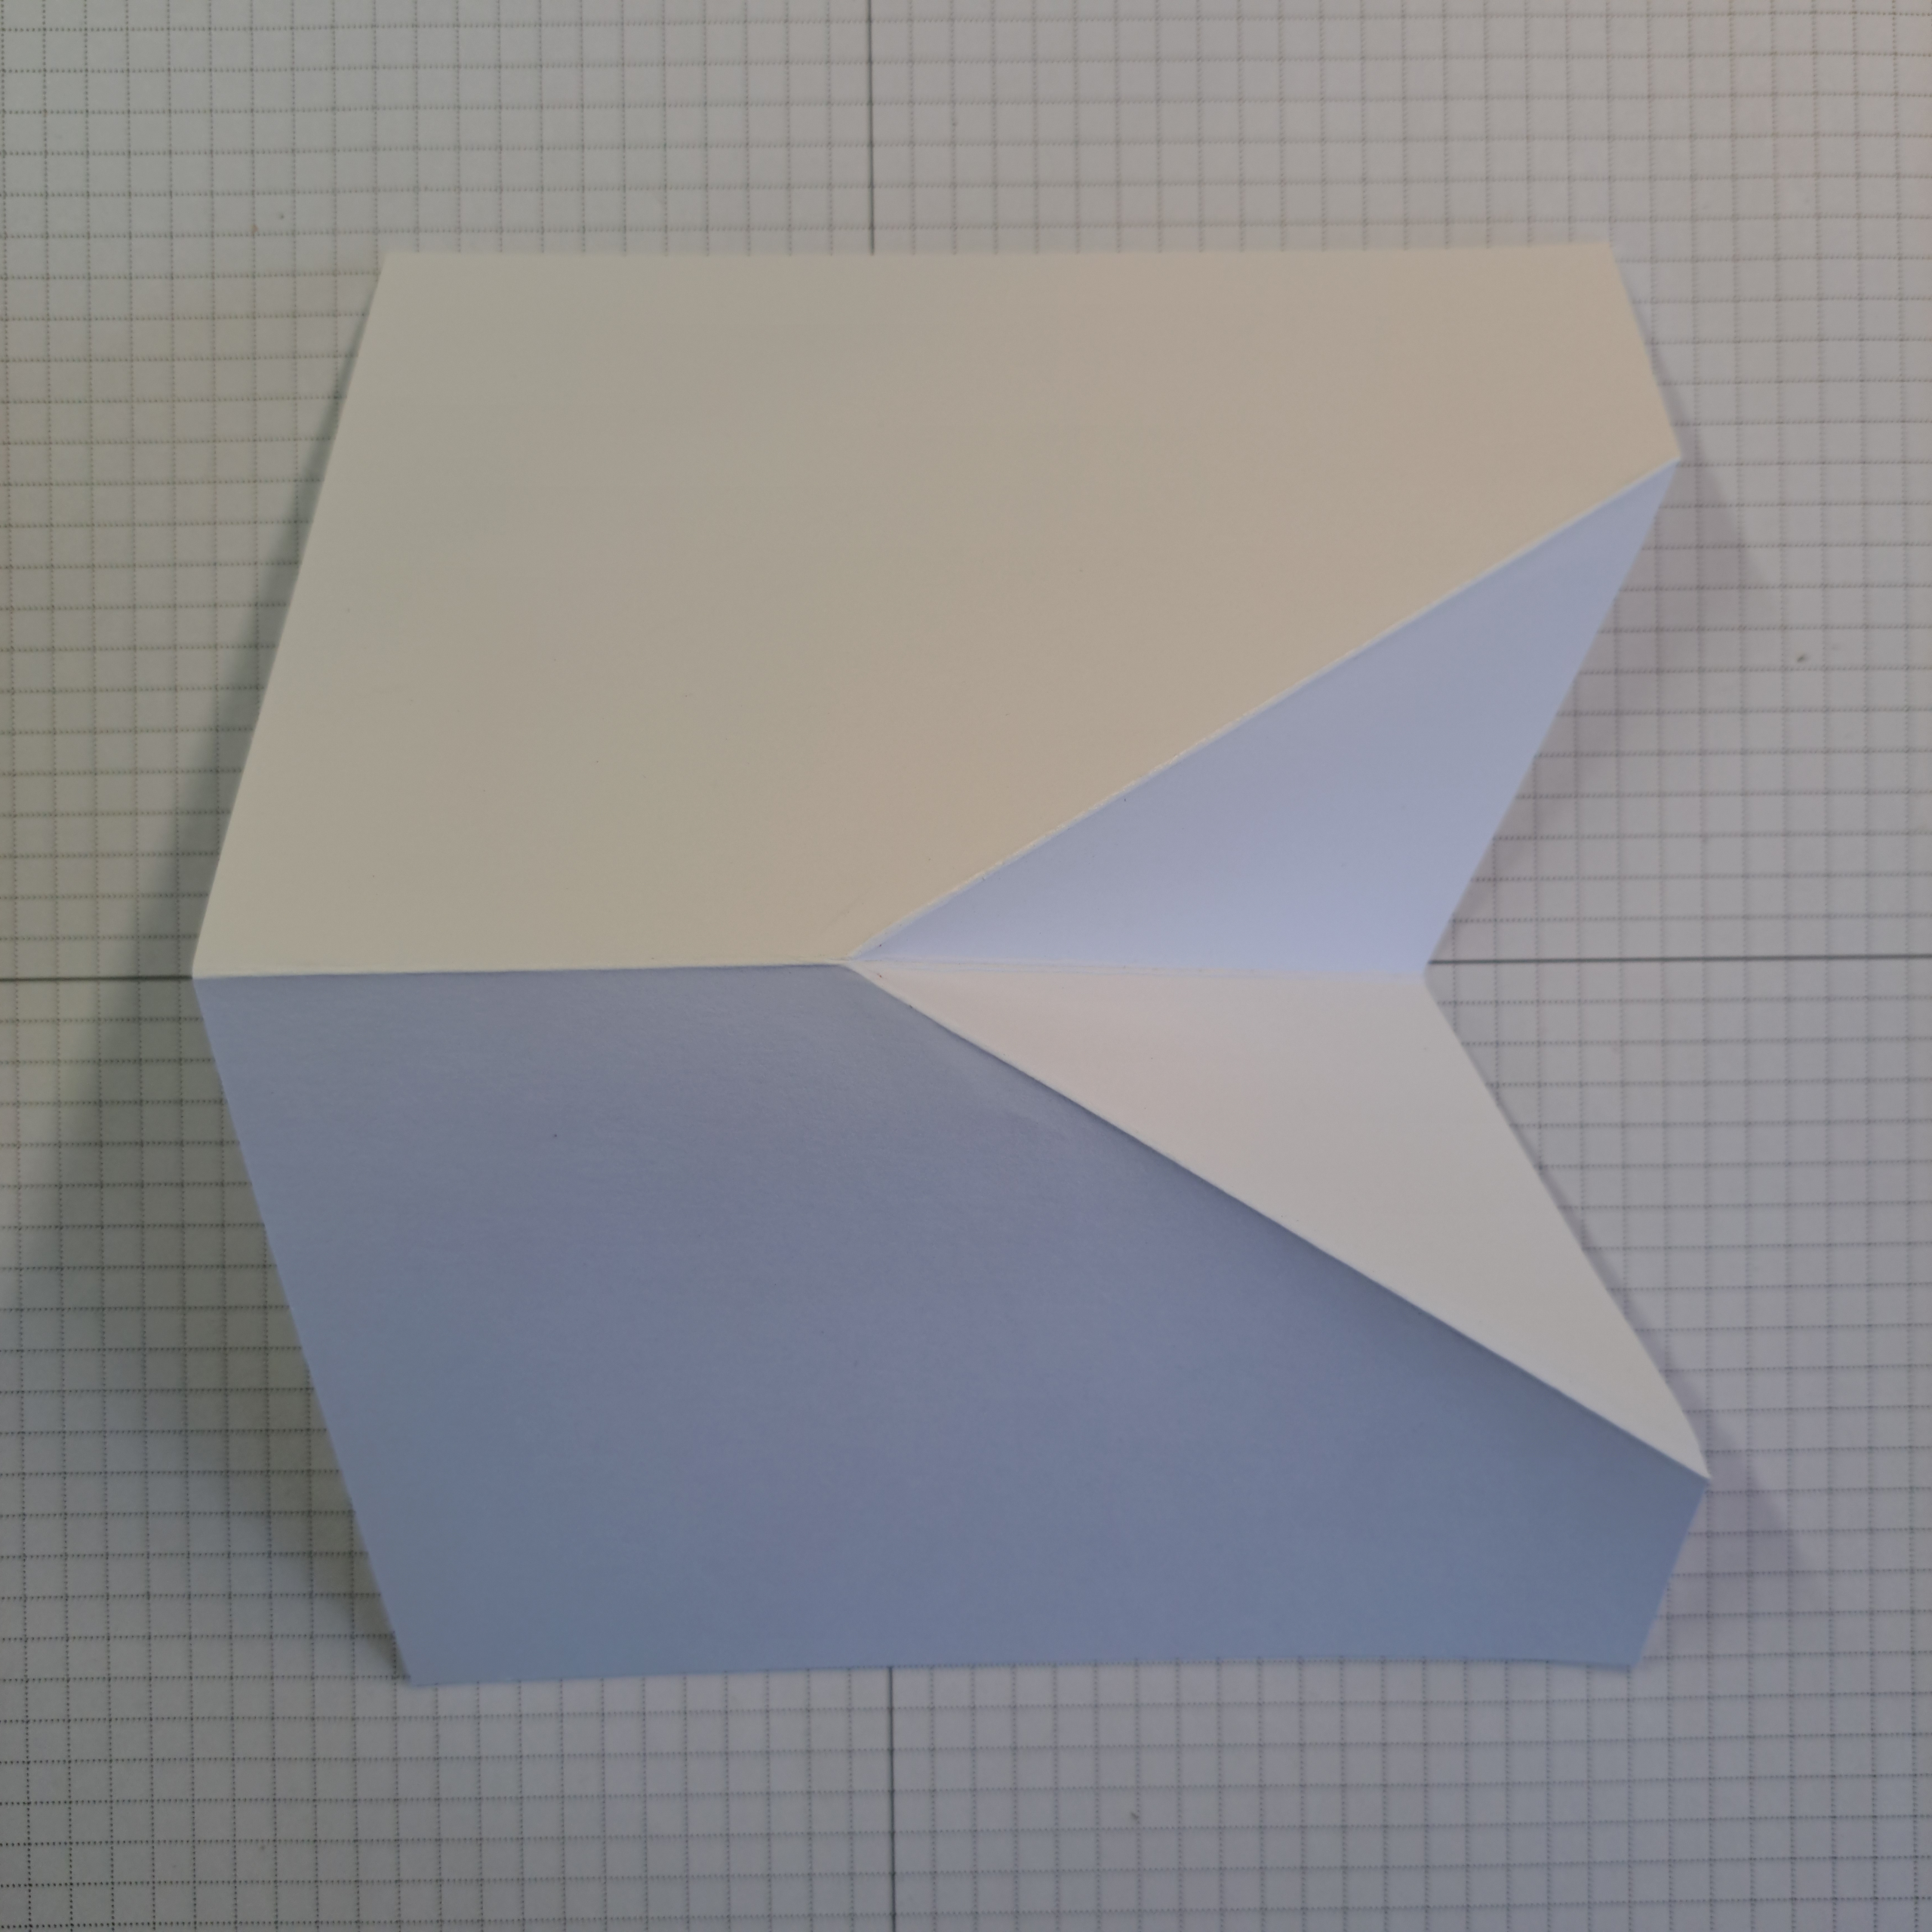
Invert the fold and burnish well.
Decorating the card
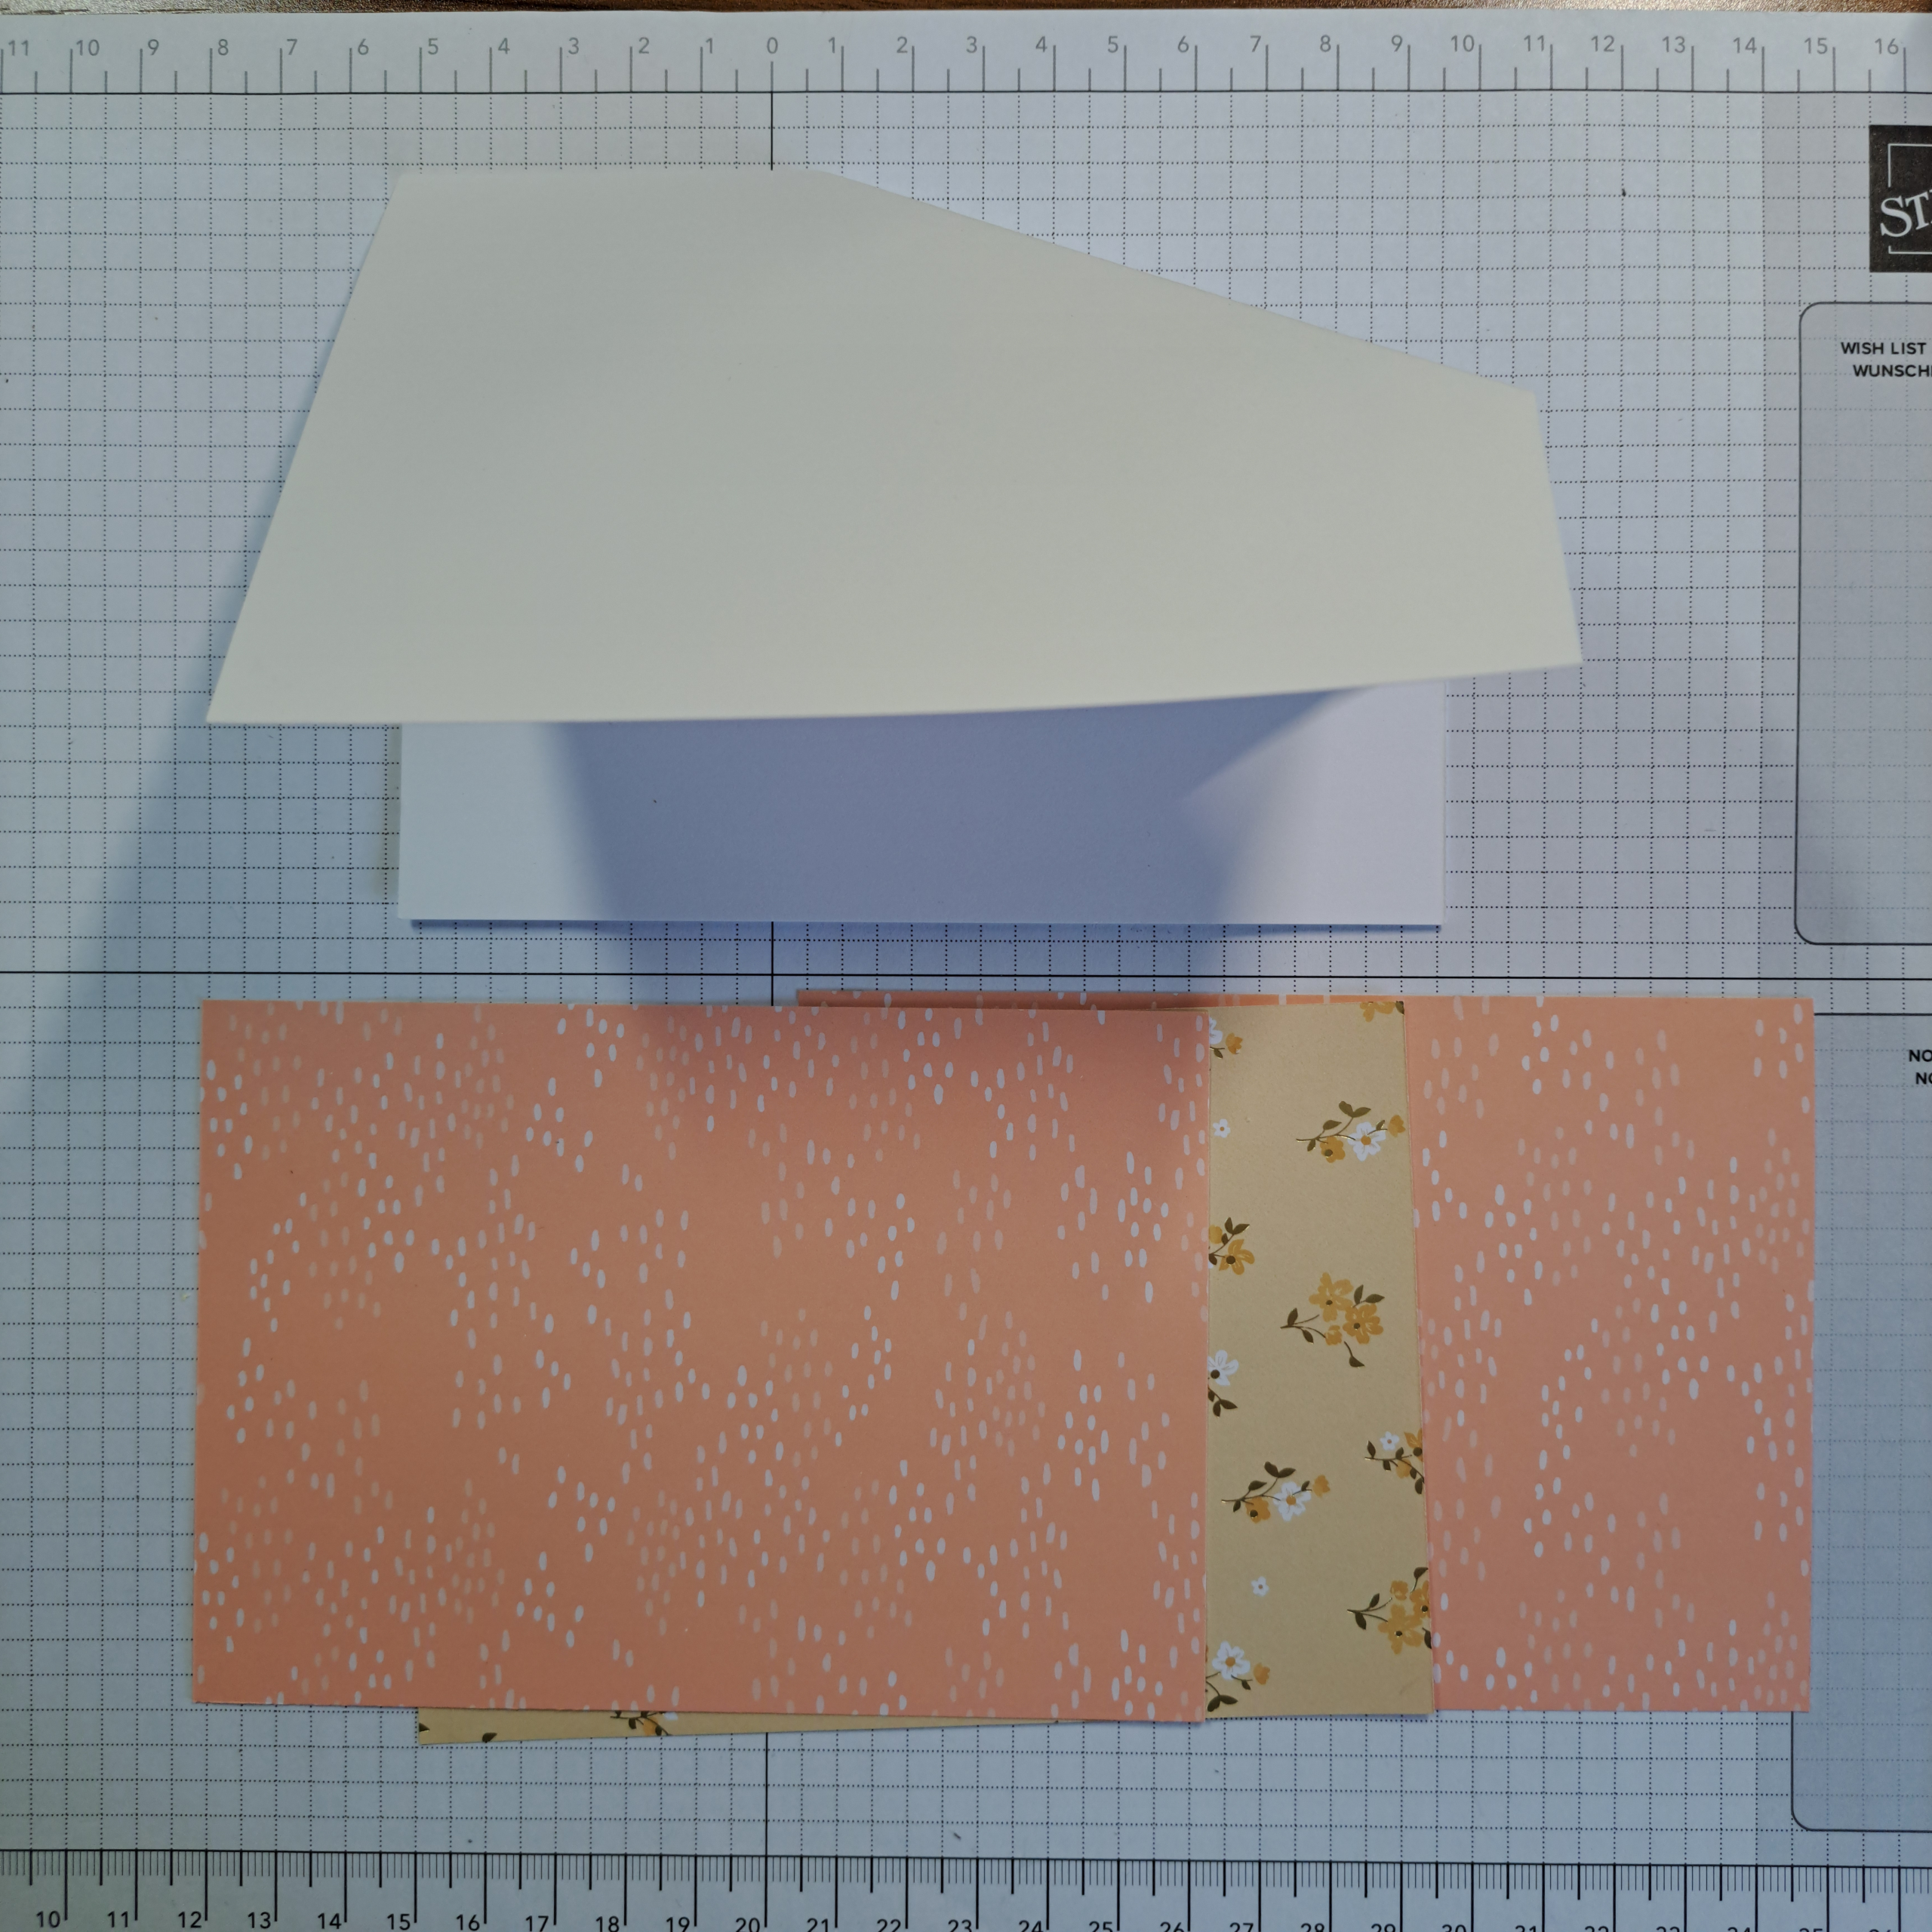
Cut three pieces of Designer Series Paper to 10cm x 14.35cm (4-1/8 ” x 5-3/8″). Decide which part of the card each of the DSP papers will be. You will need an outside, an inside upper and an inside lower. Stack these pieces up in this order.
Align the template up with the corner that matches the card base. Clip papers and template together or hold tightly. Place all of the papers into the trimmer and cut them all at once.
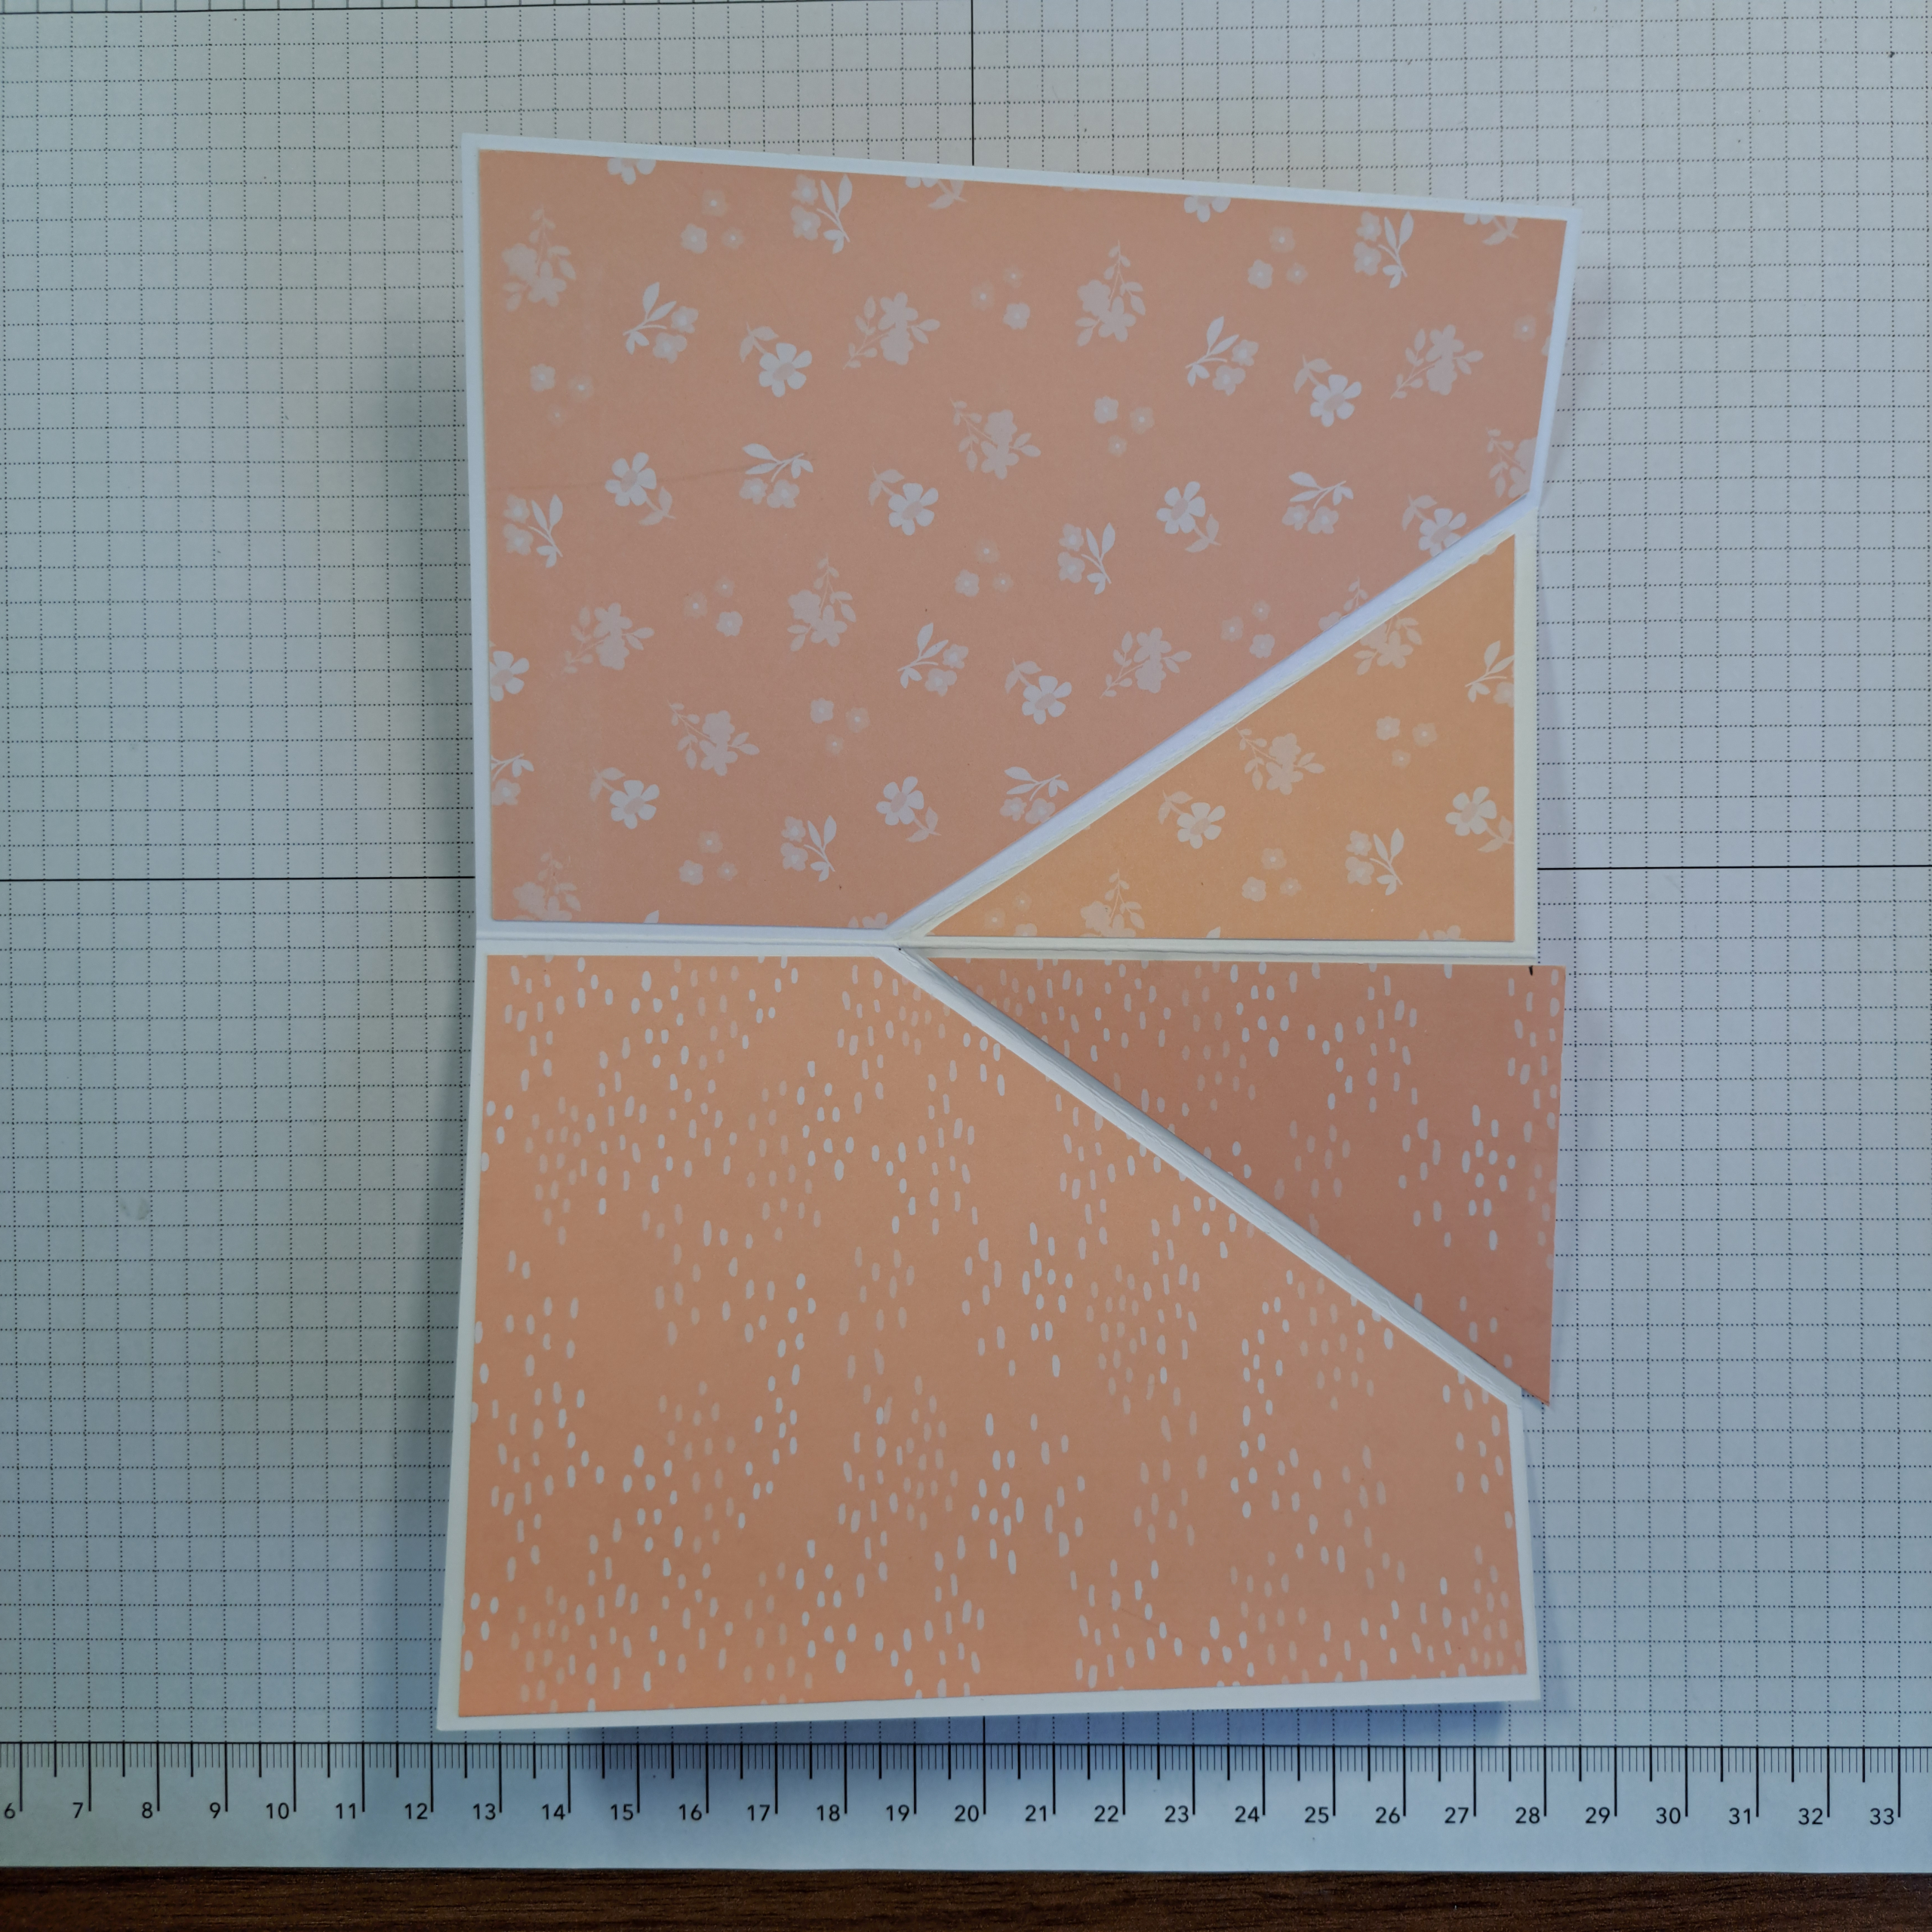
Affix the Designer Series Papers to the card front and insides. Use the left over triangular pieces on the interior triangular areas. You will need to trim off approximate .7cm (1/4″) on the short side of the triangle to create a nice border. Be sure you measure the triangle on the paper before cutting, on some of the cards I needed to cut a little less and on one card a little more. Or you can leave the inside triangular fold plain.

Optionally, cut card liner from a piece of white card stock to measure 9cm x 13.35cm (4-1/4″ x 5-1/8″). Do this if you have chosen a pattern for the interior that does not look good if you write on it. Align the template up to the upper right corner of the card liner and cut along the line. For this project I choose to stamp an inside greeting onto the white card liner using the Crisp Cantaloupe ink.
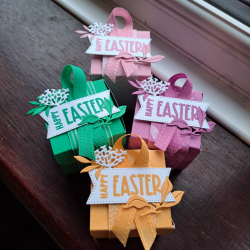
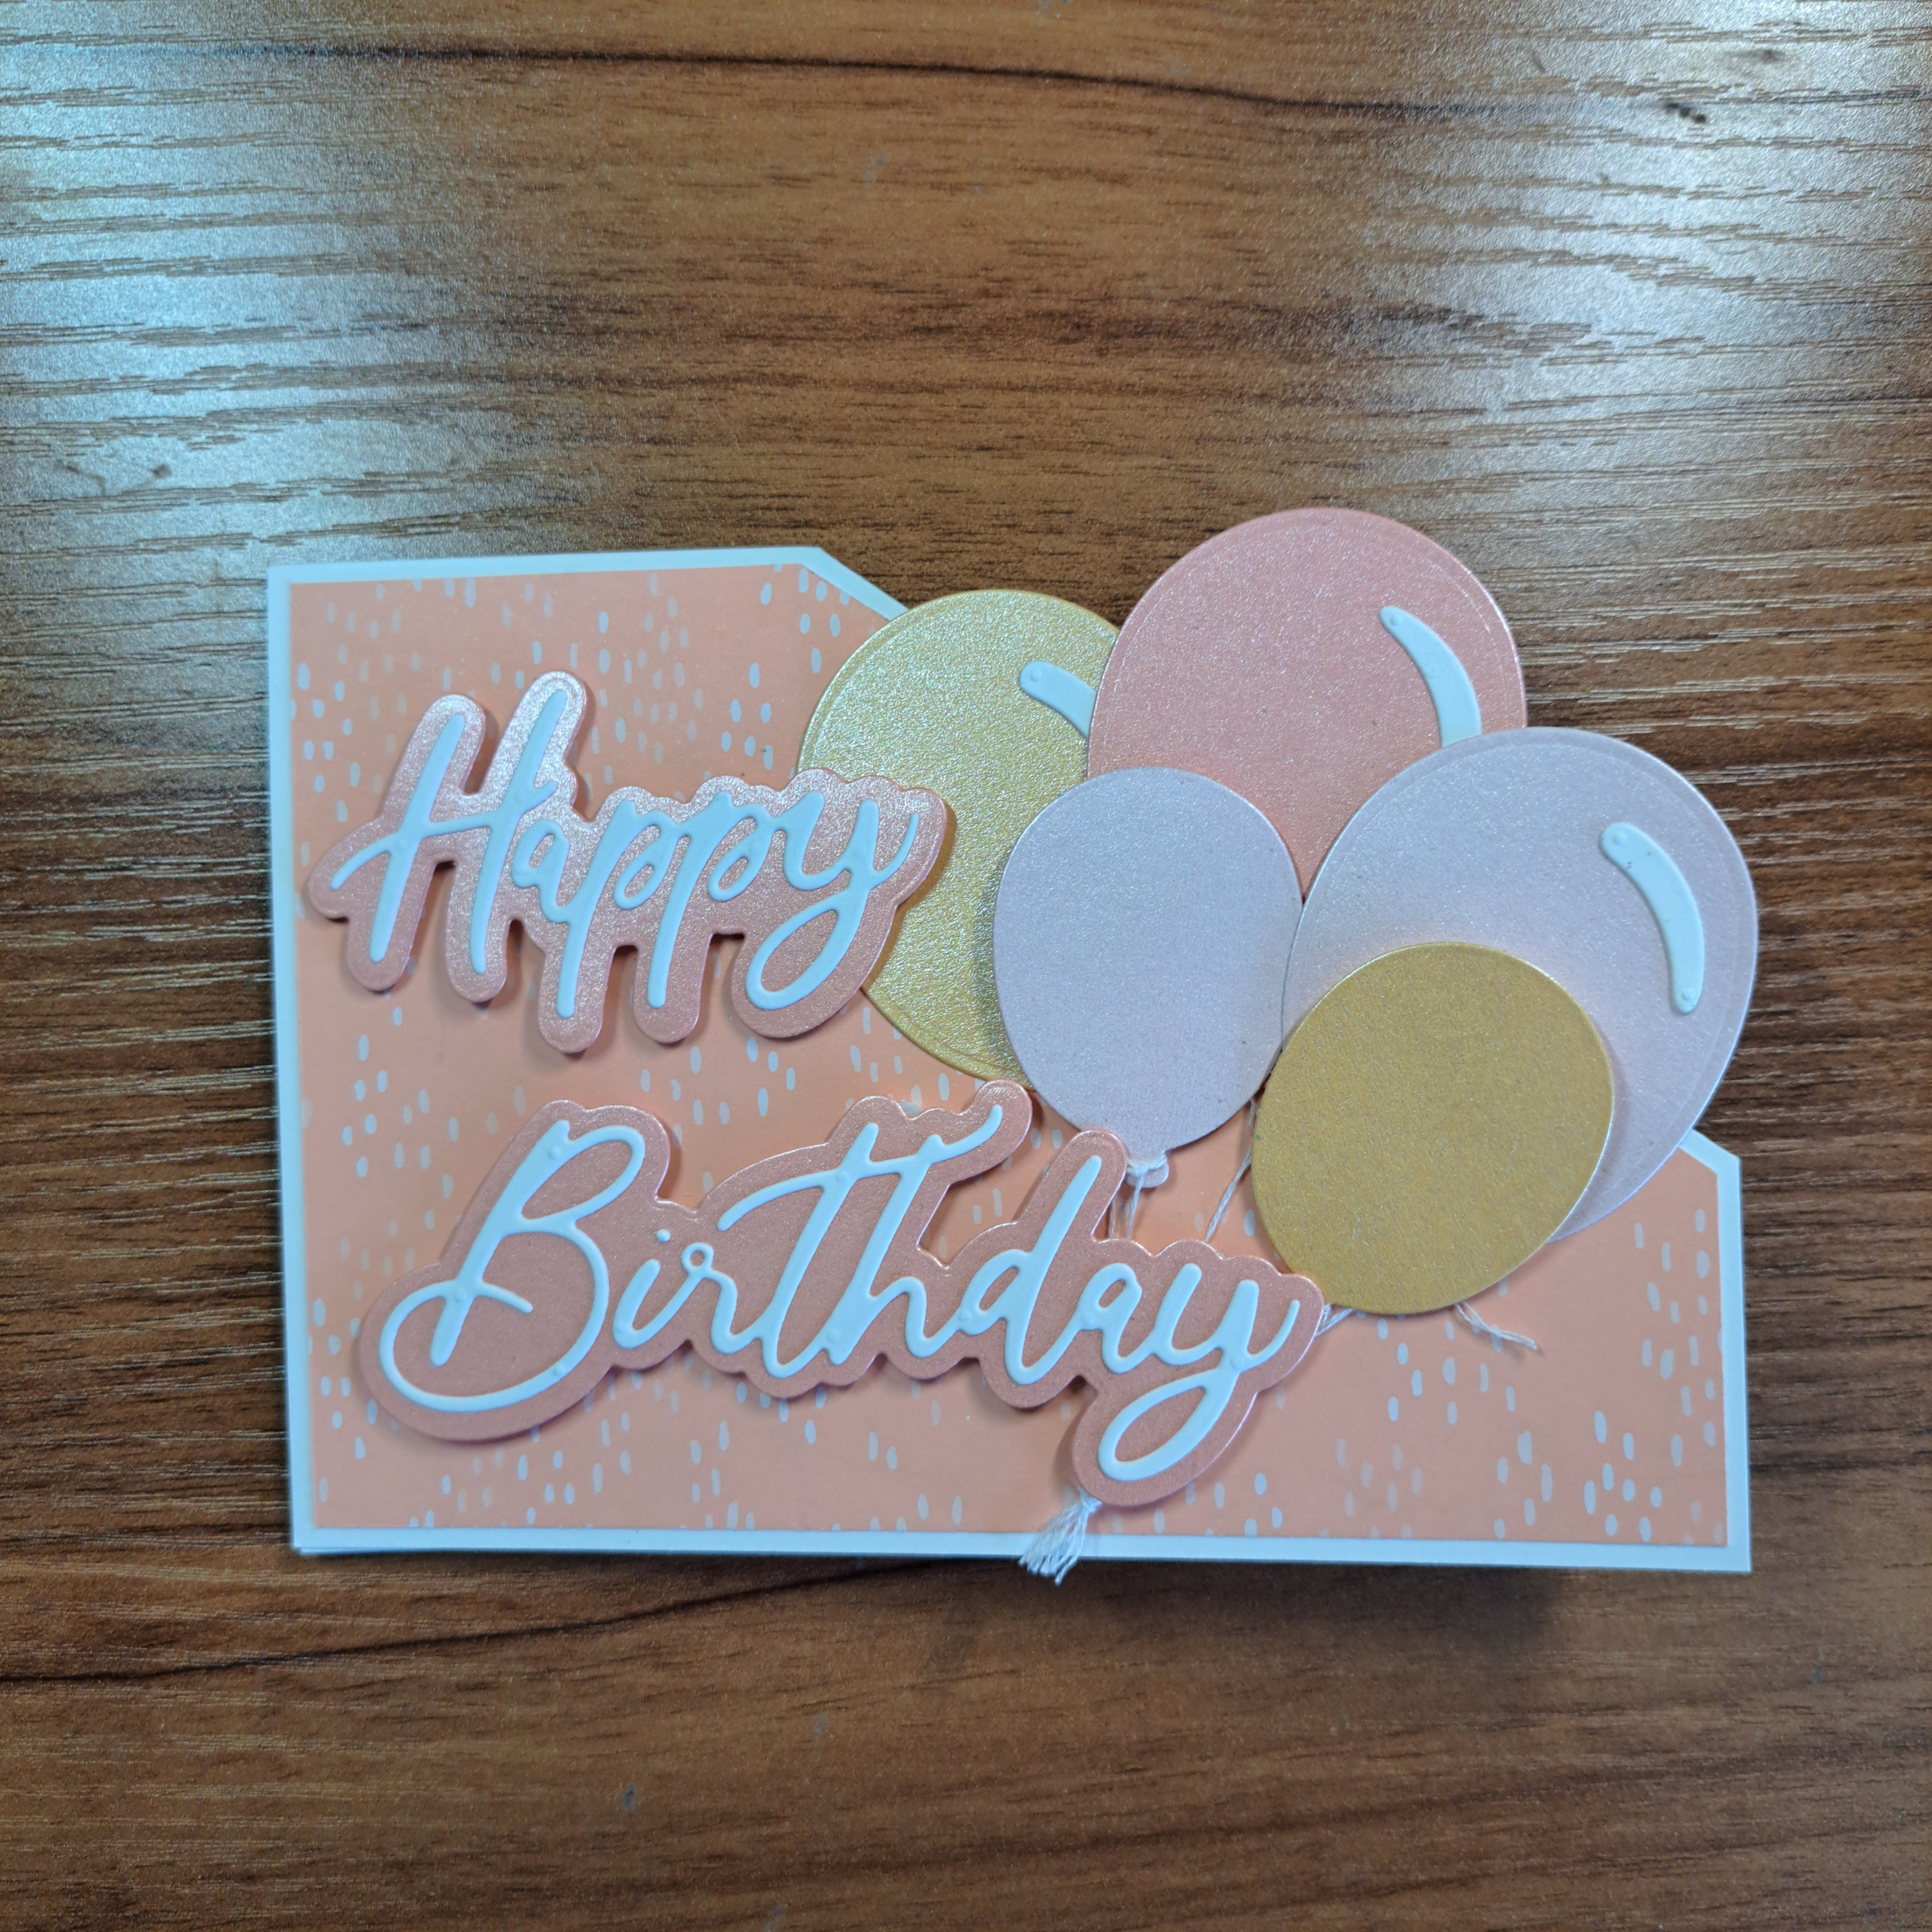
Die cut the lettering backgrounds out of the Crisp Cantaloupe Pearlized Specialty Paper. You will need one for the ‘Happy’ and one for ‘Birthday’. From the same color Pearlized paper cut two 3.5cm (1-1/4″) balloons and one 4.5cm (1-3/4″) balloons.
Cut a small scrap of the Barely Blush Pearlized Specialty Paper and use it to die cut one each of the 3.5cm (1-1/4″) and 4.5cm (1-3/4″) balloons. Repeat using a scrap of the Golden Glow Pearlized Specialty Paper.
The fine lettering and balloon embellishments are die cut from a piece of white card stock measuring 7cm x 10cm (2-3/4″ x 4″). Optional (but highly recommended), cut a matching piece of double sided adhesive and affix to the back of the white card stock before die cutting. This will make your life easier as the lettering is very fine and delicate and difficult to adhere using liquid glue. Also from this scrap I cut two of the balloon highlight pieces (one die cuts two pieces, you should have four small pieces in total).
Adhere the white lettering over the matching base. Take you time here, this is a bit fussy but the look is worth the effort.
Cut a couple of lengths of white Baker’s Twine or embroidery thread about 15cm (6″) long. Separate out the threads so that you have a pair (I tried to use the whole piece of twine but felt it was too thick). Tie one to each of the balloon bases.
Arrange three of the large balloons on the front of the card. Allow the tops of the balloons to extend above the diagonal fold line, glue flat to card. Next place dimensionals on the back of two of the smaller balloons, arrange them on top of the larger balloons. Draw the threads down and knot them together (as if the balloons were in a bunch). Use a drop of glue or a glue dot to hold the threads taught at the knot.
Place dimensionals on the back of the Happy Birthday words and adhere to the card front as shown in finished photo.
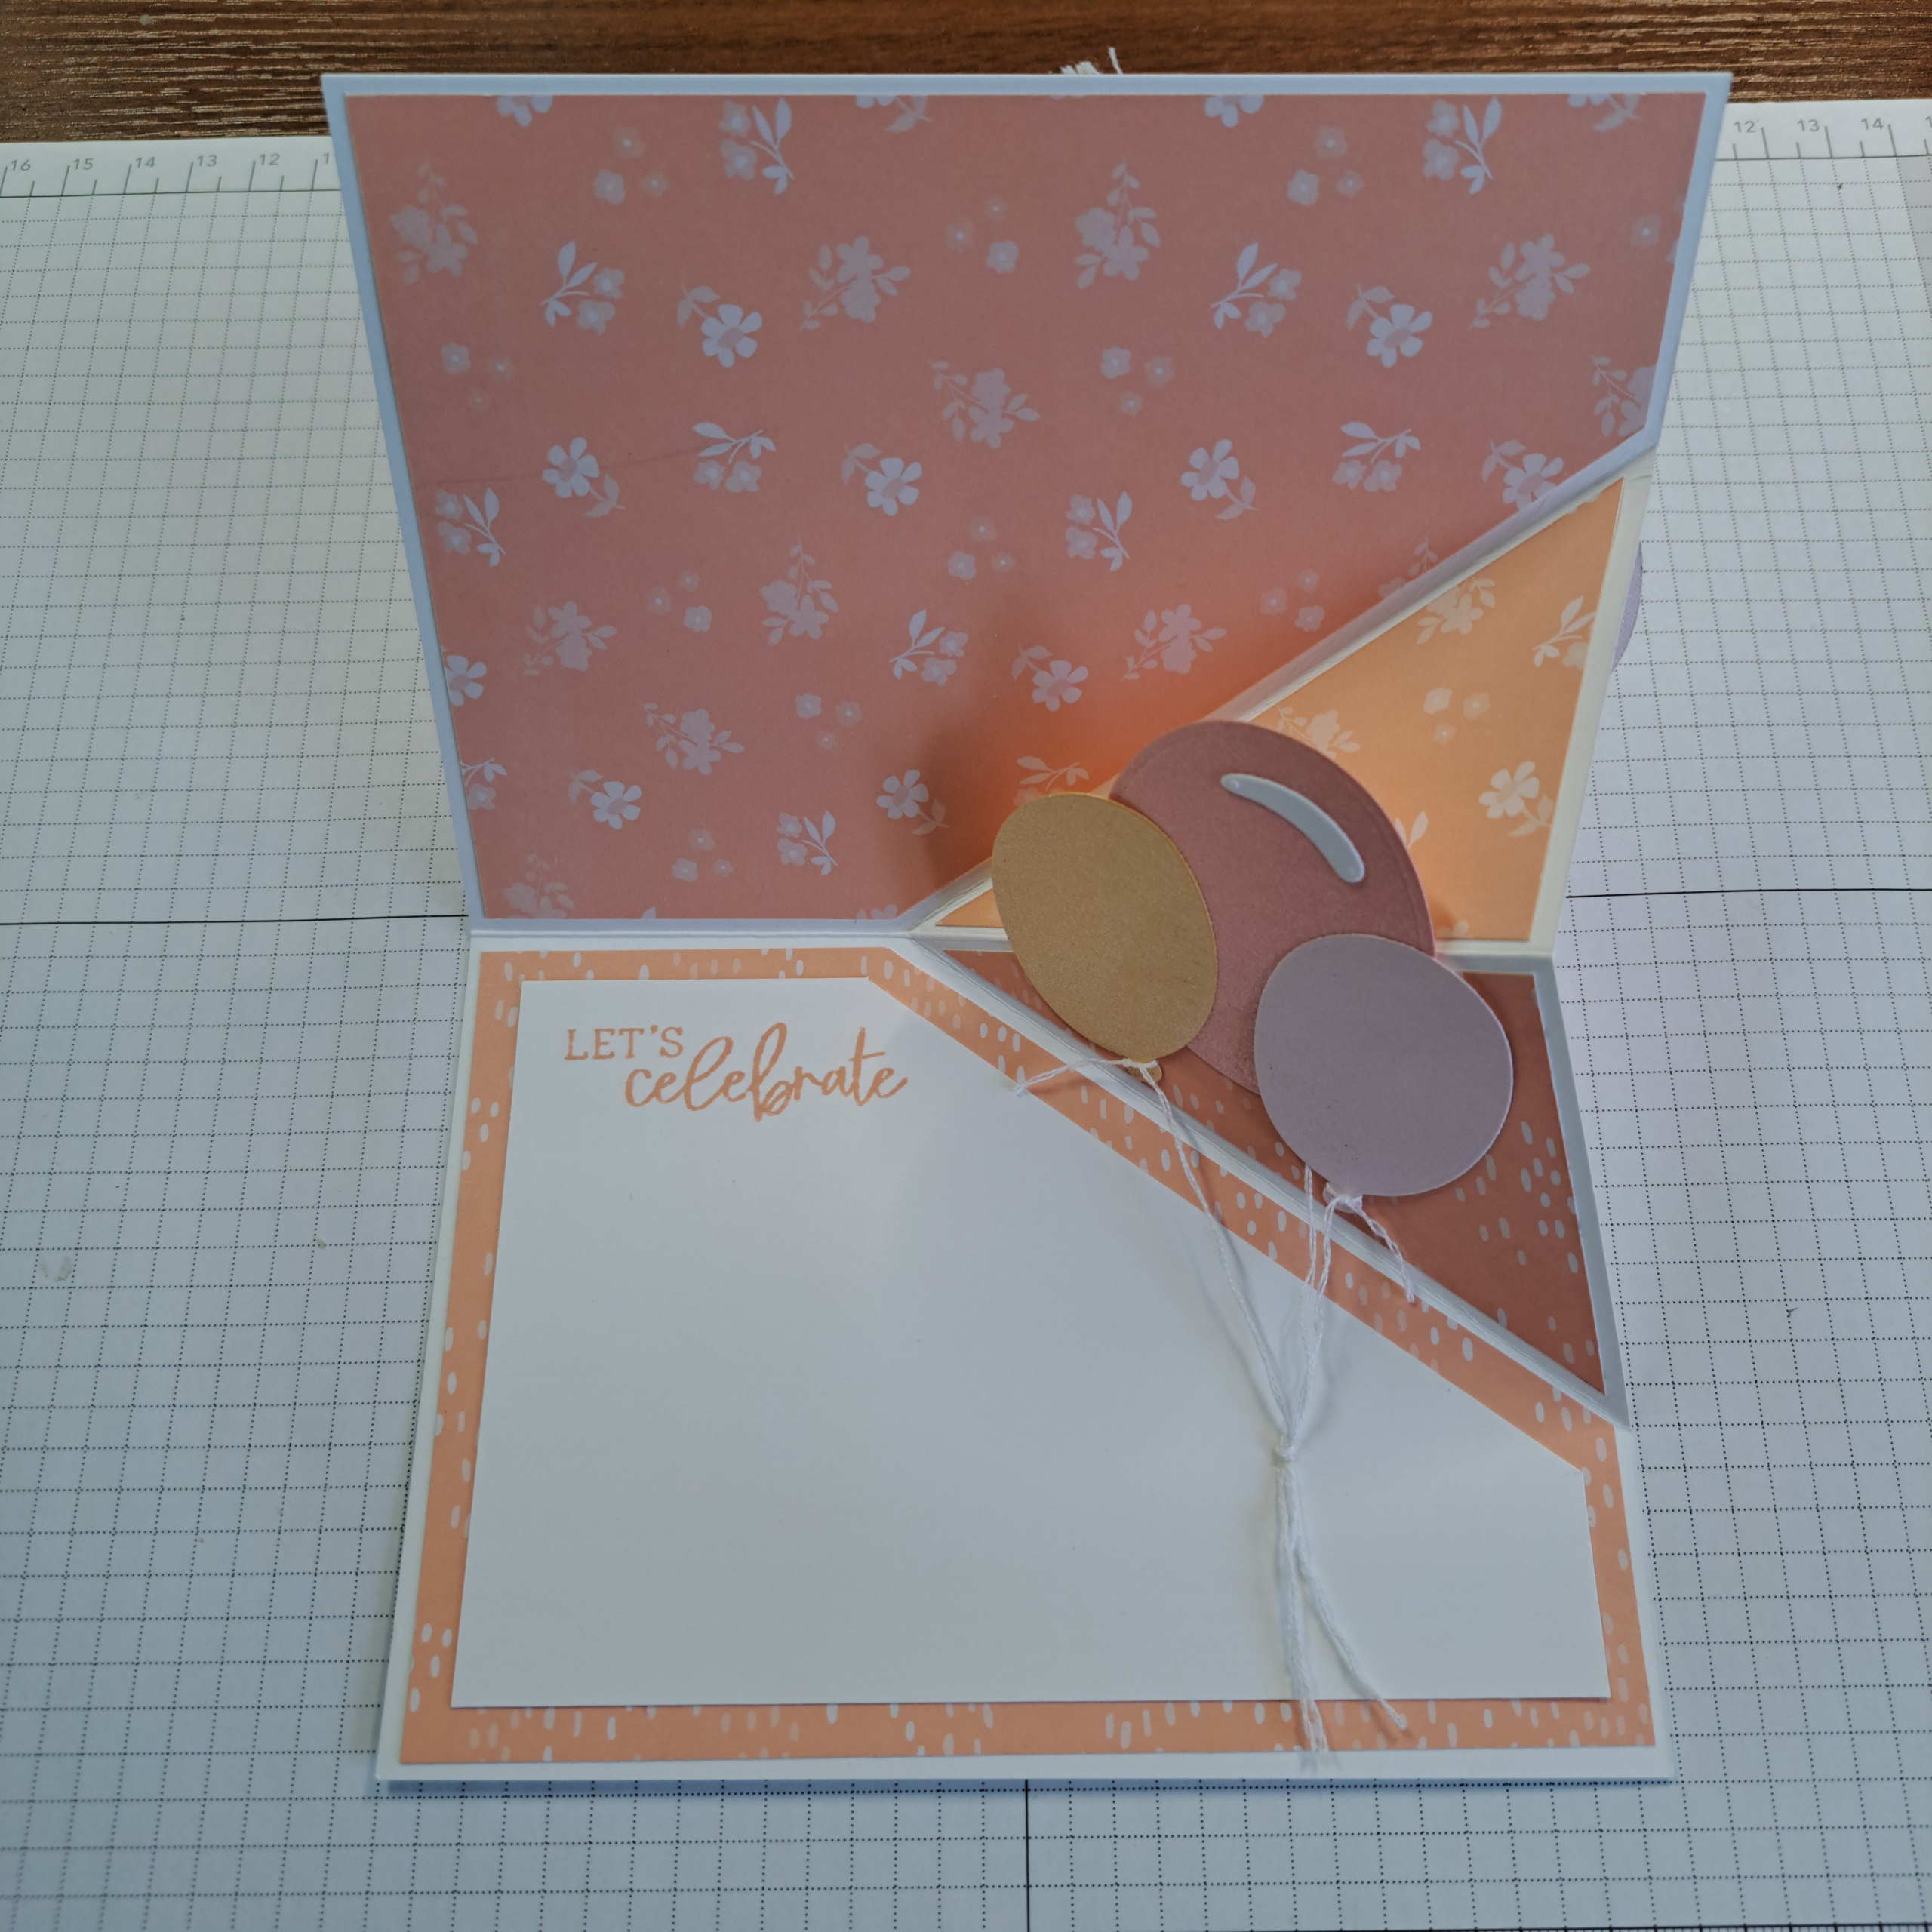
For the interior of the card tie threads to the three remaining balloons as you did for the front. You should have one more of the white balloon highlight pieces, affix this to the larger balloon.
Place the larger balloon towards the center of the triangle fold. Hold in place temporarily, close the card to be sure it will lay flat inside before gluing down. Arrange the other two balloons on either side of the large balloon. Be sure they do not extend below the lower fold of the inset triangle otherwise the card will not close properly. I did not use dimensionals on these die cuts as I feared it would make the card too bumpy to close.
Knot the three threads together as you did on the front of the card. Lay the card all the way out flat, pull the threads taught and glue the knot down to the card base (as you did on the front). The balloon strings will be a little bit loose when the card is opened normally and will still look good and prevent the die cuts from tearing loose if the card were forced to open out flat.
Thank you for reading with me today. If you give this card a try, do please post a picture in the comments or on social media and tag me @LoriOthen. I have seen this design and versions of it around for a few years. I first saw it here from Stampin Jill https://www.youtube.com/watch?v=UjMKXhKzWeo
As far as I know she is the only one who came up with the idea of the template. You can skip it, but I found I used it on every element of the card (except the balloons ofc) and I thought it is well worth doing. The measurements for the imperial sized card are hers, the modified metric card measurements are mine. If you have a chance take a look at Jill’s video and give her a righteous thumbs up!
Product List![Words & Wishes Dies (English) [ 167894 ]](https://assets1.tamsnetwork.com/images/EC042017NF/167894s.jpg "Words & Wishes Dies (English) [ 167894 ]")
![Balloon Festoon Photopolymer Stamp Set (English) [ 167602 ]](https://assets1.tamsnetwork.com/images/EC042017NF/167602s.jpg "Balloon Festoon Photopolymer Stamp Set (English) [ 167602 ]")
![Balloon Festoon Dies [ 167605 ]](https://assets1.tamsnetwork.com/images/EC042017NF/167605s.jpg "Balloon Festoon Dies [ 167605 ]")
![Bloom Boutique 12" X 12" (30.5 X 30.5 Cm) Specialty Designer Series Paper [ 167637 ]](https://assets1.tamsnetwork.com/images/EC042017NF/167637s.jpg "Bloom Boutique 12\" X 12\" (30.5 X 30.5 Cm) Specialty Designer Series Paper [ 167637 ]")
![2026–2028 In Color™ 12" X 12" (30.5 X 30.5 Cm) Pearlized Specialty Paper [ 167766 ]](https://assets1.tamsnetwork.com/images/EC042017NF/167766s.jpg "2026–2028 In Color™ 12\" X 12\" (30.5 X 30.5 Cm) Pearlized Specialty Paper [ 167766 ]")
![Basic White A4 Cardstock [ 166781 ]](https://assets1.tamsnetwork.com/images/EC042017NF/166781s.jpg "Basic White A4 Cardstock [ 166781 ]")
![Baker's Twine Essentials Pack [ 155475 ]](https://assets1.tamsnetwork.com/images/EC042017NF/155475s.jpg "Baker's Twine Essentials Pack [ 155475 ]")
![Mini Glue Dots [ 103683 ]](https://assets1.tamsnetwork.com/images/EC042017NF/103683s.jpg "Mini Glue Dots [ 103683 ]")
![Adhesive Sheets [ 152334 ]](https://assets1.tamsnetwork.com/images/EC042017NF/152334s.jpg "Adhesive Sheets [ 152334 ]")
![Multipurpose Liquid Glue [ 154974 ]](https://assets1.tamsnetwork.com/images/EC042017NF/154974s.jpg "Multipurpose Liquid Glue [ 154974 ]")
![Stampin' Dimensionals [ 104430 ]](https://assets1.tamsnetwork.com/images/EC042017NF/104430s.jpg "Stampin' Dimensionals [ 104430 ]")
![Take Your Pick [ 144107 ]](https://assets1.tamsnetwork.com/images/EC042017NF/144107s.jpg "Take Your Pick [ 144107 ]")
![Paper Trimmer [ 152392 ]](https://assets1.tamsnetwork.com/images/EC042017NF/152392s.jpg "Paper Trimmer [ 152392 ]")
![Stampin' Cut & Emboss Machine [ 149653 ]](https://assets1.tamsnetwork.com/images/EC042017NF/149653s.jpg "Stampin' Cut & Emboss Machine [ 149653 ]")