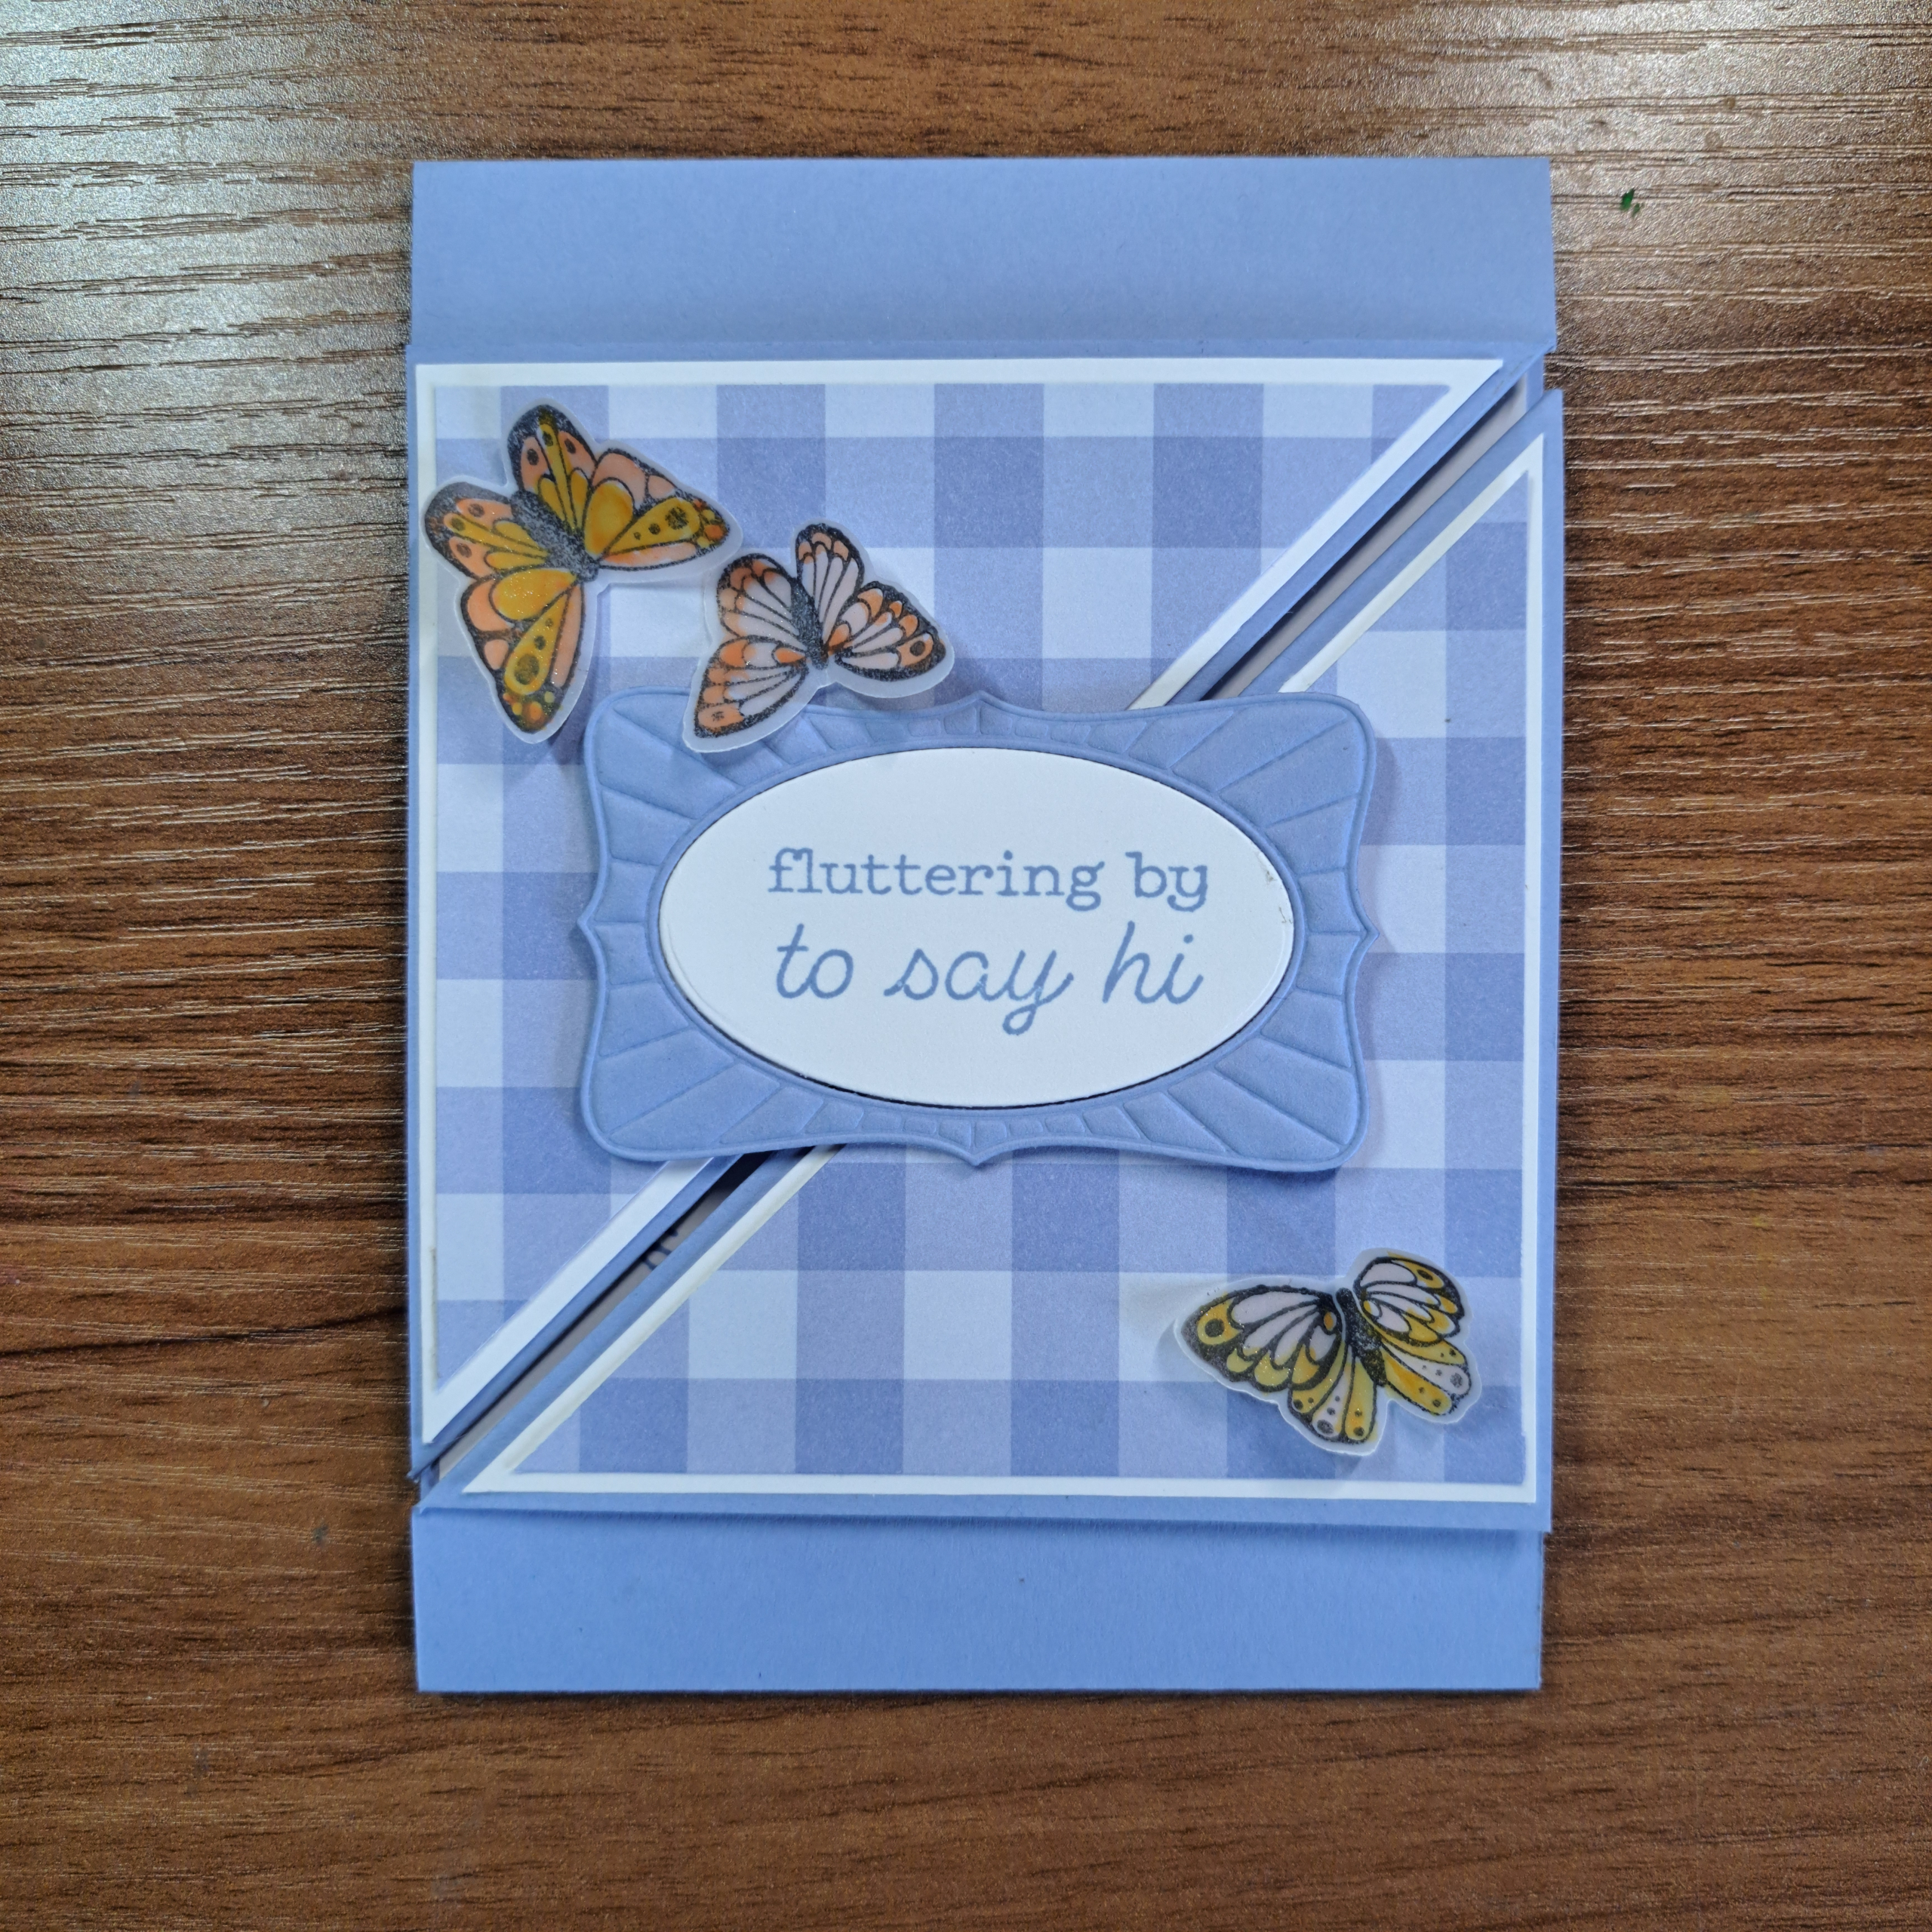
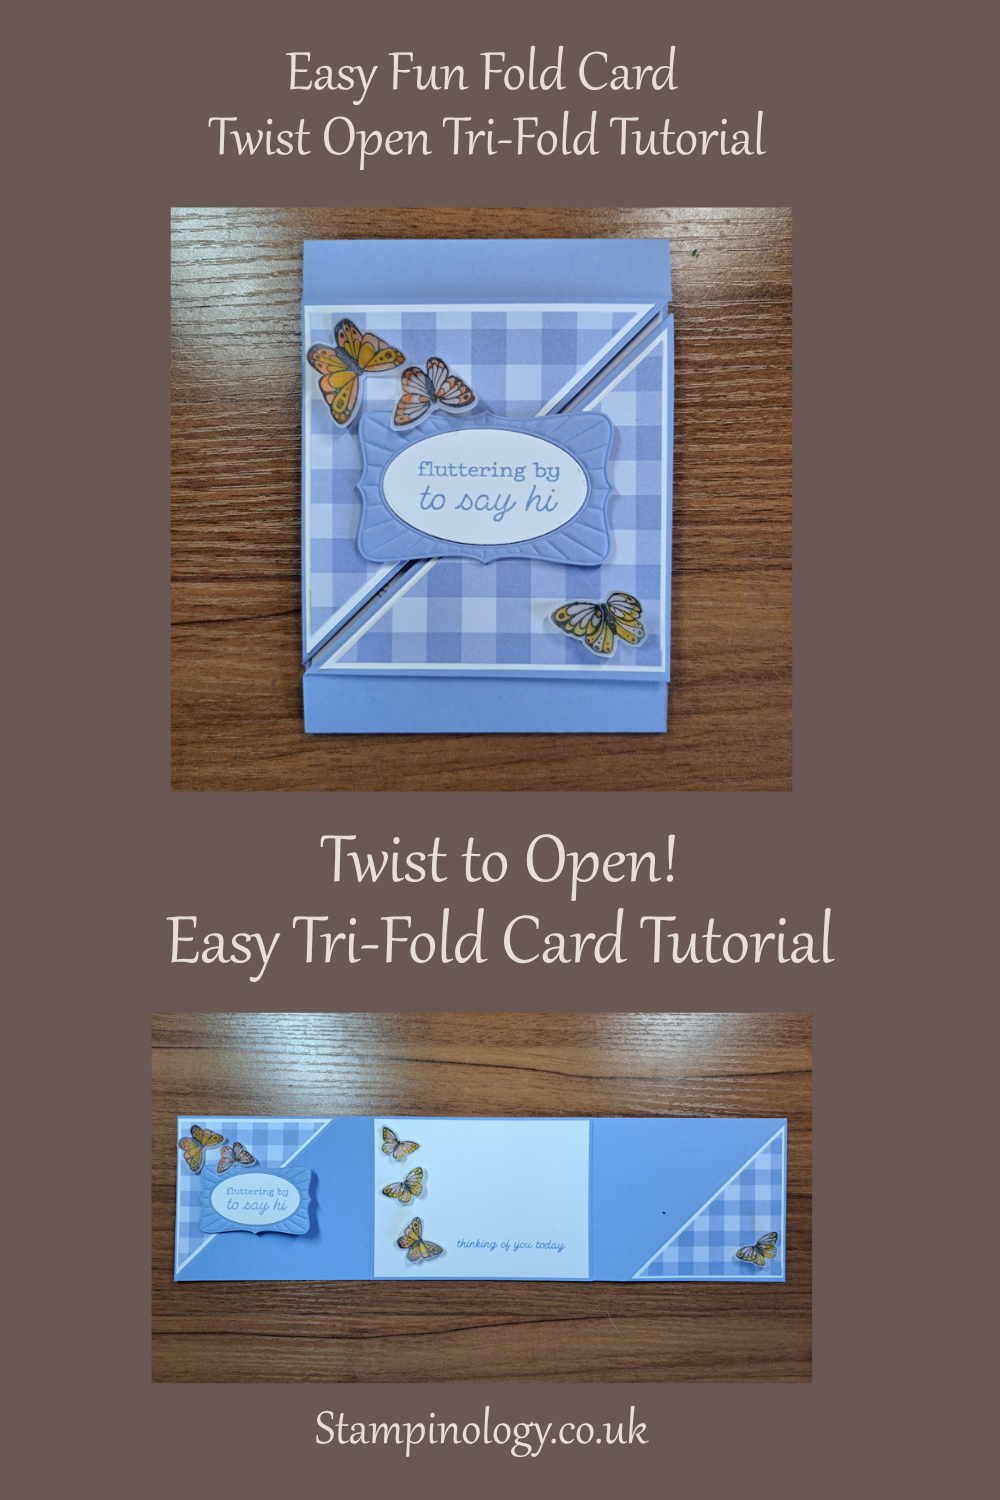
This tri-fold card has been around for many years. And it’s time to get it back into the spotlight. The clever design is very easy to execute but it does require some thought and attention to the placement of pieces. But don’t worry, I have you covered with clear explanations and lots of pictures.
Supplies
All Aflutter Photopolymer Stamp Set
All Aflutter Punch
Phrases and Frames Dies
2026-28 In Color Gingham Designer Series Paper
Vellum
Hydrangea Hue Card Stock
Basic White Card Stock
Hydrangea Hue Stampin’ Pad
Stazon Jet Black Stamp Pad
Barely Blush Shimmer Brush
Golden Glow Shimmer Brush
Crisp Cantaloupe Shimmer Brush
Stampin’ Dimensionals
Liquid Glue
Glue Dots
Paper Trimmer
Impressions Plate
Cut and Emboss Machine
Directions
Card Base
Using the Hydrangea Hue card stock, cut 2 pieces: 10-1/4″ x 4″. Align the long side of the strip at the top of your Paper Trimmer/Score Board, score each piece at 14cm (5-1/2″).
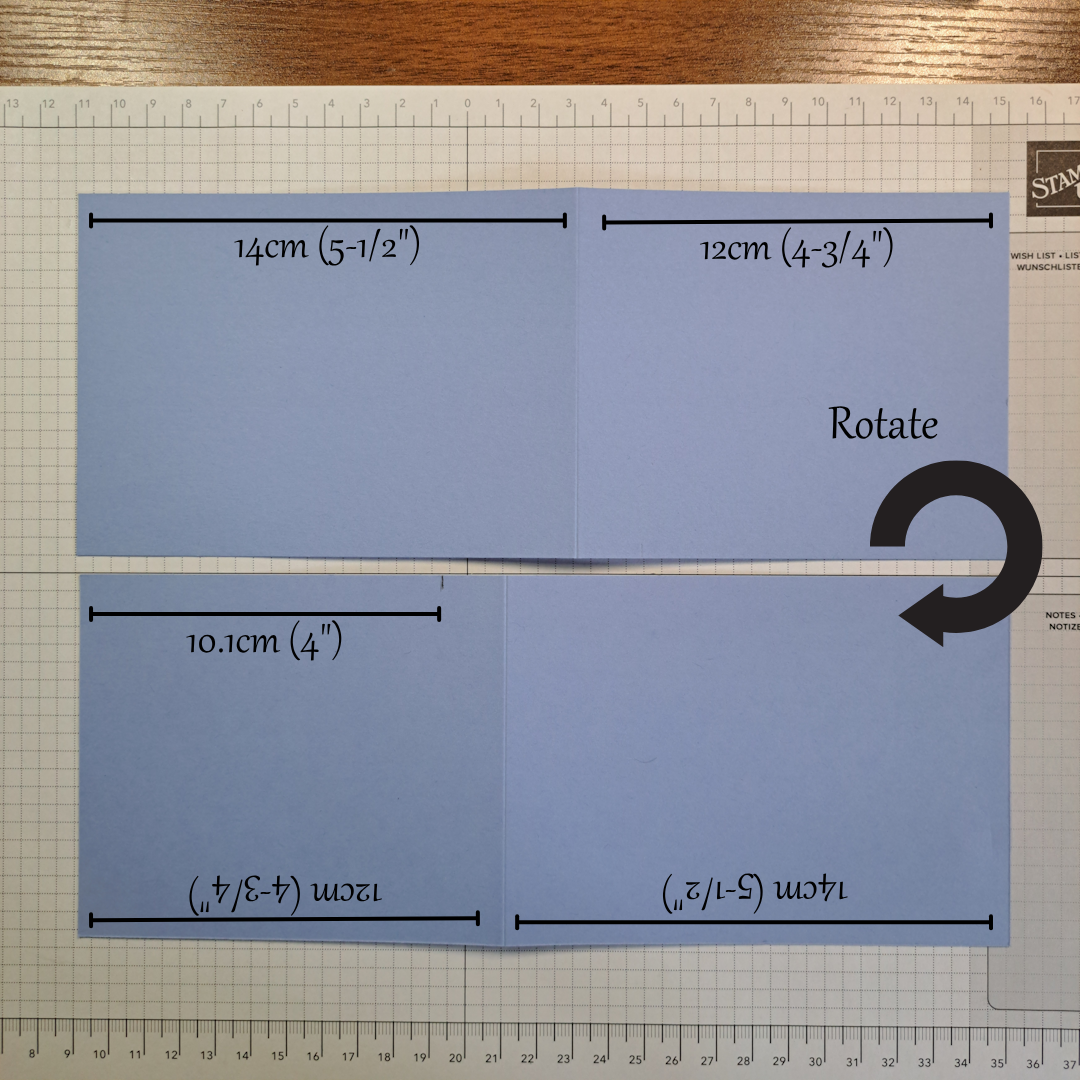
Rotate the strip so that the side you just scored now sits on the right, from this opposite side measure over 10.1cm (4″), make a small pencil at what is now the top of the strip. (See photo.)
Repeat this flip and mark action on the 2nd piece of 10-1/4″ x 4″ piece. You should have now have two pieces of card stock exactly the same.
Still working on the short side, score a diagonal line from the pencil mark down to the bottom corner. Repeat this score line on the second piece of card stock. You should now have two pieces of Hydrangea Hue card stock cut and scored exactly the same.
Lay the card base pieces out in front of you as shown in the photograph below. Now turn the bottom piece 180 degrees so that the diagonal fold lines are now going in the opposite direction. (center photo) Layer the long (5-1/2″) side of the strips on top of one another and glue together. The two strips form now form a single long card. When you fold on the vertical fold line the two triangular fold should line up in the center. (See photos below.)
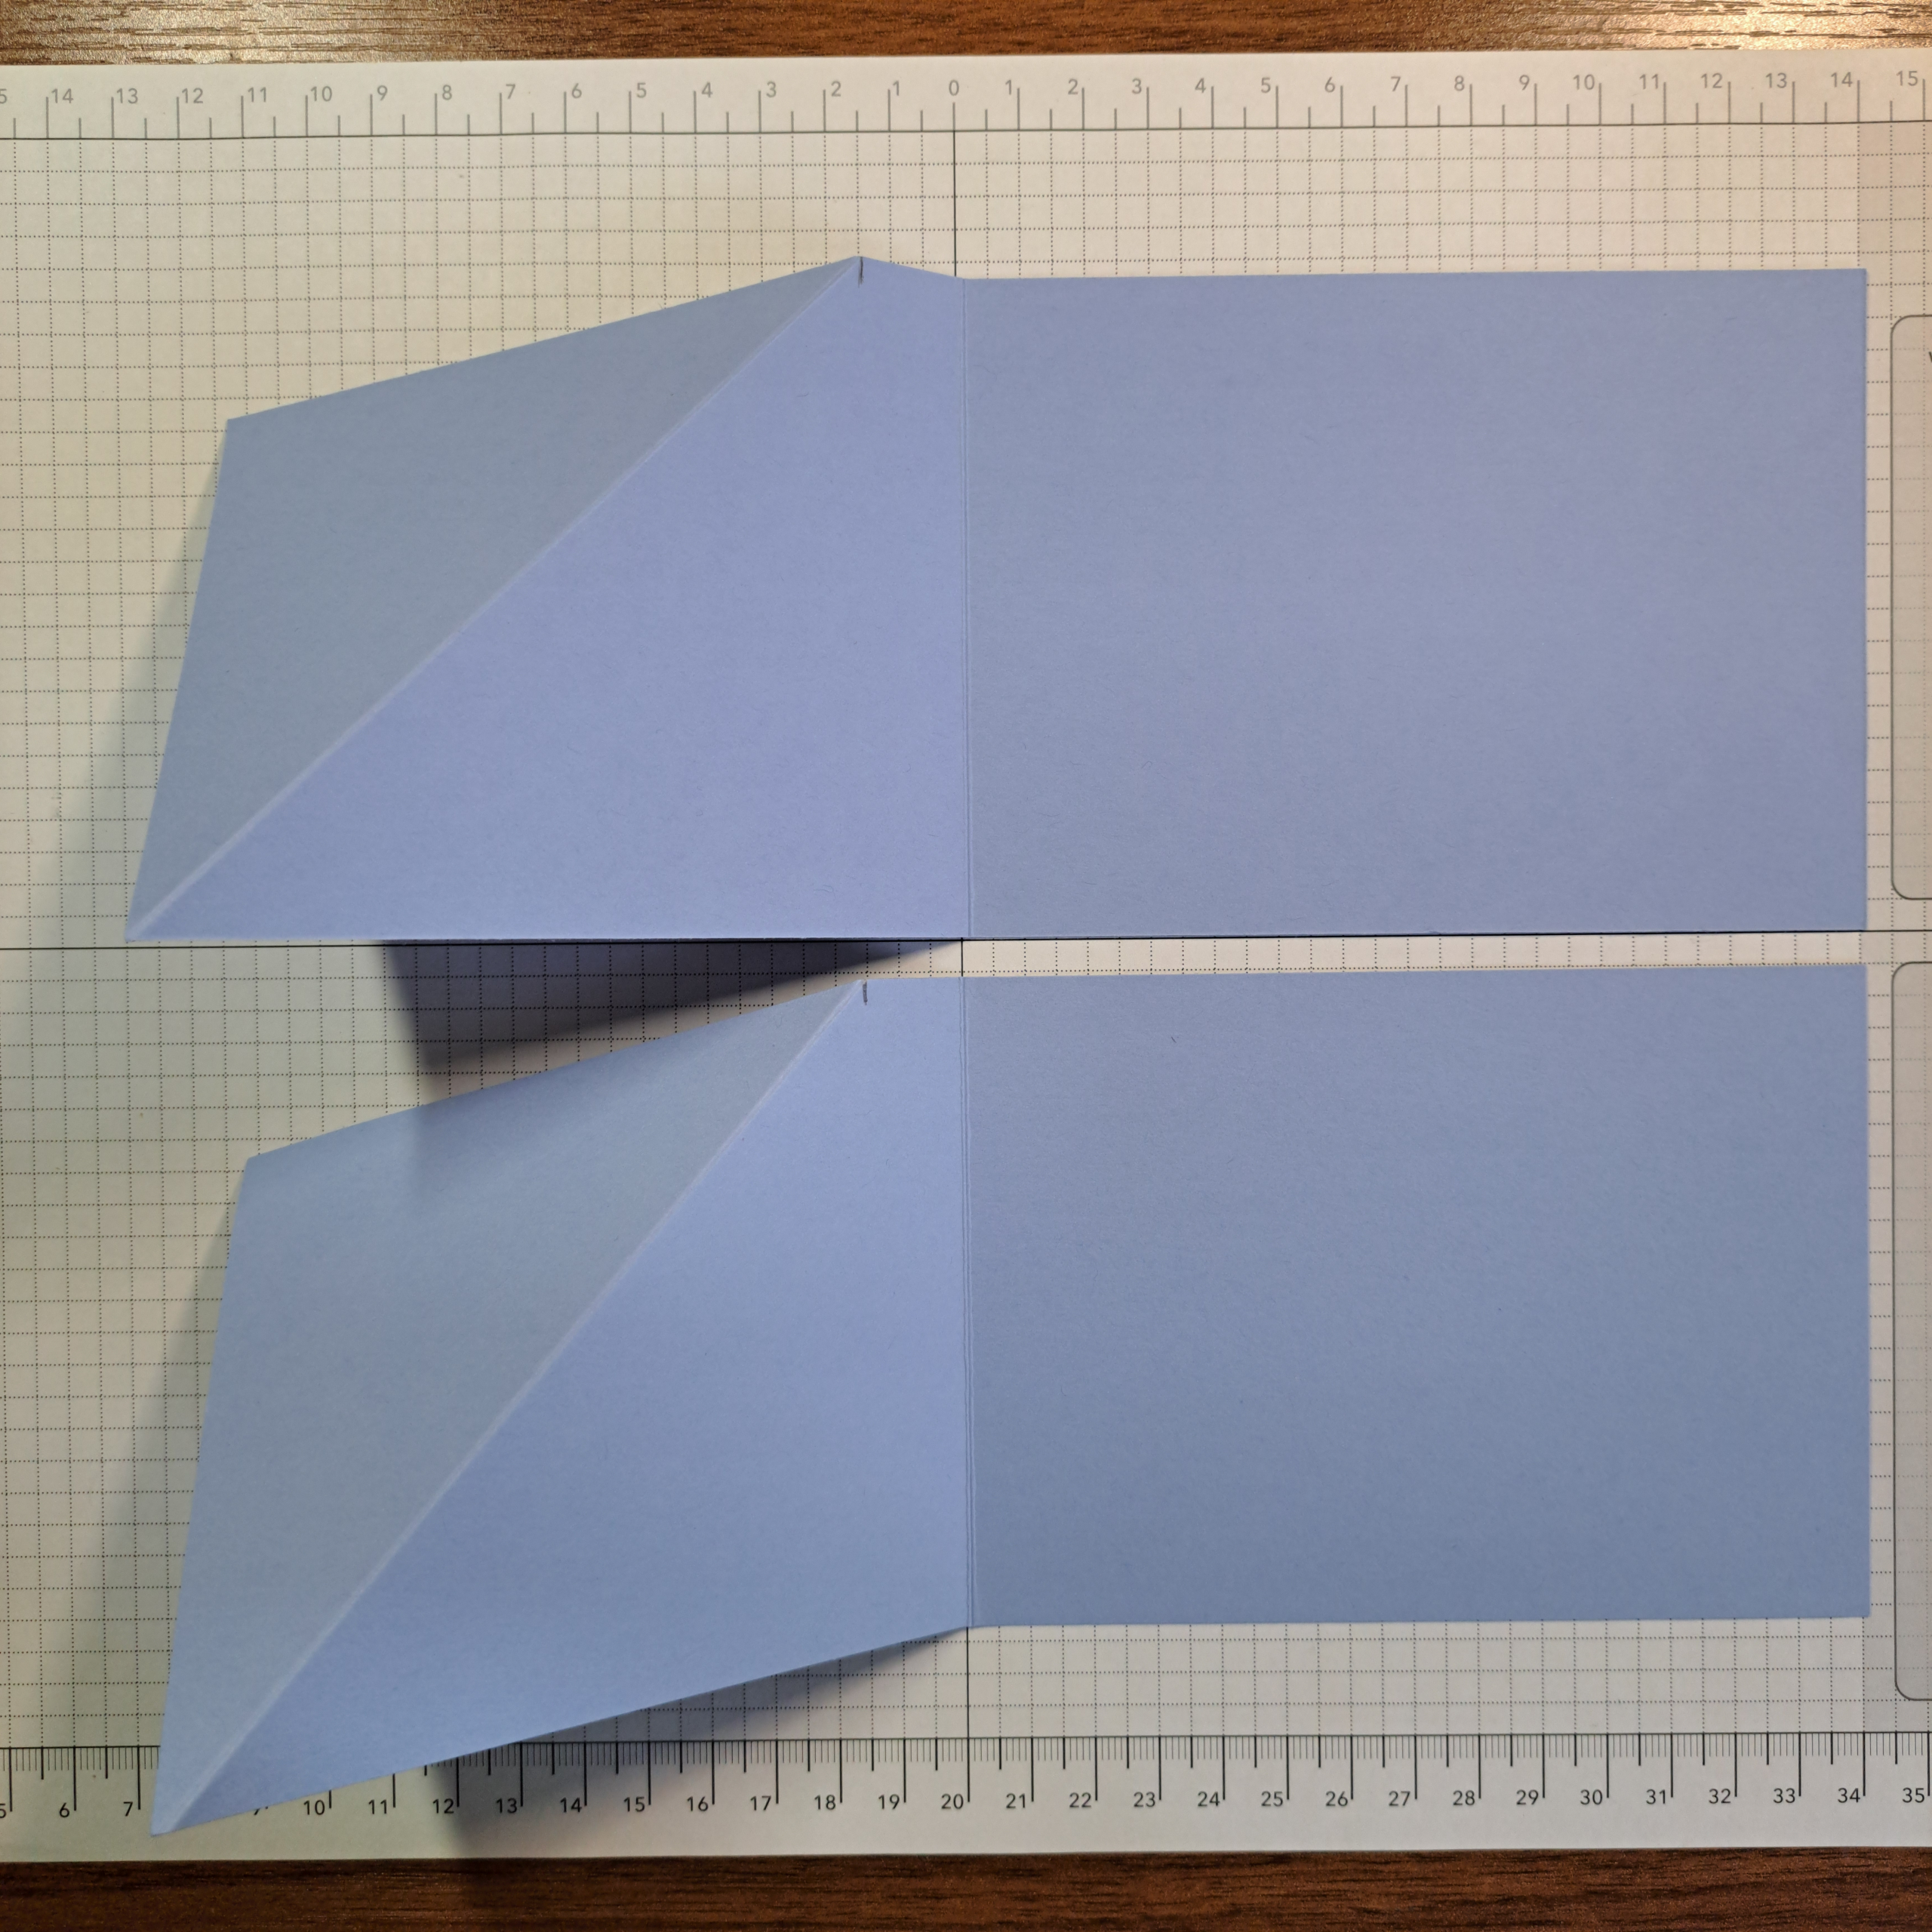
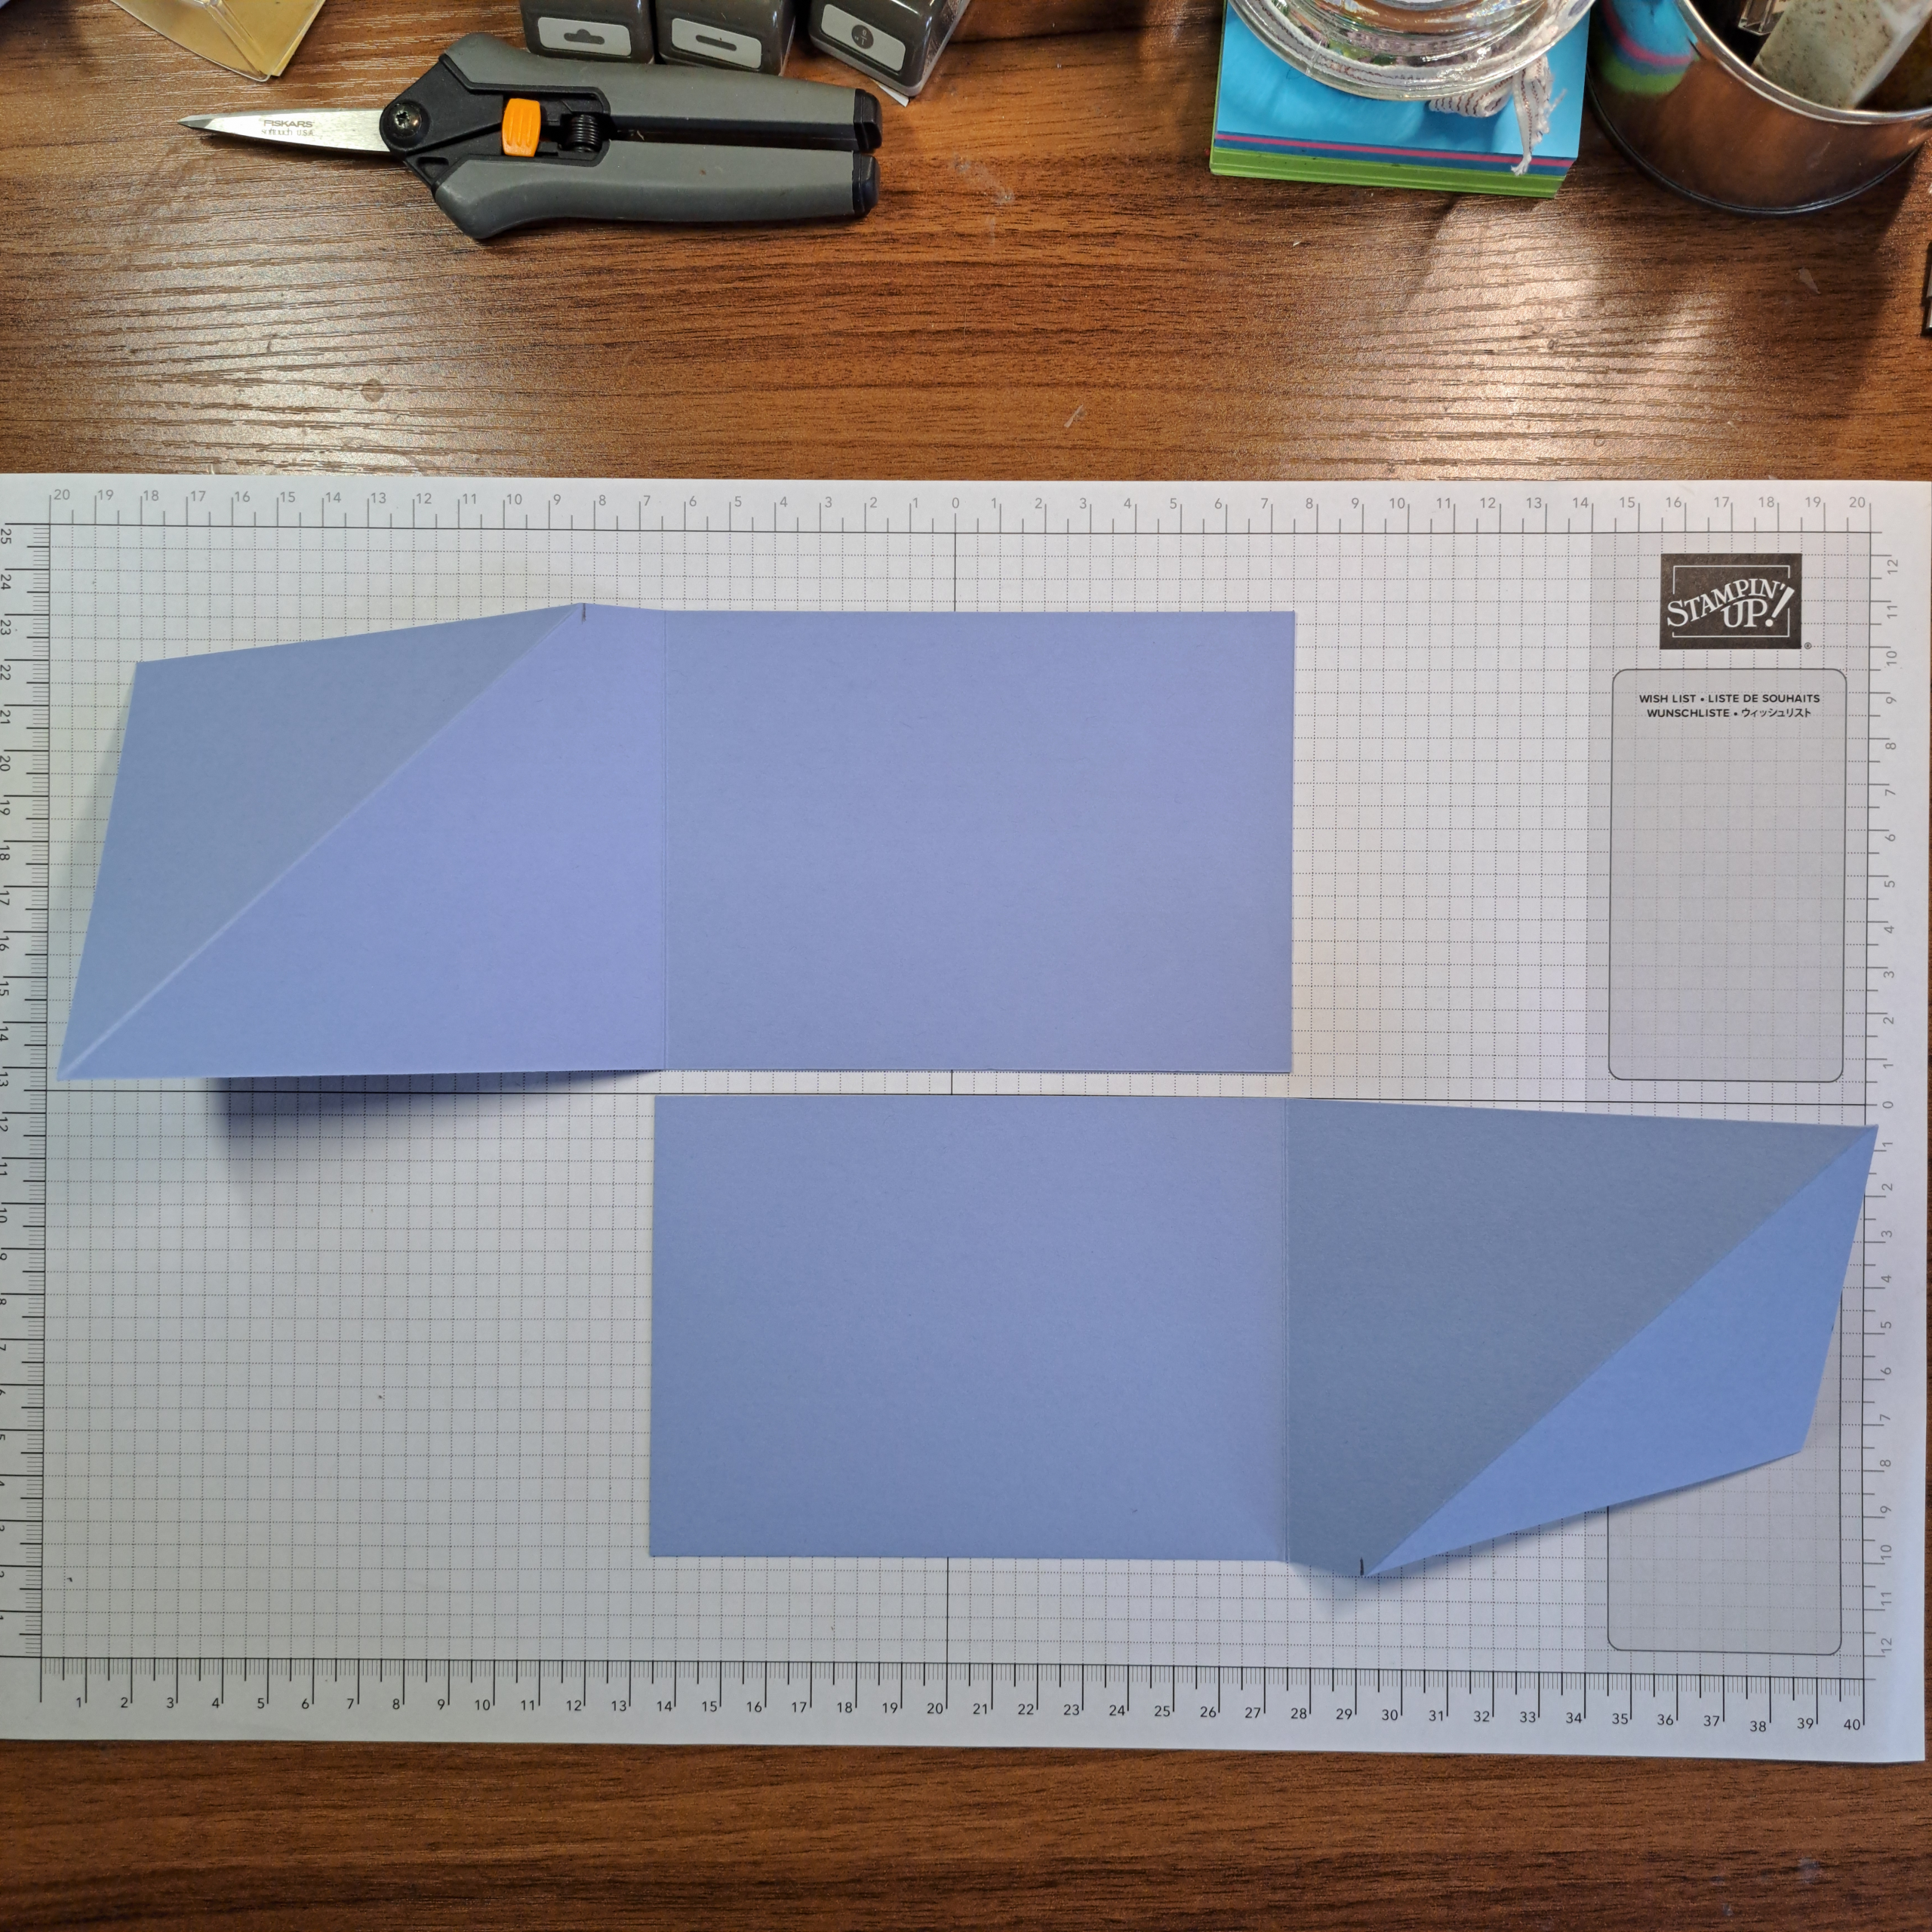
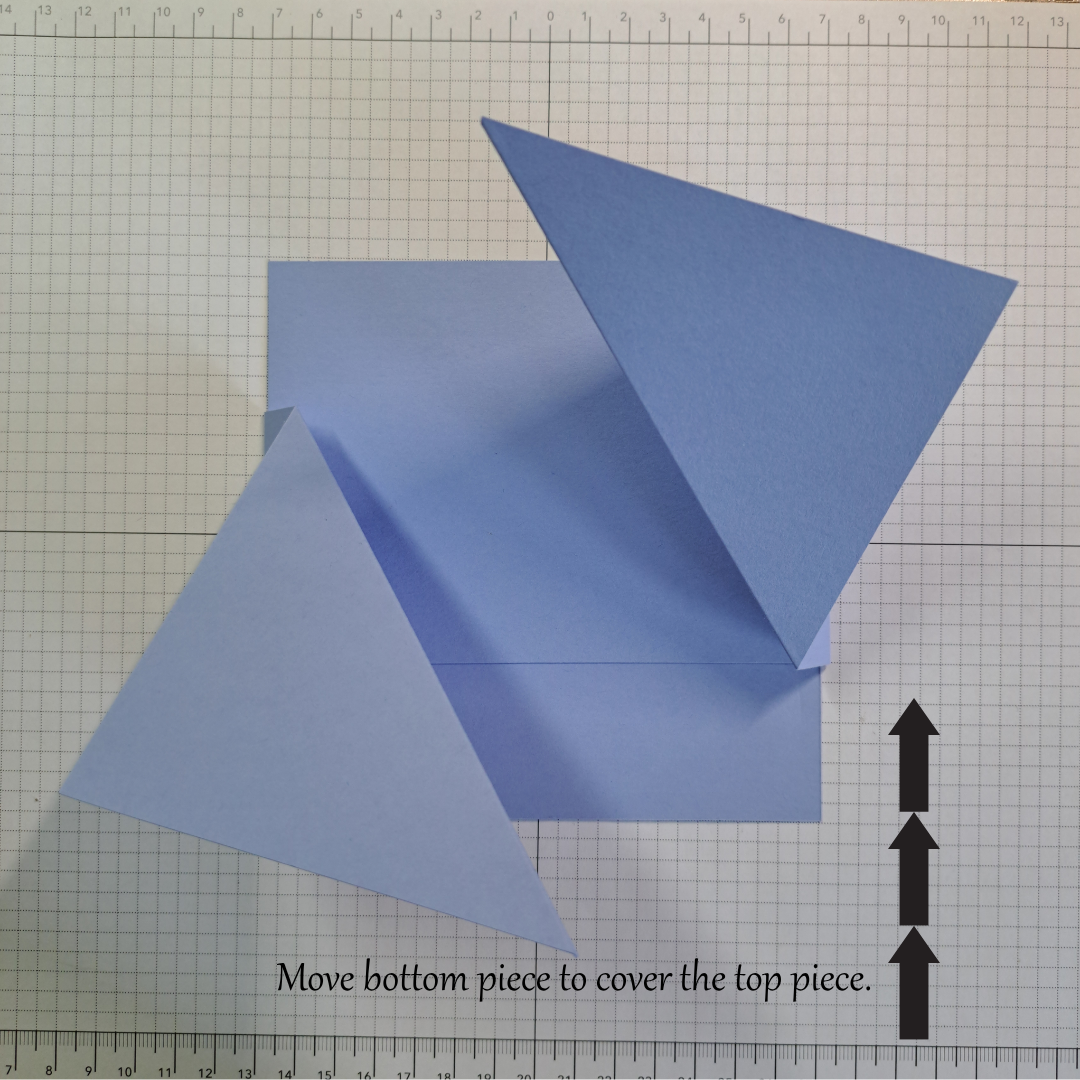
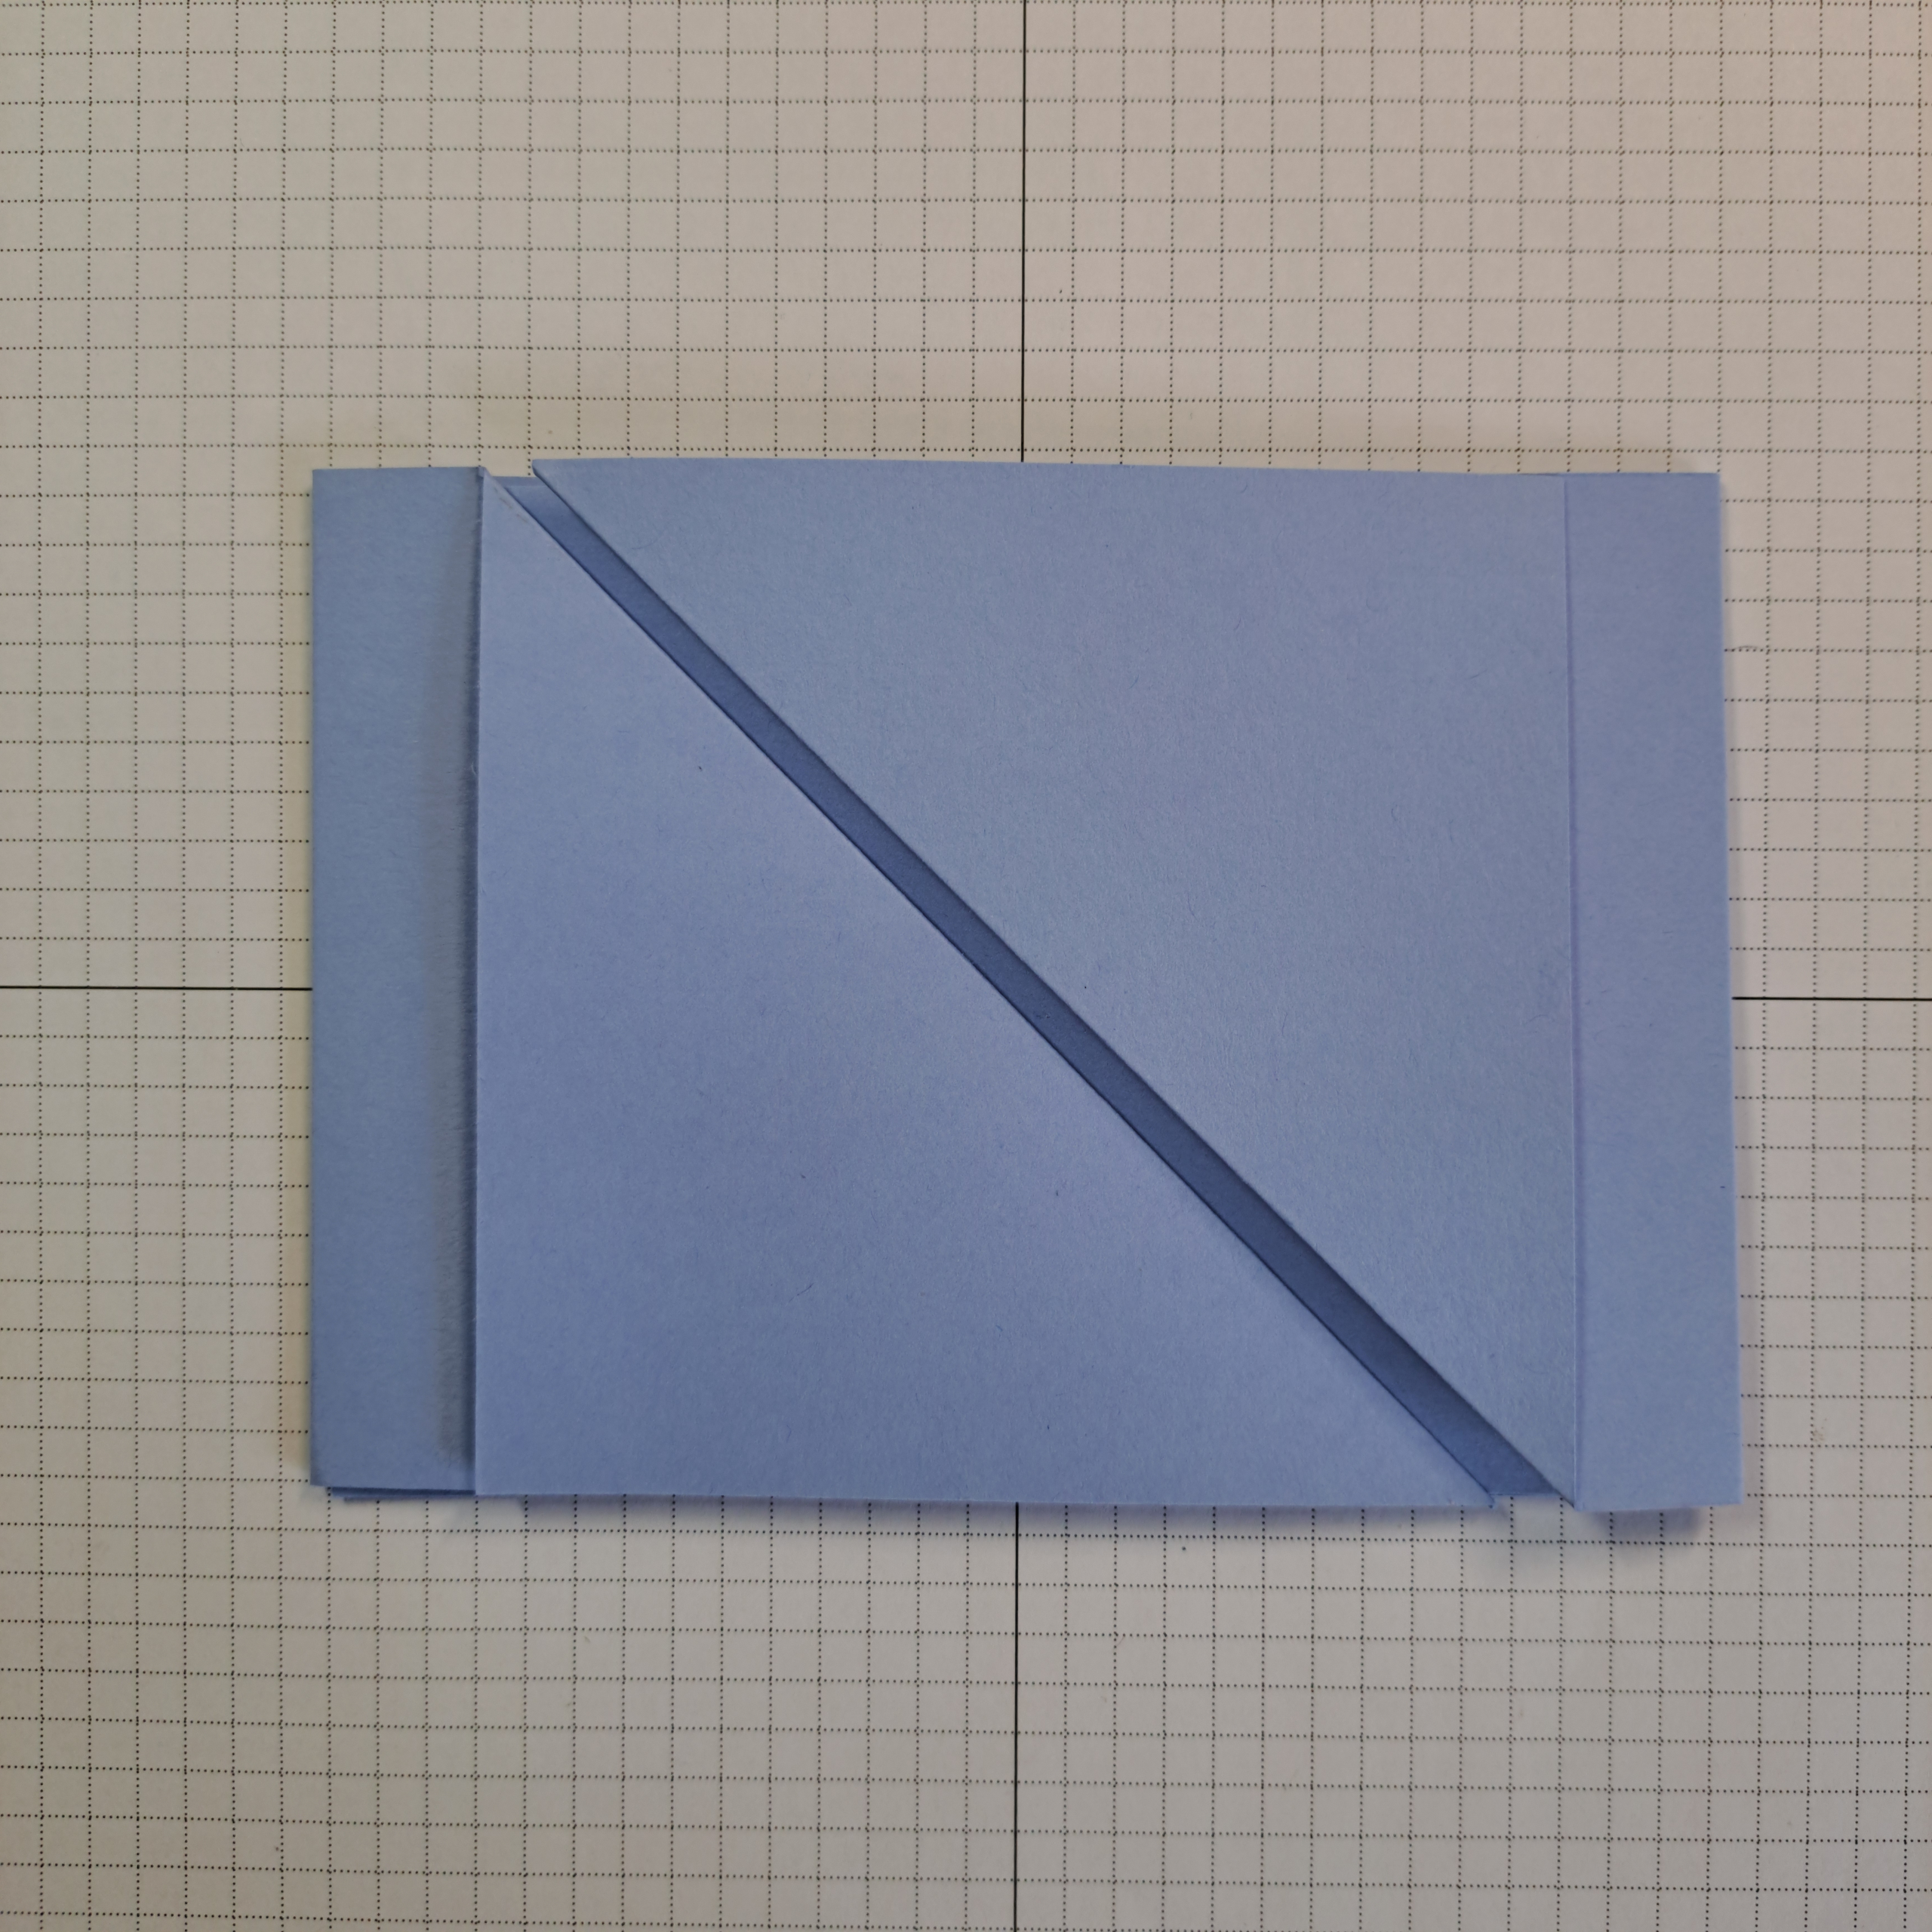
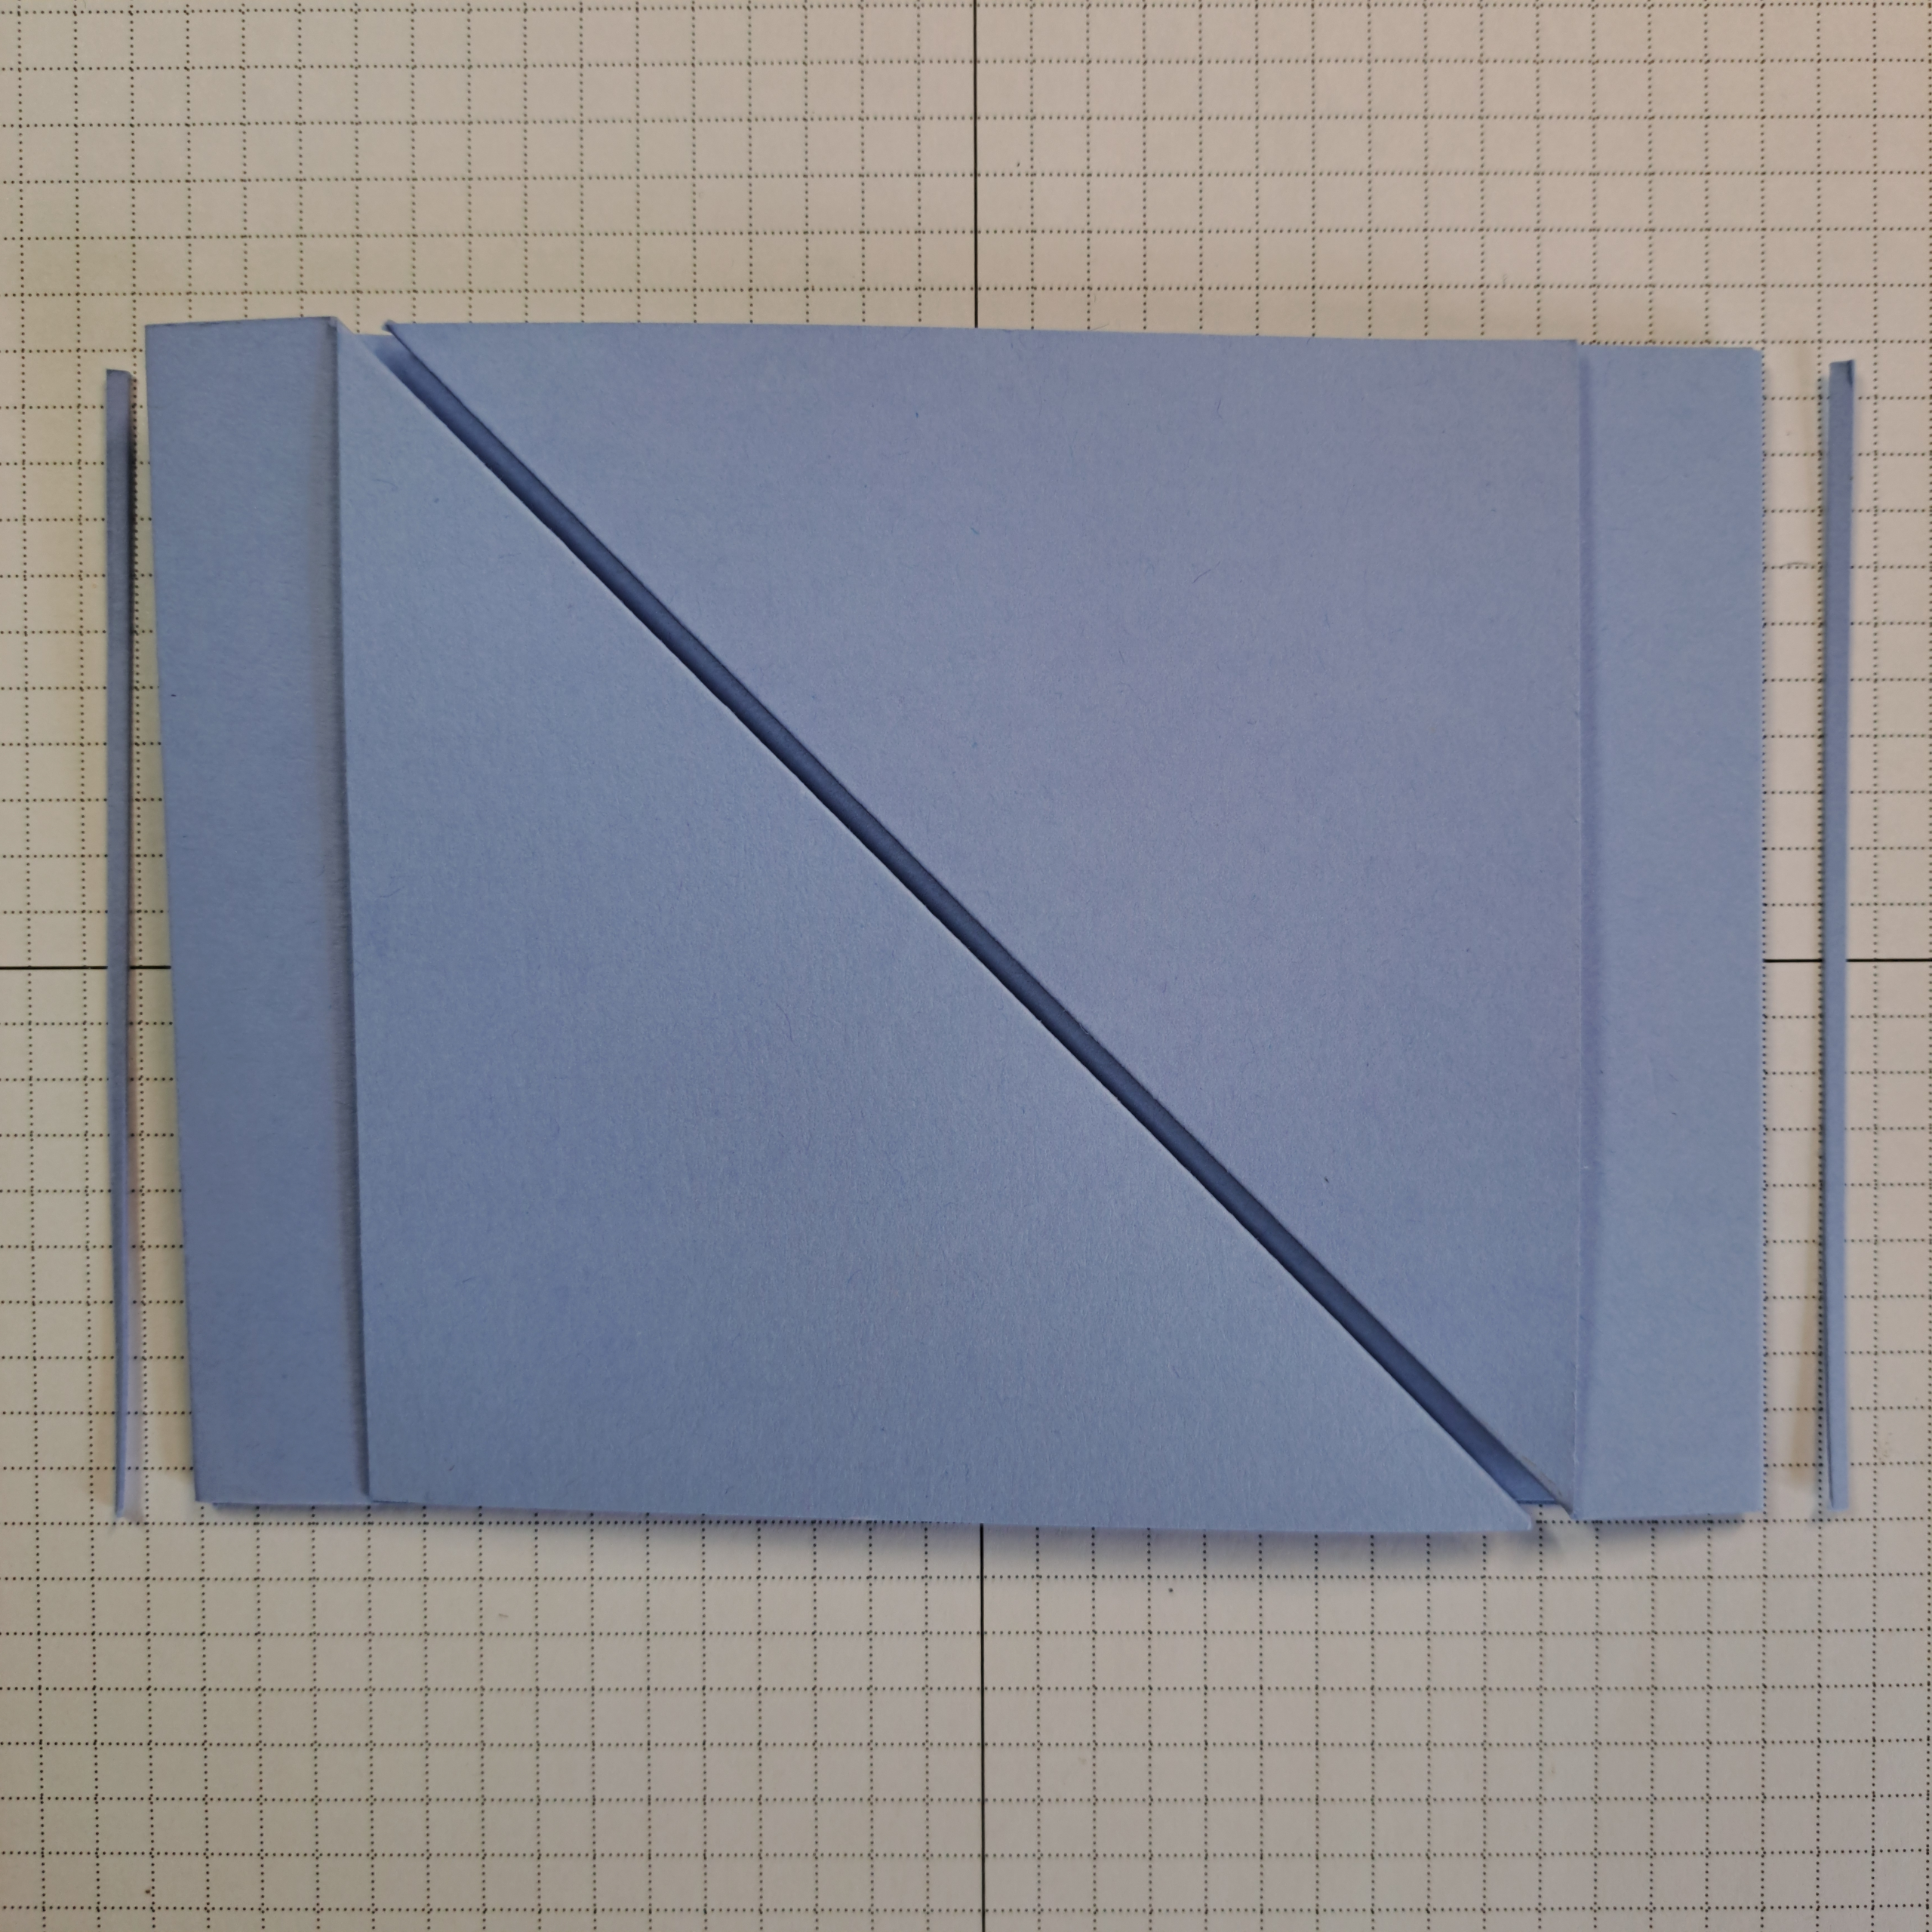
If you need to make any adjustments to the card you can do so before gluing the two pieces of the base together. On my original mock up of this card everything lined up great. While making this card to photograph I noticed that the diagonal folds were a littler further apart than I liked so I shaved a small amount off each of the card bases so that the folds would fit a little closer together. Note: If you need to make an adjustment here be sure to adjust the card liner as well.
Card Front
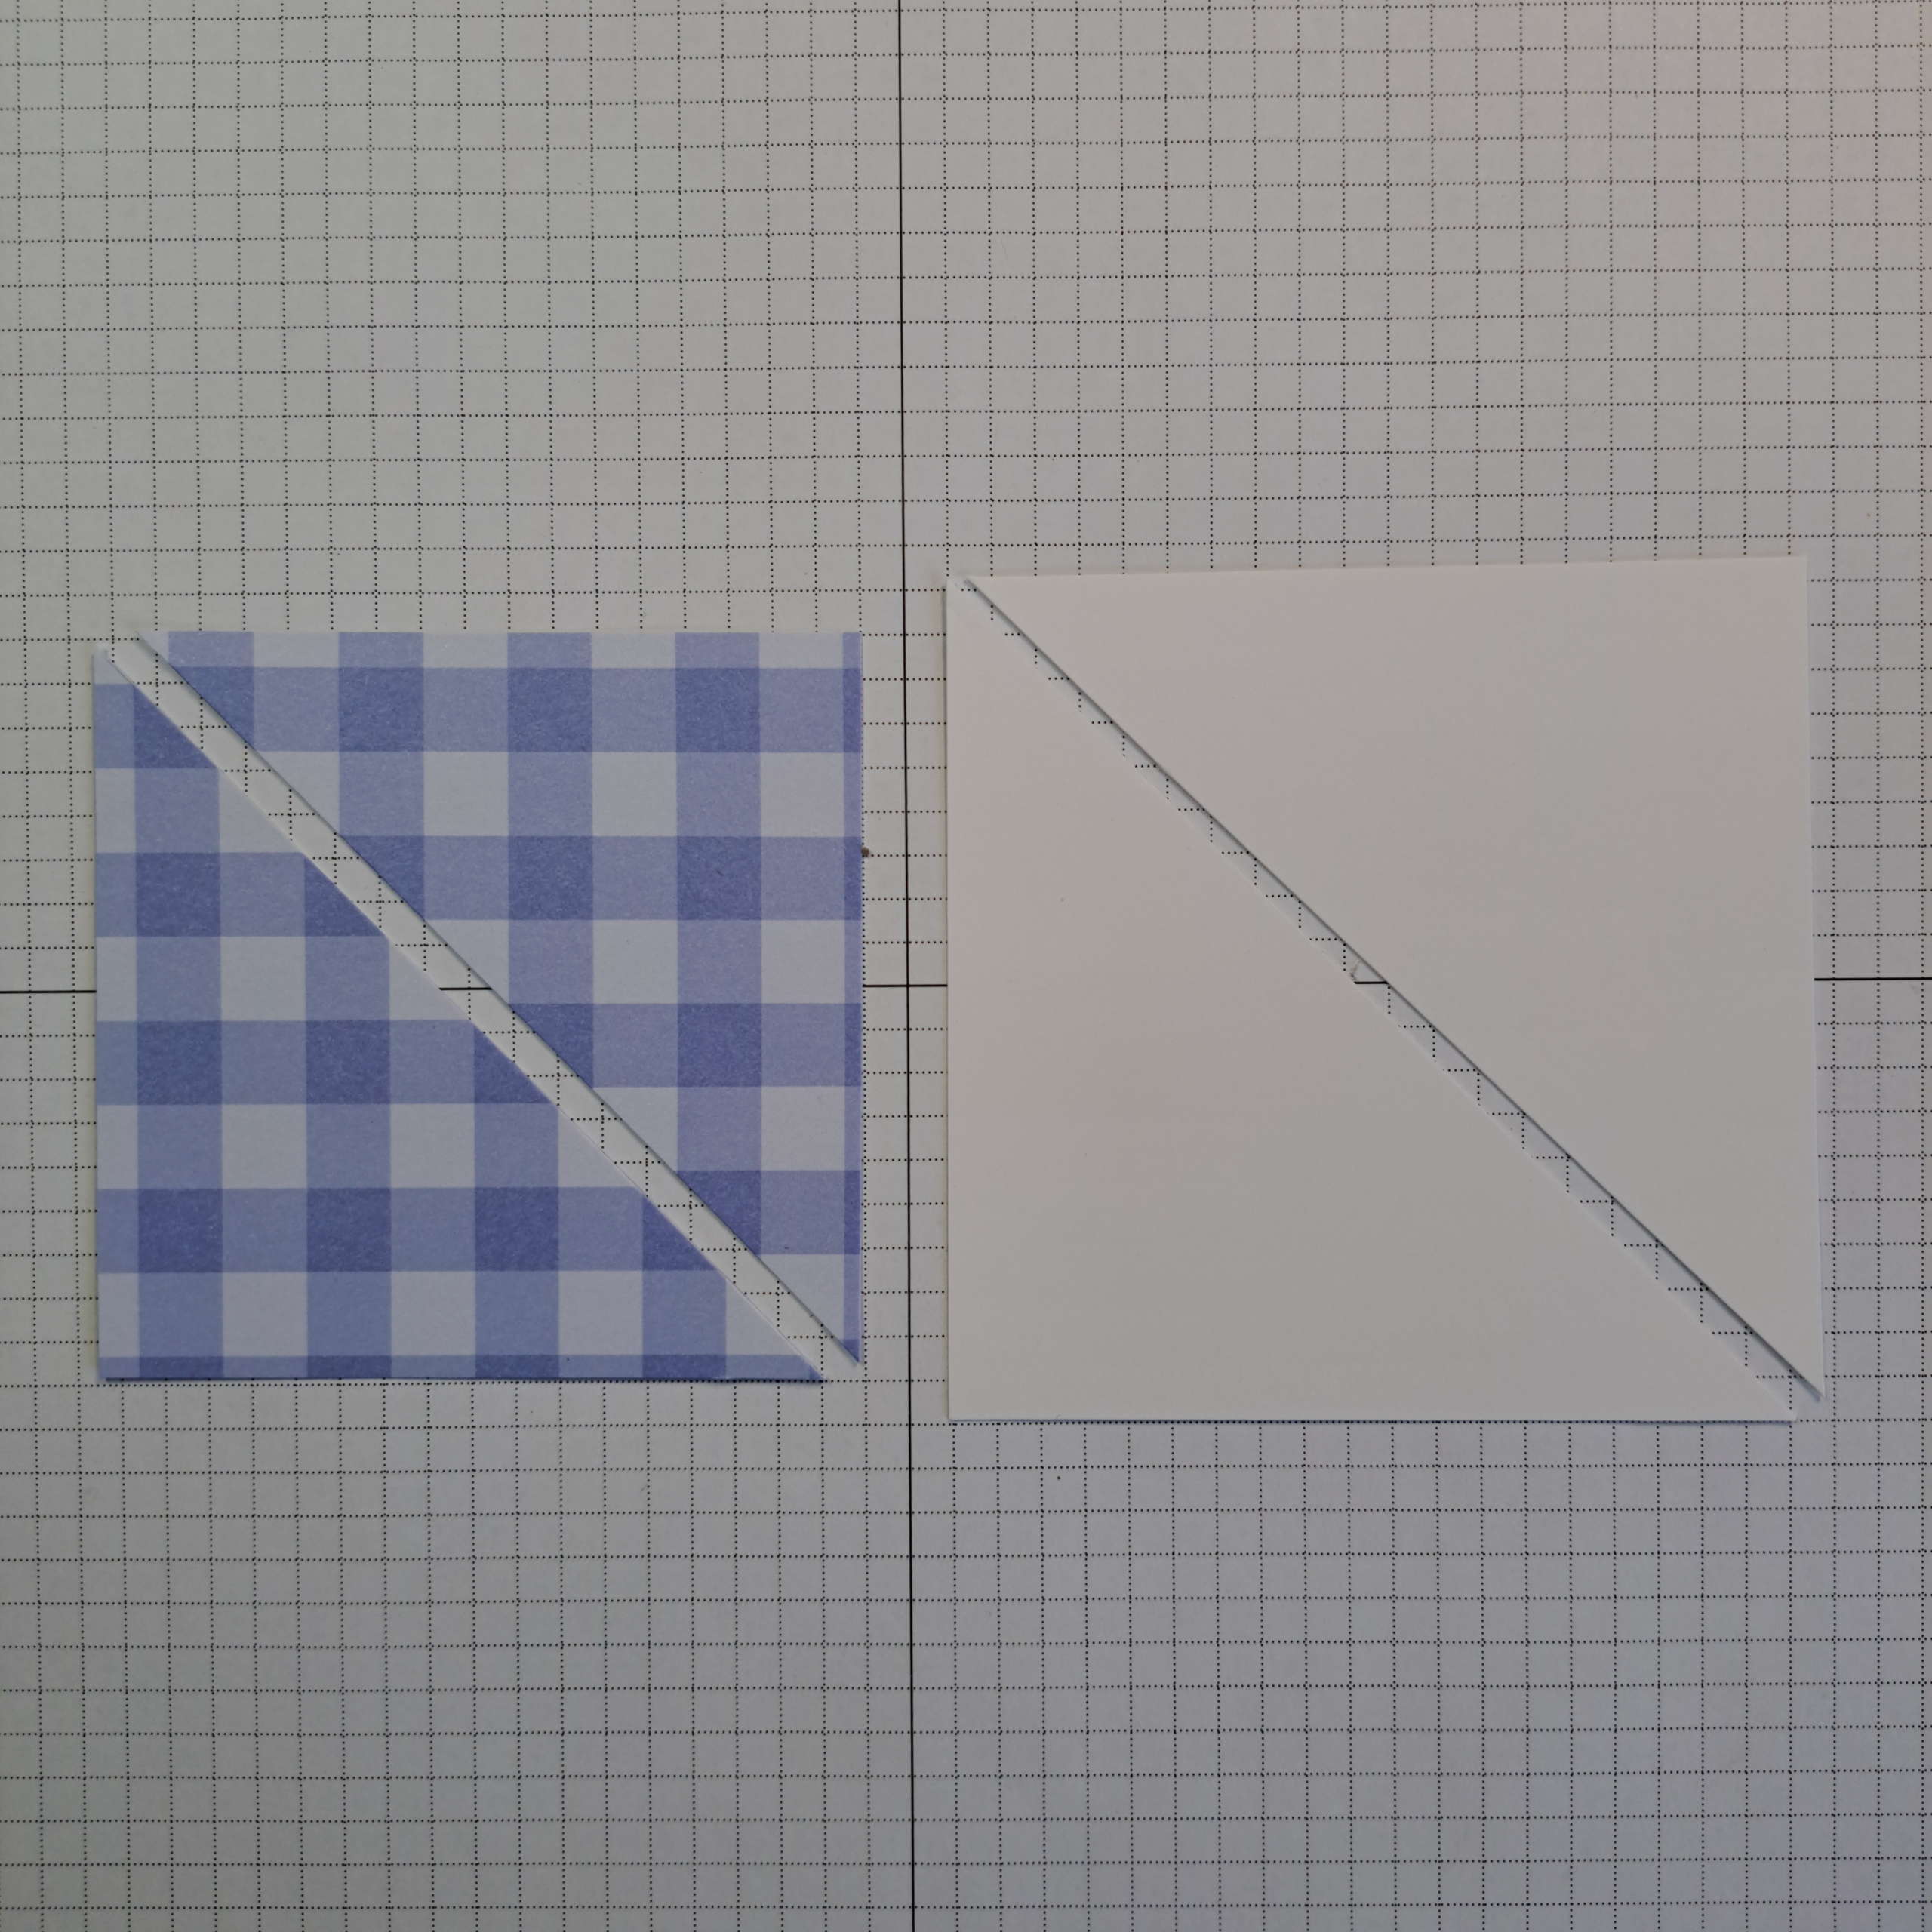
Cut a piece of basic white card stock to 9.5 x 9.5cm (3-3/4″ x 3-3-3/4″) square. Now cut this piece diagonally so that you now have two equal triangle.
Using the 2026-28 Gingham Designer Series Paper, cut a square to 3-1/2″ x 3-1/2″. This piece will also be cut diagonally into two equal triangles.
Adhere each of the Gingham triangles to the basic white triangles leaving a narrow border of white all the way around the triangle.
Next adhere each of these layered triangles to the card front triangles (the ones formed by the diagonal folds).
To create center piece for card front die cut the medium size frame from Hydrangea Hue card stock and a second one from a scrap of basic white card stock. This die is from the Impressions Dies collection, if you have the Impressions plate run the outer portion of Hydrangea frame through the Cut and Emboss machine again to create the frame texture.
You will only need the center oval from the white frame. Since this piece has no added texture you will not need to do anything to it except stamp the greeting onto the center with the Hydrangea Hue ink. Place the white stamped oval piece into the center of the Hydrangea frame. To keep the two pieces together I placed down a piece of cello tape face up first, then put down the frame face up so the tape stuck to the back of the frame. Next place the oval down, pressing firmly to stick it to the cello tape. Save the other oval and frame for another project.
To attach the greeting to the card, place dimensionals on the back of the upper right corner of the greeting piece. Stick the greeting down to the upper right triangle only so that the card will open. See finished photo at the beginning of the post for placement.
The butterfly embellishments were created by stamping the butterflies onto velum using the Stazon ink. They were then colored in using the shimmer brushes in Golden Glow, Barely Blush and Crisp Cantaloupe. The matching All Aflutter punch was used to punch out the butterflies. Two sets of butterflies were created, one for the outside and one for the inside. Adhere the butterflies to the card using glue dots.
Card Interior
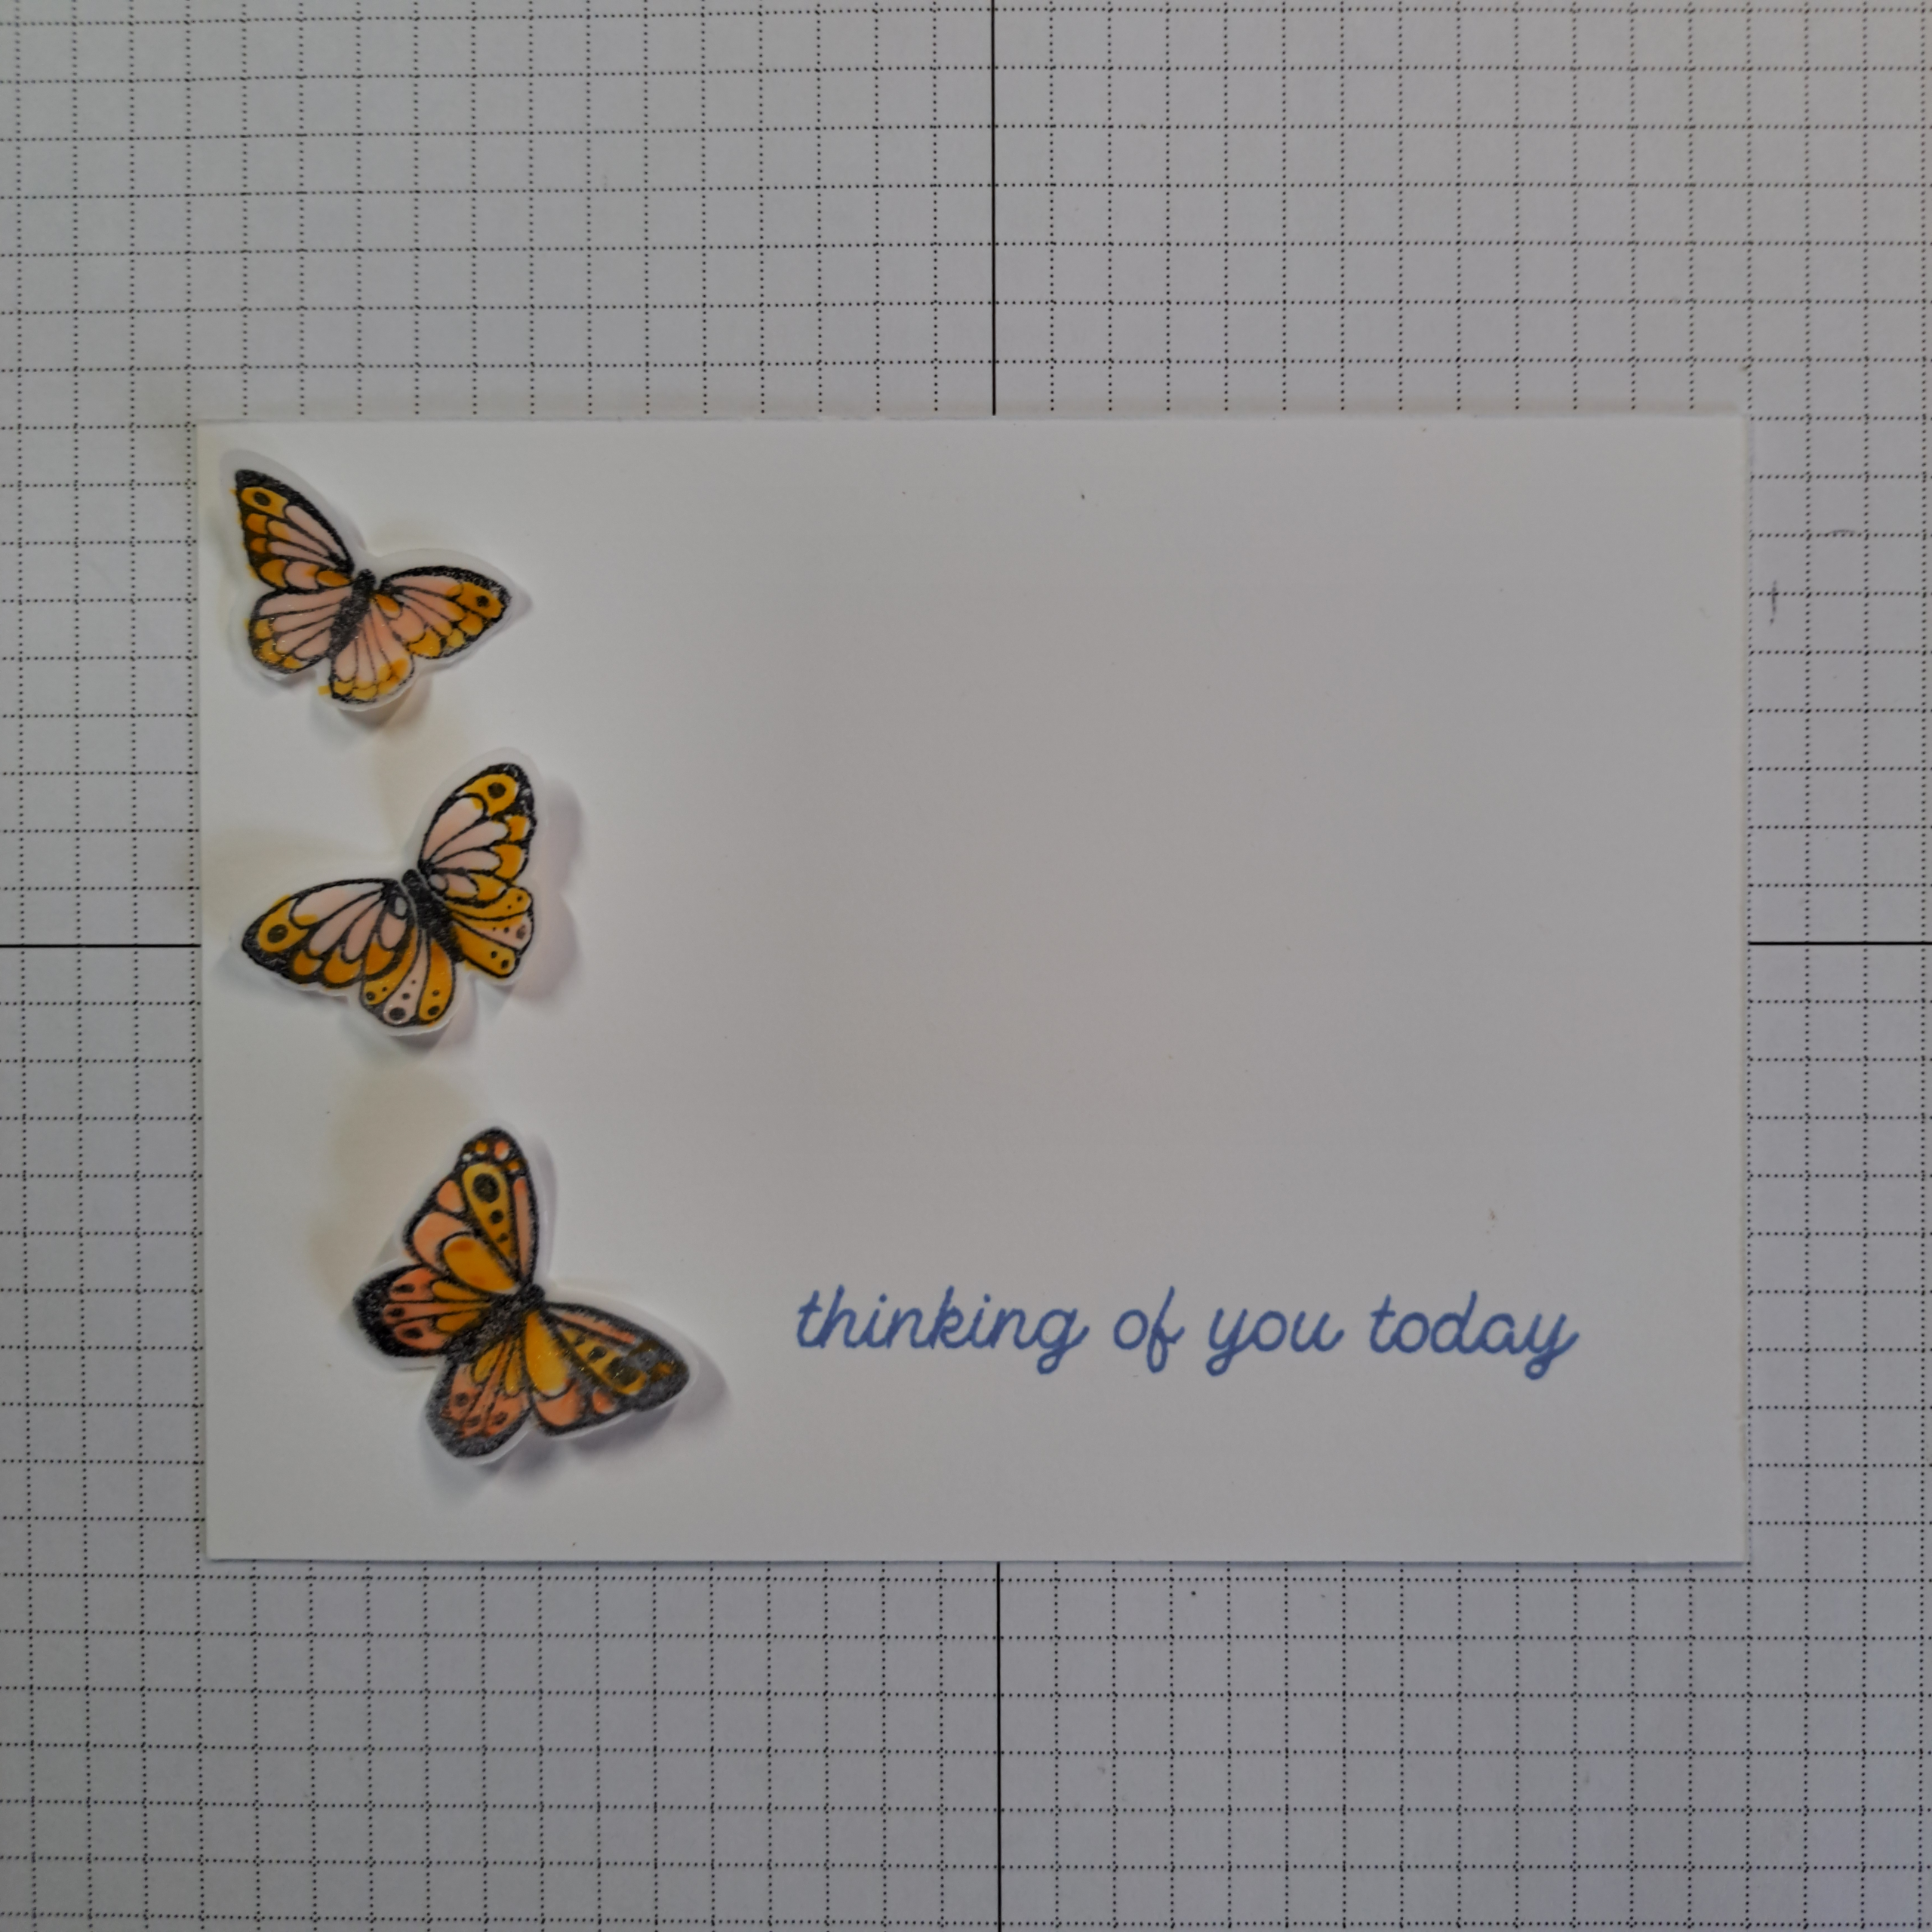
Cut a rectangle of basic white card stock to 13.6cm x 9.8cm (5-3/8″ x 3-7/8″). This piece acts as a card liner and place to write messages. Remember if you had to make adjustments to the card base you will need to make the same adjustments to the length of this piece as well.
I decorated the card liner using another one of the greetings from the All Aflutter stamp set and Hydrangea Hue ink. The butterflies were adhered in place using glue dots.
Attach the card liner to the center inside of your card and voilà you are done!
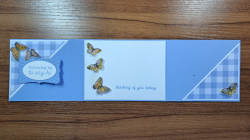
Thank you for reading today. I hope you give this card a try, if you do please post a picture in the comments or on social media and tag me @LoriOthen.
As mentioned above, the basic tri-fold design has been around for awhile. However it took me finding this awesome video from Dawn’s Stamping Thoughts https://www.youtube.com/watch?v=COe2LsmncVcto to convince me that it needed a re-boot. Click the link to head over to the video and give Dawn a huge thumb’s up! While you are there check out some of her other videos, she is an absolute love and great fun to watch.
Product List![All Aflutter Photopolymer Stamp Set (English) [ 167564 ]](https://assets1.tamsnetwork.com/images/EC042017NF/167564s.jpg "All Aflutter Photopolymer Stamp Set (English) [ 167564 ]")
![Phrases & Frames Dies [ 167586 ]](https://assets1.tamsnetwork.com/images/EC042017NF/167586s.jpg "Phrases & Frames Dies [ 167586 ]")
![All Aflutter Punch [ 167569 ]](https://assets1.tamsnetwork.com/images/EC042017NF/167569s.jpg "All Aflutter Punch [ 167569 ]")
![2026–2028 In Color™ Gingham Gallery 12" X 12" (30.5 X 30.5 Cm) Designer Series Paper [ 168218 ]](https://assets1.tamsnetwork.com/images/EC042017NF/168218s.jpg "2026–2028 In Color™ Gingham Gallery 12\" X 12\" (30.5 X 30.5 Cm) Designer Series Paper [ 168218 ]")
![Vellum 12" X 12" (30.5 X 30.5 Cm) Specialty Paper [ 167099 ]](https://assets1.tamsnetwork.com/images/EC042017NF/167099s.jpg "Vellum 12\" X 12\" (30.5 X 30.5 Cm) Specialty Paper [ 167099 ]")
![Hydrangea Hue A4 Cardstock [ 167688 ]](https://assets1.tamsnetwork.com/images/EC042017NF/167688s.jpg "Hydrangea Hue A4 Cardstock [ 167688 ]")
![Basic White A4 Cardstock [ 166781 ]](https://assets1.tamsnetwork.com/images/EC042017NF/166781s.jpg "Basic White A4 Cardstock [ 166781 ]")
![Hydrangea Hue Classic Stampin' Pad [ 167677 ]](https://assets1.tamsnetwork.com/images/EC042017NF/167677s.jpg "Hydrangea Hue Classic Stampin' Pad [ 167677 ]")
![Barely Blush Shimmer Brush [ 167664 ]](https://assets1.tamsnetwork.com/images/EC042017NF/167664s.jpg "Barely Blush Shimmer Brush [ 167664 ]")
![Golden Glow Shimmer Brush [ 167662 ]](https://assets1.tamsnetwork.com/images/EC042017NF/167662s.jpg "Golden Glow Shimmer Brush [ 167662 ]")
![Crisp Cantaloupe Shimmer Brush [ 167661 ]](https://assets1.tamsnetwork.com/images/EC042017NF/167661s.jpg "Crisp Cantaloupe Shimmer Brush [ 167661 ]")
![Stampin' Dimensionals [ 104430 ]](https://assets1.tamsnetwork.com/images/EC042017NF/104430s.jpg "Stampin' Dimensionals [ 104430 ]")
![Mini Glue Dots [ 103683 ]](https://assets1.tamsnetwork.com/images/EC042017NF/103683s.jpg "Mini Glue Dots [ 103683 ]")
![Multipurpose Liquid Glue [ 154974 ]](https://assets1.tamsnetwork.com/images/EC042017NF/154974s.jpg "Multipurpose Liquid Glue [ 154974 ]")
![Paper Trimmer [ 152392 ]](https://assets1.tamsnetwork.com/images/EC042017NF/152392s.jpg "Paper Trimmer [ 152392 ]")
![Impressions Plate [ 167767 ]](https://assets1.tamsnetwork.com/images/EC042017NF/167767s.jpg "Impressions Plate [ 167767 ]")
![Stampin' Cut & Emboss Machine [ 149653 ]](https://assets1.tamsnetwork.com/images/EC042017NF/149653s.jpg "Stampin' Cut & Emboss Machine [ 149653 ]")