
No fun fold today, instead I wanted to show you a fun technique that has been around for ages. In the past it has been done with all kinds of shapes, mostly squares, circles, ovals, and rectangles. But there are some fancy ones out there done with stars and even rubber duckie shapes.
Originally what the shapes all had in common was several hours of measuring and cutting. With the advent of hard plastic stencil-like cutting guides in the 80’s, this technique became a lot easier but no less time consuming. It became a very popular thing to do with scrapbook photos that had a lot of background in comparison to the size of the object of the photo. Not to mention digital photos were not as common and this was a great way to disguise those less than perfect shots.
These days we have home die cutting machines and countless dies to choose from. But sometimes even with the graduated dies it can be difficult to get them lined up, stuck down and correctly cut. Now enter Stampin’ Up’s Beautiful Gallery Suite with fabulous Designer Series Papers and the Gallery Blooms Die set. One die and you are done! There is no fear of messing up your beautiful pictures, be they photographs of those you love or just lovely papers you hate to mess up. In this tutorial I have included a picture of this wonderous die and some extra measurements to speed your project along.
Supplies
Gallery Blooms Die Set
Beautiful Motifs Photopolymer Stamp Set
Beautiful Gallery Designer Series Paper
Mossy Meadow Card Stock
Crumb Cake Card Stock
Crumb Cake Stampin Pad
Multipurpose Liquid Glue
Paper Trimmer
Cut & Emboss Machine
Directions
Please note: It is my usual habit to put the imperial measurements in parentheses after the metric measurements. However, for this tutorial I have put the imperial measurements in a separate section at the bottom as there are several notes on using a half sheet of imperial card stock as a base. I felt it would get too confusing trying to meld the two sets of measurements and directions together.
Metric Card Base

For the card base cut a piece of the Mossy Meadow card stock to 21cm x 14.85cm. Score at 10.5cm, fold and burnish.
If using the dark Mossy Meadow as a card base you may want to cut a card liner. For this example I used a piece of Crumb Cake card stock cut to 10cm x 14.35cm. The greeting is stamped with Crumb Cake ink.
Metric Card Front

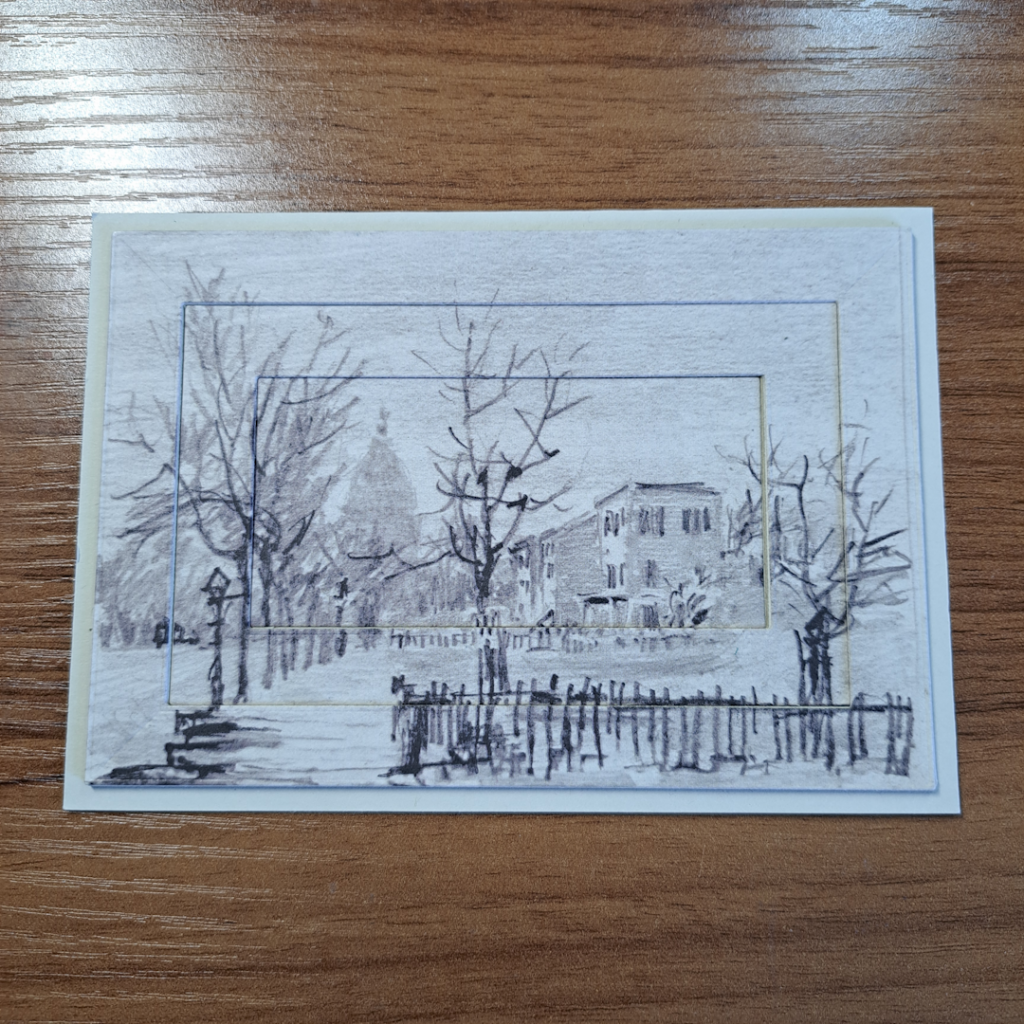
Lay out a piece of the Beautiful Gallery Designer Series paper and determine where on the picture you wish to cut. Place the large frame die from the Gallery Blooms Die set down and run through your machine. The picture will separate out into three pieces.
Next cut three pieces of Crumb Cake card stock to the following measurements: a) 10cm x 14.35cm; b)7.1cm x 11.6cm; c)4.8cm x 9.1cm.
Layer the DSP pieces over the solid Crumb Cake pieces as shown in the photo.
Now layer the pieces onto the card base beginning with the largest piece. Lay it down so that there is an equal border of green on all sides. Next lay down the middle sized piece in the same manner and lastly the smallest piece. You can refer to the finished photo for these placements.


Imperial Card Base
It must be observed that making this card using imperial measurements is not for the feint of heart so be prepared to get out your 16th’s.
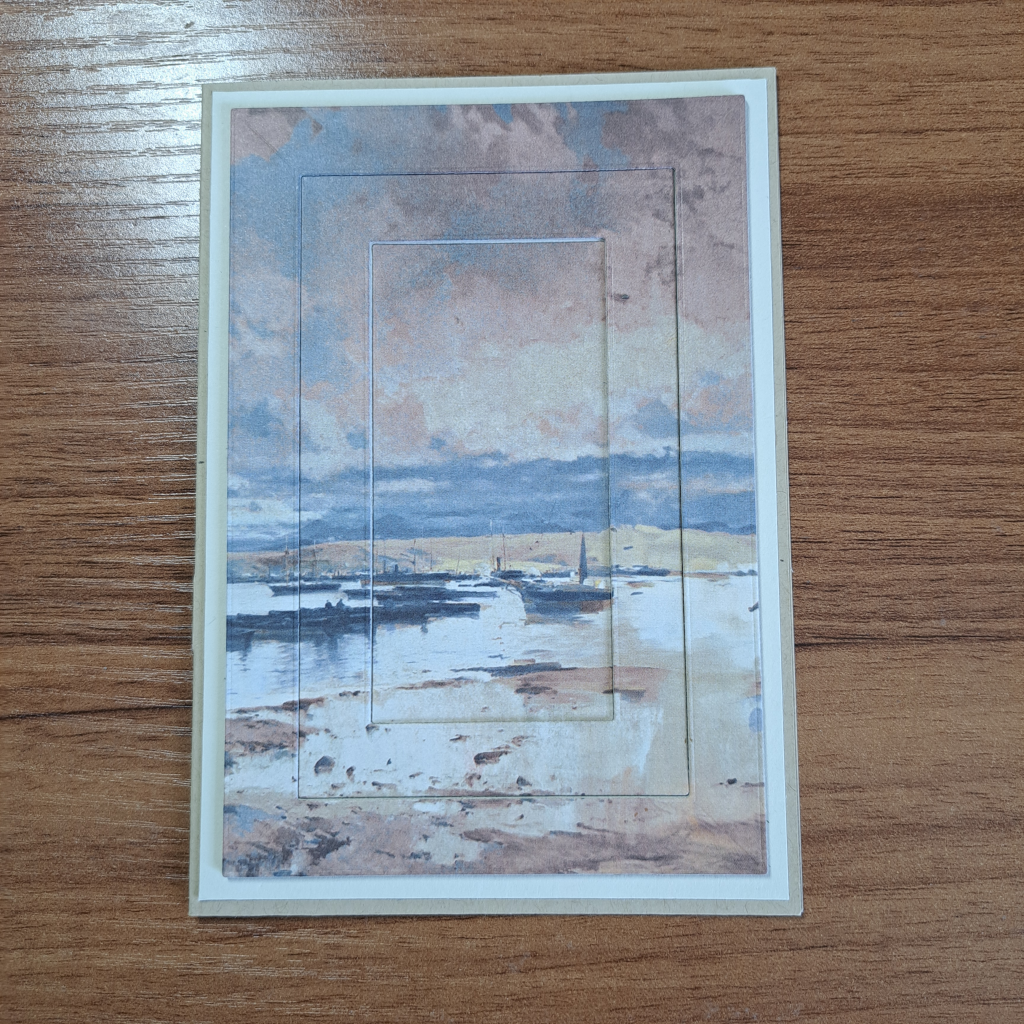
If you wish to have a slightly larger card as in the finished photograph above, you can cut a card base from imperial card stock using these measurements: 8-1/8″ x 5-7/8″ with a score line at 4-1/4″. The first contrasting card stock mat layer will be cut to 3-13/16″ x 5-10/16.
If your preference is to make a card base using a half sheet of imperial card stock, cut your card base to 7-3/4″ x 5-1/2″ with a score line at 4-1/16″. Because this card is smaller than the original you will not need a first contrasting card stock layer. Just lay your largest die cut frame directly onto the card base. (See photograph below).
The next two sets of measurements work for both card bases:
For the middle sized frame piece the mat is cut to 2-13/16″ x 5-10/16″.
For the smallest solid piece cut the mat to 1-15/16″ x 3-9/16″.
Assemble the card as noted in the above metric directions.

Notes: The imperial card was made using the brand new Secret Sea card stock and another pattern from the Beautiful Gallery Designer Series Papers.
I tried rounding up the measurements to something more palatable or at least easier to read on the ruler but I did not have very much luck as the proportions between the large, medium and small layers seemed off.
To illustrate this I have included a photo of one of the imperial sized cards that I made. In this sample I accidently picked up the mat with the rounded up numbers for the smallest piece and stuck it in. It took me a moment or two to realize what I had done but by then it was too late to pull it up. As you can see the mat layer for the smallest piece seems a great deal larger than the other two matting layers, when in fact it is only just short of a sixteenth of an inch on all sides larger. This is the difference in using the eighths and the sixteenths.
Thanks for reading with me today. I hope I have inspired you to give this technique a try. I purposely left off any embellishments so you can have a clear of picture of the technique itself. But be assured there is some linen thread destined for the metric card and a mini tag cut from Secret Sea with a greeting embossed in white that will fit perfectly to the right of that large rose on the imperial card…
Product List![Beautiful Gallery Suite Collection (English) [ 165217 ]](https://assets1.tamsnetwork.com/images/EC042017NF/165217s.jpg "Beautiful Gallery Suite Collection (English) [ 165217 ]")
![Gallery Blooms Dies [ 165212 ]](https://assets1.tamsnetwork.com/images/EC042017NF/165212s.jpg "Gallery Blooms Dies [ 165212 ]")
![Beautiful Motifs Photopolymer Stamp Set (English) [ 165198 ]](https://assets1.tamsnetwork.com/images/EC042017NF/165198s.jpg "Beautiful Motifs Photopolymer Stamp Set (English) [ 165198 ]")
![Beautiful Gallery 6" X 6" (15.2 X 15.2 Cm) Designer Series Paper [ 165196 ]](https://assets1.tamsnetwork.com/images/EC042017NF/165196s.jpg "Beautiful Gallery 6\" X 6\" (15.2 X 15.2 Cm) Designer Series Paper [ 165196 ]")
![Mossy Meadow A4 Cardstock [ 133683 ]](https://assets1.tamsnetwork.com/images/EC042017NF/133683s.jpg "Mossy Meadow A4 Cardstock [ 133683 ]")
![Crumb Cake A4 Card Stock [ 121685 ]](https://assets1.tamsnetwork.com/images/EC042017NF/121685s.jpg "Crumb Cake A4 Card Stock [ 121685 ]")
![Crumb Cake Classic Stampin' Pad [ 147116 ]](https://assets1.tamsnetwork.com/images/EC042017NF/147116s.jpg "Crumb Cake Classic Stampin' Pad [ 147116 ]")
![Secret Sea A4 Cardstock [ 165296 ]](https://assets1.tamsnetwork.com/images/EC042017NF/165296s.jpg "Secret Sea A4 Cardstock [ 165296 ]")
![Secret Sea Classic Stampin' Pad [ 165285 ]](https://assets1.tamsnetwork.com/images/EC042017NF/165285s.jpg "Secret Sea Classic Stampin' Pad [ 165285 ]")


![Stampin' Cut & Emboss Machine [ 149653 ]](https://assets1.tamsnetwork.com/images/EC042017NF/149653s.jpg "Stampin' Cut & Emboss Machine [ 149653 ]")
Part II
When I finished this post (the first time) I knew there was so much more I wanted to do with this frame die and these wonderful papers. I think the above technique belongs in the modern category of ‘eclipse cards ‘. With this being said, I thought this might be the perfect time to jump into the dimensional world of eclipse cards.
Step Into My Card (reverse eclipse)
Supplies
Gallery Blooms Dies
Beautiful Gallery Designer Series Paper
Very Vanilla Card Stock
Crumb Cake Card Stock
Basic Beige Card Stock
Multipurpose Liquid Glue
Cut and Emboss Machine
Directions
Card Base for metric is 21cm x 14.85cm, score half way at 10.5, fold and burnish. Card base for imperial is 7-3/4″ x 5-1/2″, score at 4-1/16″, fold and burnish.
For the metric card cut a base/bottom layer to 10cm x 14.35cm. For the imperial version place your layers directly onto your card base.
Cut three sets of frames using the frame die and a contrasting color of card stock. Choose which portion of your Designer Series Paper you wish to use, place the frame die down there and run through you die cutting machine.

Step one: Lay the first layer of the card stock frame die cuts out onto either your base layer (for metric) or your card base (imperial). Glue down the two ‘outside’ frames. Replace the center section with the center section of your Designer Series Paper picture and glue this down.

Step two: Lay the second die cut frame sections onto the first, omitting the center portion. Glue these so they line up exactly with the first ones. In the photo I has used a contrasting card stock color so you can see the difference in the layers. When this card is completed and permanently assembled I will have used all the same color card stock on all of the frames. If you wish you can use a high contrast color for the frames and you will be able to see the flash of the high contrast color when the card/picture is turned in different directions. Using the high contrast color is more whimsical and works great for bright or children’s cards. For this card I went for more subtle.

Step three: Place the center frame piece cut from the DSP in place being sure to line it up exactly with the center frame piece put down in step two.

Step four: Place the third and final card stock frame piece down. For this layer you will only use the largest ‘outside’ frame.
Step five: Place the last DSP frame piece in place aligning it with the card stock frame placed in the previous step.
If you are making the imperial card you are finished. If you have been working on the metric card back ground piece, now is the time to glue it to the card base.
The Shadow Box Card (shadow box or frame eclipse)
Supplies
Gallery Blooms Photopolymer Stamp Set
Gallery Blooms Dies
Beautiful Gallery Designer Series Paper
Grey Granite Card Stock
Basic Beige Card Stock
Grey Granite Stampin Pad
Calypso Coral Watercolor Pencil
Multipurpose Liquid Glue
Cut and Emboss Machine
Directions
Card Base for metric is 21cm x 14.85cm, score half way at 10.5, fold and burnish. Card base for imperial is 7-3/4″ x 5-1/2″, score at 4-1/16″, fold and burnish.

For the metric card cut a base/bottom layer to 10cm x 14.35cm out of Beautiful Gallery Designer Series Paper. There are two ways to handle the bottom layer for the imperial card. The first (and my lazy way) is to cut a set of frames out of your DSP. You will not use the outer two frame pieces in this project. However if you prefer you can use the second method and cut a piece of the DSP to 3-5/8″ x 5-3/8″. This piece must align exactly with the card stock frame pieces so if you are off by a bit you may need to trim.
Next cut one set of frames using the frame die and plain card stock. I chose to use the basic beige because it made me think of the matting on professional framed prints.
Now cut two sets of frames from a contrasting color card stock. I used the same color as my card base. You will only use the outside frames of each set for this project. Of note here several ‘frames’ would look good here, you could use papers from the Country Woods collection or perhaps some gold or silver card stock if you wanted a more modern look.
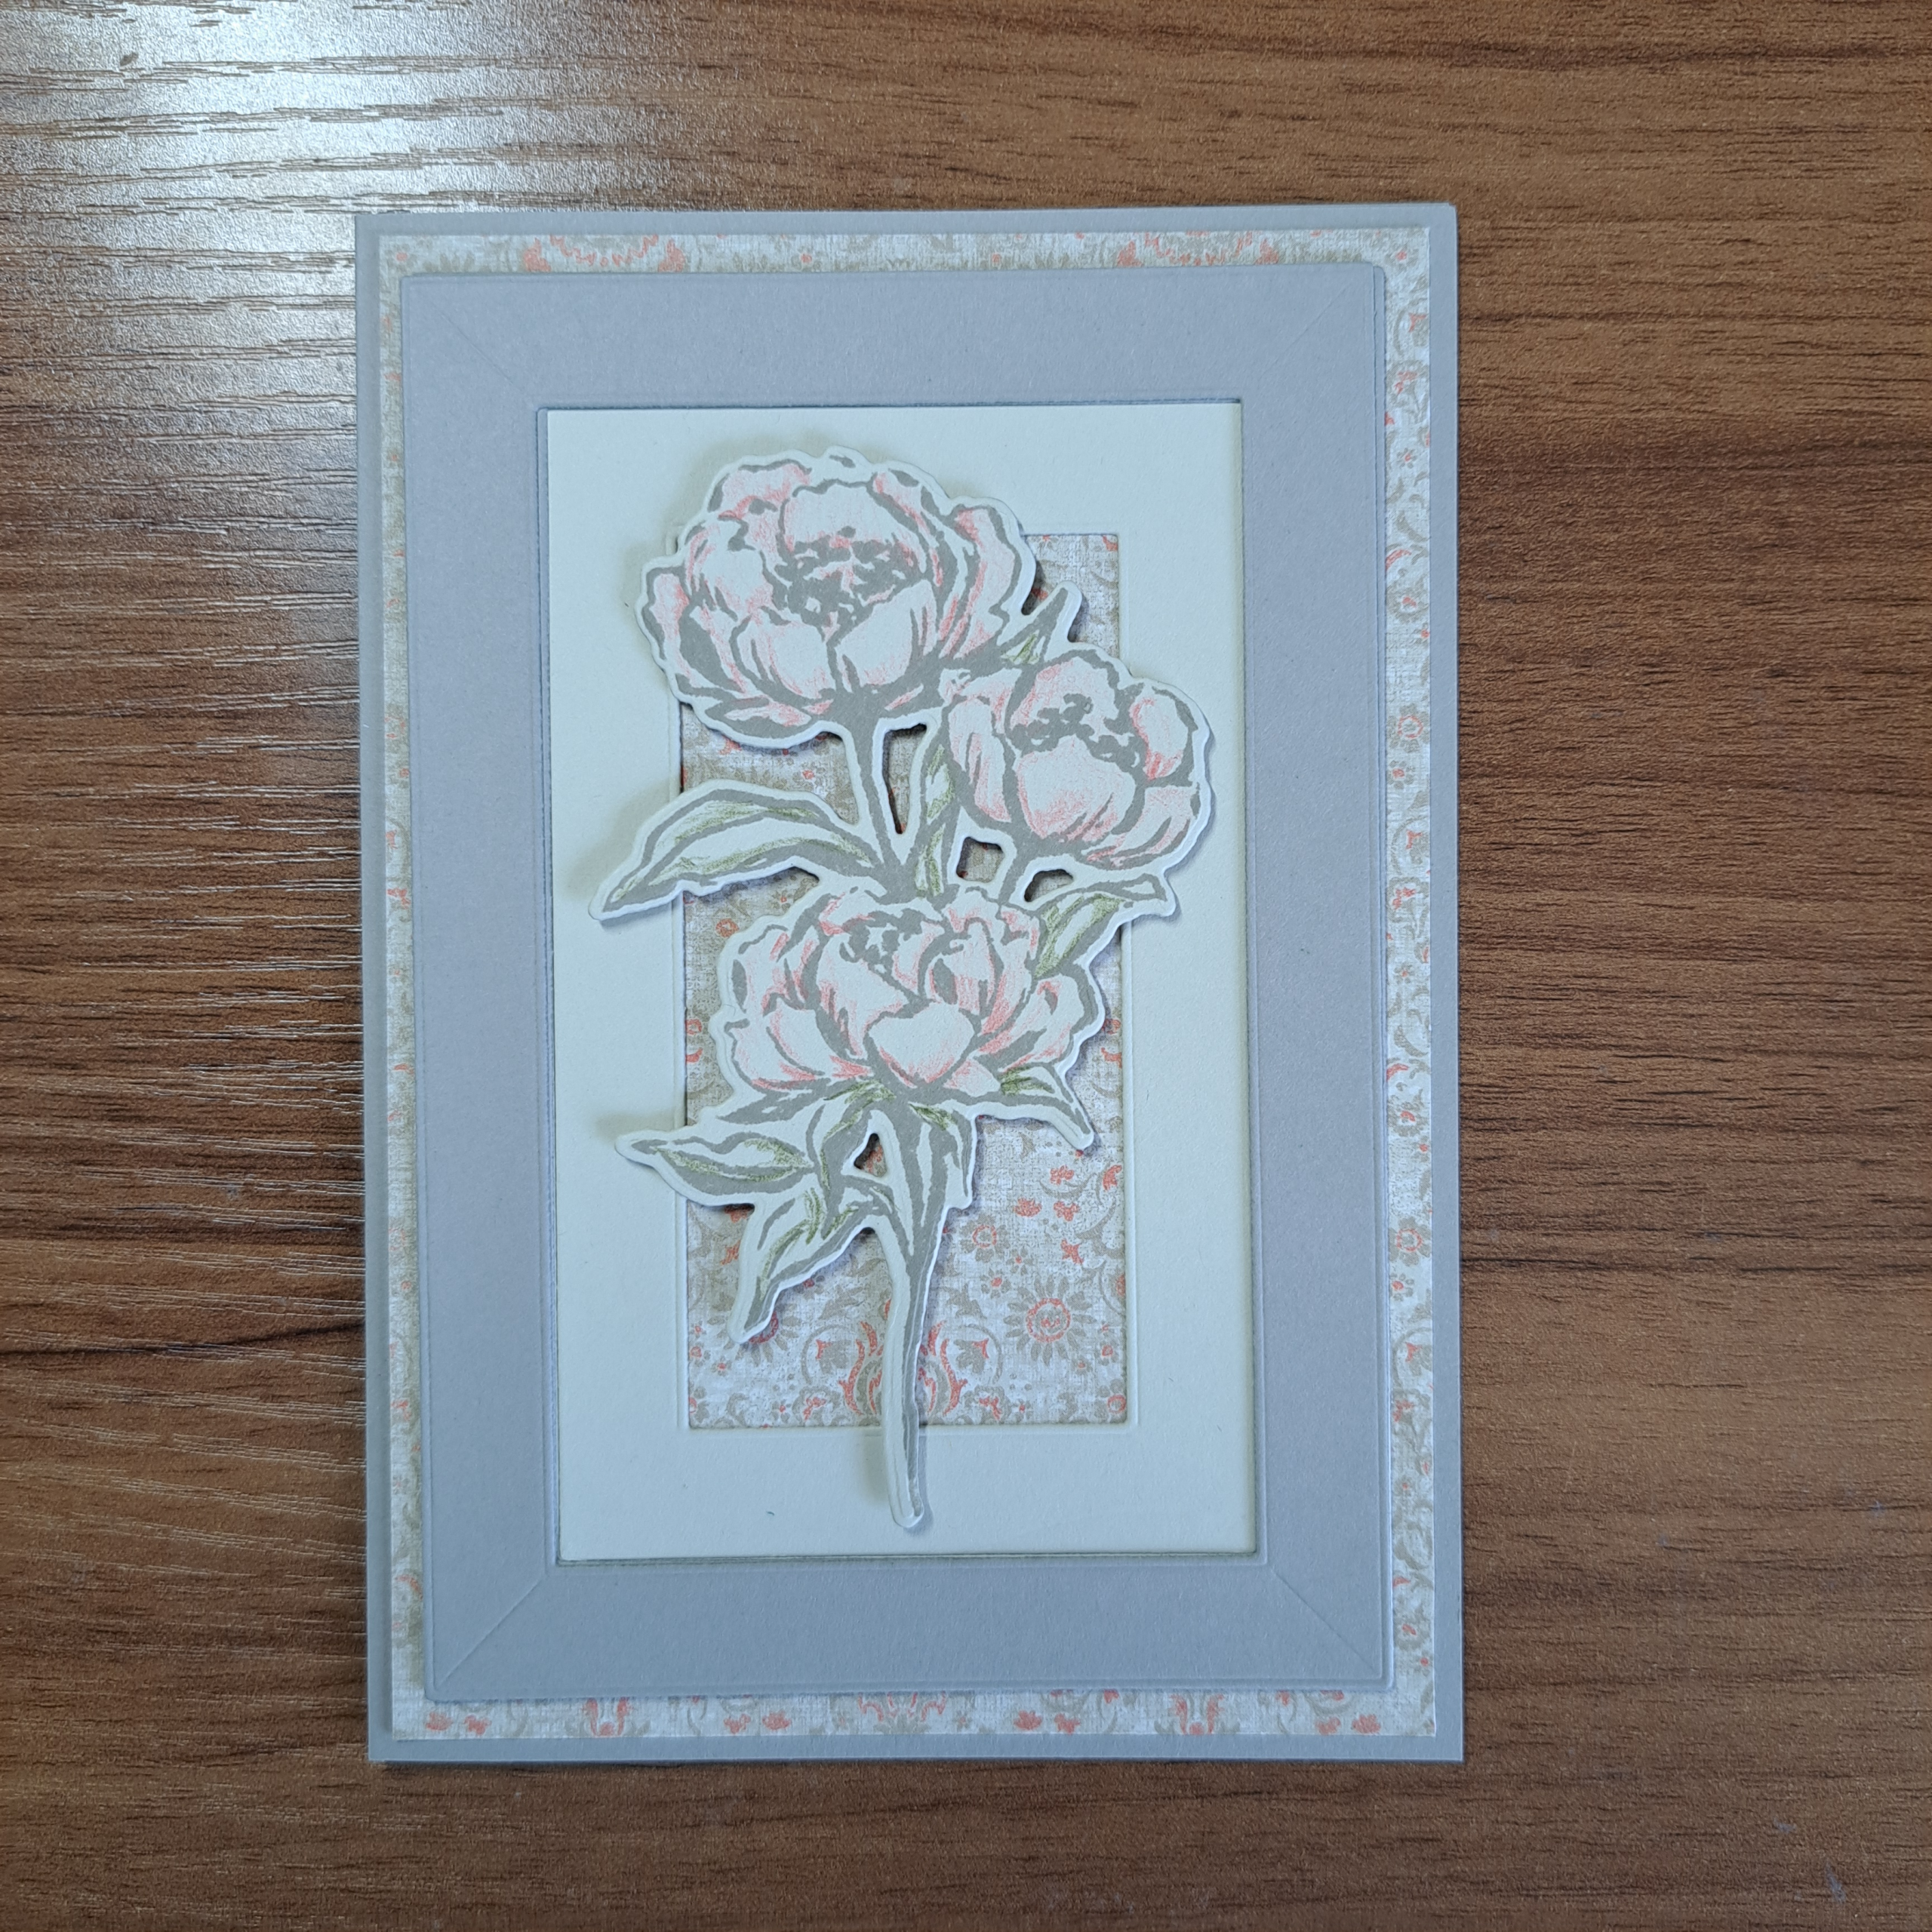
For my center focal point I stamped my image, from the Gallery Bloom stamp set, onto basic beige card stock using the Grey Granite ink. I added bits of color with a Calypso Coral Watercolor Pencil using what I call the scribble technique. But I could have just as easily used a Calypso Coral Stampin Blend marker with the same slap-dash splashing of color. The image was cut out using the coordinating die from the Gallery Bloom die set.
Assembling the Card

Step one: Glue the back ground down flat as shown in the photo above. If you are using the lazy frame method to build imperial card move on to the next step.
Step two: Adhere down your lighter color frame set next, discarding the center piece. Be sure you have a nice neat equal border all the way around the outside of your frame set. If you are using my imperial lazy method, here is where you will glue the center of your DSP frame into the center of your basic beige frames.
Step three: Glue together the remaining two outside frame pieces. These are the pieces I cut from the Gray Granite card stock.

Step four: Glue the outside frame pieces over the top of the outside beige frame piece as shown in the photo.
Step five: Place dimensionals on the back side of your flower image and adhere to the center of the card as shown in the finished photo above.
Hello There Tag

Supplies
Alphabet A La Mode Dies
Tags of Thanks bundle
Beautiful Gallery Designer Series Paper
Grey Granite Card Stock
Basic Grey Card Stock
Multipurpose Liquid Glue
Paper Trimmer
Cut and Emboss Machine
Directions
Cut a rectangle of Basic Grey card stock, 14.5cm x 7cm (5-3/4″ x 2-3/4″). Cut another rectangle from the Beautiful Gallery Designer Series paper, 14cm x 6.5cm (5-1/2″ x 2-1/2).
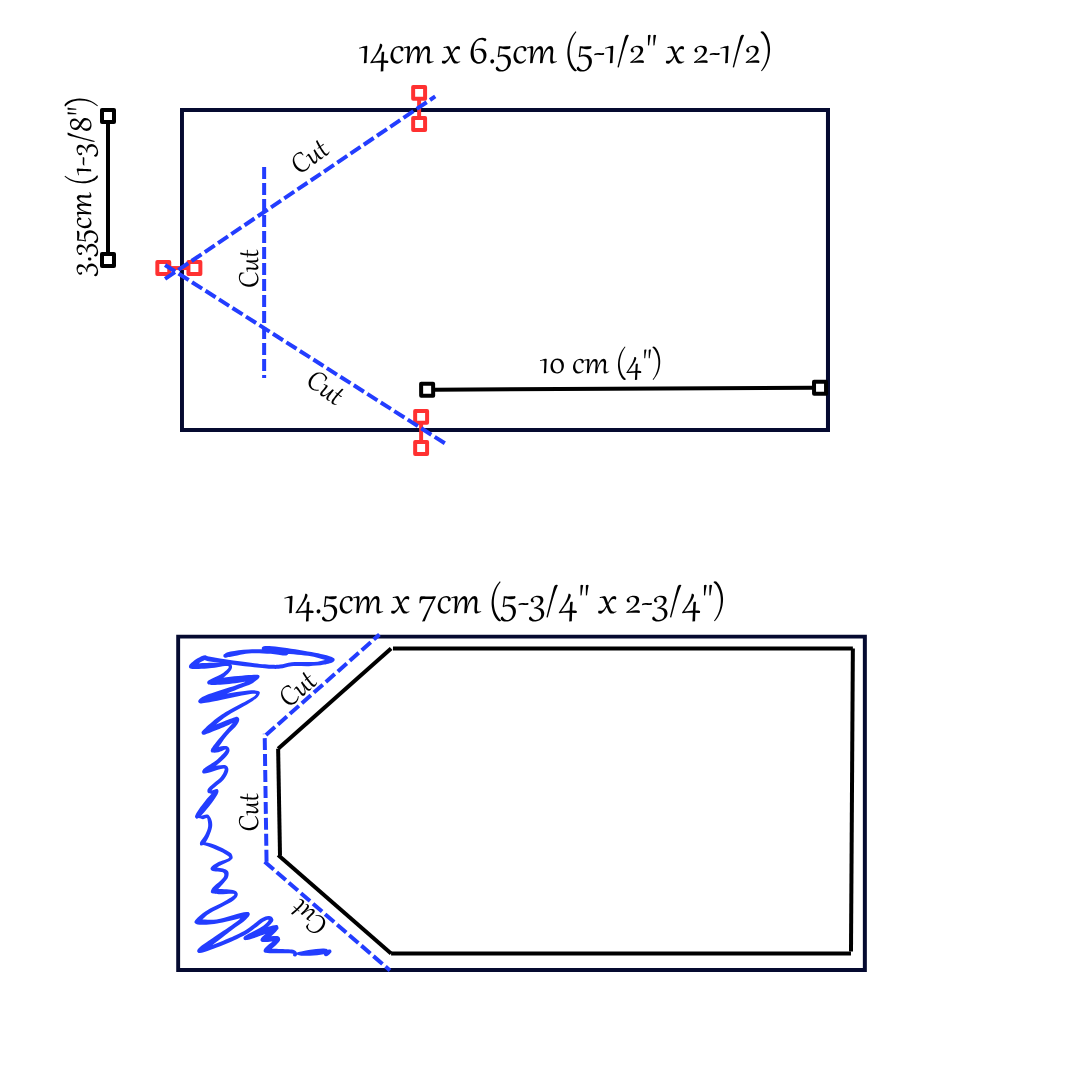
Determine how you want your paper to lie for your tag, this is very important if your are using a directional print. These instructions are for the flat end of the tag to be on the right, if you wish it on the left just reverse the following instructions. From the right side of your card (flat side) measure over to the 10 cm (4″) line. Make a small mark on the top and bottom of your tag. Be sure these marks are lined up exactly. To do this I put the DSP in my paper trimmer and made the marks along the cutting/scoring track.
Move to the left edge of your DSP tag piece and mark the center at 3.35cm (1-3/8″). Cut your tag from the top 10cm (4″) mark diagonally down to the center mark at 3.35cm (1-3/8″). Now cut from the bottom 10cm (4″) mark diagonally up to the center mark at 3.35cm (1-3/8″). Trim the pointed point off with a pair of scissors. In my example I cut the point off at approximately 2cm (3-4″).
Tape down your alphabet dies to the DSP tag piece. I did take some time here and lined them up. But there is no rule that says they can’t ‘dance’ across the tag. Die cut the letters saving the cut out pieces.
Die cut three of each letter from the basic grey card stock.
Glue your DSP tag piece to your grey granite rectangle leaving a narrow border on the right, top and bottom. Put your tag into your paper trimmer and trim the excess grey granite card stock, again leave that narrow border showing between the edge of the DSP and the edge of the tag.
Glue down the grey granite letters onto the tag, matching them up to the cut out slots. I found it was easier to finish one layer at a time. However you do you, others may find that you can complete all three layers of a single letter before moving on. You need to pay attention to any letters that have cut out places like the ‘O’ in this example. For this letter glue in the first level of grey granite letters down and then glue the cut out DSP piece where it should fall (in this case in the center of the letter). The remaining letters will be stacked leaving those center pieces flush to the surface of the tag.
Next glue the DSP letters on top of your layers of grey granite letters.
Finish by cutting a slot in the narrowed end using the ‘D’ shaped punch (also called a ‘belly’ shape) from the Tags of Thanks bundle.
This tag was inspired by the lovely Jacque Williams of StampHappy in New Zealand. Here is her video, hop on over and give some love to the down under! https://www.youtube.com/watch?v=OLaIuxMa2Dk&t=15s&ab_channel=JacqueWilliams
I hope that you have enjoyed Part II and that you are inspired to try out this fun and flexible technique!
Product List![Gallery Blooms Photopolymer Stamp Set [ 165211 ]](https://assets1.tamsnetwork.com/images/EC042017NF/165211s.jpg "Gallery Blooms Photopolymer Stamp Set [ 165211 ]")
![Alphabet à La Mode Dies [ 160750 ]](https://assets1.tamsnetwork.com/images/EC042017NF/160750s.jpg "Alphabet à La Mode Dies [ 160750 ]")
![Tags Of Thanks Bundle (English) [ 165410 ]](https://assets1.tamsnetwork.com/images/EC042017NF/165410s.jpg "Tags Of Thanks Bundle (English) [ 165410 ]")
![Basic Beige A4 Cardstock [ 164512 ]](https://assets1.tamsnetwork.com/images/EC042017NF/164512s.jpg "Basic Beige A4 Cardstock [ 164512 ]")
![Very Vanilla A4 Cardstock [ 166785 ]](https://assets1.tamsnetwork.com/images/EC042017NF/166785s.jpg "Very Vanilla A4 Cardstock [ 166785 ]")
![Gray Granite A4 Cardstock [ 147008 ]](https://assets1.tamsnetwork.com/images/EC042017NF/147008s.jpg "Gray Granite A4 Cardstock [ 147008 ]")
![Basic Gray A4 Card Stock [ 121689 ]](https://assets1.tamsnetwork.com/images/EC042017NF/121689s.jpg "Basic Gray A4 Card Stock [ 121689 ]")
![Gray Granite Classic Stampin' Pad [ 147118 ]](https://assets1.tamsnetwork.com/images/EC042017NF/147118s.jpg "Gray Granite Classic Stampin' Pad [ 147118 ]")
![Watercolor Pencils Assortment 1 [ 161700 ]](https://assets1.tamsnetwork.com/images/EC042017NF/161700s.jpg "Watercolor Pencils Assortment 1 [ 161700 ]")

