Supplies Needed
4-1/8″ x 11″ balmy blue cardstock for base
3-7/8″ x 5-1/4″ white cardstock for front
3-7/8″ x 5-1/4″ white cardstock for interior
3-7/8″ x 5-1/4″ coordinating Regency Park 6″x6″ DSP for front
3/4″ strip of balmy blue cardstock
left over blue & white scraps of card stock for die cutting
the greeting focal point and small flowers (also for focal point)
Stampin’ Pad Balmy Blue
Stampin’ Pad Stary Night
Sentimental Park Photo Polymer Stamp Set
Sentimental Park Cut & Emboss Die Set
Cane Weave 3D Stampin’ Cut & Emboss Folder
Stampin’ Dimensionals
Adhesive-Backed Milky Dots or Iridescent Pearls Basic JewelsMono Multi Liquid Glue
 If using a full sheet of A-4 Balmy Blue cardstock, cut the end off of the cardstock piece so it measures 11″. Save the cut off strip to later use to stamp for faux ribbon. Card should now measure 8-1/4 x 11″. Cut page width wise at the 4-1/8″ mark. Set aside one half to use for another card base later or for cutting the focal point greeting (if no other scraps of this cardcolor are available).Score card base at 5-1/2″. Fold in half.
Emboss one of your two pieces of whisper white cardstock (3-7/8 x 5-1/4″) using the Cane weave 3D embossing folder. Cut the embossed piece diagonally from left top corner to bottom right corner.
After cutting a 6″ x 6″ piece of Regency Park DSP to 3-7/8 x 5-1/4″. Save left over strip for another project. Cut the DSP in half diagonally from left top corner to bottom right corner. (See Photo)
 Glue diagonal pieces to front of Balmy Blue card base. Align the bottom left corner of white embossed stock to the bottom left corner of the card base, be sure to leave approximately 1/8″ of an inch border of Balmy Blue showing around the left and bottom edge of the card base. Next glue the one of the DSP triangles to the top and right edge. Again leaving approx 1/8″ Balmy Blue border. Set aside the remaining triangles to be used in another project or for a second card. See photo.
Create a faux Ribbon
To make the faux ribbon, place the small hash marks stamp onto a clear stamping block. Ink the stamp with Starry Night and stamp repeatedly along the edge of the strip of left-over Balmy Blue card. Ink the stamp each time to maintain the dark color. Stamp down the first time in the upright position, for the second stamp, turn 180 degrees (upside down) and align end to end. Flip 180 for each stamp all the way to the end of the strip. Doing this 180 turn will align the stamp pattern so it appears to be endless.

Repeat process above (or below depending on whether you started along the top edge or the bottom edge of the strip). Allow a moment for the ink to dry. (And if you are like me, clean your hands that are now covered in blue ink)
Cut the strip down until it measure 3/4″ wide. Glue diagonally to the front of the card, covering the bare space between the triangles. Trim ends.
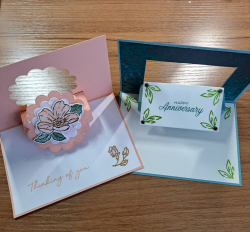
 Create the greeting focal point by die cutting the large flower tag in balmy blue and the coordinating smaller tag in white. Next die cut the small flowers from whisper white cardstock or if you choose to go with just texture you can cut the flowers from blue. The die set gives you two of each of the small flower dies, making it easier to cut lots of tiny flowers at one time. I recommend using all four dies to get enough flowers to choose from.
Glue the flowers onto the blue tag being careful to keep the slots open so the white card slips can slip into them when finished. I got a little crazy and used some of the blue dots left over from die cutting the large tag to make centers for some of the white flowers I did not fill them all in as I knew I would be using some embellishments to finish.
Stamp your greeting onto the smaller white tag. I used the YOU and the Happy Birthday from the Sentimental Park stamp set. I stamped the YOU in balmy blue first and then used the clear block to line up the Happy Birthday, which was stamped in Starry Night. In this case it worked better to stamp the lighter color first. (See finished photo)
 Slot the white card into the right and left edges of the blue tag. Attach the greeting to the front of the card with large dimension. To finish, stamp the interior of the card with the flower group outline stamp from the Sentimental Park stamp set in Starry Sky. Next double stamp with the solid flower group stamp in Balmy Blue. (Not shown is the envelope I stamped in the same way). Glue the white card to the interior and shout voilà.
Product List