Supplies Needed
4-1/8″ x 11″ Stary Sky cardstock for base
3-7/8″ x 5-1/4″ white cardstock for front
3-7/8″ x 5-1/4″ white cardstock for interior
3-1/2″ x 3-1/2″ square of balmy blue cardstock
white card stock for stamping flowers approx 4″ x 5-1/4″
Stampin’ Pad Balmy Blue
Stampin’ Pad Starrry Night
Petal Park Photo Polymer Stamp Set
Petal Park Builder Punch
Stylish Shapes Dies
Cane Weave 3D Stampin’ Cut & Emboss Folder
Stampin’ Dimensionals
Adhesive-Backed Milky Dots or Iridescent Pearls Basic Jewels
Mono Multi Liquid Glue
Directions
 Cut a piece of Night of Navy cardstock to 4-1/8″ x 11″, score at 5-1/2″ and fold in half to create the card base.
Cut 2 pieces of white card stock to 3-7/8″ x 5-1/4″. Set aside one piece for the interior.

Take the other piece and emboss using the Cane Weave 3D Stampin’ Cut & Emboss Folder. This embossed design is directional, be sure to line up the bottom of your paper with the line on the embossing folder.
Next place the largest circle die from the Stylish Shapes die set onto your embossed card piece. Run it through the your Stampin’ Cut & Emboss machine. I put the circle slightly higher than the mid point. Note: after running the paper through the machine to cut the circle, you will notice that the cane pattern has been over all lightly depressed and the area around the cut out circle has maintained a slightly sharper pattern. This will not make a difference in your finished card as it will be mostly be covered by the flower placement.
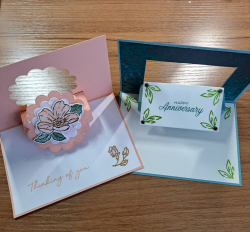
 Now it’s stampin’ time. Using your third piece of white card stock stamp the triple flower outline three times in Starry Night. Use the solid triple flower to fill in with Balmy Blue. (I usually stamp an extra because I sometimes mess one up) In the photo I did not stamp off the balmy blue ink because I wanted my flowers to be dark to stand out better. But if you wanted a lighter, softer look, stamp off both the outline and fill-in stamps.

I affixed the square piece of Balmy Blue cardstock to the back side of the embossed front piece, covering the hole. I then stamped my greeting with Starry Night slightly above the center line of the circle. I found it easier to stamp the greeting after affixing the background. I also stamped a second greeting onto the white liner inside the card. To round out the inside of the card I stamped the triple group of small flowers, the outline in Starry Night and the fill-in with Balmy Blue.
 Place the white embossed piece on the front of your card base. Leave approximately 1/8″ border. Embossing does shrink the paper a little bit but it shrinks it evenly so it will not affect the border except that it will be a little bigger than you might expect. Affix the white liner to the inside of the card base.
 Use the Petal Park Builder Punch to punch out the flowers. Having the flowers stamp together makes it easier to align the stamped image up with the punch. (See Photo)

Arrange your punched out flowers on your card. I used dimensionals to “pop-up” the larger flowers and placed them first. Next I glued down the smaller flowers.
Last but not least, I placed some bling, in the form of milky dots, onto the flower centers.
 Here are some more examples
 Just a Note: Not in the mood to stamp? You can cut your flowers from some of the pages of the Regency Park DSP. The DSP was designed to use with the Petal Park Builder Punch
Product List