This hexagonal box brings the WOW factor. However, it’s probably the easiest box tutorial yet. Just one piece of card stock, some cleaver scoring and a little double sided tape is all you need. I have given you directions on using the standard A4 cardstock followed by the measurements for using the imperial 8-1/2″ x 11″ standard card stock. Which ever piece of card stock you choose you will be amazed.
Supplies
1 piece of cardstock 12cm x 29.7 (8-1/2″ x 11″)
Paper Trimmer
Tear & Tape
Multipurpose Liquid Glue
Optional for decoration:
6 strips of patterned paper cut to 4cm x 10.5cm (1-1/2″ x 4-3/4″)
Directions
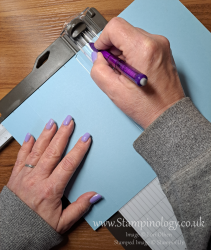
Align the long side of your paper across the top of your Paper Trimmer. Starting from the left mark 2.4cm (7/8″) lightly with a pencil. Move your paper to the 4.8cm (1-3/4″) mark and score the length of the paper. Moving across the paper in 2.4cm (7/8″) increments alternate marking with a pencil and scoring. See diagram above for details. There should be six pencil marks and six score lines. The last section is your tape/glue tab and will only be .9cm (1/2″) wide.
Next turn your paper so the short end is at the top. Score at the 4.5cm line. Turn your paper and score the opposite side at 4.5cm (1-3/4″) line.
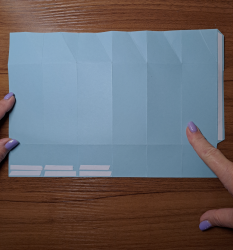
Now we are going to make some diagonal scores from the pencil marks down to the junction of your score marks. See diagram for details. You can use your Paper Trimmer to make the score lines or a ruler and stylus. (Photo on the right)
Scoreing done, time to make some cuts. At the bottom of your page cut along the score lines up to that bottom score line at 4.5cm (1-3/4″)
Cut away the bottom “tab” up to the score line and cut away a small triange on the “tab” so your box join will be cleaner.
Erase any visible pencil marks.
Let’s fold! Hopefully you made all of your score marks on one side of your paper. Your first folds are along the diagonal score lines. Pinch each fold firmly and then turn it to the opposite side and pinch again.
The second set of folds will be on the vertical lines. Go from one score line to the next, always folding inward and burnishing firmly, remember we are forming a “circle” shaped box.
Lastly turn the paper vertically and fold the two score lines at the 4.5cm (1-1-3/4). Again folding to the inside and burnishing.
If you plan on decorating the box, now is the time to adhere your patterned paper to the panels formed by the folding & burnishing. I used glue for the patterned paper and Tear & Tape for the labels. You can also place down your double sided tape at this point, see cutting and scoring guide for placement. (Or photo on the right)
Finish
Fold in the narrow .9cm (1/2″) tab and place adhesive, bring the opposite edge over and seal down. If you are using glue place a weight on top of the seam and be sure to allow sufficient time for the glue to dry. The next step will put stress on the seam.
Fold the top of the box closed and turn over.
We are going to stick the opposite tabs together. Stick the center tabs together first by folding in the taped tab and then fold the unglued tab over the top. These tabs need to align to keep your box shape. Repeat with the other two sets of tabs. Fini!
Tips
Struggling to get those first two bottom tabs to align while holding the box upside down? Find a tall flat bottomed glass, open out the box and place it over the glass, this will give you an extra “hand” for sealing the box bottom. (In the photo above you can see my big plastic cup peeking out on the lower right.
If you are using a light weight card stock, I recommend drawing around the bottom of your finished box on to another piece of cardstock. Cut out the shape and then trim about .5cm (1/4″) off of each side. Place a thin layer of glue to the piece you cut out and fit it to the inside of your box for strength. I have also seen this done with decorative paper and applied to the outside bottom of the box.
Want a more permanent closure for “no peeking?” Punch holes in the closure wings and thread a cord through and tie the box closed. (See photo graphs below)


Thank you giving this a read. I hope you give this box a try. If you do, please post a picture here or share on social media with @loriothen. As always I am here for you, I would love to see your comments below or you can contact me directly by email Lori@Stampinology.co.uk or via the contact me page.


