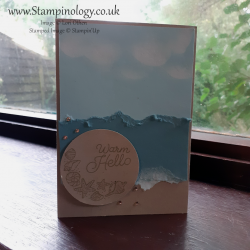
We interrupt this box making series to bring you a Warm Hello. This card is my response to a team challenge (and the soaring heat in Europe and the UK). Our challenge was to use the Stampin’Up colors Pool Party, Lost Lagoon & Crumb Cake in a card. It did not matter how they were used, just that the colors were featured.
As I looked at the colors, the beach popped into my head. Well, it was more like: “It is so hot. I can’t move. My brain has shut down. Can’t the fan go any higher? How can I make a card when all I can think about is cooling off. Wouldn’t a dip in the ocean be nice? Um… Oh! Wait! Look at that! The sky, the sea and the sand! Got it!”
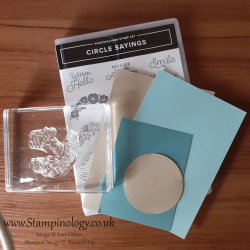
Supplies
1 piece Crumb Cake card stock 21cm x 14.9cm
1 piece Pool Party card stock 14.4cm x 10cm
1 piece Lost Lagoon card 10.3cm x 7.5cm
Scrap of Crumb Cake to cut the circle 7.5cm x 7.5cm
Scrap of card stock to make a “stencil”
Circle Sayings Bundle
Crumb Cake Stampin Pad
Whisper White Craft Stampin Pad
Sponge Dauber
Multipurpose Glue
Wink of Stella
Adhesive Backed Sparkle Gems
Paper Trimmer
Directions
Cut the Crumb Cake card stock to size and score half way (10.5cm), fold to form the card base.
Working on the next layer, determine how much of the Crumb Cake you would like to show, I choose to show about 3cm. This represents your “beach”. And the amount of card stock to be torn away on this layer. Cut your Pool Party Card Stock to 14.4cm x 10 cm. Holding the card stock firmly with one hand and moving the other hand slowly tear off your determined amount (3cm). You want the card stock to fracture and create a very rough edge (see photo to left).
Use white ink and a sponge dauber, to brush the torn edge of the card. Please note, I would not recommend using a blending brush to do this, the Whisper White Craft Ink is a pigment ink and cannot be cleaned with water alone. I did not have a clean sponge dauber so I used the clean edge of a make-up sponge. Grab a spare bit of card stock and practice a moment to see how the pigment ink blends, it is a bit thicker and different than the dye ink in the regular Stampin Pads.
Next cut your stencil. I just cut random curves. If you look at the picture I originally cut the stencil wrong. If we were using white card stock and blue ink (for the sky) the curves would be cut rounding up, since we are using blue card stock and white ink (for the clouds) cut the curves in a scoop (see photo on the right).
Place your stencil near the top of the Pool Party card stock and sponge along the curved edges with the white ink. You can do as little or as much as you would like. My clouds are thin, but fluffy white is achievable with a little patience. Blend thin layers to build up opacity. Next move your stencil down your page a small amount and slide it either to the left or right so your clouds are more random. Repeat rubbing the ink into the curved edge of the stencil.
When finished glue this layer down to your Crumb Cake base card stock. Leave a small border of Crumb Cake showing on the top and sides.
For the third layer cut your Lost Lagoon card stock to 10.3cm x 7.5cm. Tear along one of the 10.3cm edges. This will be your “horizon line”. Determine how much of your sky (Pool Party card stock) you want to show. Place your horizon line there, and tear away the bottom of the 10.3cm card stock so that a little of the Pool Party shows there as well. This creates the suggestion of surf meeting the sand.
With your white ink brush the bottom edge of the Lost Lagoon card stock. I did not do the top edge as I was going for plain waves as opposed to white caps. But you could put white ink on both edges.
Glue the Lost Lagoon layer in place over the Pool Party layer. Optionally you could pop this layer up with dimensionals.
Cut a circle with the 2-2/8 punch out of a scrap of the Crum Cake card stock. I aligned the Warm Hello and the Sea Shells stamps on my card stock circle, then I just pressed my stampin block onto the stamps. Voila already lined up. I inked the stamps with the Crumb Cake Stampin Pad and pressed it to the circle. The greeting is finished off using the Wink of Stella to add some sparkle to the sea shells. It is a little difficult to see in the pictures but it looks really nice in-person.
The greeting circle is raised up on dimensionals. And some sparkle was added in the form of adhesive backed sparkle gems.
I hope you enjoyed this quick tutorial, it took me longer to write it than to make the card! If you give it a go, please post a picture below or tag me on social media. Also, if you don’t make the card but take up the challenge to use the three colors in a project, I want to see that too!


